1. 概述
安全性是 Spring 生態系統中首要的考慮因素。因此,OAuth2 可以與 Spring Web MVC 幾乎無需配置即可協同工作,這一點並不令人驚訝。
然而,原生 Spring 解決方案並不是唯一實現呈現層的途徑。 Jersey,作為符合 JAX-RS 標準的實現,也可以與 Spring OAuth2 協同工作。
在本教程中,我們將瞭解如何使用 Spring Social Login 保護 Jersey 應用程序,該應用程序使用 OAuth2 標準實現。
2. Maven 依賴項
讓我們添加 spring-boot-starter-jersey 依賴項,將 Jersey 集成到 Spring Boot 應用程序中:
<dependency>
    <groupId>org.springframework.boot</groupId>
    <artifactId>spring-boot-starter-jersey</artifactId>
</dependency>
為了配置 Security OAuth2,我們需要 spring-boot-starter-security 和 spring-security-oauth2-client:
<dependency>
    <groupId>org.springframework.boot</groupId>
    <artifactId>spring-boot-starter-security</artifactId>
</dependency>
<dependency>
    <groupId>org.springframework.security</groupId>
    <artifactId>spring-security-oauth2-client</artifactId>
</dependency>
我們將使用 Spring Boot Starter Parent 版本 2。
3. Jersey 呈現層
我們需要一個資源類,包含幾個端點,以便使用 Jersey 作為呈現層。
3.1. 資源類
以下是包含端點定義的類:
@Path("/")
public class JerseyResource {
    // endpoint definitions
}
該類本身非常簡單,它只有一個 @Path 註解。該註解的值 標識了類主體中所有端點的基本路徑。
值得一提的是,這個資源類沒有使用組件掃描的類型註解。事實上,它甚至不需要成為 Spring Bean。原因是,我們不依賴 Spring 來處理請求映射。
3.2. 登錄頁面
以下是處理登錄請求的方法:
@GET
@Path("login")
@Produces(MediaType.TEXT_HTML)
public String login() {
    return "Log in with <a href=\"/oauth2/authorization/github\">GitHub</a>";
}
此方法返回一個字符串,用於處理針對端點 /login 的 GET 請求。 text/html 內容類型指示用户的瀏覽器以可點擊的鏈接顯示響應。
我們將使用 GitHub 作為 OAuth2 提供者,因此鏈接 /oauth2/authorization/github。 此鏈接將觸發重定向到 GitHub 授權頁面。
3.3. 主頁
讓我們定義另一個方法來處理請求到根路徑:
@GET
@Produces(MediaType.TEXT_PLAIN)
public String home(@Context SecurityContext securityContext) {
    OAuth2AuthenticationToken authenticationToken = (OAuth2AuthenticationToken) securityContext.getUserPrincipal();
    OAuth2AuthenticatedPrincipal authenticatedPrincipal = authenticationToken.getPrincipal();
    String userName = authenticatedPrincipal.getAttribute("login");
    return "Hello " + userName;
}
此方法返回主頁,該主頁是一個字符串,其中包含已登錄的用户名。請注意,在這種情況下,我們從 login 屬性中提取了用户名。 另一個 OAuth2 提供者可能使用不同的屬性來存儲用户名,儘管如此。
顯然,上述方法僅適用於已認證的請求。如果請求未進行認證,它將被重定向到 login 端點。 我們將在第 4 節中瞭解如何配置此重定向。
3.4. 將 Jersey 註冊到 Spring 容器
讓我們使用 Servlet 容器註冊資源類,以便啓用 Jersey 服務。 幸運的是,這非常簡單:
@Component
public class RestConfig extends ResourceConfig {
    public RestConfig() {
        register(JerseyResource.class);
    }
}
通過在 ResourceConfig 子類中註冊 JerseyResource,我們告知了 Servlet 容器該資源類中的所有端點。
最後一步是 將 ResourceConfig 子類,即 RestConfig 在本例中,與 Spring 容器註冊。 我們使用 @Component 註解實現了此註冊。
4. 配置 Spring Security
我們可以像配置普通 Spring 應用一樣,配置 Jersey 的安全性:
@Configuration
public class SecurityConfig {

    @Bean
    public SecurityFilterChain filterChain(HttpSecurity http) throws Exception {
        http.authorizeRequests()
            .antMatchers("/login")
            .permitAll()
            .anyRequest()
            .authenticated()
            .and()
            .oauth2Login()
            .loginPage("/login");
        return http.build();
    }
}
給定鏈中最關鍵的方法是 oauth2Login。此方法 配置使用 OAuth 2.0 提供程序的身份驗證支持。 在本教程中,提供程序是 GitHub。
另一個顯著的配置是登錄頁面。通過將字符串 “/login” 提供給 loginPage 方法,我們告訴 Spring 將未身份驗證的請求重定向到 /login 端點。
請注意,默認的安全配置還提供了一個自動生成的頁面在 /login。因此,即使我們沒有配置登錄頁面,未身份驗證的請求仍將被重定向到該端點。
默認配置和顯式設置之間的區別在於,在默認情況下,應用程序返回生成的頁面而不是我們的自定義字符串。
5. 應用程序配置
為了擁有一個受 OAuth2 保護的應用程序,我們需要向 OAuth2 提供方註冊一個客户端。之後,將客户端憑據添加到應用程序中。
5.1. 註冊 OAuth2 客户端
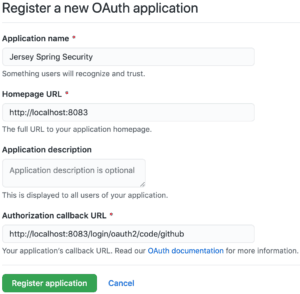
讓我們通過 註冊一個 GitHub 應用 開始註冊過程。在 GitHub 開發人員頁面上,點擊 New OAuth App 按鈕打開 Register a new OAuth application 表單。
接下來,填寫顯示的表單,使用適當的值。對於應用程序名稱,請輸入任何使應用程序易於識別的字符串。主頁 URL 可以是 http://localhost:8083, 授權回調 URL 是 http://localhost:8083/login/oauth2/code/github。
回調 URL 是瀏覽器在用户使用 GitHub 進行身份驗證並授予應用程序訪問權限後重定向到的路徑。
註冊表單可能看起來像這樣:
現在,點擊 Register application 按鈕。瀏覽器應該然後重定向到 GitHub 應用的主頁,該主頁顯示客户端 ID 和客户端密鑰。
5.2. 配置 Spring Boot 應用程序
讓我們將名為 jersey-application.properties 的屬性文件添加到類路徑中:
server.port=8083
spring.security.oauth2.client.registration.github.client-id=<your-client-id>
spring.security.oauth2.client.registration.github.client-secret=<your-client-secret>
請務必將佔位符 <your-client-id> 和 <your-client-secret> 替換為我們自己的 GitHub 應用程序中的值。
最後,將此文件作為 Spring Boot 應用程序的屬性源添加:
@SpringBootApplication
@PropertySource("classpath:jersey-application.properties")
public class JerseyApplication {
    public static void main(String[] args) {
        SpringApplication.run(JerseyApplication.class, args);
    }
}
6. Authentication in Action
Let’s see how we can log in to our application after registering with GitHub.
6.1. Accessing the Application
Let’s start the application, then access the homepage at the address localhost:8083. Since the request is unauthenticated, we’ll be redirected to the login page:
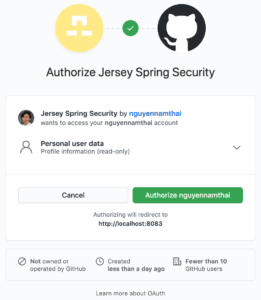
Now, when we hit the GitHub link, the browser will redirect to the GitHub authorize page:
By looking at the URL, we can see that the redirected request carried many query parameters, such as response_type, client_id, and scope:
https://github.com/login/oauth/authorize?response_type=code&client_id=c30a16c45a9640771af5&scope=read:user&state=dpTme3pB87wA7AZ--XfVRWSkuHD3WIc9Pvn17yeqw38%3D&redirect_uri=http://localhost:8083/login/oauth2/code/githubThe value of response_type is code, meaning the OAuth2 grant type is authorization code. Meanwhile, the client_id parameter helps identifies our application. For the meanings of all the parameters, please head over to the GitHub Developer page.
When the authorize page shows up, we need to authorize the application to continue. After the authorization is successful, the browser will redirect to a predefined endpoint in our application, together with a few query parameters:
http://localhost:8083/login/oauth2/code/github?code=561d99681feeb5d2edd7&state=dpTme3pB87wA7AZ--XfVRWSkuHD3WIc9Pvn17yeqw38%3DBehind the scenes, the application will then exchange the authorization code for an access token. Afterward, it uses this token to get information on the logged-in user.
After the request to localhost:8083/login/oauth2/code/github returns, the browser goes back to the homepage. This time, we should see a greeting message with our own username:
6.2. How to Obtain the Username?
It’s clear that the username in the greeting message is our GitHub username. At this point, a question may arise: how can we get the username and other information from an authenticated user?
In our example, we extracted the username from the login attribute. However, this isn’t the same across all OAuth2 providers. In other words, a provider may provide data in certain attributes at its own discretion. Therefore, we can say there’re simply no standards in this regard.
In the case of GitHub, we can find which attributes we need in the reference documentation. Likewise, other OAuth2 providers provide their own references.
Another solution is that we can launch the application in the debug mode and set a breakpoint after an OAuth2AuthenticatedPrincipal object is created. When going through all attributes of this object, we’ll have insight into the user’s information.
7. 測試
讓我們編寫一些測試來驗證應用程序的行為。
7.1. 設置環境
以下是包含測試方法的類:
@RunWith(SpringRunner.class)
@SpringBootTest(webEnvironment = RANDOM_PORT)
@TestPropertySource(properties = "spring.security.oauth2.client.registration.github.client-id:test-id")
public class JerseyResourceUnitTest {
    @Autowired
    private TestRestTemplate restTemplate;

    @LocalServerPort
    private int port;

    private String basePath;

    @Before
    public void setup() {
        basePath = "http://localhost:" + port + "/";
    }

    // test methods
}
與其使用真實的 GitHub 客户端 ID,我們定義了一個測試 ID 用於 OAuth2 客户端。 此 ID 然後設置為 spring.security.oauth2.client.registration.github.client-id 屬性。
此測試類中的所有註解在 Spring Boot 測試中都是常見的,因此我們不會在此教程中涵蓋它們。 如果這些註解不清楚,請查看 Spring Boot 中的 Testing in Spring Boot、Integration Testing in Spring,或 Exploring the Spring Boot TestRestTemplate。
7.2. 主頁
我們將證明當未身份驗證的用户嘗試訪問主頁時,他們將被重定向到登錄頁面進行身份驗證:
@Test
public void whenUserIsUnauthenticated_thenTheyAreRedirectedToLoginPage() {
    ResponseEntity<Object> response = restTemplate.getForEntity(basePath, Object.class);
    assertThat(response.getStatusCode()).isEqualTo(HttpStatus.FOUND);
    assertThat(response.getBody()).isNull();

    URI redirectLocation = response.getHeaders().getLocation();
    assertThat(redirectLocation).isNotNull();
    assertThat(redirectLocation.toString()).isEqualTo(basePath + "login");
}
7.3. 登錄頁面
讓我們驗證訪問登錄頁面會導致授權路徑返回的情況:
@Test
public void whenUserAttemptsToLogin_thenAuthorizationPathIsReturned() {
    ResponseEntity response = restTemplate.getForEntity(basePath + "login", String.class);
    assertThat(response.getHeaders().getContentType()).isEqualTo(TEXT_HTML);
    assertThat(response.getBody()).isEqualTo("Log in with GitHub");
}
7.4. 授權端點
最後,當將請求發送到授權端點時,瀏覽器將重定向到 OAuth2 提供商的 authorize 頁面,帶有適當的參數:
@Test
public void whenUserAccessesAuthorizationEndpoint_thenTheyAresRedirectedToProvider() {
    ResponseEntity response = restTemplate.getForEntity(basePath + "oauth2/authorization/github", String.class);
    assertThat(response.getStatusCode()).isEqualTo(HttpStatus.FOUND);
    assertThat(response.getBody()).isNull();

    URI redirectLocation = response.getHeaders().getLocation();
    assertThat(redirectLocation).isNotNull();
    assertThat(redirectLocation.getHost()).isEqualTo("github.com");
    assertThat(redirectLocation.getPath()).isEqualTo("/login/oauth/authorize");

    String redirectionQuery = redirectLocation.getQuery();
    assertThat(redirectionQuery.contains("response_type=code"));
    assertThat(redirectionQuery.contains("client_id=test-id"));
    assertThat(redirectionQuery.contains("scope=read:user"));
}
8. 結論
在本教程中,我們已使用 Jersey 應用程序設置了 Spring Social Login。 教程還包括了註冊與 GitHub OAuth2 提供程序的步驟。
