1. 概述
Springdoc-OpenAPI 是一個用於自動化生成 Spring Boot 應用程序的服務文檔,基於 OpenAPI 3 規範的庫。
通過用户界面與我們的 API 交互,而無需實施一個,在某些情況下非常方便。因此,讓我們看看如何消費端點,如果涉及授權。
在本教程中,我們將學習 如何使用 Springdoc 中的 Form Login 和 Basic Authentication(使用 Spring Security)來管理安全端點訪問。
2. 項目設置我們將設置一個使用 Spring Boot 構建的 Web 應用程序,該應用程序通過 Spring Security 提供 API 安全,並使用 Springdoc 生成文檔。
2.1. 依賴項讓我們聲明我們項目所需的 Maven 依賴項。我們將添加 springdoc-openapi-starter-webmvc-ui,該組件負責與 Swagger-UI 集成,並提供默認可訪問的視覺工具,位於:
http://localhost:8080/swagger-ui.html
<dependency>
     <groupId>org.springdoc</groupId>
     <artifactId>springdoc-openapi-starter-webmvc-ui</artifactId>
     <version>2.5.0</version>
</dependency>
2.2. 示例 API對於本文,我們將實現一個作為 Springdoc 生成文檔的來源的模擬 REST 控制器。此外,我們將演示通過 Swagger-UI 交互訪問 FooController 的受保護端點的方法。
@RestController
@RequestMapping(value = "foos", produces = MediaType.APPLICATION_JSON_VALUE)
@OpenAPIDefinition(info = @Info(title = "Foos API", version = "v1"))
public class FooController {

    @GetMapping(value = "/{id}")
    public FooDTO findById(@PathVariable("id") final Long id) {
        return new FooDTO(randomAlphabetic(STRING_LENGTH));
    }

    @GetMapping
    public List<FooDTO> findAll() {
        return Lists.newArrayList(new FooDTO(randomAlphabetic(STRING_LENGTH)),
          new FooDTO(randomAlphabetic(STRING_LENGTH)), new FooDTO(randomAlphabetic(STRING_LENGTH)));
    }

    @PostMapping
    @ResponseStatus(HttpStatus.CREATED)
    public FooDTO create(@RequestBody final FooDTO fooDTO) {
        return fooDTO;
    }
}
2.3. 用户憑據我們將使用 Spring Security 的內存身份驗證來註冊我們的測試用户憑據:
@Autowired
public void configureGlobal(AuthenticationManagerBuilder auth, PasswordEncoder passwordEncoder) throws Exception {
    auth.inMemoryAuthentication()
      .withUser("user")
      .password(passwordEncoder.encode("password"))
      .roles("USER");
}
3. 登錄認證
http://localhost:8080/swagger-ui.html<dependency>
<groupId>org.springdoc</groupId>
<artifactId>springdoc-openapi-starter-webmvc-ui</artifactId>
<version>2.5.0</version>
</dependency>2.2. 示例 API對於本文,我們將實現一個作為 Springdoc 生成文檔的來源的模擬 REST 控制器。此外,我們將演示通過 Swagger-UI 交互訪問 FooController 的受保護端點的方法。
@RestController
@RequestMapping(value = "foos", produces = MediaType.APPLICATION_JSON_VALUE)
@OpenAPIDefinition(info = @Info(title = "Foos API", version = "v1"))
public class FooController {
@GetMapping(value = "/{id}")
public FooDTO findById(@PathVariable("id") final Long id) {
return new FooDTO(randomAlphabetic(STRING_LENGTH));
}
@GetMapping
public List<FooDTO> findAll() {
return Lists.newArrayList(new FooDTO(randomAlphabetic(STRING_LENGTH)),
new FooDTO(randomAlphabetic(STRING_LENGTH)), new FooDTO(randomAlphabetic(STRING_LENGTH)));
}
@PostMapping
@ResponseStatus(HttpStatus.CREATED)
public FooDTO create(@RequestBody final FooDTO fooDTO) {
return fooDTO;
}
}
2.3. 用户憑據我們將使用 Spring Security 的內存身份驗證來註冊我們的測試用户憑據:
@Autowired
public void configureGlobal(AuthenticationManagerBuilder auth, PasswordEncoder passwordEncoder) throws Exception {
auth.inMemoryAuthentication()
.withUser("user")
.password(passwordEncoder.encode("password"))
.roles("USER");
}
3. 登錄認證
@RestController
@RequestMapping(value = "foos", produces = MediaType.APPLICATION_JSON_VALUE)
@OpenAPIDefinition(info = @Info(title = "Foos API", version = "v1"))
public class FooController {
@GetMapping(value = "/{id}")
public FooDTO findById(@PathVariable("id") final Long id) {
return new FooDTO(randomAlphabetic(STRING_LENGTH));
}
@GetMapping
public List<FooDTO> findAll() {
return Lists.newArrayList(new FooDTO(randomAlphabetic(STRING_LENGTH)),
new FooDTO(randomAlphabetic(STRING_LENGTH)), new FooDTO(randomAlphabetic(STRING_LENGTH)));
}
@PostMapping
@ResponseStatus(HttpStatus.CREATED)
public FooDTO create(@RequestBody final FooDTO fooDTO) {
return fooDTO;
}
}@Autowired
public void configureGlobal(AuthenticationManagerBuilder auth, PasswordEncoder passwordEncoder) throws Exception {
auth.inMemoryAuthentication()
.withUser("user")
.password(passwordEncoder.encode("password"))
.roles("USER");
}3. 登錄認證
讓我們看看如何通過基於表單的登錄認證來與我們的安全登錄保護的端點進行交互。
3.1. 安全配置
在這裏,我們定義了使用表單登錄授權請求的配置:
@Bean
public SecurityFilterChain filterChain(HttpSecurity http) throws Exception {
    http.csrf(AbstractHttpConfigurer::disable)
            .authorizeHttpRequests(auth -> auth.requestMatchers("/v3/api-docs/**",
                 "/swagger-ui/**", "/swagger-ui.html")
                .permitAll()
                .anyRequest()
                .authenticated())
            .formLogin(formLogin -> formLogin.defaultSuccessUrl("/foos"));
    return http.build();
}
3.2. 登錄文檔
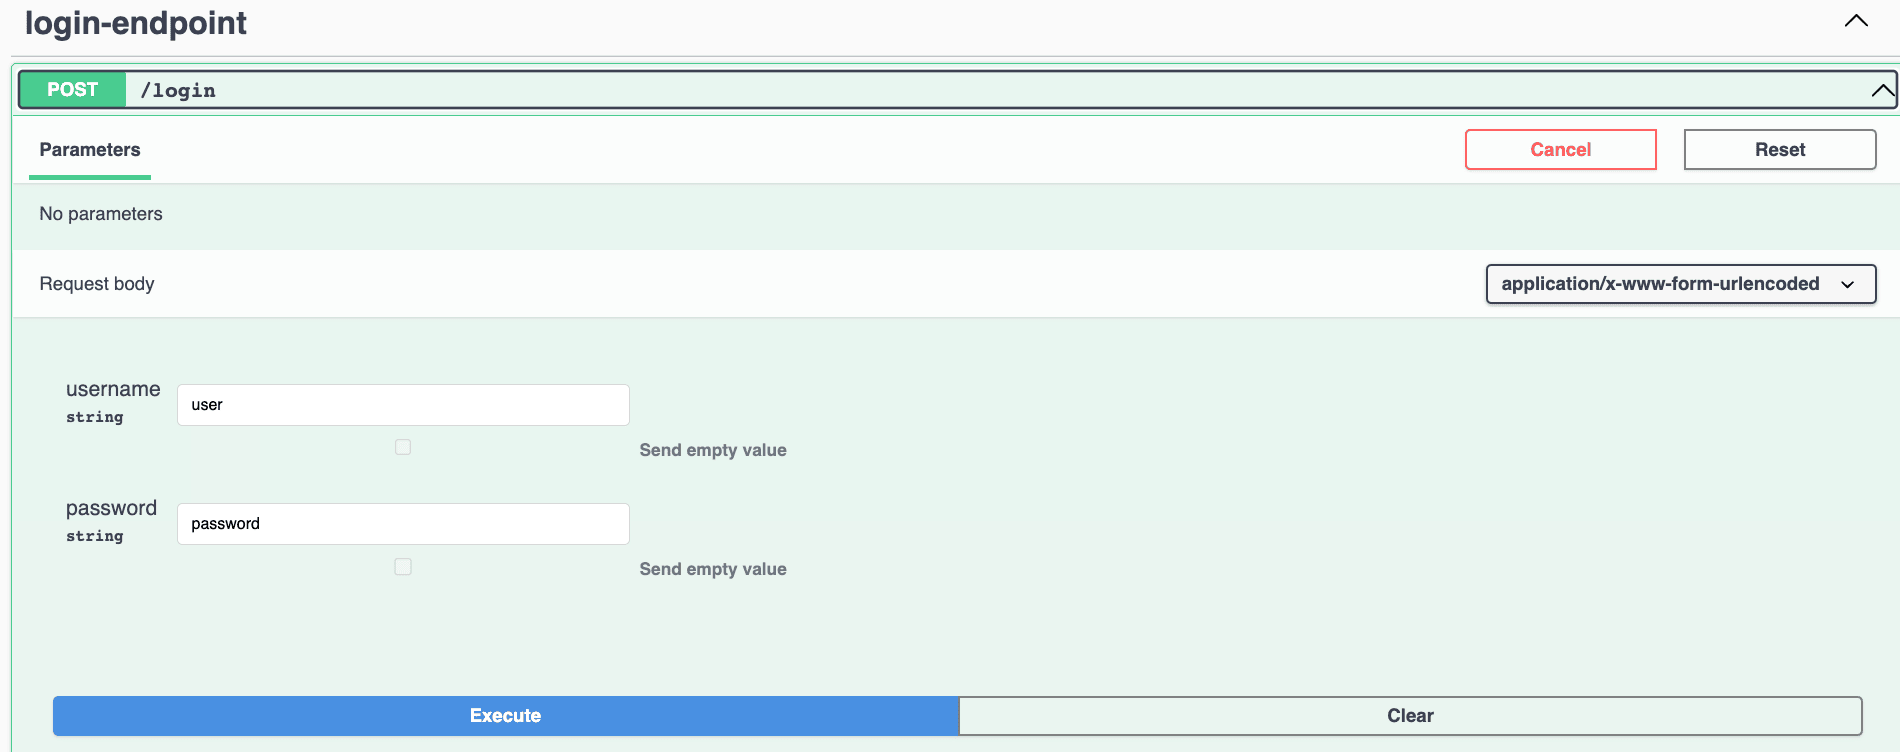
默認情況下,框架提供的登錄端點未進行文檔化。因此,我們需要通過設置相應的配置屬性使其可見。此外,有用的配置屬性可以在庫的 文檔中找到:
springdoc.show-login-endpoint=true之後,Springdoc 將檢測配置的 Spring Security 的表單登錄,並在 Swagger-UI 中生成文檔。 這樣,它將添加 /login 端點,其中包含用户名和密碼請求參數,以及特定的 application/x-www-form-urlencoded 請求主體類型:
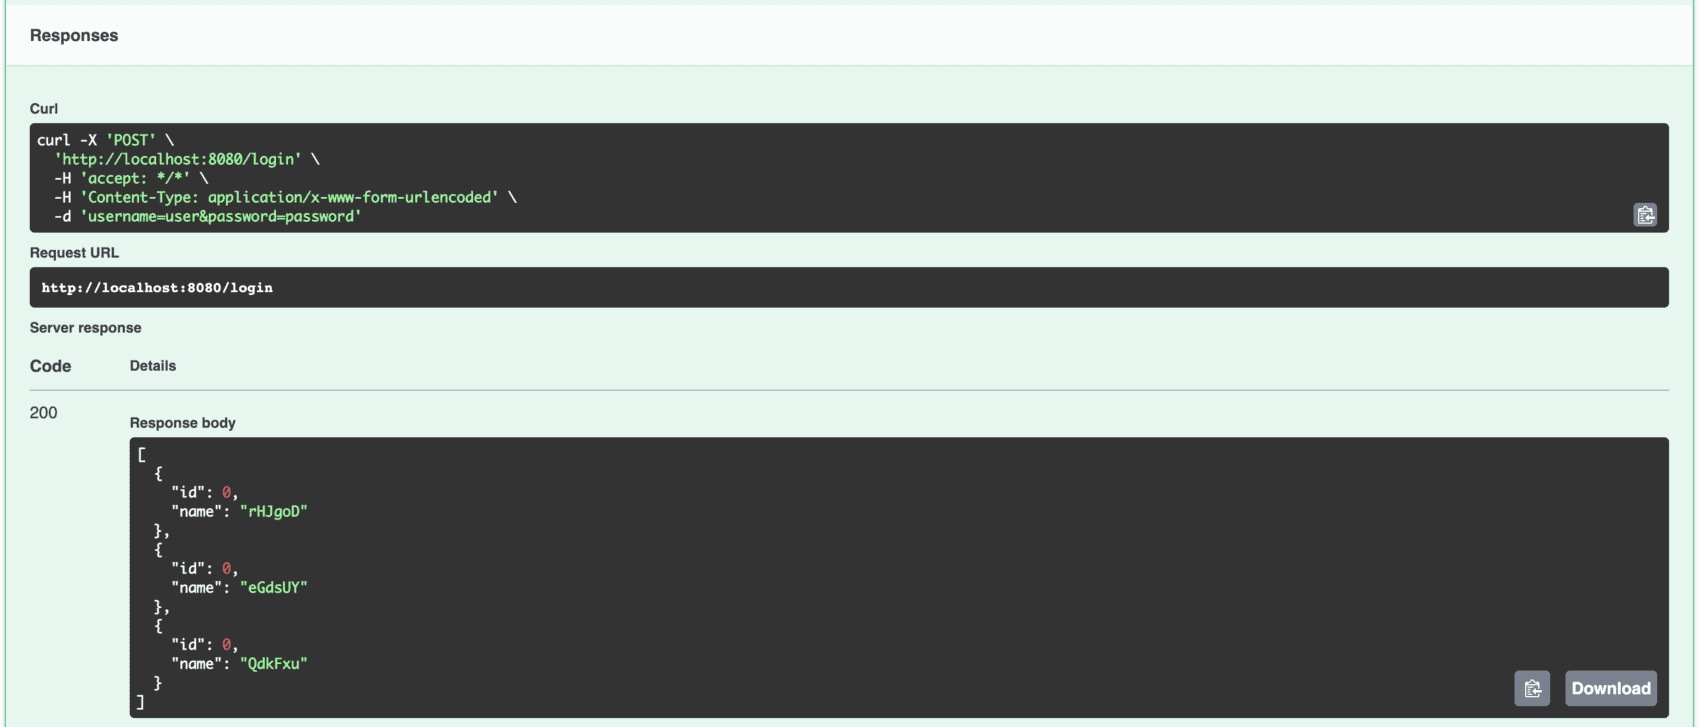
認證成功後,我們將調用安全的 FooController 端點。 此外,由於 defaultSucccesfulUrl 安全配置,我們還將收到來自 /foos 端點的響應,用於成功的登錄:
3.3. 註銷文檔
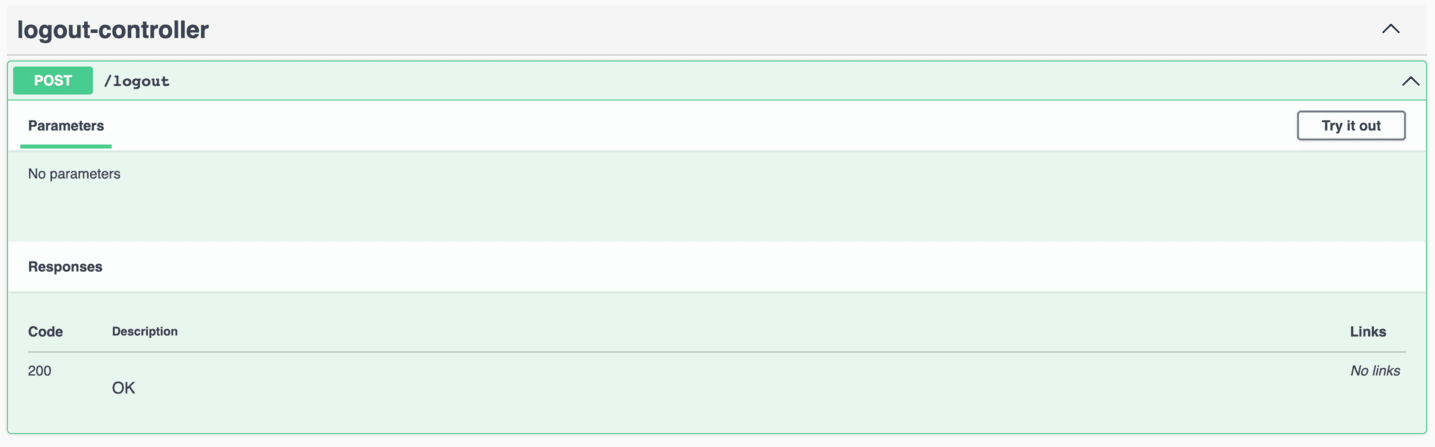
能夠註銷有助於在 Swagger-UI 中實現用户切換,這在應用基於角色的 API 授權時很有幫助。
Springdoc 不提供像登錄一樣自動檢測註銷端點的機制。 因此,我們需要定義一個假 REST 控制器,該控制器暴露一個對 post-request 映射的 /logout 路徑。 但是,我們不需要添加實現,因為 Spring Security 將攔截和處理請求:
@RestController
public class LogoutController {

    @PostMapping("logout")
    public void logout() {}
}
通過添加 LogoutController,該庫將生成文檔並使註銷在 Swagger-UI 中可用:
4. 基本身份驗證
處理使用基本身份驗證保護的端點時,我們不需要直接調用登錄。另一方面,OpenAPI 支持一組標準 安全方案,包括基本身份驗證,並且我們可以相應地配置 Springdoc。
4.1. 安全配置
用於使用基本身份驗證保護端點的簡單安全配置:
@Bean
public SecurityFilterChain filterChain(HttpSecurity http) throws Exception {
    http.csrf(AbstractHttpConfigurer::disable)
            .authorizeHttpRequests(auth -> auth.requestMatchers("/v3/api-docs/**",
                 "/swagger-ui/**", "/swagger-ui.html")
                .permitAll()
                .anyRequest()
                .authenticated())
            .httpBasic(Customizer.withDefaults());
    return http.build();
}
4.2. Springdoc 安全方案
要配置 OpenAPI 安全方案,我們需要提供 @SecurityScheme 註解驅動的配置:
@Configuration
@SecurityScheme(
  type = SecuritySchemeType.HTTP,
  name = "basicAuth",
  scheme = "basic")
public class SpringdocConfig {}
然後,我們還需要用 FooController 註解標記,使用 @SecurityRequirement(name = “basicAuth”)。
@RestController
@OpenAPIDefinition(info = @Info(title = "Foos API", version = "v1"))
@SecurityRequirement(name = "basicAuth")
@RequestMapping(value = "foos", produces = MediaType.APPLICATION_JSON_VALUE)
public class FooController {
    ...
}
因此,Swagger-UI 中的授權按鈕將可用:
然後,我們可以提供用户憑據,如下所示:
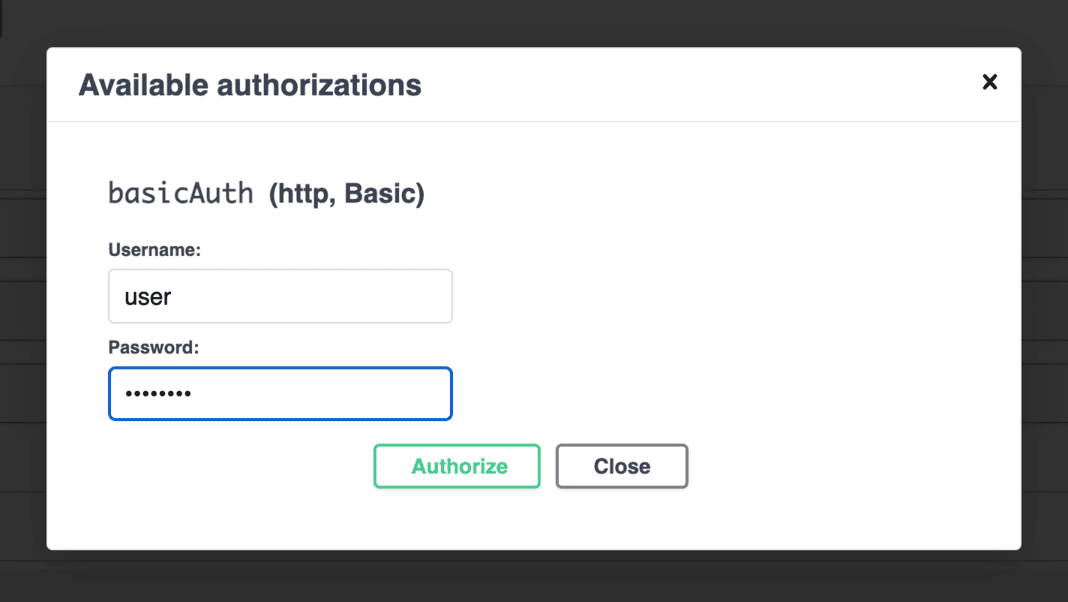
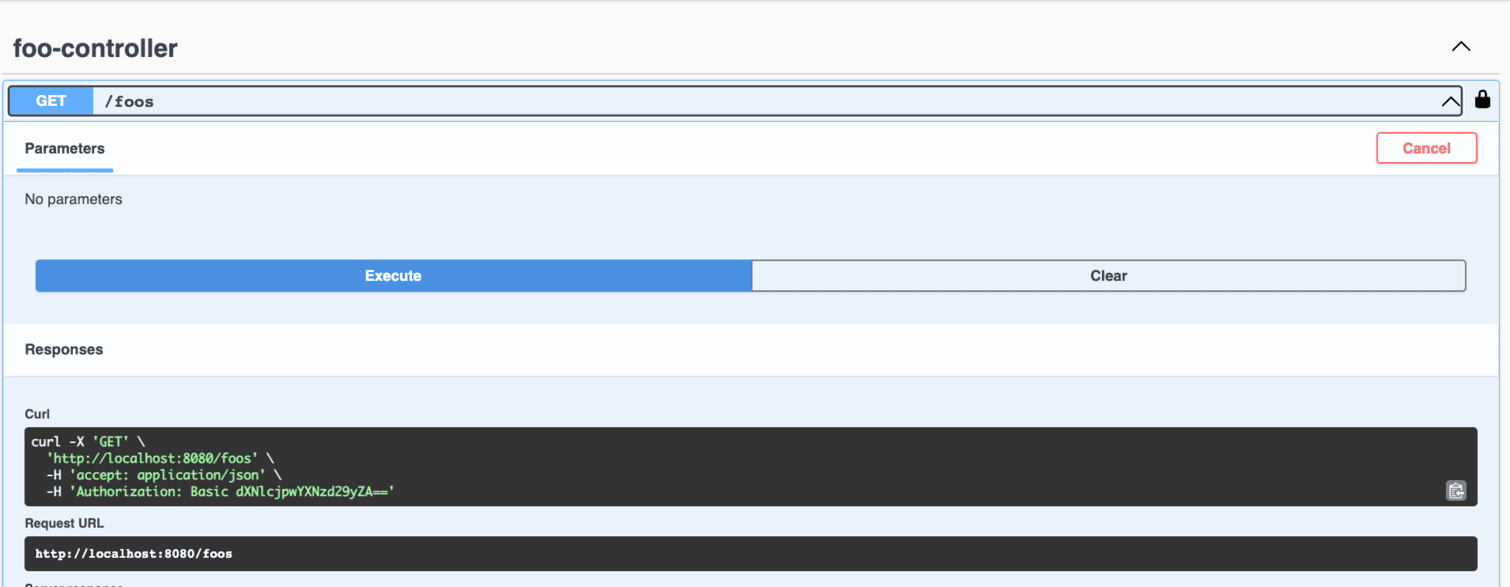
隨後,當調用任何 FooController 端點時,請求中將包含帶有憑據的 Authorization 標頭,如生成的 curl 命令所示。因此,我們可以執行請求:
5. 結論
在本文中,我們學習瞭如何配置 Springdoc 中的身份驗證,以便通過 Swagger-UI 生成的文檔訪問受保護的端點。最初,我們通過基於表單的登錄設置進行了配置。然後,我們配置了 Basic 身份驗證方案。
