1. 概述
驗證從來都不是我們期望的那麼簡單。當然,驗證用户在應用程序中輸入的值對於維護我們數據的完整性也至關重要。
在Web應用程序的上下文中,數據輸入通常使用HTML表單進行,並且需要客户端和服務器端都進行驗證。
在本教程中,我們將探討使用AngularJS實現表單輸入客户端驗證以及使用Spring MVC框架進行服務器端驗證。
本文重點介紹Spring MVC。我們的文章Spring Boot中的驗證描述瞭如何在Spring Boot中進行驗證。
2. Maven 依賴
為了開始,讓我們添加以下依賴項:
<dependency>
    <groupId>org.springframework</groupId>
    <artifactId>spring-webmvc</artifactId>
    <version>4.3.7.RELEASE</version>
</dependency>
<dependency>
    <groupId>org.hibernate.validator</groupId>
    <artifactId>hibernate-validator</artifactId>
    <version>8.0.1.Final</version>
</dependency>
<dependency>
    <groupId>com.fasterxml.jackson.core</groupId>
    <artifactId>jackson-databind</artifactId>
    <version>2.13.0</version>
</dependency>
最新版本的 spring-webmvc、hibernate-validator 和 jackson-databind 可從 Maven Central 下載。
3. 使用 Spring MVC 進行驗證
應用程序絕不應該僅僅依賴客户端驗證,因為客户端驗證很容易被規避。為了防止錯誤的或惡意值被保存,或導致應用程序邏輯執行不當,重要的是在服務器端驗證輸入值。
Spring MVC 通過使用 JSR 349 Bean Validation 規範註解,提供服務器端驗證支持。對於本示例,我們將使用該規範的參考實現,即 hibernate-validator。
3.1. 數據模型
讓我們創建一個 User 類,該類具有帶有適當驗證註解的屬性:
public class User {

    @NotNull
    @Email
    private String email;

    @NotNull
    @Size(min = 4, max = 15)
    private String password;

    @NotBlank
    private String name;

    @Min(18)
    @Digits(integer = 2, fraction = 0)
    private int age;

    // standard constructor, getters, setters
}
上述註釋屬於 JSR 349規範,除@Email和@NotBlank外,後者是特定於 hibernate-validator庫的。
3.2. Spring MVC 控制器
讓我們創建一個控制器類,定義一個 /user 端點,用於將新的 User 對象保存到列表中。
為了啓用通過請求參數接收的 User 對象驗證,聲明必須由 @Valid 註解預先聲明,驗證錯誤將存儲在 BindingResult 實例中。
要確定對象是否包含無效值,可以使用 BindingResult 實例的 hasErrors() 方法。
如果 hasErrors() 返回 true,我們可以返回包含與未通過驗證相關的錯誤消息的 JSON 數組。 否則,我們將添加對象到列表中:
@PostMapping(value = "/user")
@ResponseBody
public ResponseEntity<Object> saveUser(@Valid User user,
  BindingResult result, Model model) {
    if (result.hasErrors()) {
        List<String> errors = result.getAllErrors().stream()
          .map(DefaultMessageSourceResolvable::getDefaultMessage)
          .collect(Collectors.toList());
        return new ResponseEntity<>(errors, HttpStatus.OK);
    } else {
        if (users.stream().anyMatch(it -> user.getEmail().equals(it.getEmail()))) {
            return new ResponseEntity<>(
              Collections.singletonList("Email already exists!"),
              HttpStatus.CONFLICT);
        } else {
            users.add(user);
            return new ResponseEntity<>(HttpStatus.CREATED);
        }
    }
}如你所見,服務端驗證具有在客户端無法執行的額外檢查的優勢。
在我們的例子中,我們可以驗證是否有具有相同電子郵件的用户存在——並在發現存在的情況下返回 409 CONFLICT 狀態。
我們還需要定義用户列表並使用一些值對其進行初始化:
private List<User> users = Arrays.asList(
  new User("[email protected]", "pass", "Ana", 20),
  new User("[email protected]", "pass", "Bob", 30),
  new User("[email protected]", "pass", "John", 40),
  new User("[email protected]", "pass", "Mary", 30));
讓我們也添加一個映射,用於以 JSON 對象形式檢索用户列表:
@GetMapping(value = "/users")
@ResponseBody
public List<User> getUsers() {
    return users;
}
我們還需要在 Spring MVC 控制器中添加一項映射,用於返回我們應用程序的主頁:
@GetMapping("/userPage")
public String getUserProfilePage() {
    return "user";
}
在 AngularJS 部分,我們將更詳細地查看 user.html 頁面。
3.3. Spring MVC 配置
讓我們為我們的應用程序添加一個基本的 MVC 配置:
@Configuration
@EnableWebMvc
@ComponentScan(basePackages = "com.baeldung.springmvcforms")
class ApplicationConfiguration implements WebMvcConfigurer {

    @Override
    public void configureDefaultServletHandling(
      DefaultServletHandlerConfigurer configurer) {
        configurer.enable();
    }

    @Bean
    public InternalResourceViewResolver htmlViewResolver() {
        InternalResourceViewResolver bean = new InternalResourceViewResolver();
        bean.setPrefix("/WEB-INF/html/");
        bean.setSuffix(".html");
        return bean;
    }
}
3.4. 初始化應用程序
讓我們創建一個實現 WebApplicationInitializer 接口的類來運行我們的應用程序:
public class WebInitializer implements WebApplicationInitializer {

    public void onStartup(ServletContext container) throws ServletException {

        AnnotationConfigWebApplicationContext ctx
          = new AnnotationConfigWebApplicationContext();
        ctx.register(ApplicationConfiguration.class);
        ctx.setServletContext(container);
        container.addListener(new ContextLoaderListener(ctx));

        ServletRegistration.Dynamic servlet
          = container.addServlet("dispatcher", new DispatcherServlet(ctx));
        servlet.setLoadOnStartup(1);
        servlet.addMapping("/");
    }
}
<h3><strong>3.5. 使用 cURL 測試 Spring MVC 驗證</strong></h3>
<p>在實施 AngularJS 客户端部分之前,我們可以使用以下命令通過 cURL 測試我們的 API:</p>
curl -i -X POST -H "Accept:application/json"
  "localhost:8080/spring-mvc-forms/user?email=aaa&password=12&age=12"
響應是一個包含默認錯誤消息的數組:
[
    "not a well-formed email address",
    "size must be between 4 and 15",
    "may not be empty",
    "must be greater than or equal to 18"
]
4. AngularJS 驗證
客户端驗證在創建更好的用户體驗方面非常有用,因為它向用户提供有關如何成功提交有效數據的信息,並使他們能夠繼續與應用程序交互。
AngularJS 庫對在表單字段上添加驗證要求、處理錯誤消息和樣式的有效和無效表單提供了極佳的支持。
首先,讓我們創建一個 AngularJS 模塊,該模塊注入了 ngMessages 模塊,該模塊用於驗證消息。
var app = angular.module('app', ['ngMessages']);接下來,讓我們創建一個 AngularJS 服務和控制器,它將消費前面章節中構建的 API。
4.1. AngularJS 服務
我們的服務將包含兩個方法,這些方法會調用 MVC 控制器方法——一個用於保存用户,另一個用於檢索用户列表:
app.service('UserService',['$http', function ($http) {

    this.saveUser = function saveUser(user){
        return $http({
          method: 'POST',
          url: 'user',
          params: {email:user.email, password:user.password,
            name:user.name, age:user.age},
          headers: 'Accept:application/json'
        });
    }

    this.getUsers = function getUsers(){
        return $http({
          method: 'GET',
          url: 'users',
          headers:'Accept:application/json'
        }).then( function(response){
        	return response.data;
        } );
    }

}]);
4.2. AngularJS 控制器
UserCtrl 控制器注入UserService,調用服務方法並處理響應和錯誤消息:
app.controller('UserCtrl', ['$scope','UserService', function ($scope,UserService) {

	$scope.submitted = false;

	$scope.getUsers = function() {
		   UserService.getUsers().then(function(data) {
		       $scope.users = data;
	       });
	   }

    $scope.saveUser = function() {
    	$scope.submitted = true;
    	  if ($scope.userForm.$valid) {
            UserService.saveUser($scope.user)
              .then (function success(response) {
                  $scope.message = 'User added!';
                  $scope.errorMessage = '';
                  $scope.getUsers();
                  $scope.user = null;
                  $scope.submitted = false;
              },
              function error(response) {
                  if (response.status == 409) {
                    $scope.errorMessage = response.data.message;
            	  }
            	  else {
                    $scope.errorMessage = 'Error adding user!';
            	  }
                  $scope.message = '';
            });
    	  }
    }

   $scope.getUsers();
}]);
如上例所示,我們可以看到服務方法只有在 $valid 屬性的 userForm 為 true 時才會被調用。然而,在這種情況下,還存在重複郵箱的檢查,這隻能在服務器端進行,並在 error() 函數中單獨處理。
此外,請注意,已定義了 submitted 變量,它將告訴我們表單是否已被提交。
初始時,該變量將為 false,並在調用 saveUser() 方法時變為 true。如果我們不想在用户提交表單之前顯示驗證消息,可以使用 submitted 變量來防止這種情況。
4.3. 使用 AngularJS 進行表單驗證
為了充分利用 AngularJS 庫和我們的 AngularJS 模塊,我們需要將腳本添加到我們的 user.html 頁面中:
<script src="https://ajax.googleapis.com/ajax/libs/angularjs/1.5.6/angular.min.js">
</script>
<script src="https://ajax.googleapis.com/ajax/libs/angularjs/1.4.0/angular-messages.js">
</script>
<script src="js/app.js"></script>
然後我們可以通過設置 <em ng-app 和 <em ng-controller 屬性來使用我們的模塊和控制器:
<body ng-app="app" ng-controller="UserCtrl">讓我們創建我們的 HTML 表單:
<form name="userForm" method="POST" novalidate
  ng-class="{'form-error':submitted}" ng-submit="saveUser()" >
...
</form>
請注意,為了防止默認 HTML5 驗證並使用我們自己的驗證,需要在表單上設置novalidate屬性。
ng-class 屬性會根據submitted 變量的值動態地為表單添加form-error CSS 類。
ng-submit 屬性定義了 AngularJS 控制器函數,該函數將在表單提交時調用。 使用ng-submit 代替ng-click 的優點是,它還響應使用 ENTER 鍵提交表單。
現在,讓我們添加四個用於用户屬性的輸入字段:
<label class="form-label">Email:</label>
<input type="email" name="email" required ng-model="user.email" class="form-input"/>

<label class="form-label">Password:</label>
<input type="password" name="password" required ng-model="user.password"
  ng-minlength="4" ng-maxlength="15" class="form-input"/>

<label class="form-label">Name:</label>
<input type="text" name="name" ng-model="user.name" ng-trim="true"
  required class="form-input" />

<label class="form-label">Age:</label>
<input type="number" name="age" ng-model="user.age" ng-min="18"
  class="form-input" required/>
每個輸入字段都通過 ng-model 屬性綁定到 user 變量中的一個屬性。
用於設置驗證規則, 我們使用 HTML5 的 required 屬性以及幾個 AngularJS 特定的屬性:ng-minglength, ng-maxlength, ng-min, 和ng-trim。
對於 email 字段,我們還使用 type 屬性,其值為 email,用於客户端電子郵件驗證。
為了添加與每個字段相對應的錯誤消息, AngularJS 提供了 ng-messages 指令,它遍歷輸入對象的 $errors 對象並根據每個驗證規則顯示消息。
讓我們在輸入定義之後添加 email 字段的指令:
<div ng-messages="userForm.email.$error"
  ng-show="submitted && userForm.email.$invalid" class="error-messages">
    <p ng-message="email">Invalid email!</p>
    <p ng-message="required">Email is required!</p>
</div>
可以為其他輸入字段添加類似的錯誤消息。
我們可以控制指令在email字段中顯示的時間,通過使用布爾表達式和ng-show屬性來實現。 在我們的示例中,當字段具有無效值(即$invalid屬性為true)並且submitted變量也為true時,會顯示該指令。
對於一個字段,只會顯示一條錯誤消息。
我們還可以根據$valid屬性,在輸入字段後添加一個勾選標記(以HEX代碼字符✓表示):
<div class="check" ng-show="userForm.email.$valid">✓</div>AngularJS 驗證也支持使用 CSS 類進行樣式化,例如 ng-valid 和 ng-invalid,或者更具體的類,如 ng-invalid-required 和 ng-invalid-minlength。
讓我們為表單中的 form-error 類內的無效輸入添加 CSS 屬性 border-color:red。
.form-error input.ng-invalid {
    border-color:red;
}
我們還可以使用 CSS 類將錯誤消息顯示為紅色:
.error-messages {
color:red;
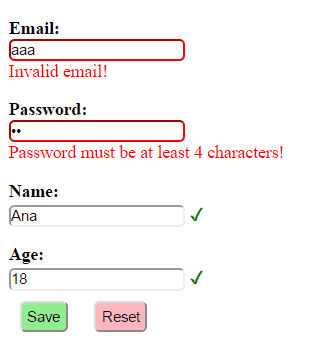
}將所有內容整合完成後,讓我們來看一個客户端表單驗證在填寫包含有效值和無效值的情況下呈現樣子的示例:
5. 結論
在本教程中,我們演示瞭如何使用 AngularJS 和 Spring MVC 將客户端驗證和服務器端驗證結合起來。
要查看應用程序,請在運行後訪問 /userPage 網址。
