1. 概述
React 是由 Facebook 構建的基於組件的 JavaScript 庫。 使用 React,我們可以輕鬆構建複雜的 Web 應用程序。 在本文中,我們將使 Spring Security 與 React 登錄頁面協同工作。
我們將利用先前示例中 Spring Security 的現有配置。 因此,我們將在此之前關於使用 Spring Security 創建表單登錄頁面的文章基礎上進行擴展。
2. 設置 React
首先,我們使用命令行工具 create-react-app 創建一個應用程序,通過執行命令“create-react-app react”。
我們會有一個如下的配置:在 react/package.json 中:
 {
    "name": "react",
    "version": "0.1.0",
    "private": true,
    "dependencies": {
        "react": "^16.4.1",
        "react-dom": "^16.4.1",
        "react-scripts": "1.1.4"
    },
    "scripts": {
        "start": "react-scripts start",
        "build": "react-scripts build",
        "test": "react-scripts test --env=jsdom",
        "eject": "react-scripts eject"
    }
}
然後,我們使用 frontend-maven-plugin 來幫助我們使用 Maven 構建 React 項目:
    <plugin>
        <groupId>com.github.eirslett</groupId>
        <artifactId>frontend-maven-plugin</artifactId>
        <version>1.6</version>
        <configuration>
            <nodeVersion>v8.11.3</nodeVersion>
            <npmVersion>6.1.0</npmVersion>
            <workingDirectory>src/main/webapp/WEB-INF/view/react</workingDirectory>
        </configuration>
        <executions>
            <execution>
                <id>install node and npm</id>
                <goals>
                    <goal>install-node-and-npm</goal>
                </goals>
            </execution>
            <execution>
                <id>npm install</id>
                <goals>
                    <goal>npm</goal>
                </goals>
            </execution>
            <execution>
                <id>npm run build</id>
                <goals>
                    <goal>npm</goal>
                </goals>
                <configuration>
                    <arguments>run build</arguments>
                </configuration>
            </execution>
        </executions>
    </plugin>
最新版本的插件可以在這裏找到:這裏。
當我們運行 mvn compile 時,這個插件會下載 node 和 npm,安裝所有 node module 依賴項,併為我們構建 React 項目。
這裏有幾個我們需要解釋的配置屬性。我們指定了 node 和 npm 的版本,以便插件知道要下載哪個版本。
我們的 React 登錄頁面將作為 Spring 中的靜態頁面,因此我們使用 “src/main/webapp/WEB-INF/view/react” 作為 npm 的工作目錄。
3. Spring Security 配置
在深入 React 組件之前,我們更新 Spring 配置以提供 React 應用的靜態資源:
@EnableWebMvc
@Configuration
public class MvcConfig extends WebMvcConfigurer {

    @Override
    public void addResourceHandlers(
      ResourceHandlerRegistry registry) {

        registry.addResourceHandler("/static/**")
          .addResourceLocations("/WEB-INF/view/react/build/static/");
        registry.addResourceHandler("/*.js")
          .addResourceLocations("/WEB-INF/view/react/build/");
        registry.addResourceHandler("/*.json")
          .addResourceLocations("/WEB-INF/view/react/build/");
        registry.addResourceHandler("/*.ico")
          .addResourceLocations("/WEB-INF/view/react/build/");
        registry.addResourceHandler("/index.html")
          .addResourceLocations("/WEB-INF/view/react/build/index.html");
    }
}
注意,我們添加了靜態資源 “index.html”,而不是動態提供的 JSP。
接下來,我們更新 Spring Security 配置以允許訪問這些靜態資源。
而不是像我們在之前的表單登錄文章中使用 “login.jsp”,這裏我們使用 “index.html” 作為我們的 Login 頁面:
@Configuration
@EnableWebSecurity
@Profile("!https")
public class SecSecurityConfig {

    //...

    @Bean
    public SecurityFilterChain filterChain(HttpSecurity http) throws Exception {
      return http.csrf(csrf -> csrf.csrfTokenRepository(CookieCsrfTokenRepository.withHttpOnlyFalse()))
          .authorizeHttpRequests(request -> request.requestMatchers("/admin/**")
            .hasRole("ADMIN")
            .requestMatchers(HttpMethod.GET, "/index*", "/static/**", "/*.js", "/*.json", "/*.ico", "/rest")
            .permitAll()
            .anyRequest()
            .authenticated())
          .formLogin(form -> form.loginPage("/index.html")
            .loginProcessingUrl("/perform_login")
            .defaultSuccessUrl("/homepage.html", true)
            .failureUrl("/index.html?error=true"))
          .logout(logout -> logout.logoutUrl("/perform_logout")
            .deleteCookies("JSESSIONID"))
          .build();
    }
}
如上所示,當我們將表單數據提交到 “/perform_login” 時,Spring 會將我們重定向到 “/homepage.html” 如果憑據匹配成功,或者到 “/index.html?error=true” 否則。
4. React Components
Now, let’s get our hands dirty on React. We’ll build and manage a form login using components.
Note that we’ll use ES6 (ECMAScript 2015) syntax to build our application.
4.1. Input
Let’s start with an Input component that backs the <input /> elements of the login form in react/src/Input.js:
import React, { Component } from 'react'
import PropTypes from 'prop-types'

class Input extends Component {
    constructor(props){
        super(props)
        this.state = {
            value: props.value? props.value : '',
            className: props.className? props.className : '',
            error: false
        }
    }

    //...

    render () {
        const {handleError, ...opts} = this.props
        this.handleError = handleError
        return (
          <input {...opts} value={this.state.value}
            onChange={this.inputChange} className={this.state.className} />
        )
    }
}

Input.propTypes = {
  name: PropTypes.string,
  placeholder: PropTypes.string,
  type: PropTypes.string,
  className: PropTypes.string,
  value: PropTypes.string,
  handleError: PropTypes.func
}

export default Input
As seen above, we wrap the <input /> element into a React controlled component to be able to manage its state and perform field validation.
React provides a way to validate the types using PropTypes. Specifically, we use Input.propTypes = {…} to validate the type of properties passed in by the user.
Note that PropType validation works for development only. PropType validation is to check that all the assumptions that we’re making about our components are being met.
It’s better to have it rather than getting surprised by random hiccups in production.
4.2. Form
Next, we’ll build a generic Form component in the file Form.js that combines multiple instances of our Input component on which we can base our login form.
In the Form component, we take attributes of HTML <input/> elements and create Input components from them.
Then the Input components and validation error messages are inserted into the Form:
import React, { Component } from 'react'
import PropTypes from 'prop-types'
import Input from './Input'

class Form extends Component {

    //...

    render() {
        const inputs = this.props.inputs.map(
          ({name, placeholder, type, value, className}, index) => (
            <Input key={index} name={name} placeholder={placeholder} type={type} value={value}
              className={type==='submit'? className : ''} handleError={this.handleError} />
          )
        )
        const errors = this.renderError()
        return (
            <form {...this.props} onSubmit={this.handleSubmit} ref={fm => {this.form=fm}} >
              {inputs}
              {errors}
            </form>
        )
    }
}

Form.propTypes = {
  name: PropTypes.string,
  action: PropTypes.string,
  method: PropTypes.string,
  inputs: PropTypes.array,
  error: PropTypes.string
}

export default Form
Now let’s take a look at how we manage field validation errors and login error:
class Form extends Component {
constructor(props) {
super(props)
if(props.error) {
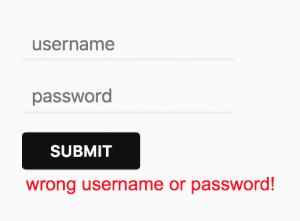
this.state = {
failure: 'wrong username or password!',
errcount: 0
}
} else {
this.state = { errcount: 0 }
}
}
handleError = (field, errmsg) => {
if(!field) return
if(errmsg) {
this.setState((prevState) => ({
failure: '',
errcount: prevState.errcount + 1,
errmsgs: {...prevState.errmsgs, [field]: errmsg}
}))
} else {
this.setState((prevState) => ({
failure: '',
errcount: prevState.errcount===1? 0 : prevState.errcount-1,
errmsgs: {...prevState.errmsgs, [field]: ''}
}))
}
}
renderError = () => {
if(this.state.errcount || this.state.failure) {
const errmsg = this.state.failure
|| Object.values(this.state.errmsgs).find(v=>v)
return <div className="error">{errmsg}</div>
}
}
//...
}In this snippet, we define the handleError function to manage the error state of the form. Recall that we also used it for Input field validation. Actually, handleError() is passed to the Input Components as a callback in the render() function.
We use renderError() to construct the error message element. Note that Form’s constructor consumes an error property. This property indicates if the login action fails.
Then comes the form submission handler:
class Form extends Component {

    //...

    handleSubmit = (event) => {
        event.preventDefault()
        if(!this.state.errcount) {
            const data = new FormData(this.form)
            fetch(this.form.action, {
              method: this.form.method,
              body: new URLSearchParams(data)
            })
            .then(v => {
                if(v.redirected) window.location = v.url
            })
            .catch(e => console.warn(e))
        }
    }

}
We wrap all form fields into FormData and send it to the server using the fetch API.
Let’s not forget our login form comes with a successUrl and failureUrl, meaning that no matter if the request is successful or not, the response would require a redirection.
That’s why we need to handle redirection in the response callback.
4.3. Form Rendering
Now that we’ve set up all the components we need, we can continue to put them in the DOM. The basic HTML structure is as follows (find it under react/public/index.html):
<!DOCTYPE html>
<html lang="en">
  <head>
    <!-- ... -->
  </head>
  <body>

    <div id="root">
      <div id="container"></div>
    </div>

  </body>
</html>
Finally, we’ll render the Form into the <div/> with id “container” in react/src/index.js:
import React from 'react'
import ReactDOM from 'react-dom'
import './index.css'
import Form from './Form'

const inputs = [{
  name: "username",
  placeholder: "username",
  type: "text"
},{
  name: "password",
  placeholder: "password",
  type: "password"
},{
  type: "submit",
  value: "Submit",
  className: "btn"
}]

const props = {
  name: 'loginForm',
  method: 'POST',
  action: '/perform_login',
  inputs: inputs
}

const params = new URLSearchParams(window.location.search)

ReactDOM.render(
  <Form {...props} error={params.get('error')} />,
  document.getElementById('container'))
So our form now contains two input fields: username and password, and a submit button.
Here we pass an additional error attribute to the Form component because we want to handle login error after redirection to the failure URL: /index.html?error=true.
Now we’ve finished building a Spring Security login application using React. The last thing we need to do is to run mvn compile.
During the process, the Maven plugin will help build our React application and gather the build result in src/main/webapp/WEB-INF/view/react/build.
5. 結論
在本文中,我們介紹瞭如何構建一個 React 登錄應用並使其與 Spring Security 後端進行交互。更復雜的應用程序將涉及使用 React Router 或 Redux 進行狀態轉換和路由,但這些超出了本文的範圍。
