1. 概述
跨站腳本攻擊(XSS)或 XSS 攻擊一直位列 OWASP 十大安全風險 的前列。XSS 攻擊發生在 Web 服務器在未經驗證或編碼的情況下處理用户惡意輸入並將其渲染在頁面上。與 XSS 攻擊一樣,代碼注入和點擊劫持通過竊取用户數據和冒充用户,給 Web 應用程序造成 havoc。
在本教程中,讓我們學習如何使用 Content-Security-Policy 頭部緩解 Spring Security 基礎 Web 應用程序中的代碼注入風險。
2. 內容安全策略內容安全策略 (CSP) 是一種 HTTP 響應頭,它顯著降低了諸如 XSS、點擊劫持 等代碼注入攻擊,在現代瀏覽器中。
一個 Web 服務器通過 Content-Security-Policy 標頭指定瀏覽器可以渲染的資源列表。 這些資源可以是瀏覽器渲染的任何內容,例如 CSS、JavaScript、圖像等。
此標頭的語法如下:
Content-Security-Policy: <directive>; <directive>; <directive> ; ...此外,我們也可以將此策略作為 HTML 頁面的 <meta> 標籤設置:
<meta http-equiv="Content-Security-Policy" content="<directive>;<directive>;<directive>; ...">此外,這些 指令 包含多個值,可以有多個指令,每個指令之間用分號 (;) 隔開。
Content-Security-Policy: script-src 'self' https://baeldung.com; style-src 'self';
在此示例中,我們有兩個指令(script-src 和 style-src)以及 script-src 指令有兩個值(‘self’ 和 https://baeldung.com)。
3. 漏洞演示
現在,讓我們來看一個 XSS 和代碼注入漏洞可能造成的嚴重性示例。
3.1. 登錄表單
通常,在會話超時時,我們將用户重定向到 Web 應用程序中的登錄頁面。標準登錄表單具有用户名/密碼字段和提交按鈕:
<span> 會話超時。請登錄。</span>
<form id="login" action="/login">
    <input type="email" class="form-control" id="email">
    <input type="password" class="form-control" id="password">
    <button type="submit">登錄</button>
</form>
3.2. 代碼注入
用户可以在提供用户輸入時通過表單字段注入可疑代碼。例如,假設一個接受用户名在註冊表單中的文本框。
而不是用户名,用户可以輸入 <script>alert(“this is not expected”)</script> 並提交表單。隨後,當表單顯示用户名時,它會執行腳本(在本例中顯示消息)。該腳本甚至可以加載外部腳本,從而造成更大的危害。
同樣,假設我們有具有不足驗證的表單字段。再次,用户利用這一點並向 DOM (文檔對象模型) 注入惡意 JavaScript 代碼:
<span> 會話超時。請登錄。</span>
<form id="login" action="/login">
<input type="email" class="form-control" id="email">
<input type="password" class="form-control" id="password">
<button type="submit">登錄</button>
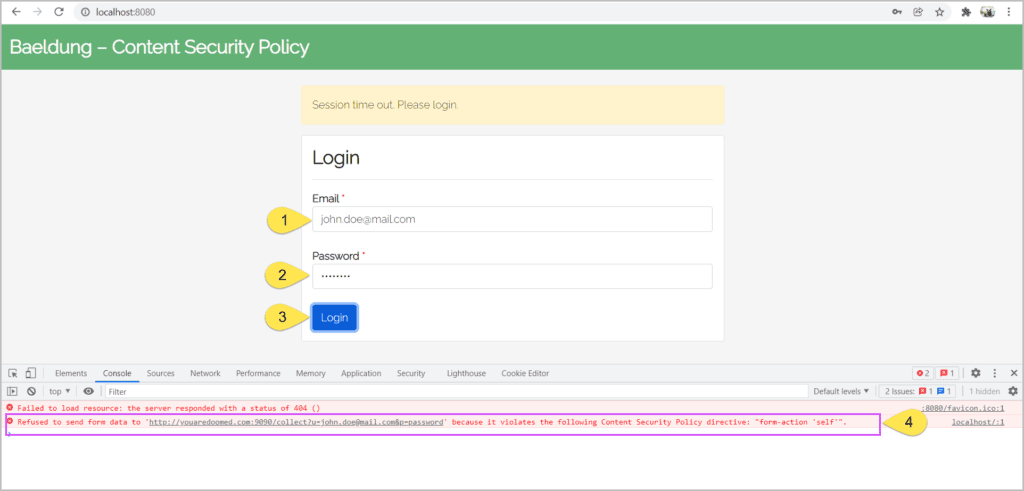
</form>注入的 JavaScript 代碼在點擊 登錄 按鈕時將用户重定向到惡意網站。
當不知情的用户提交表單時,他會被重定向到 https://youaredoomed.com 並泄露他的憑據。
3.3. 演示
讓我們看看這個漏洞在行動中的效果。
通常,在會話超時後,服務器會將用户重定向到登錄頁面以輸入他的憑據。但是,注入的惡意代碼會將用户重定向到意外站點,並附帶用户的憑據:
4. Spring Security
In this section, let’s discuss ways to mitigate these code injection vulnerabilities.
4.1. HTML <meta> Tags
Adding a <Content-Security-Policy> header in the previous example would have blocked submitting the form to the malicious server. So, let’s add this header using the <meta> tag and check the behavior:
<meta http-equiv="Content-Security-Policy" content="form-action 'self';">Adding the above <meta> tag prevents the browser from submitting the form to other origins:
Adding the above <meta> tag prevents the browser from submitting the form to other origins:
Even though the <meta> tags can mitigate the XSS and code injection attacks, they have limited functionality. For instance, we can’t use <meta> tags for reporting the Content-Security-Policy violations.
Henceforth, let’s use the power of Spring Security to mitigate these risks by setting the <Content-Security-Policy> header.
4.2. Maven Dependencies
First, let’s add <a href="https://mvnrepository.com/artifact/org.springframework.boot/spring-boot-starter-security">Spring Security</a> and <a href="https://mvnrepository.com/artifact/org.springframework.boot/spring-boot-starter-web">Spring Web</a> dependencies to our <pom.xml>:
<dependency>
    <groupId>org.springframework.boot</groupId>
    <artifactId>spring-boot-starter-security</artifactId>
</dependency>
<dependency>
    <groupId>org.springframework.boot</groupId>
    <artifactId>spring-boot-starter-web</artifactId>
</dependency>
4.3. Configuration
Next, let’s define Spring Security configuration by creating a <SecurityFilterChain> bean:
@Configuration
public class ContentSecurityPolicySecurityConfiguration {
    @Bean
    public SecurityFilterChain filterChain(HttpSecurity http) throws Exception {
        http.headers(Customizer.withDefaults())
            .xssProtection(Customizer.withDefaults())
            .contentSecurityPolicy(contentSecurityPolicyConfig -> contentSecurityPolicyConfig.policyDirectives("form-action 'self'"));
        return http.build();
    }
}
Here, we declared <contentSecurityPolicy> to restrict the form actions to the same origin.
4.4. Content-Security-Policy Response Header
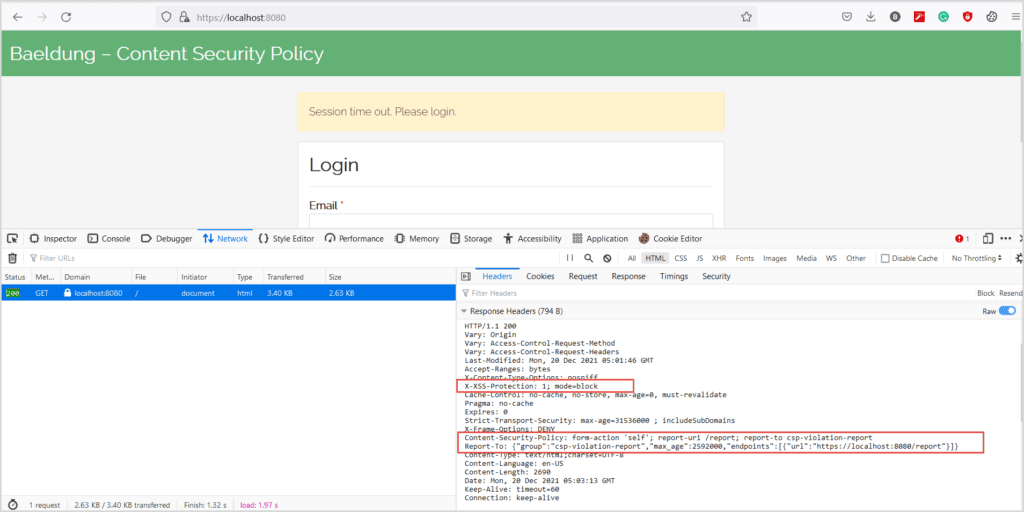
With necessary configurations in place, let’s verify the security provided by Spring Security. For this, let’s open the browser’s developer tools (by pressing F12 or similar keys), click on the<Network> tab, and let’s open the URL <http://localhost:8080>:
Now, we’ll fill the form and submit it:
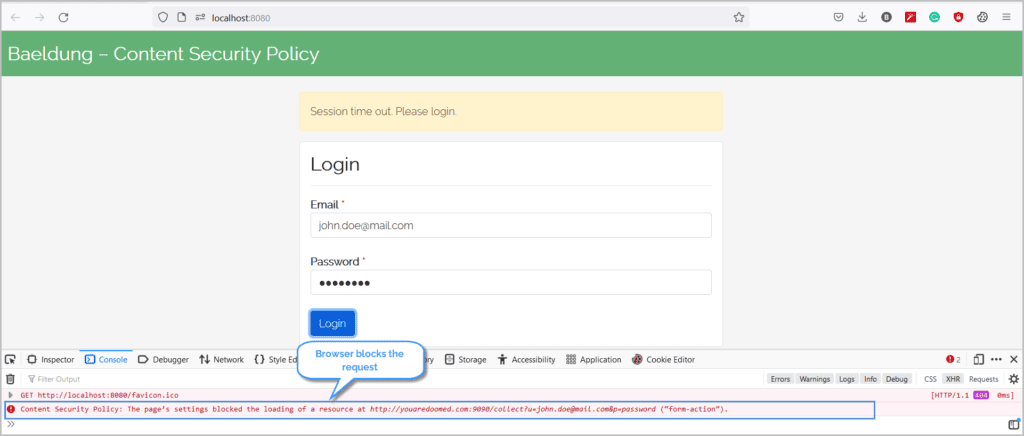
With the <Content-Security-Policy> header in place, the browser blocks the submit request and mitigates the risk of compromising the credentials.
Similarly, we can configure Spring Security to support <a href="https://developer.mozilla.org/en-US/docs/Web/HTTP/Headers/Content-Security-Policy/report-to">different directives</a>. For instance, this code specifies the browsers to load the scripts only from the same origin:
.contentSecurityPolicy("script-src 'self'");Similarly, we can instruct the browsers to download the CSS only from the same origin and <em>somecdn.css.com</em>
.contentSecurityPolicy("style-src 'self' somecdn.css.com");Additionally, we can combine any number of directives in the <Content-Security-Policy> header. For instance, to restrict the CSS, JS, and form actions, we can specify:
.contentSecurityPolicy("style-src 'self' somecdn.css.com; script-src 'self'; form-action 'self'")4.5. Reporting
Apart from ordering the browsers to block malicious content, a server can ask the browsers to send a report for the blocked content. So, let’s combine the <report-uri> directive with other directives for the browser to send a POST whenever the content is blocked.
The browsers post the below content to the URL defined in <report-uri>
{
    "csp-report": {
        "blocked-uri": "",
        "document-uri": "",
        "original-policy": "",
        "referrer": "",
        "violated-directive": ""
    }
}
Therefore, we need to define an API that receives this violation report sent by the browser and log the request for illustration and clarity.
We first defined a <report-to> group with <csp-violation-report> and associated an endpoint. Next, as part of <.contentSecurityPolicy,>, we used this group name as the value of the <report-to> directive.
Now, when we open the page in the browser, we see:
Next, let’s fill the form and submit it:
With the <Content-Security-Policy> header in place, the browser blocks the submit request and mitigates the risk of compromising the credentials.
Similarly, we can configure Spring Security to support <a href="https://developer.mozilla.org/en-US/docs/Web/HTTP/Headers/Content-Security-Policy/report-to">different directives</a>. For instance, this code specifies the browsers to load the scripts only from the same origin:
.contentSecurityPolicy("script-src 'self'");Similarly, we can instruct the browsers to download the CSS only from the same origin and <em>somecdn.css.com</em>
.contentSecurityPolicy("style-src 'self' somecdn.css.com");Additionally, we can combine any number of directives in the <Content-Security-Policy> header. For instance, to restrict the CSS, JS, and form actions, we can specify:
.contentSecurityPolicy("style-src 'self' somecdn.css.com; script-src 'self'; form-action 'self'")5. 結論
在本文中,我們看到了如何保護我們的Web應用程序免受點擊劫持、代碼注入和XSS攻擊。
雖然沒有完全保護這些攻擊的方法,但內容安全策略(Content-Security-Policy)頭響應有助於緩解大部分攻擊。目前,大多數現代瀏覽器對該頭響應的支持並不完全。因此,設計和構建符合安全原則和標準的應用程序至關重要。
