1. 概述
在本教程中,我們將學習如何使用 Spring OAuth2RestTemplate 來進行 OAuth2 REST 調用。
我們將創建一個 Spring Web 應用程序,該應用程序能夠列出 GitHub 帳户的倉庫。
2. Maven 配置
首先,我們需要將 spring-boot-starter-security 和 spring-security-oauth2-autoconfigure 依賴添加到我們的 pom.xml 中。由於我們正在構建一個 Web 應用程序,還需要添加 spring-boot-starter-web 和 spring-boot-starter-thymeleaf 構件。
<dependency>
    <groupId>org.springframework.boot</groupId>
    <artifactId>spring-boot-starter-web</artifactId>
</dependency>
<dependency>
    <groupId>org.springframework.boot</groupId>
    <artifactId>spring-boot-starter-security</artifactId>
</dependency>
<dependency>
    <groupId>org.springframework.security.oauth.boot</groupId>
    <artifactId>spring-security-oauth2-autoconfigure</artifactId>
    <version>2.6.8</version>
</dependency>
<dependency>
    <groupId>org.springframework.boot</groupId>
    <artifactId>spring-boot-starter-thymeleaf</artifactId>
    </dependency>
3. OAuth2 屬性
接下來,我們將向我們的 application.properties 文件添加 OAuth 配置,以便連接 GitHub 賬户:
github.client.clientId=[CLIENT_ID]
github.client.clientSecret=[CLIENT_SECRET]
github.client.userAuthorizationUri=https://github.com/login/oauth/authorize
github.client.accessTokenUri=https://github.com/login/oauth/access_token
github.client.clientAuthenticationScheme=form

github.resource.userInfoUri=https://api.github.com/user
github.resource.repoUri=https://api.github.com/user/repos
請注意,我們需要將 [CLIENT_ID][CLIENT_SECRET] 替換為來自 GitHub OAuth App 的值。您可以按照 創建 OAuth App 指南在 GitHub 上註冊一個新應用:
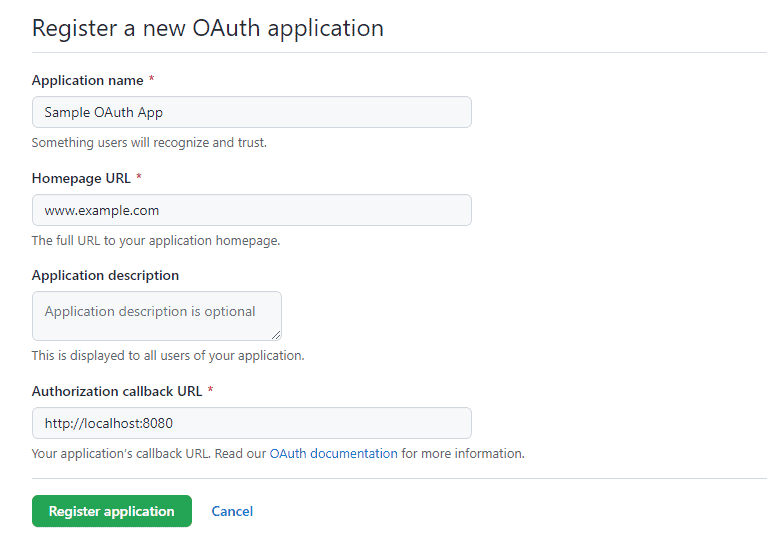
讓我們確保 Authorization 回調 URL 設置為 http://localhost:8080,這將重定向 OAuth 流到我們的 Web 應用程序主頁。
4. OAuth2RestTemplate 配置
現在,是時候創建一個安全配置,為我們的應用程序提供 OAuth2 支持。
4.1. SecurityConfig 類
首先,讓我們創建一個 Spring 的安全配置:
@Configuration
@EnableOAuth2Client
public class SecurityConfig {
    OAuth2ClientContext oauth2ClientContext;

    public SecurityConfig(OAuth2ClientContext oauth2ClientContext) {
        this.oauth2ClientContext = oauth2ClientContext;
    }

    ...
}
@EnableOAuth2Client 賦予我們一個 OAuth2 上下文,我們將使用它來創建我們的OAuth2RestTemplate。
4.2. OAuth2RestTemplate Bean
其次,我們將創建一個OAuth2RestTemplate 的 Bean:
@Bean
public OAuth2RestTemplate restTemplate() {
    return new OAuth2RestTemplate(githubClient(), oauth2ClientContext);
}

@Bean
@ConfigurationProperties("github.client")
public AuthorizationCodeResourceDetails githubClient() {
    return new AuthorizationCodeResourceDetails();
}
通過這樣,我們使用 OAuth2 屬性和上下文來創建一個模板實例。
@ConfigurationProperties 註解將所有github.client 屬性注入到AuthorizationCodeResourceDetails 實例中。
4.3. 認證過濾器
第三,我們需要一個認證過濾器來處理 OAuth2 流:
private Filter oauth2ClientFilter() {
    OAuth2ClientAuthenticationProcessingFilter oauth2ClientFilter = new OAuth2ClientAuthenticationProcessingFilter("/login/github");
    OAuth2RestTemplate restTemplate = restTemplate();
    oauth2ClientFilter.setRestTemplate(restTemplate);
    UserInfoTokenServices tokenServices = new UserInfoTokenServices(githubResource().getUserInfoUri(), githubClient().getClientId());
    tokenServices.setRestTemplate(restTemplate);
    oauth2ClientFilter.setTokenServices(tokenServices);
    return oauth2ClientFilter;
}

@Bean
@ConfigurationProperties("github.resource")
public ResourceServerProperties githubResource() {
    return new ResourceServerProperties();
}在這裏,我們指示過濾器在應用程序的/login/github URL 上啓動 OAuth2 流。
4.4. Spring Security 配置
最後,讓我們註冊OAuth2ClientContextFilter 並創建一個 Web 安全配置:
@Bean
public SecurityFilterChain filterChain(HttpSecurity http) throws Exception {
    http.authorizeRequests()
        .antMatchers("/", "/login**", "/error**")
        .permitAll()
        .anyRequest()
        .authenticated()
        .and()
        .logout()
        .logoutUrl("/logout")
        .logoutSuccessUrl("/")
        .and()
        .addFilterBefore(oauth2ClientFilter(), BasicAuthenticationFilter.class);
    return http.build();
}

@Bean
public FilterRegistrationBean oauth2ClientFilterRegistration(OAuth2ClientContextFilter filter) {
    FilterRegistrationBean registration = new FilterRegistrationBean<>();
    registration.setFilter(filter);
    registration.setOrder(Ordered.HIGHEST_PRECEDENCE + 1);
    return registration;
}
我們保護 Web 應用程序的路徑,並確保OAuth2ClientAuthenticationProcessingFilter 在BasicAuthenticationFilter 之前註冊。
5. 使用 OAuth2RestTemplate
OAuth2RestTemplate 的主要目標是減少用於發出OAuth2 基礎 API 調用所需的代碼量。 它基本上滿足了我們應用程序的兩個需求:
- 處理OAuth2 身份驗證流程
- 擴展 Spring 的 RestTemplate 以進行 API 調用
現在,我們能夠像一個 Web 控制器中的自動裝入的 Bean 一樣使用 OAuth2RestTemplate。
5.1. 登錄
讓我們創建一個 index.html 文件,其中包含登錄和主頁選項:
<!DOCTYPE html>
<html lang="en" xmlns="http://www.w3.org/1999/xhtml" xmlns:th="http://www.thymeleaf.org">
<head>
    <title>OAuth2Client</title>
</head>
<body>
<h3>
    <a href="/login/github" th:href="@{/home}" th:if="${#httpServletRequest?.remoteUser != undefined }">
        前往主頁
    </a>
    <a href="/hello" th:href="@{/login/github}" th:if="${#httpServletRequest?.remoteUser == undefined }">
        GitHub 登錄
    </a>
</h3>
</body>
</html>
未身份驗證的用户將被呈現登錄選項,而身份驗證用户可以訪問主頁。
5.2. 主頁
現在,讓我們創建一個控制器來向已認證的 GitHub 用户問候:
@Controller
public class AppController {

    OAuth2RestTemplate restTemplate;

    public AppController(OAuth2RestTemplate restTemplate) {
        this.restTemplate = restTemplate;
    }

    @GetMapping("/home")
    public String welcome(Model model, Principal principal) {
        model.addAttribute("name", principal.getName());
        return "home";
    }
}請注意,welcome 方法中有一個安全Principal 參數。 我們正在將Principal 的名稱作為 UI 模型中的屬性添加到模型中。
讓我們查看 home.html 模板:
<!DOCTYPE html>
<html lang="en" xmlns="http://www.w3.org/1999/xhtml" xmlns:th="http://www.thymeleaf.org">
<head>
    <title>Home</title>
</head>
<body>
    <p>
        歡迎 <b th:inline="text"> [[${name}]] </b>
    </p>
    <h3>
        <a href="/repos">查看倉庫</a><br/><br/>
    </h3>

    <form th:action="@{/logout}" method="POST">
        <input type="submit" value="退出登錄"/>
    </form>
</body>
</html>
此外,我們添加了一個鏈接來查看用户的倉庫列表以及一個註銷選項。
5.3. GitHub 倉庫
現在,是時候使用先前控制器中創建的 OAuth2RestTemplate 來呈現由用户擁有的所有 GitHub 倉庫。
首先,我們需要創建一個 GithubRepo 類來表示一個倉庫:
public class GithubRepo {
    Long id;
    String name;

    // getters and setters

}
其次,讓我們為先前創建的 AppController 添加一個倉庫映射:
@GetMapping("/repos")
public String repos(Model model) {
    Collection<GithubRepo> repos = restTemplate.getForObject("https://api.github.com/user/repos", Collection.class);
    model.addAttribute("repos", repos);
    return "repositories";
}
OAuth2RestTemplate 處理了向 GitHub 發出請求的所有樣板代碼。 此外,它將 REST 響應轉換為 GithubRepo 集合。
最後,讓我們創建一個 repositories.html 模板來迭代倉庫集合:
<!DOCTYPE html>
<html lang="en" xmlns="http://www.w3.org/1999/xhtml" xmlns:th="http://www.thymeleaf.org">
<head>
    <title>Repositories</title>
</head>
<body>
    <p>
        <h2>Repos</h2>
    </p>
    <ul th:each="repo: ${repos}">
        <li th:text="${repo.name}"></li>
    </ul>
</body>
</html>
6. 結論
在本文中,我們學習瞭如何使用OAuth2RestTemplate來簡化對OAuth2資源服務器的REST調用,例如GitHub。
我們回顧了Web應用程序中OAuth2流程的構建塊。然後,我們看到了如何通過REST API調用來檢索GitHub用户的所有倉庫。
