1. 簡介
登錄表單在任何需要身份驗證以提供其服務的 Web 服務中都是常見的特性,並且仍然如此。然而,隨着安全問題日益突出,變得清晰的是,簡單的文本密碼是一個弱點:它們可以被猜測、攔截或泄露,從而導致安全事件,可能導致財務和/或聲譽損害。
以前嘗試用替代方案(如 mTLS、安全卡等)替換密碼,試圖解決這個問題,但導致了糟糕的用户體驗和額外的成本。
在本教程中,我們將探索 Passkeys(也稱為 WebAuthn),這是一個提供密碼安全的替代標準的規範。特別是,我們將演示如何快速地將此身份驗證機制添加到 Spring Boot 應用程序中,使用 Spring Security。
2. 什麼是 Passkey?
Passkey 或 WebAuthn 是一種由 W3C 聯盟定義的標準 API,允許在 Web 瀏覽器上運行的應用程序管理公鑰並將其註冊用於與特定服務提供商一起使用。
典型的註冊場景如下:
- 用户在服務上創建一個新帳户。初始憑據通常是熟悉的用户名/密碼
- 註冊後,用户轉到個人資料頁面並選擇“創建 Passkey”
- 系統顯示 Passkey 註冊表單
- 用户填寫表單,提供所需的信息 – 例如,有助於用户稍後選擇正確密鑰的密鑰標籤 – 並提交表單
- 系統將 Passkey 保存到數據庫中,並將其與用户帳户關聯。同時,該密鑰的私有部分也將保存在用户的設備上
- Passkey 註冊完成
一旦密鑰註冊完成,用户可以使用存儲的 Passkey 訪問該服務。根據瀏覽器的安全配置和用户的設備配置,登錄可能需要指紋掃描、解鎖智能手機或類似操作。
Passkey 由兩部分組成:瀏覽器發送給服務提供商的公鑰以及保存在本地設備上的私有部分。
此外,客户端 API 的實現確保給定的 Passkey 只能與註冊它的同一站點使用
3. 在 Spring Boot 應用中添加 Passkeys
讓我們創建一個簡單的 Spring Boot 應用來測試 Passkeys。 我們的應用將只有一個歡迎頁面,顯示當前用户的姓名以及指向 Passkeys 註冊頁面的鏈接
第一步是向項目添加所需的依賴項:
<dependency>
    <groupId>org.springframework.boot</groupId>
    <artifactId>spring-boot-starter-web</artifactId>
    <version>3.4.3</version>
</dependency>
<dependency>
    <groupId>org.springframework.boot</groupId>
    <artifactId>spring-boot-starter-security</artifactId>
    <version>3.4.3</version>
</dependency>
<dependency>
    <groupId>com.webauthn4j</groupId>
    <artifactId>webauthn4j-core</artifactId>
    <version>0.28.5.RELEASE</version>
</dependency>
這些依賴項的最新版本可以在 Maven Central 上找到:
重要提示:WebAuthn 支持需要 Spring Boot 版本 3.4.0 或更高版本
4. Spring Security 配置
從 Spring Security 6.4 開始,這是通過 spring-boot-starter-security 依賴項提供的默認版本,配置 DSL 具有通過 webauthn() 方法的內置 passkey 支持。
@Bean
SecurityFilterChain webauthnFilterChain(HttpSecurity http, WebAuthNProperties webAuthNProperties) {
    return http.authorizeHttpRequests( ht -> ht.anyRequest().authenticated())
      .formLogin(withDefaults())
      .webAuthn(webauth ->
          webauth.allowedOrigins(webAuthNProperties.getAllowedOrigins())
            .rpId(webAuthNProperties.getRpId())
            .rpName(webAuthNProperties.getRpName())
      )
      .build();
}
我們得到的結果如下:
- 登錄頁面上會有一個“使用 passkey 登錄”按鈕
- 註冊頁面位於 /webauthn/register
為了確保正常運行,我們必須至少向 webauthn 配置器提供以下配置屬性:
- allowedOrigins:外部網站的 URL,必須使用 HTTPS(除非使用 localhost)
- rpId:應用程序標識符,必須與 hostname 部分的 allowedOrigin 屬性相匹配的有效域名
- rpName:瀏覽器在註冊和/或登錄過程中可能使用的用户友好的名稱
然而,此配置缺少 passkey 支持的關鍵方面:註冊的密鑰在應用程序重啓時會丟失。 這是因為 Spring Security 默認使用基於內存的實現憑據存儲,這不適用於生產環境。
稍後我們將看到如何解決這個問題。
5. Passkey Walk-Around
With the passkey configuration in place, it’s time for a quick walk-through of our application. Once we start it using mvn spring-boot:run or the IDE, we can open our browser and navigate to http://localhost:8080.
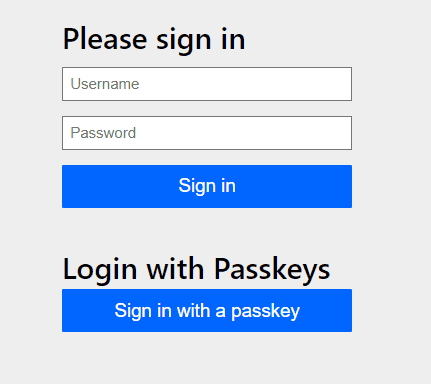
The standard login page for Spring applications will now include the “Sign in with a passkey” button. Since we haven’t registered any key yet, we must log in using username/password credentials, which we’ve configured in our application.yaml file: alice/changeit.

As expected, we’re now logged in as Alice. We can now continue to the registration page by clicking on the “Register PassKey” link:
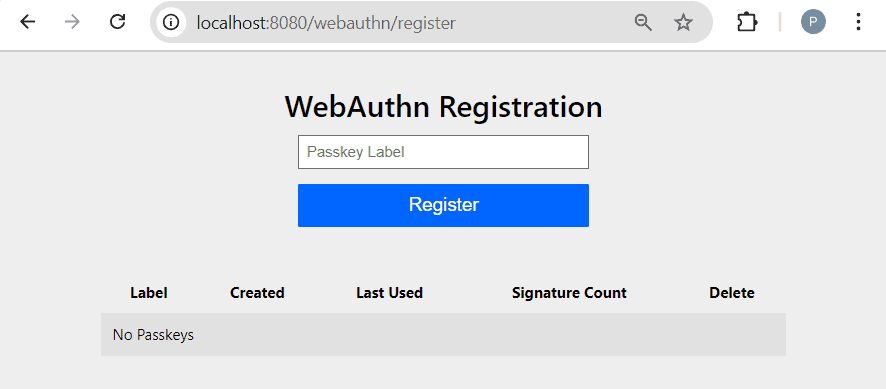
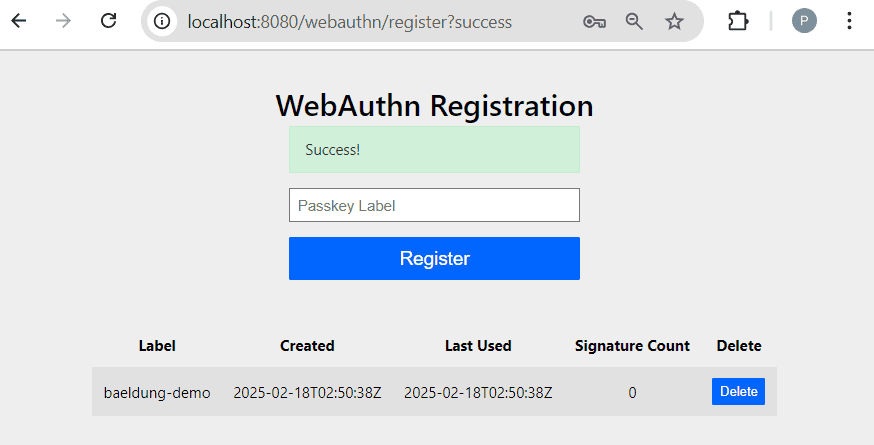
Here, we’ll just provide a label – baeldung-demo – and click on “Register”. What happens next depends on the device type (desktop, mobile, tablet) and OS (Windows, Linux, Mac, Android), but in the end, it will result in a new key being added to the list:
For instance, in Chrome on Windows, the dialog will give a choice to create a new key and store it with the browser’s native password manager or use the Windows Hello functionality available on the OS.
Next, let’s log out of the application and try our new key. First, we navigate to http://localhost:8080/logout and confirm that want to exit. Next, on the login form, we click on “Sign in with a passkey”. The browser will show a dialog which allows you to select a passkey:
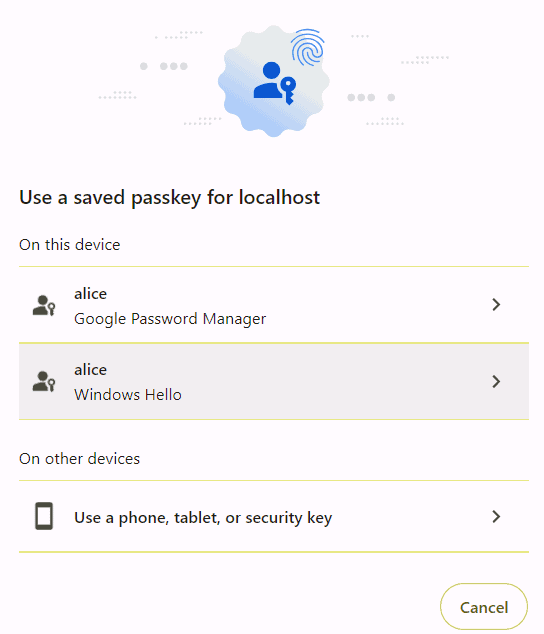
Once we select one of the available keys, the device will perform an additional authentication challenge. For the “Windows Hello” authentication, this can be a fingerprint scan, face recognition, etc.
If the authentication is successful, the user’s private key will be used to sign a challenge and send it to the server, where it will be validated using the previously stored public key. Finally, if everything checks, the login completes and the welcome page will be displayed as before.
6. Passkey 存儲庫
正如前面提到的,Spring Security 創建的默認 Passkey 配置不提供已註冊密鑰的持久化。 為了解決這個問題,我們需要提供以下接口的實現:
- PublicKeyCredentialUserEntityRepository
- UserCredentialRepository
6.1. PublicKeyCredentialUserEntityRepository
此服務管理 PublicKeyCredentialUserEntity 實例,並將由標準 UserDetailsService 管理的用户賬户映射到用户賬户標識符
- name: 賬户的友好名稱標識
- id: 用户的賬户標識符
- displayName: 賬户名稱的替代版本,用於顯示目的
請注意,當前實現假設 name 和 id 在給定的身份驗證域內是唯一的。
通常,我們可以假設此表中條目與由標準 UserDetailsService 管理的賬户之間存在 1:1 關係。
該實現,可在網上找到,使用 Spring Data JDBC 存儲庫來存儲這些字段在 PASSKEY_USERS 表中的。
6.2. UserCredentialRepository
管理 CredentialRecord 實例,該實例存儲在註冊過程中從瀏覽器接收的公共密鑰
- userEntityUserId: 擁有此密鑰的 PublicKeyCredentialUserEntity 的標識符
- label: 註冊時為此密鑰分配的用户自定義標籤
- lastUsed: 此密鑰的最後使用日期
- created: 此密鑰的創建日期
請注意,CredentialRecord 與 PublicKeyCredentialUserEntity 之間存在 N:1 關係,這反映在存儲庫的方法中。例如,findByUserId() 方法返回 CredentialRecord 實例的列表。
我們的實現考慮到了這一點,並使用 PASSKEY_CREDENTIALS 表中的外鍵,以確保參照完整性。
7. 測試
雖然可以使用模擬請求測試基於 passkey 的應用程序,但這些測試的價值有限。 大多數失敗場景與客户端問題相關,因此需要使用真實的瀏覽器驅動的集成測試,藉助自動化工具。
在這裏,我們將使用 Selenium 實現“正常流程”場景,僅用於説明該技術。 尤其是,我們將使用 VirtualAuthenticator 功能來配置 WebDriver,從而模擬註冊和登錄頁面之間的交互,利用這種機制。
例如,創建帶有 VirtualAuthenticator 的新驅動程序的方式如下:
@BeforeEach
void setupTest() {
    VirtualAuthenticatorOptions options = new VirtualAuthenticatorOptions()
      .setIsUserVerified(true)
      .setIsUserConsenting(true)
      .setProtocol(VirtualAuthenticatorOptions.Protocol.CTAP2)
      .setHasUserVerification(true)
      .setHasResidentKey(true);

    driver = new ChromeDriver();
    authenticator = ((HasVirtualAuthenticator) driver).addVirtualAuthenticator(options);
}
一旦我們獲得了 authenticator 實例,我們就可以使用它來模擬不同的場景,例如成功的或失敗的登錄、註冊等。 我們的 實時測試 會經過一個完整的循環,包括以下步驟:
- 使用用户名/密碼憑據進行初始登錄
- Passkey 註冊
- 註銷
- 使用 Passkey 登錄
8. 結論
在本教程中,我們演示瞭如何在 Spring Boot Web 應用程序中使用 Passkeys 的方法,包括 Spring Security 的配置和為實際應用所需的密鑰持久化支持。
