1. 簡介
在本教程中,我們將討論使用 Proof Key for Code Exchange (PKCE) 用於 OAuth 2.0 公開客户端的應用。
2. 背景
OAuth 2.0 公有客户端,例如使用 單頁應用程序 (SPA) 或移動應用程序,利用 授權碼流程,容易受到授權碼截獲攻擊。惡意攻擊者如果在不安全的網絡上攔截授權碼,則可能從授權端點獲取授權碼。
如果攻擊者能夠訪問授權碼,它就可以使用它來獲取訪問令牌。一旦攻擊者擁有訪問令牌,它就可以像合法應用程序用户一樣訪問受保護的應用程序資源,從而嚴重損害應用程序。例如,如果訪問令牌與金融應用程序相關聯,攻擊者可能會獲得敏感的應用程序信息。
2.1. OAuth 授權碼截獲攻擊
在本文中,讓我們討論如何發生 OAuth 授權碼截獲攻擊: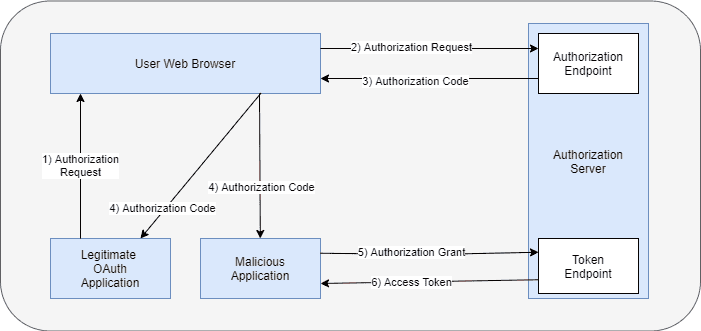
- 一個合法的 OAuth 應用程序使用其 Web 瀏覽器啓動 OAuth 授權請求流程,並提供所有必需的詳細信息
- Web 瀏覽器將請求發送到授權服務器
- 授權服務器將授權碼返回到 Web 瀏覽器
- 在此階段,惡意用户如果通信發生在不安全的通道上,則可能訪問授權碼
- 惡意用户使用授權碼兑換來從授權服務器獲取訪問令牌
- 由於授權碼有效,授權服務器會向惡意應用程序頒發訪問令牌。惡意應用程序可以使用訪問令牌代表合法應用程序進行操作並訪問受保護的資源
Proof Key for Code Exchange 是 OAuth 框架的一個擴展,旨在緩解此攻擊。
3. PKCE with OAuth
PKCE 擴展包括以下附加步驟,應用於 OAuth 授權碼流程:
- 客户端應用程序發送兩個附加參數code_challenge和code_challenge_method與初始授權請求中
- 客户端也發送code_verifier在下一步中,用於交換授權碼以獲取訪問令牌
首先,一個啓用了 PKCE 的客户端應用程序選擇一個動態創建的密碼學隨機密鑰,稱為code_verifier。此code_verifier對於每個授權請求都是唯一的。根據PKCE 規範,code_verifier值的長度必須在 43 到 128 個八字節之間。
此外,code_verifier可以包含僅字母數字 ASCII 字符和少量允許的符號。其次,code_verifier被轉換成code_challenge,使用支持的code_challenge_method。目前,支持的轉換方法是plain和S256。plain是一種無操作轉換,保持code_challange值與code_verifier相同。S256方法首先對code_verifier生成 SHA-256 哈希,然後對哈希值執行 Base64 編碼。
3.1. 阻止 OAuth 代碼攔截攻擊
下面的圖表演示了 PKCE 擴展如何防止訪問令牌盜竊:
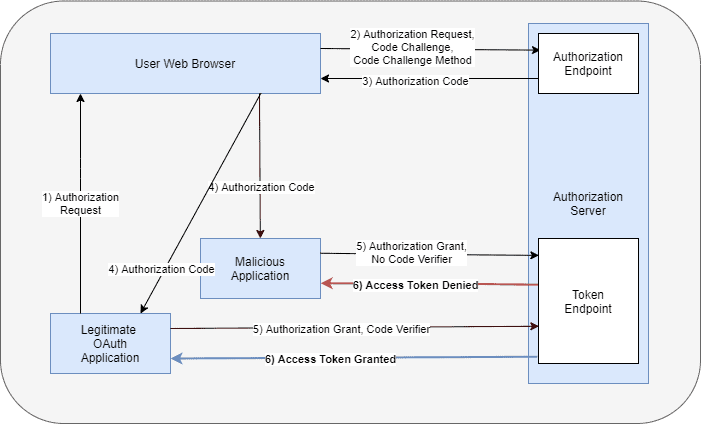
- 一個合法的 OAuth 應用程序使用其 Web 瀏覽器發起 OAuth 授權請求流程,並此外添加code_challenge和code_challenge_method參數。
- Web 瀏覽器將請求發送到授權服務器,並存儲code_challenge和code_challenge_method,用於客户端應用程序。
- 授權服務器返回授權碼到 Web 瀏覽器。
- 在此時,惡意用户可以訪問授權碼,如果通信發生在不安全的通道上。
- 惡意用户嘗試使用授權碼兑換以獲取訪問令牌,從授權服務器。但是,惡意用户不知道需要與請求一起發送的code_verifier。授權服務器拒絕向惡意應用程序發出訪問令牌請求。
- 合法的應用程序向獲取訪問令牌提供code_verifier,與授權請求中存儲的code_challenge和code_challenge_method進行計算。授權服務器匹配計算出的code_challange與之前存儲的code_challenge。這些值始終匹配,並且客户端會獲得訪問令牌。
- 客户端可以使用此訪問令牌來訪問應用程序資源。
4. PKCE With Spring Security
As of version 6.3, Spring Security supports PKCE for both servlet and reactive web applications. However, it is not enabled by default as not all identity providers support the PKCE extension yet. PKCE is automatically used for public clients when the client is running in an untrusted environment such as a native application or web browser-based application and the client_secret is empty or not provided and the client-authentication-method is set to none.
4.1. Maven Configuration
Spring Authorization server supports the PKCE extension. Thus, the simple way to include PKCE support for a Spring authorization server application is to include the spring-boot-starter-oauth2-authorization-server dependency:
<dependency>
    <groupId>org.springframework.boot</groupId>
    <artifactId>spring-boot-starter-oauth2-authorization-server</artifactId>
    <version>3.3.0</version>
</dependency>
4.2. Register Public Client
Next, let us register a public Single Page Application client by configuring the following properties in the application.yml file:
spring:
  security:
    oauth2:
      authorizationserver:
        client:
          public-client:
            registration:
              client-id: "public-client"
              client-authentication-methods:
                - "none"
              authorization-grant-types:
                - "authorization_code"
              redirect-uris:
                - "http://127.0.0.1:3000/callback"
              scopes:
                - "openid"
                - "profile"
                - "email"
            require-authorization-consent: true
            require-proof-key: true
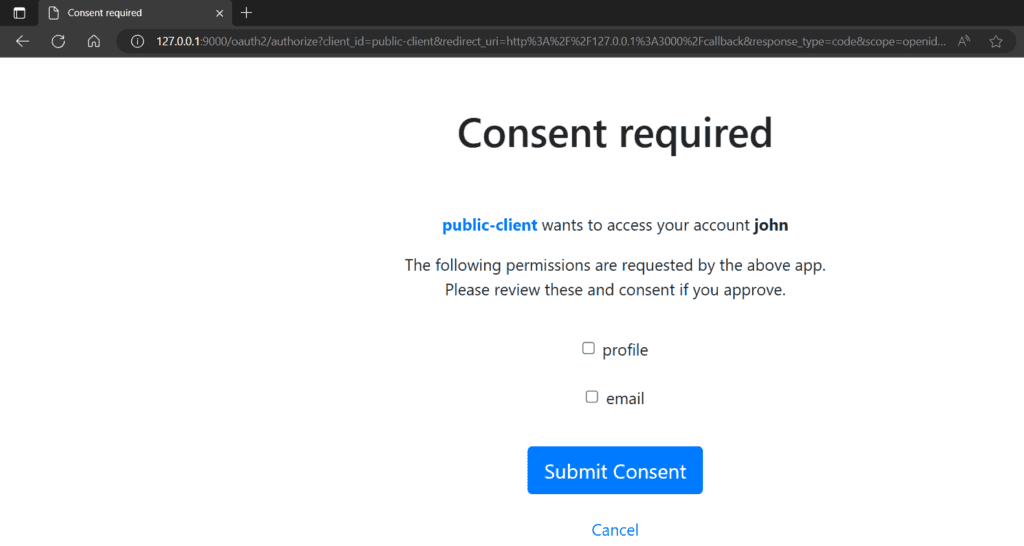
In the above code snippet, we register a client with client_id as public-client and client-authentication-methods as none. The require-authorization-consent requires the end-user to provide additional consent to access the profile and email scopes after the successful authentication. The require-proof-key configuration prevents the PKCE Downgrade Attack.
With require-proof-key configuration enabled, the authorization server does not allow any malicious attempt to bypass the PKCE flow without the code_challenge. The remaining configurations are standard configurations to register the client with the authorization server.
4.3. Spring Security Configuration
Next, let us define the SecurityFileChain configuration for the authorization server:
@Bean
@Order(1)
SecurityFilterChain authorizationServerSecurityFilterChain(HttpSecurity http) throws Exception {
    OAuth2AuthorizationServerConfiguration.applyDefaultSecurity(http);
    http.getConfigurer(OAuth2AuthorizationServerConfigurer.class)
      .oidc(Customizer.withDefaults());
    http.exceptionHandling((exceptions) -> exceptions.defaultAuthenticationEntryPointFor(new LoginUrlAuthenticationEntryPoint("/login"), new MediaTypeRequestMatcher(MediaType.TEXT_HTML)))
      .oauth2ResourceServer((oauth2) -> oauth2.jwt(Customizer.withDefaults()));
    return http.cors(Customizer.withDefaults())
      .build();
}
In the above configuration, we first apply the authorization server’s default security settings. We then apply the Spring security default settings for OIDC, CORS, and Oauth2 resource servers. Let us now define another SecurityFilterChain configuration that will be applied to other HTTP requests, such as the login page:
@Bean
@Order(2)
SecurityFilterChain defaultSecurityFilterChain(HttpSecurity http) throws Exception {
    http.authorizeHttpRequests((authorize) -> authorize.anyRequest()
      .authenticated())
      .formLogin(Customizer.withDefaults());
    return http.cors(Customizer.withDefaults())
      .build();
}
In this example, we use a very simple React application as our public client. This application runs on http://127.0.0.1:3000. The authorization server runs on a different port, 9000. Since these two applications are running on different domains, we will need to supply additional CORS settings so that the authorization server allows the React application to access it:
@Bean
CorsConfigurationSource corsConfigurationSource() {
    UrlBasedCorsConfigurationSource source = new UrlBasedCorsConfigurationSource();
    CorsConfiguration config = new CorsConfiguration();
    config.addAllowedHeader("*");
    config.addAllowedMethod("*");
    config.addAllowedOrigin("http://127.0.0.1:3000");
    config.setAllowCredentials(true);
    source.registerCorsConfiguration("/**", config);
    return source;
}
We are defining a CorsConfigurationSource instance with the allowed origin, headers, methods, and other configurations. Note that in the above configuration, we are using the IP address 127.0.0.1 instead of localhost as the latter is not allowed. Lastly, let us define a UserDetailsService instance to define a user in the authorization server.
@Bean
UserDetailsService userDetailsService() {
    PasswordEncoder passwordEncoder = PasswordEncoderFactories.createDelegatingPasswordEncoder();
    UserDetails userDetails = User.builder()
      .username("john")
      .password("password")
      .passwordEncoder(passwordEncoder::encode)
      .roles("USER")
      .build();

    return new InMemoryUserDetailsManager(userDetails);
}
With the above configurations, we will be able to use the username john and password as the password to authenticate to the authorization server.
4.4. Public Client Application
Let us now talk about the public client. For demonstration purposes, we are using a simple React application as the Single Page Application. This application uses the oidc-client-ts library for client-side OIDC and OAuth2 support. The SPA application is configured with the following configurations:
const pkceAuthConfig = {
  authority: 'http://127.0.0.1:9000/',
  client_id: 'public-client',
  redirect_uri: 'http://127.0.0.1:3000/callback',
  response_type: 'code',
  scope: 'openid profile email',
  post_logout_redirect_uri: 'http://127.0.0.1:3000/',
  userinfo_endpoint: 'http://127.0.0.1:9000/userinfo',
  response_mode: 'query',
  code_challenge_method: 'S256',
};

export default pkceAuthConfig;
The authority is configured with the address of the Spring Authorization server, which is http://127.0.0.1:9000. The code challenge method parameter is configured as S256. These configurations are used to prepare the UserManager instance, which we use later to invoke the authorization server. This application has two endpoints – the “/” to access the landing page of the application and the callback endpoint that handles the callback request from the Authorization server:
import React, { useState, useEffect } from 'react';
import { BrowserRouter, Routes, Route } from 'react-router-dom';
import Login from './components/LoginHandler';
import CallbackHandler from './components/CallbackHandler';
import pkceAuthConfig from './pkceAuthConfig';
import { UserManager, WebStorageStateStore } from 'oidc-client-ts';

function App() {
    const [authenticated, setAuthenticated] = useState(null);
    const [userInfo, setUserInfo] = useState(null);

    const userManager = new UserManager({
        userStore: new WebStorageStateStore({ store: window.localStorage }),
        ...pkceAuthConfig,
    });

    function doAuthorize() {
        userManager.signinRedirect({state: '6c2a55953db34a86b876e9e40ac2a202',});
    }

    useEffect(() => {
        userManager.getUser().then((user) => {
            if (user) {
                setAuthenticated(true);
            }
            else {
                setAuthenticated(false);
            }
      });
    }, [userManager]);

    return (
      <BrowserRouter>
          <Routes>
              <Route path="/" element={<Login authentication={authenticated} handleLoginRequest={doAuthorize}/>}/>
              <Route path="/callback"
                  element={<CallbackHandler
                      authenticated={authenticated}
                      setAuth={setAuthenticated}
                      userManager={userManager}
                      userInfo={userInfo}
                      setUserInfo={setUserInfo}/>}/>
          </Routes>
      </BrowserRouter>
    );
}

export default App;
5. Testing
我們將使用帶有 OIDC 客户端支持啓用的 React 應用程序來測試流程。要安裝所需的依賴項,我們需要從應用程序的根目錄運行 npm install 命令。然後,我們使用 npm start 命令啓動應用程序。
5.1. 訪問應用程序以獲取授權碼
此客户端應用程序執行以下兩個活動:首先,訪問主頁 http://127.0.0.1:3000 渲染登錄頁面。這是我們的 SPA 應用程序的登錄頁面: 其次,在登錄後,SPA 應用程序使用 code_challenge 和 code_challenge_method 調用 Spring 授權服務器: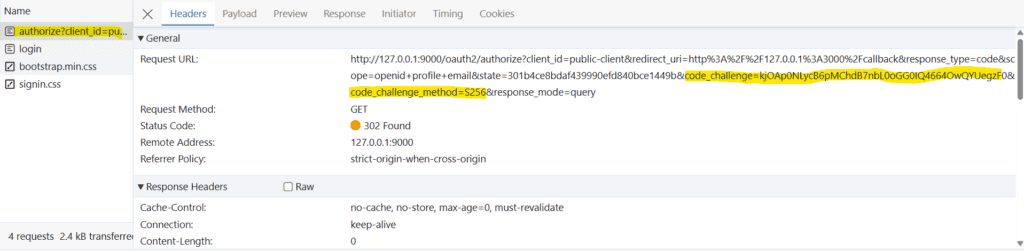
http://127.0.0.1:9000/oauth2/authorize?
client_id=public-client&
redirect_uri=http%3A%2F%2F127.0.0.1%3A3000%2Fcallback&
response_type=code&
scope=openid+profile+email&
state=301b4ce8bdaf439990efd840bce1449b&
code_challenge=kjOAp0NLycB6pMChdB7nbL0oGG0IQ4664OwQYUegzF0&
code_challenge_method=S256&
response_mode=query
授權服務器將請求重定向到 Spring Security 登錄頁面: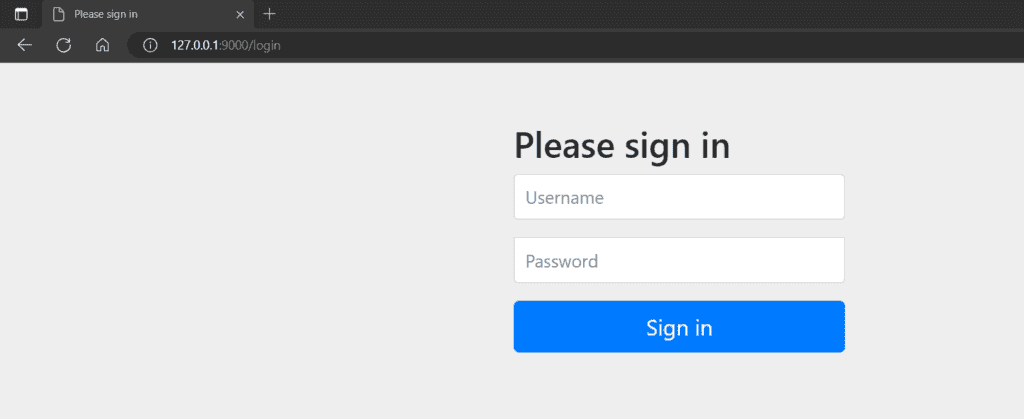
5.2. 交換授權碼以獲取訪問令牌
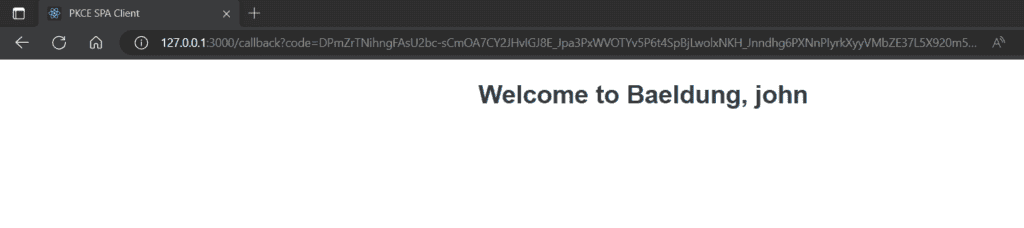
如果我們在登錄後完成,授權服務器將返回授權碼。 隨後,SPA 請求另一個 HTTP 請求到授權服務器以獲取訪問令牌。 SPA 向獲取訪問令牌提供授權碼,並使用 code_challenge:

6. 結論
在本文中,我們演示瞭如何在單頁應用程序中使用 OAuth 2.0 PKCE 擴展,並結合 Spring Authorization Server。我們首先探討了 PKCE 對公共客户端的需求,並探索了 Spring Authorization Server 中配置 PKCE 流。最後,我們利用 React 應用程序來演示該流程。
