1. 概述
文檔是構建 REST API 的關鍵組成部分。在本教程中,我們將探討 SpringDoc,它簡化了基於 OpenAPI 3 規範為 Spring Boot 3.x 應用程序生成和維護 API 文檔的過程。
2. 設置 springdoc-openapi
Spring Boot 3.x 需要使用 版本 2 的 springdoc-openapi:
<dependency>
    <groupId>org.springdoc</groupId>
    <artifactId>springdoc-openapi-starter-webmvc-ui</artifactId>
    <version>2.8.5</version>
</dependency>
此外,根據 兼容性矩陣,Springdoc OpenAPI 版本必須與 Spring Boot 版本兼容。
2.1. OpenAPI 描述路徑
在正確設置依賴項後,我們可以運行應用程序並找到 OpenAPI 描述位於 /v3/api-docs,這是默認路徑:
http://localhost:8080/v3/api-docs
此外,我們可以通過在 application.properties 中使用 springdoc.api-docs 屬性自定義路徑。例如,我們可以將路徑設置為 /api-docs:
springdoc.api-docs.path=/api-docs
然後,我們可以訪問文檔如下:
http://localhost:8080/api-docs
默認情況下,OpenAPI 定義是 JSON 格式。對於 yaml 格式,我們可以獲取定義如下:
http://localhost:8080/api-docs.yaml
3. 集成 Swagger UI
除了生成 OpenAPI 3 規範,我們還可以將 springdoc-openapi 與 Swagger UI 集成,以便與我們的 API 規範交互並測試端點。
springdoc-openapi 依賴項已經包含 Swagger UI,因此我們已準備好訪問 API 文檔,即位於:
http://localhost:8080/swagger-ui/index.html3.1. 對 swagger-ui 屬性的支持
springdoc-openapi 庫還支持 swagger-ui 屬性。 這些屬性可作為 Spring Boot 屬性使用,前綴為 springdoc.swagger-ui。
例如,我們可以自定義 API 文檔的路徑,通過在我們的 application.properties 文件中更改 springdoc.swagger-ui.path 屬性:
springdoc.swagger-ui.path=/swagger-ui-custom.html因此,我們的 API 文檔現在將可用於 http://localhost:8080/swagger-ui-custom.html。
例如,我們可以根據 HTTP 方法對 API 路徑進行排序,使用 springdoc.swagger-ui.operationsSorter 屬性:
springdoc.swagger-ui.operationsSorter=method3.2. 示例 API
假設我們的應用程序有一個用於管理 Book 對象的控制器:
@RestController
@RequestMapping("/api/book")
public class BookController {

    @Autowired
    private BookRepository repository;

    @GetMapping("/{id}")
    public Book findById(@PathVariable long id) {
        return repository.findById(id)
            .orElseThrow(() -> new BookNotFoundException());
    }

    @GetMapping("/")
    public Collection<Book> findBooks() {
        return repository.getBooks();
    }

    @PutMapping("/{id}")
    @ResponseStatus(HttpStatus.OK)
    public Book updateBook(
      @PathVariable("id") final String id, @RequestBody final Book book) {
        return book;
    }
}
然後,當我們運行我們的應用程序時,我們可以通過以下網址查看文檔:
http://localhost:8080/swagger-ui-custom.html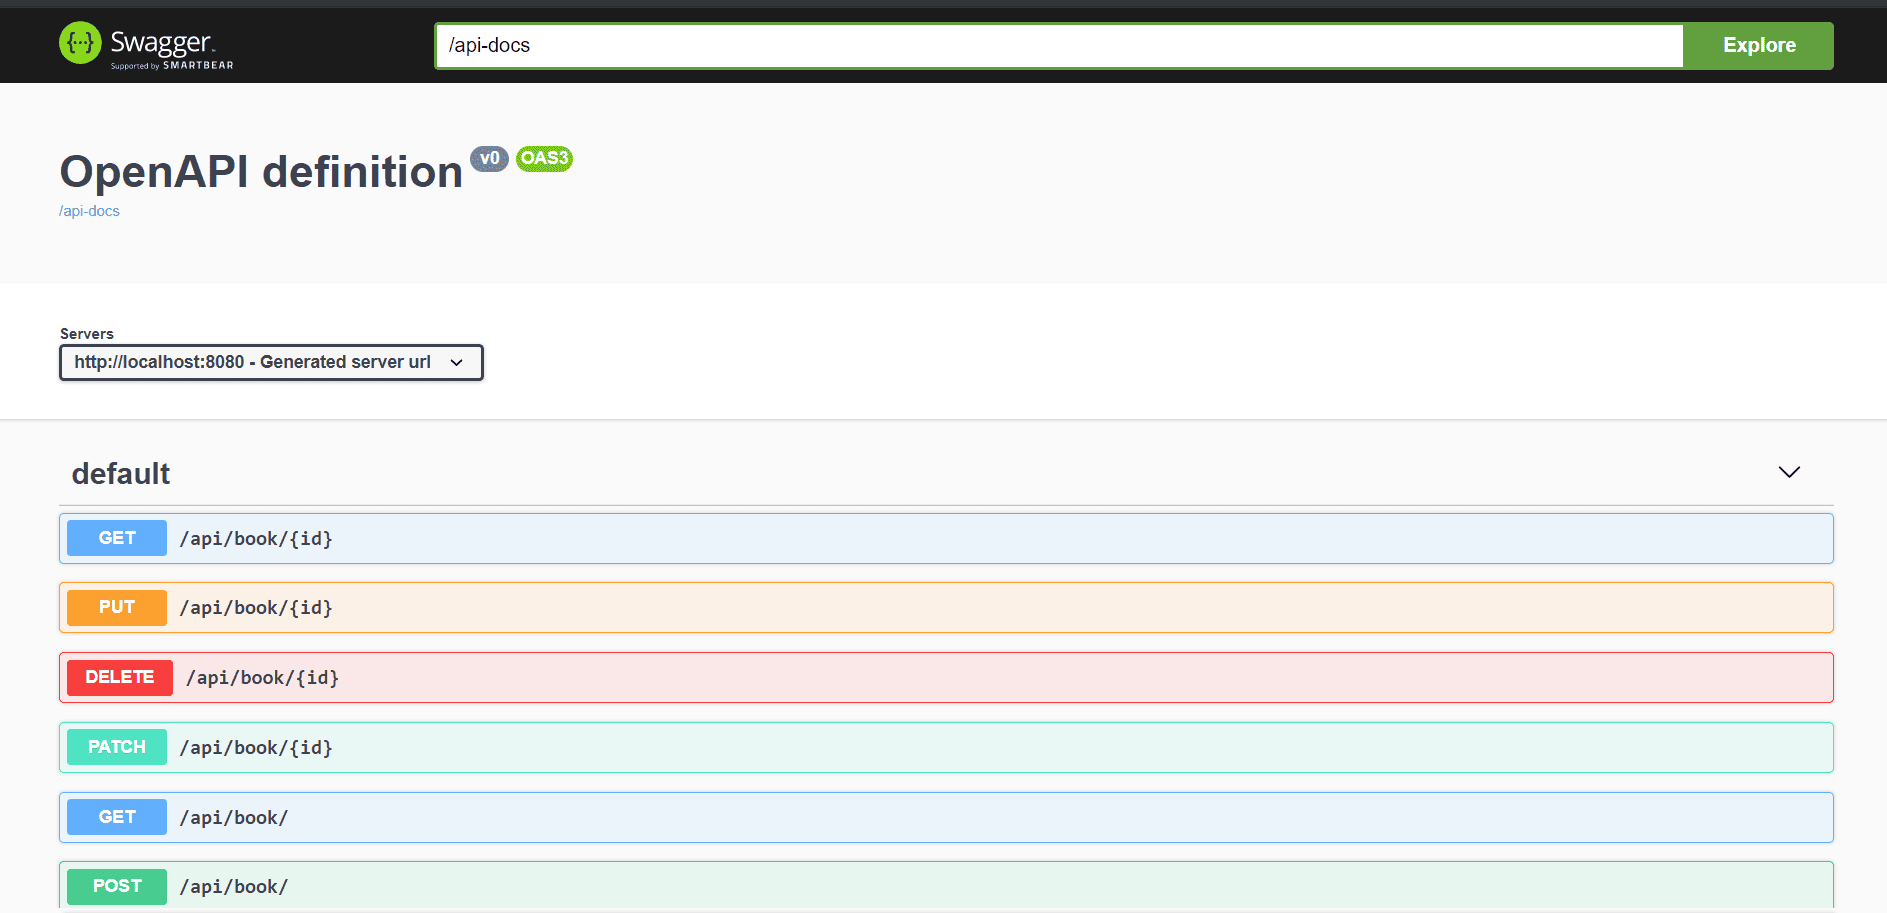
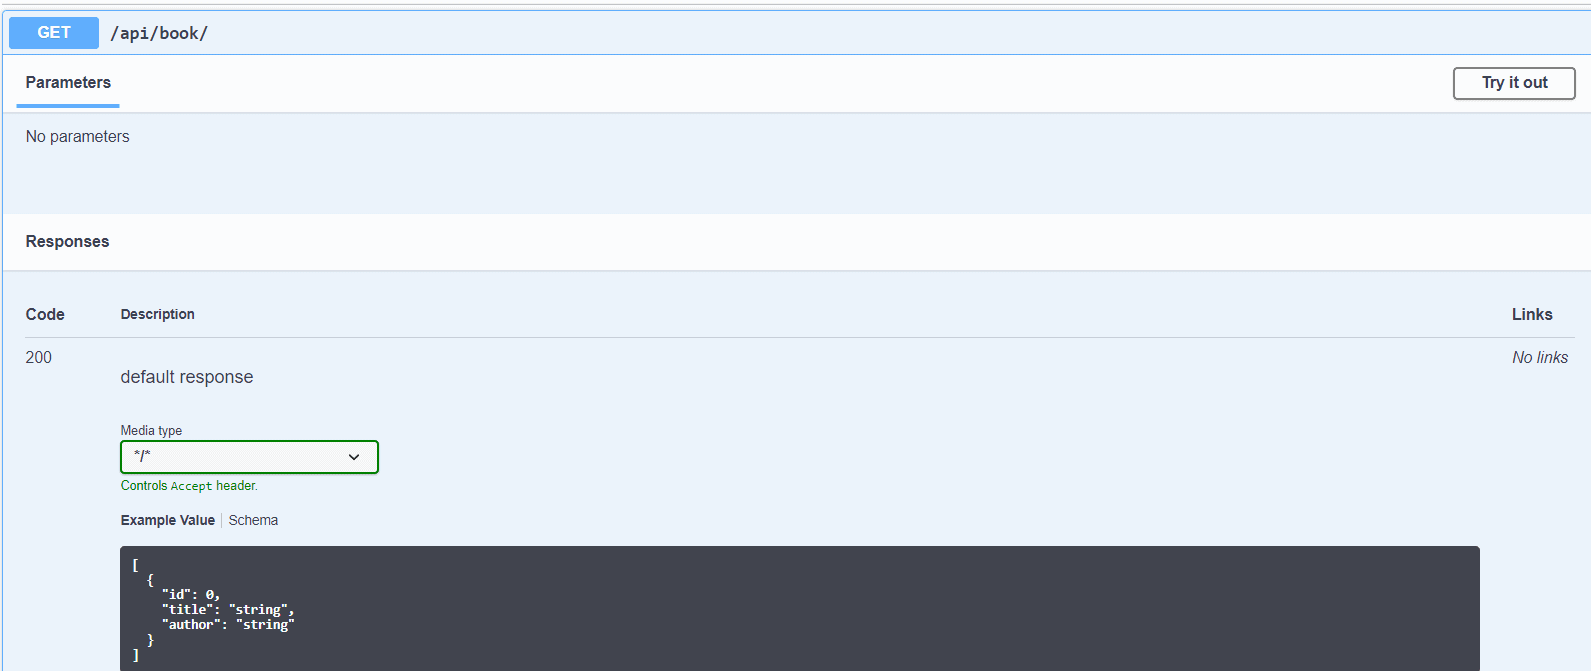
讓我們深入瞭解 /api/book 端點,並查看其請求和響應的詳細信息:
4. 集成 springdoc-openapi 與 Spring WebFlux
我們還可以啓用 springdoc.swagger-ui 屬性,以便在我們的 Spring WebFlux 應用程序中輕鬆集成 springdoc-openapi 與 Swagger UI 之間的關係。要啓用此功能,我們將在 pom.xml 文件中添加 springdoc-openapi-webflux-ui 依賴項:
<dependency>
    <groupId>org.springdoc</groupId>
    <artifactId>springdoc-openapi-starter-webflux-ui</artifactId>
    <version>2.8.5</version>
</dependency>
5. Organizing With Tags
The OpenAPI specification uses tags to group APIs into categories and groups. Each API operation can have multiple tags, and the Swagger UI will display operations in groups according to those tags.
We can define tags in a Swagger openapi.yaml definitions file. However, to demonstrate ordering tags, let’s specify them using the @Tag annotation at the method and class levels.
Let’s take a Books API example and specify tags on a controller class and its methods:
@Tag(name = "tag_at_class_level", description = "Books related class level tag")
public class BooksController {

    @Tag(name = "create")
    @Tag(name = "common_tag_at_method_level")
    @Tag(name = "createBook")
    @PostMapping(path = "/book")
    @io.swagger.v3.oas.annotations.parameters.RequestBody(required = true)
    public Book book(@Valid @RequestBody Book book) {

        return book;
    }

    @Tag(name = "find")
    @Tag(name = "common_tag_at_method_level")
    @Tag(name = "findBook", description = "Find Books related tag")
    @GetMapping(path = "/findBookById")
    public List findById(@RequestParam(name = "id", required = true)
      @NotNull @NotBlank @Size(max = 10) long id) {
        List bookList = new ArrayList<>();
	Book book = new Book();

	book.setId(1);
	bookList.add(book);
	return bookList;
    }

    @Tag(name = "delete")
    @Tag(name = "common_tag_at_method_level")
    @Tag(name = "deleteBook")
    @DeleteMapping(path = "/deleteBookById")
    public long deleteById(@RequestParam(name = "id", required = true)
      @NotNull @NotBlank @Size(max = 10) long id) {

        return id;
    }

    @Tag(name = "update")
    @Tag(name = "common_tag_at_method_level")
    @Tag(name = "updateBook")
    @PutMapping(path = "/updateBookById")
    public long updateById(@RequestParam(name = "id", required = true)
      @NotNull @NotBlank @Size(max = 10) long id) {
        return id;
    }
}
5.1. The Default Tag Order
When we run the application, the Swagger UI (http://localhost:8080/swagger-ui.html) displays the tags according to its default display order, with some additional caveats taking precedence:
The default display order is based on the operation name: PUT, POST, GET, DELETE, in that order. In other words, the PUT operation-related tags are displayed before the POST operation-related tags, and so on.
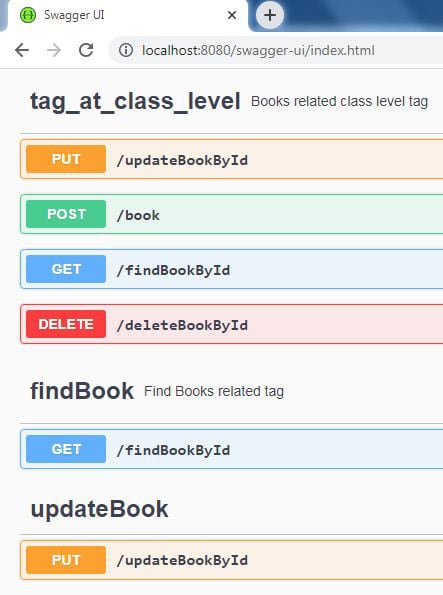
The reason the tag_at_class_level is the first tag is that the @Tag annotation adds a tag to the openAPI.tags field, which determines the global tag ordering when @Tag is applied at the method or class level with additional fields like description or externalDocs.
For the same reason, the findBook tag is listed second. However, if only a name is provided, the tag will be added to the operation only, and it doesn’t determine the global ordering of tags.
Further, a class-level tag is added to each operation, which is why the tag_at_class_level tag is applied to each operation. When a tag is applied to multiple operations, the operations under the tag are listed in the order PUT, POST, GET, and DELETE.
As seen here, the PUT-related tags are listed after the globally preferred tags. Let’s display the other tags to discover that the common_tag_at_method_level is next, which is because it is a PUT-related tag:
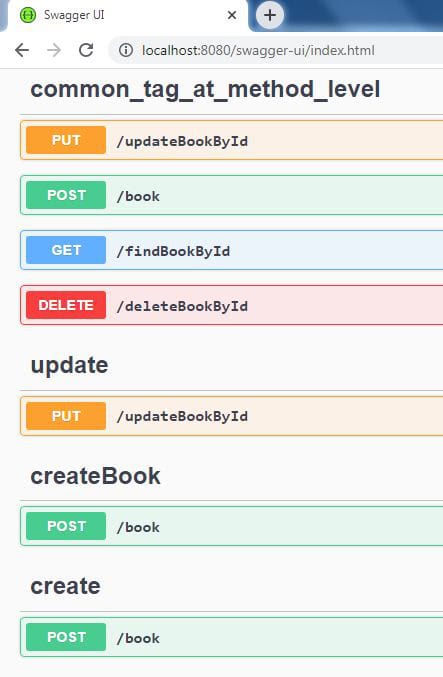
After the PUT-related tags, the POST-related tags are listed. Let’s display the rest of the tags to find that the remaining GET-related and DELETE-related tags are listed in that order:
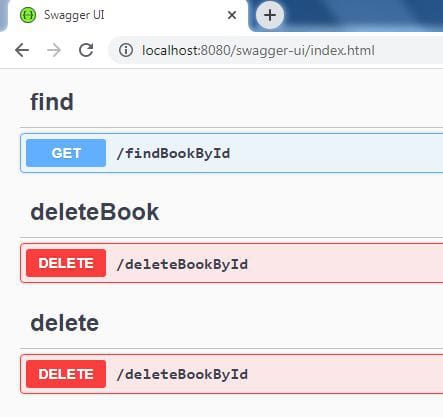
As seen here, the PUT-related tags are listed after the globally preferred tags. Let’s display the other tags to verify that the common_tag_at_method_level is next, which is because it is a PUT-related tag:

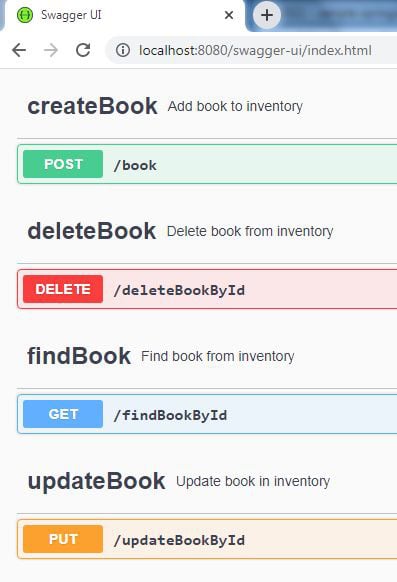
Let’s list the rest of the tags to verify they are ordered as we specified:
Notably, we don’t use any of the properties for ordering tags when we use the @OpenAPIDefinition annotation.
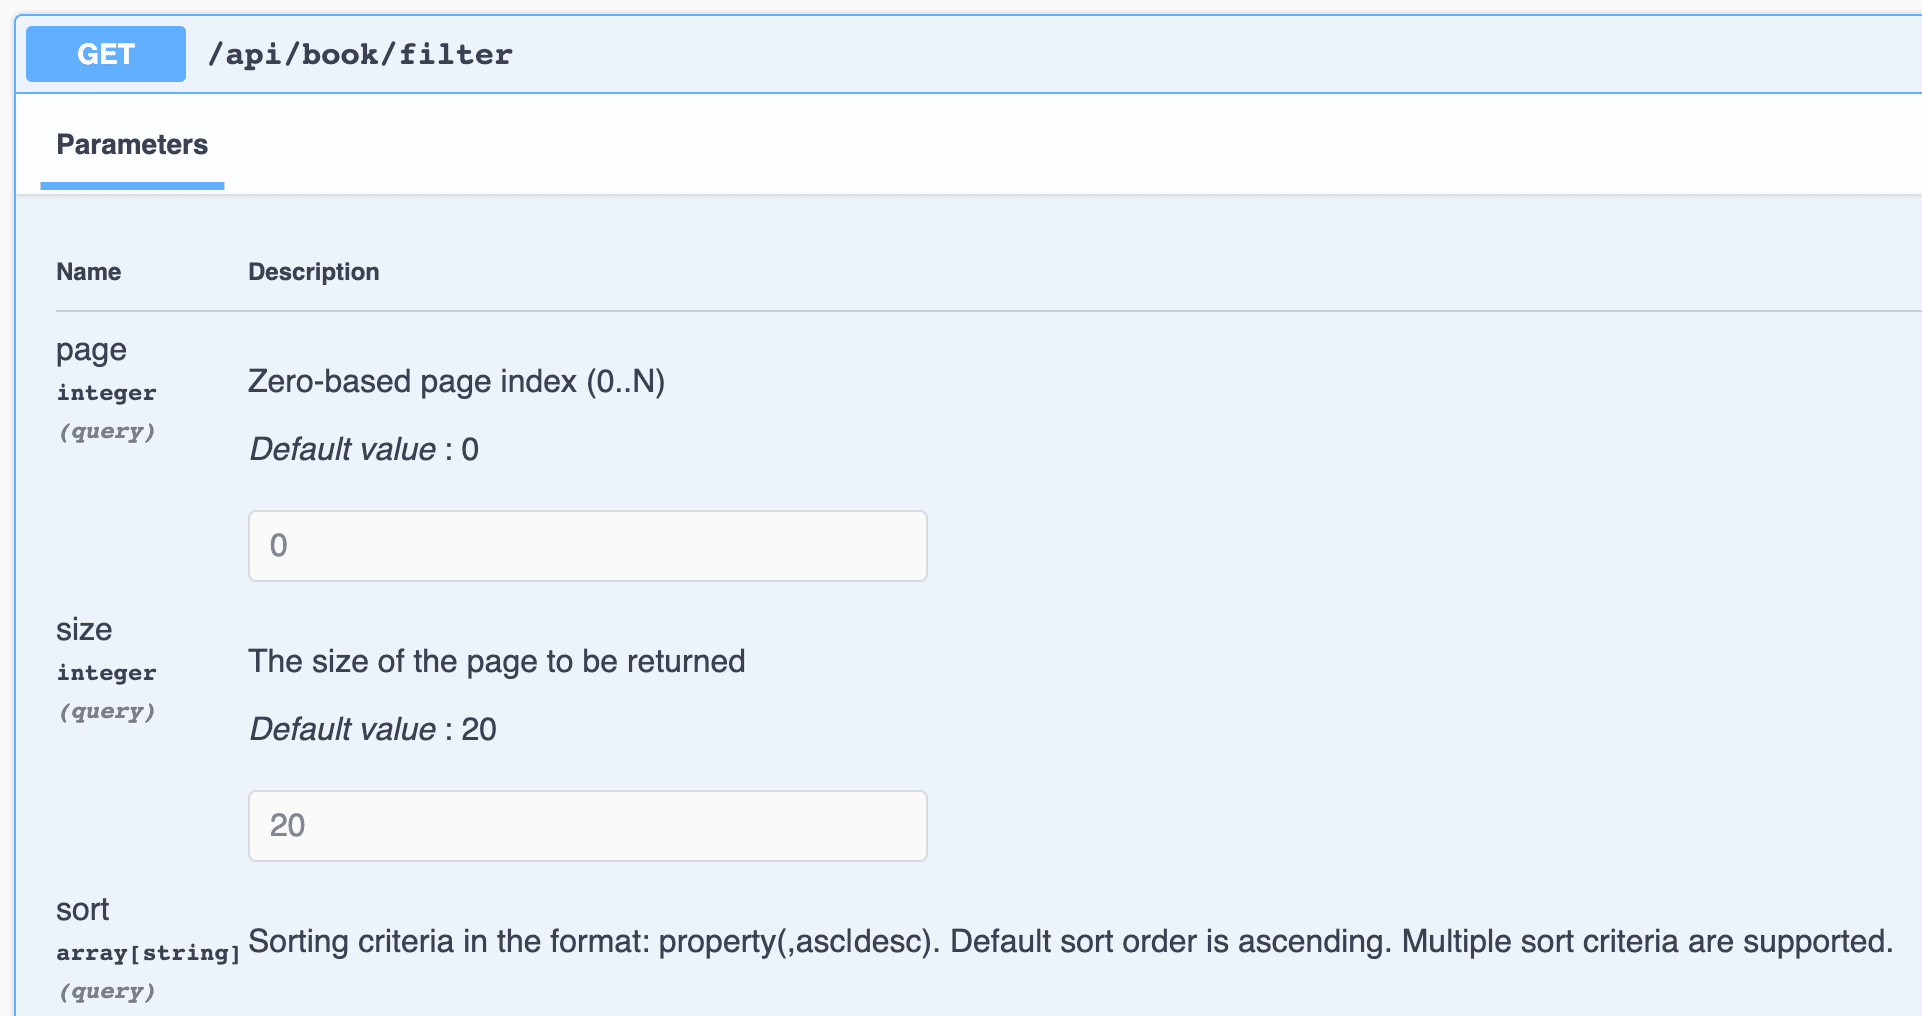
6. 暴露分頁信息
Spring Data JPA 與 Spring MVC 集成非常無縫。 這種集成的一個例子是 Pageable 支持:
@GetMapping("/filter")
public Page<Book> filterBooks(@ParameterObject Pageable pageable) {
     return repository.getBooks(pageable);
}
Pageable 的支持自 springdoc-openapi v1.6.0 版本起就已內置。 page、size 和 sort 查詢參數會被添加到生成的文檔中:
7. 使用 springdoc-openapi
springdoc-openapi 庫提供 Maven 插件 springdoc-openapi-maven-plugin,它生成 OpenAPI 描述文件,格式為 JSON 和 YAML。
springdoc-openapi-maven-plugin 插件與 spring-boot-maven 插件一起工作。 Maven 在 integration-test 階段運行 openapi 插件。
讓我們看看如何在我們的 pom.xml 中配置插件:
<plugin>
    <groupId>org.springframework.boot</groupId>
    <artifactId>spring-boot-maven-plugin</artifactId>
    <version>3.4.3</version>
    <executions>
        <execution>
            <id>pre-integration-test</id>
            <goals>
                <goal>start</goal>
            </goals>
        </execution>
        <execution>
            <id>post-integration-test</id>
            <goals>
                <goal>stop</goal>
            </goals>
        </execution>
    </executions>
</plugin>
<plugin>
    <groupId>org.springdoc</groupId>
    <artifactId>springdoc-openapi-maven-plugin</artifactId>
    <version>1.4</version>
    <executions>
        <execution>
            <phase>integration-test</phase>
            <goals>
                <goal>generate</goal>
            </goals>
        </execution>
    </executions>
</plugin>
我們可以配置插件使用自定義值:
<plugin>
    <executions>
        .........
    </executions>
    <configuration>
        <apiDocsUrl>http://localhost:8080/v3/api-docs</apiDocsUrl>
        <outputFileName>openapi.json</outputFileName>
        <outputDir>${project.build.directory}</outputDir>
    </configuration>
</plugin>
讓我們更詳細地瞭解我們可以在插件中配置的參數:
- apiDocsUrl – API 文檔可訪問的 URL,格式為 JSON,默認值為 http://localhost:8080/v3/api-docs
- outputFileName – 存儲定義的文件的名稱; 默認值為 openapi.json
- outputDir – 存儲文檔的絕對路徑; 默認情況下,它為 ${project.build.directory}
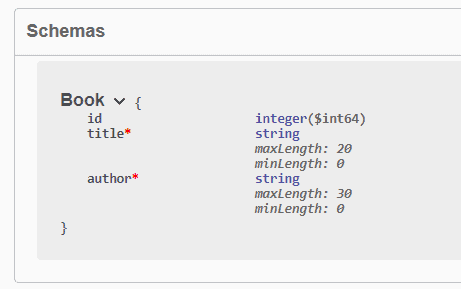
8. 使用 JSR-303 Bean 驗證自動生成文檔當我們的模型包含 JSR-303 Bean 驗證註解,例如 @NotNull, @NotBlank, @Size, @Min 和 @Max 時,springdoc-openapi 庫會利用它們生成對應約束的附加 Schema 文檔。
讓我們通過使用我們的 Book 豆類為例:
public class Book {

    private long id;

    @NotBlank
    @Size(min = 0, max = 20)
    private String title;

    @NotBlank
    @Size(min = 0, max = 30)
    private String author;

}現在,Book 豆類的生成文檔更加具有信息量:
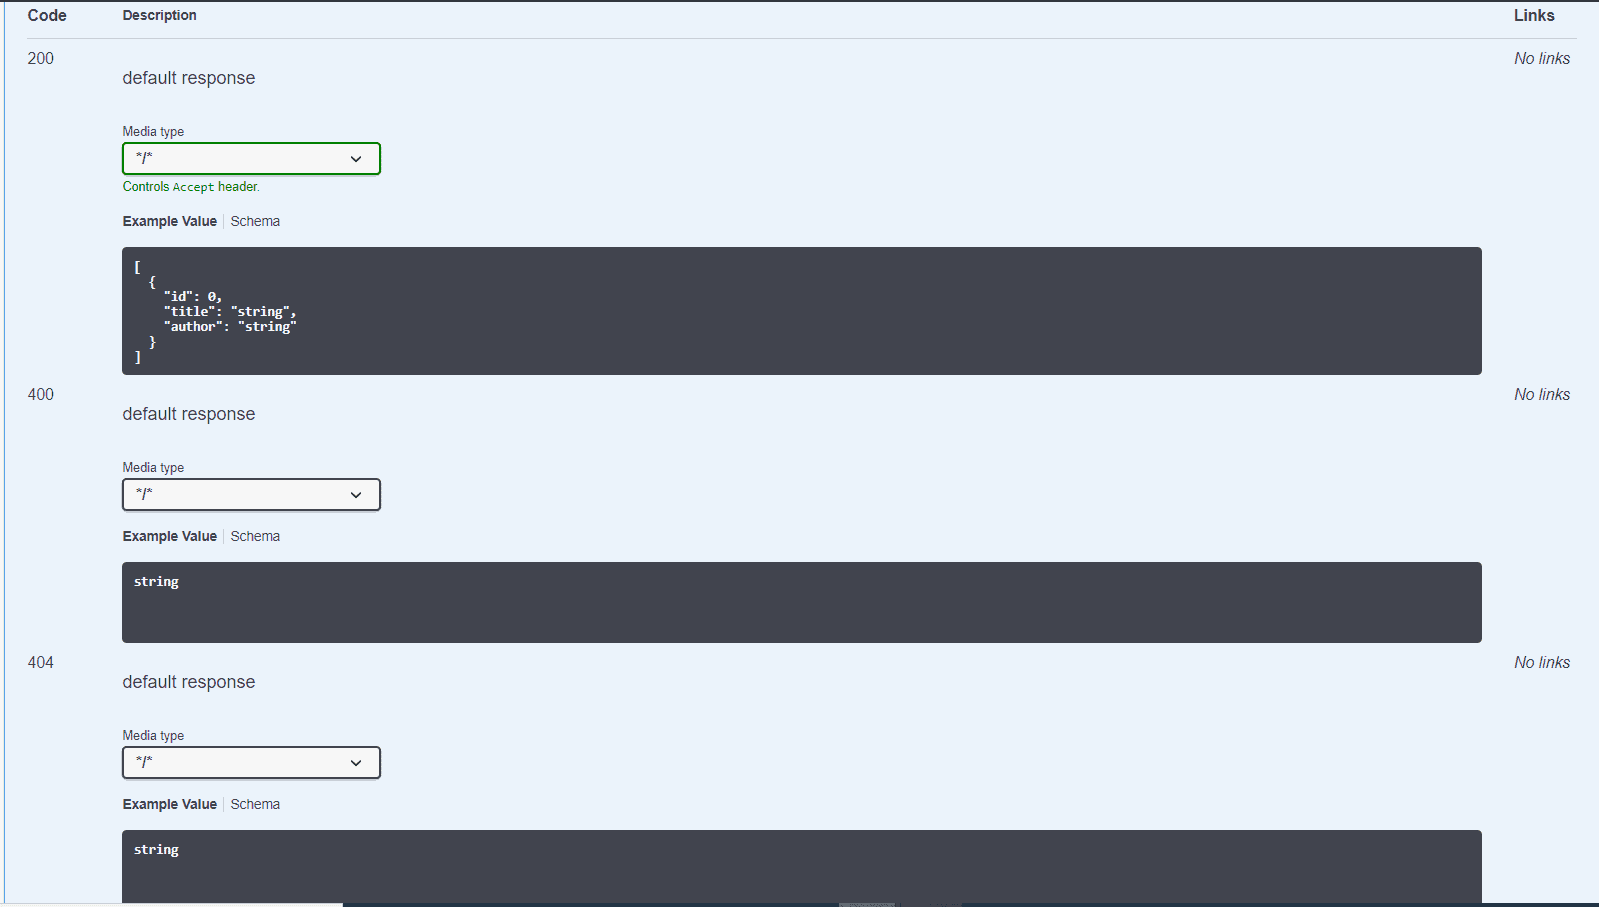
9. 使用 @ControllerAdvice 和 @ResponseStatus 生成文檔
在 @RestControllerAdvice 類的方法上使用 @ResponseStatus 註解,將自動生成響應代碼的文檔。 在該 @RestControllerAdvice 類中,兩個方法都使用了 @ResponseStatus 註解:
@RestControllerAdvice
public class GlobalControllerExceptionHandler {

    @ExceptionHandler(ConversionFailedException.class)
    @ResponseStatus(HttpStatus.BAD_REQUEST)
    public ResponseEntity<String> handleConversion(RuntimeException ex) {
        return new ResponseEntity<>(ex.getMessage(), HttpStatus.BAD_REQUEST);
    }

    @ExceptionHandler(BookNotFoundException.class)
    @ResponseStatus(HttpStatus.NOT_FOUND)
    public ResponseEntity<String> handleBookNotFound(RuntimeException ex) {
        return new ResponseEntity<>(ex.getMessage(), HttpStatus.NOT_FOUND);
    }
}
因此,我們現在可以看到響應代碼 400 和 404 的文檔:
10. 使用 @Operation 和 @ApiResponses 生成文檔
接下來,讓我們看看如何使用 OpenAPI 特定的註解為我們的 API 添加描述。
為此,我們將對控制器的 /api/book/{id} 端點添加 @Operation 和 @ApiResponses 註解:
@Operation(summary = "獲取圖書 ID")
@ApiResponses(value = {
  @ApiResponse(responseCode = "200", description = "找到圖書",
    content = { @Content(mediaType = "application/json",
      schema = @Schema(implementation = Book.class)) }),
  @ApiResponse(responseCode = "400", description = "無效 ID",
    content = @Content),
  @ApiResponse(responseCode = "404", description = "圖書未找到",
    content = @Content) })
@GetMapping("/{id}")
public Book findById(@Parameter(description = "要搜索的圖書 ID")
  @PathVariable long id) {
    return repository.findById(id).orElseThrow(() -> new BookNotFoundException());
}
效果如下:
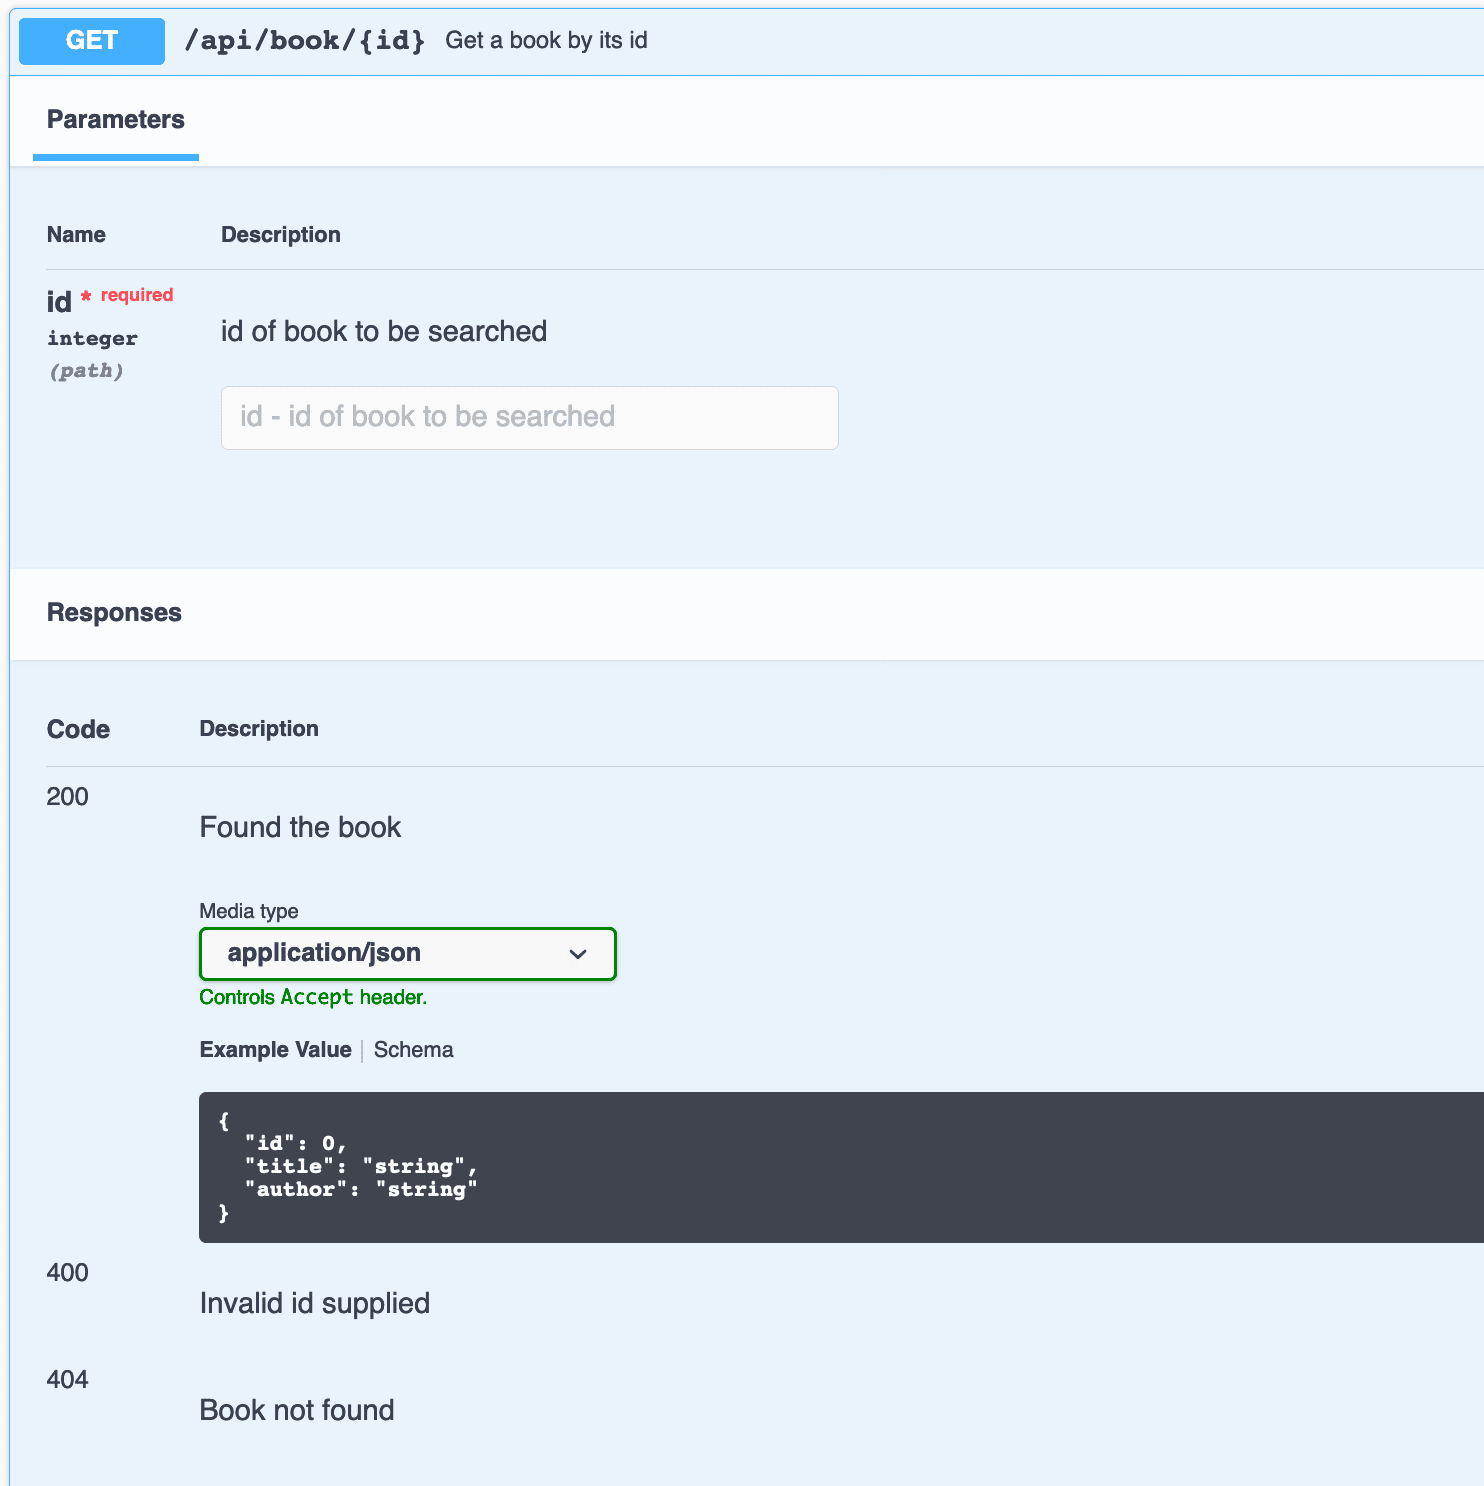
正如我們所看到的,添加到 @Operation 的文本位於 API 操作級別。 類似地,添加到各種 @ApiResponse 元素中的描述也可見於 @ApiResponses 容器註解中,為 API 響應添加了意義。
我們沒有為響應 400 和 404 上面的響應 schema。 因為我們定義了空的 @Content,所以只顯示它們的描述。
11. 描述請求體
當我們定義接受請求體的數據點時,可以使用 OpenAPI 註解中的 @RequestBody 來在 API 文檔中描述預期的體內容。
例如,如果我們將 Book 對象傳遞給我們的 API 以創建或更新書籍,我們可以對請求體進行註釋以進行文檔記錄:
@Operation(summary = "創建新書")
@ApiResponses(value = {
   @ApiResponse(responseCode = "201", description = "書籍創建成功",
    content = { @Content(mediaType = "application/json",
      schema = @Schema(implementation = Book.class)) }),
  @ApiResponse(responseCode = "400", description = "無效輸入") })
@PostMapping("/")
public Book createBook(@io.swagger.v3.oas.annotations.parameters.RequestBody(
    description = "要創建的書", required = true,
    content = @Content(mediaType = "application/json",
      schema = @Schema(implementation = Book.class),
      examples = @ExampleObject(value = "{ \"title\": \"New Book\", \"author\": \"Author Name\" }")))
    @RequestBody Book book) {
    return repository.save(book);
}
這種設置提供了對請求體的詳細文檔記錄,包括示例和模式驗證,並允許 API 消費者更好地理解他們需要發送的數據。 此外,我們注意到在代碼中使用了兩個 @RequestBody 註解:
- Spring 的 @RequestBody:這是為了讓端點在 Spring Boot 應用程序中運行所必需的,因為它將 HTTP 請求體綁定到方法參數上
- OpenAPI 的 @RequestBody:這在 OpenAPI 定義中記錄了請求體,為 API 消費者提供了詳細描述、模式驗證和示例
最後,讓我們看一下這個請求的生成文檔:
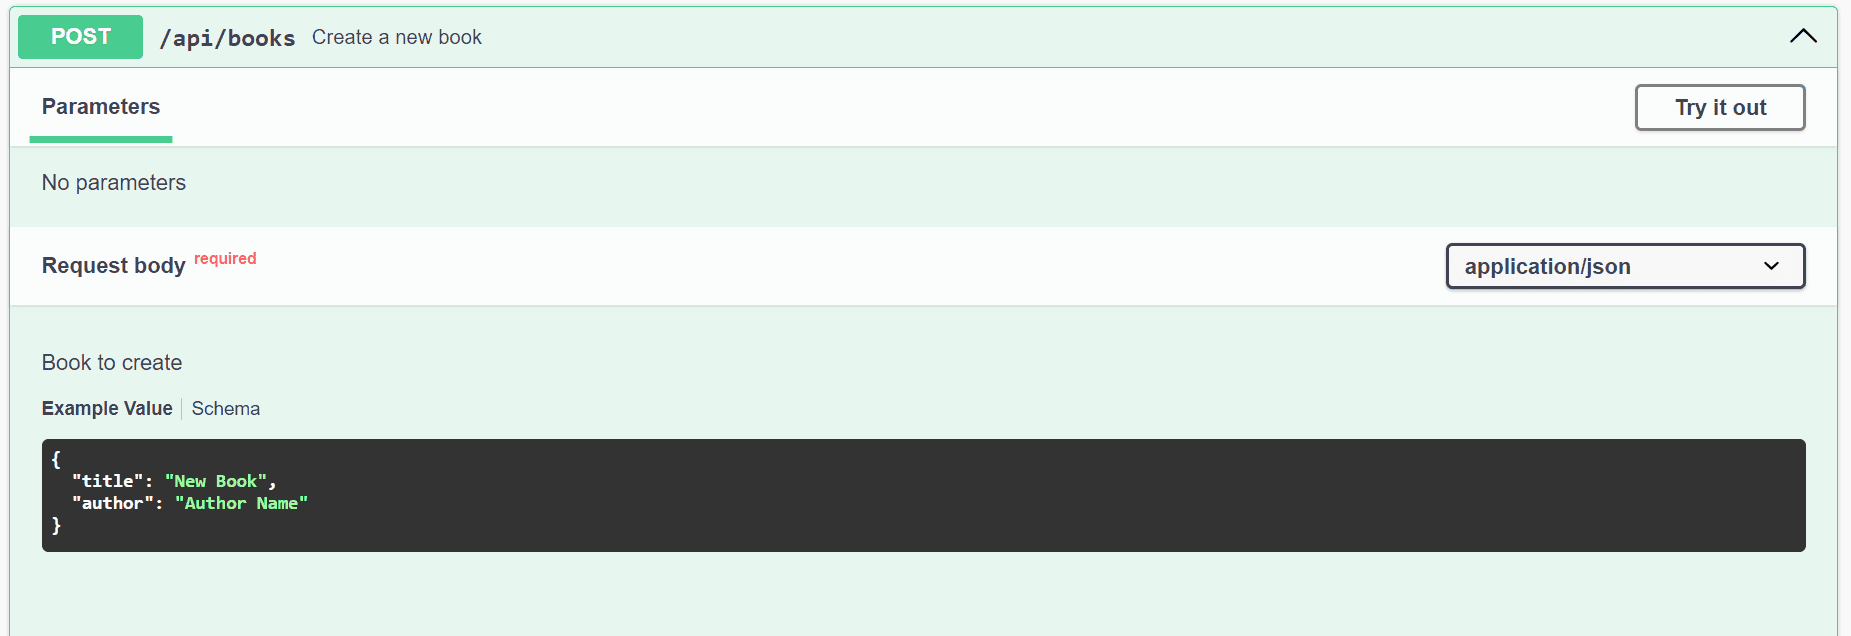
我們可以看到,註解中的具體信息會出現在文檔中,例如描述、示例對象和其他元數據,這些元數據都放置在 OpenAPI @RequestBody 註解中。
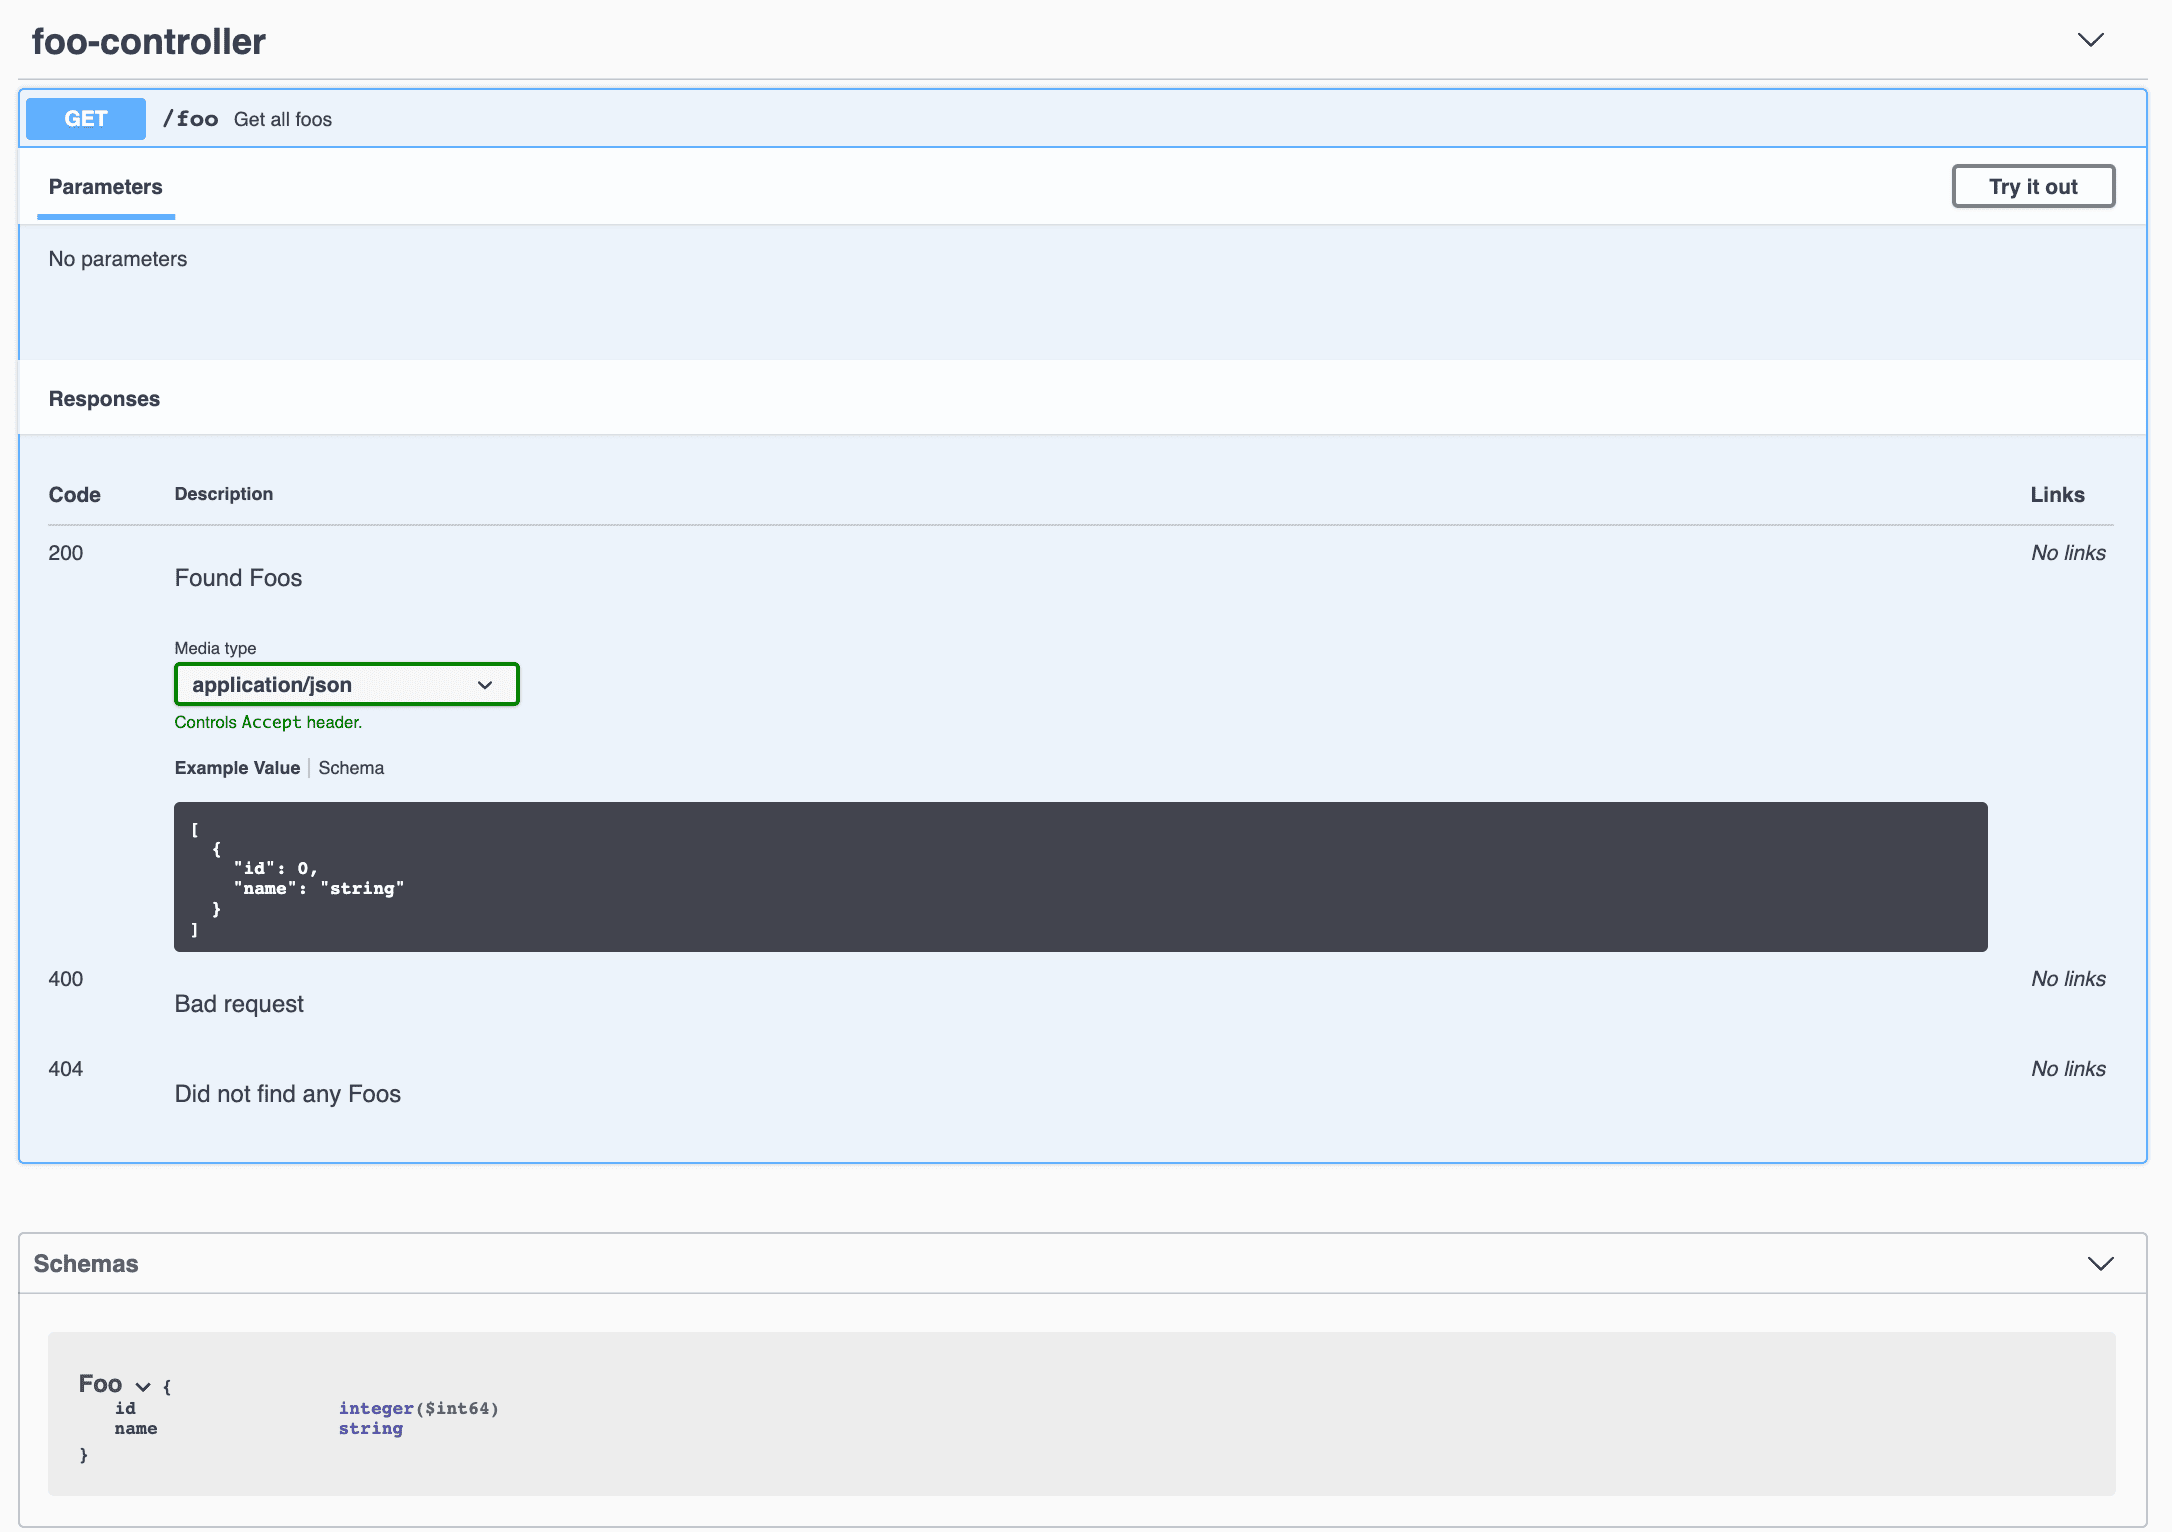
12. Kotlin 支持
Spring Boot 2.x 對 Kotlin 提供一等支持。由於我們正在使用 Spring Boot 3.x 的版本,SpringDoc 支持使用 Kotlin 編寫的應用程序
我們將創建一個簡單的 Foo API 在 Kotlin 中,以展示其效果。
在初始設置之後,我們將添加一個數據類和一個控制器。我們將把它們放在 Boot App 的子包中,以便在運行時,它能夠拾取 FooController 以及較早的 BookController:
@Entity
data class Foo(
@Id
val id: Long = 0,
@NotBlank
@Size(min = 0, max = 50)
val name: String = ""
)
@RestController
@RequestMapping("/")
class FooController() {
val fooList: List = listOf(Foo(1, "one"), Foo(2, "two"))
@Operation(summary = "Get all foos")
@ApiResponses(value = [
ApiResponse(responseCode = "200", description = "Found Foos", content = [
(Content(mediaType = "application/json", array = (
ArraySchema(schema = Schema(implementation = Foo::class)))))]),
ApiResponse(responseCode = "400", description = "Bad request", content = [Content()]),
ApiResponse(responseCode = "404", description = "Did not find any Foos", content = [Content()])]
)
@GetMapping("/foo")
fun getAllFoos(): List = fooList
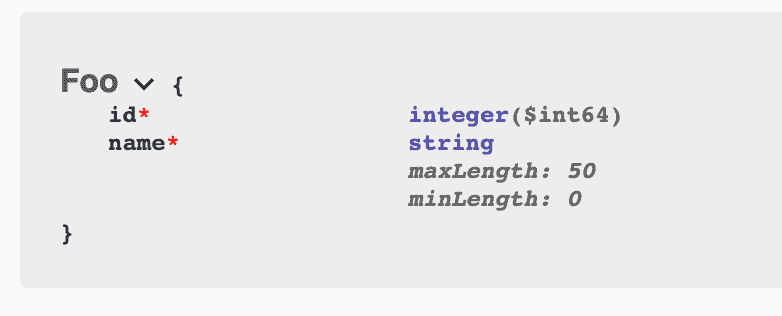
}現在,當我們訪問我們的 API 文檔 URL 時,我們會看到 Foo API:
為了增強 Kotlin 類型支持,我們可以添加此依賴項:
<dependency>
    <groupId>org.springdoc</groupId>
    <artifactId>springdoc-openapi-starter-common</artifactId
    <version>2.8.5</version>
</dependency>
之後,我們的 Foo 模式將更加信息豐富,因為它在添加 JSR-303 Bean Validation 時是這樣的:
13. 結論
在本文中,我們學習瞭如何將 springdoc-openapi 設置到我們的項目中。然後,我們看到了如何將 springdoc-openapi 與 Swagger UI 集成。最後,我們還看到了如何將其應用於 Spring Webflux 項目。
接下來,我們使用 springdoc-openapi Maven 插件為我們的 API 生成 OpenAPI 定義,並看到了如何從 Spring Data 中暴露分頁和排序信息。之後,我們研究了 springdoc-openapi 如何使用 JSR 303 bean 驗證註解和 @ResponseStatus 註解在 @ControllerAdvice 類中自動生成文檔。
我們還學習瞭如何使用 OpenAPI 專用的註解為我們的 API 添加描述。最後,我們對 OpenAPI 的 Kotlin 支持進行了瞭解。
springdoc-openapi 根據 OpenAPI 3 規範生成 API 文檔。 此外,它還為我們處理了 Swagger UI 配置,使 API 文檔生成成為一項相對簡單的任務。
