1. 概述
在本教程中,我們將探討如何將數組作為 x-www-form-urlencoded 數據發送到 Postman。
W3C 委員會 定義了多種我們可以用於在網絡層發送數據的格式,包括 form-data、raw 和 x-www-form-urlencoded 數據。 默認情況下,我們使用後者格式發送數據。
2. x-www-form-urlencoded
Listed format describes form data sent as one block in the HTTP message body. It sends an encoded form data set for submission to the server. The encoded data has the format of key-value pairs. The server must support the content type.
Forms submitted using this content type match the following encoding pattern:
- The control names and the values are escaped.
- The ‘,’ symbol will separate multiple values.
- The ‘+’ symbol will replace all space characters.
- Reserved characters should follow the RFC 17.38 notations.
- All non-alphanumeric characters are encoded using percent-encoding.
- The key is separated from the value with the equal symbol (‘=’), and key-value pairs are separated from each other with an ampersand (‘&’).
In addition, the length of the data is not specified. However, using the x-www-form-urlencoded data type has a data limit. Therefore, the media server will reject requests that exceeded the size specified inside the configuration.
Moreover, it became inefficient when sending binary data or values containing non-alphanumeric characters. Keys and values containing non-alphanumeric characters are percent-encoded (also known as URL encoding), so this type is not suitable for binary data. Therefore, we should consider using the form-data content type instead.
Furthermore, we cannot use it for encoding files. It can only encode the URL parameters or the data inside the request body.
3. Sending an Array
To use the x-www-form-urlencoded type in Postman, we need to select the radio button with the same name within the request’s body tab.
As already mentioned, the request consists of the key-value pairs. Postman will encode the data before sending it to the server. Additionally, it will encode both the key and the value.
Now, let’s see how to send an array in Postman.
3.1. Sending Simple Array Object
We’ll start by showing how to send a simple array object that contains simple object types, for instance, String elements.
First, let’s create a StudentSimple class that will have an array as an instance variable:
class StudentSimple {
   private String firstName;
   private String lastName;
   private String[] courses;

   // getters and setters
}
Second, we’ll define a controller class that will expose the REST endpoint:
@PostMapping(
  path = "/simple",
  consumes = {MediaType.APPLICATION_FORM_URLENCODED_VALUE})
public ResponseEntity<StudentSimple> createStudentSimple(StudentSimple student) {
    return ResponseEntity.ok(student);
}
When we use the consume attribute, we need to define x-www-form-urlencoded as a media type that the controller will accept from a client. Otherwise, we’ll get the 415 Unsupported Media Type error. Additionally, we need to omit the @RequestBody annotation since the annotation does not support the x-www-form-urlencoded content type.
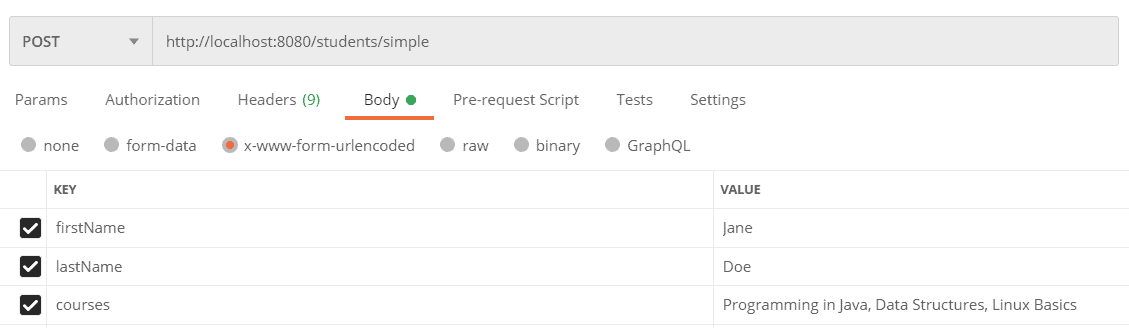
Finally, let’s create a request in Postman. The simplest way is to separate values using the comma symbol (‘,’):
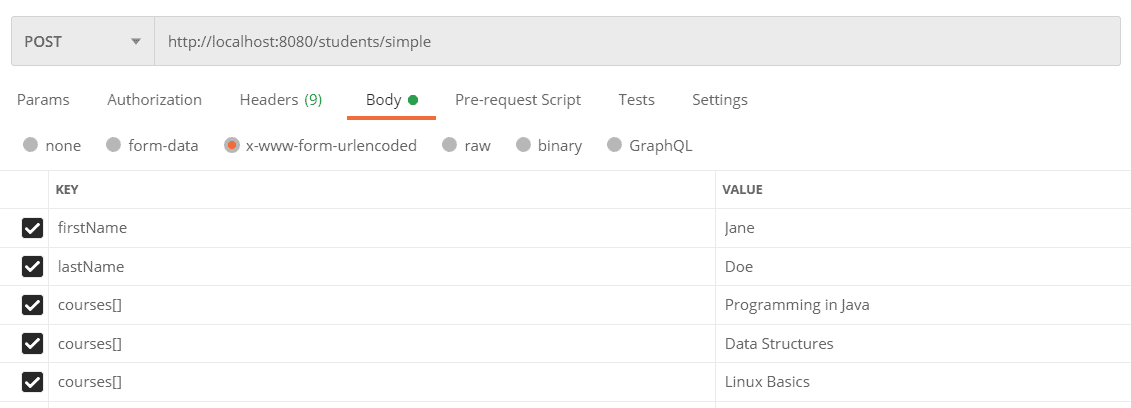
However, this approach may cause a problem if the value contains the comma symbol itself. We can resolve the problem by setting each value separately. To set elements to the courses array, we need to provide the key-value pairs using the same key:
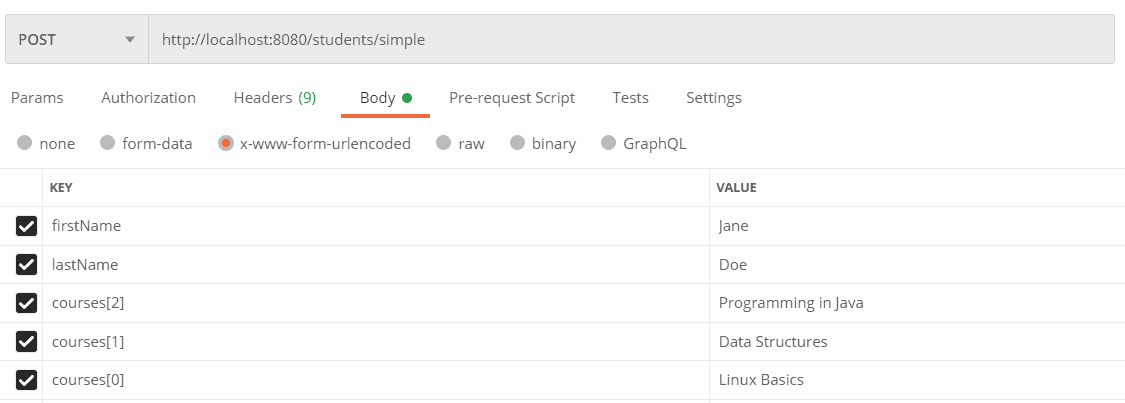
The order of the elements in an array will follow the order provided in the request.
Additionally, the square brackets are optional. On the other hand, if we want to add an element to the specific index in the array, we can achieve this by specifying the index in the square brackets:
We can test our application using the cURL request:
curl -X POST \
  http://localhost:8080/students/simple \
  -H 'Content-Type: application/x-www-form-urlencoded' \
  -d 'firstName=Jane&lastName=Doe&
        courses[2]=Programming+in+Java&
        courses[1]=Data+Structures&
        courses[0]=Linux+Basics'
3.2. Sending Complex Array Object
Now, let’s take a look at the way of sending an array containing complex objects.
First, let’s define the Course class that will represent a single course:
class Course {

    private String name;
    private int hours;

    // getters and setters
}
Next, we’ll create a class that will represent a student:
class StudentComplex {

    private String firstName;
    private String lastName;
    private Course[] courses;

    // getters and setters
}
Let’s add a new endpoint inside the controller class:
@PostMapping(
  path = "/complex",
  consumes = {MediaType.APPLICATION_FORM_URLENCODED_VALUE})
public ResponseEntity<StudentComplex> createStudentComplex(StudentComplex student) {
    return ResponseEntity.ok(student);
}
Finally, let’s create a request in Postman. As well as in the previous example, to add elements to the array, we need to provide the key-value pairs using the same key:
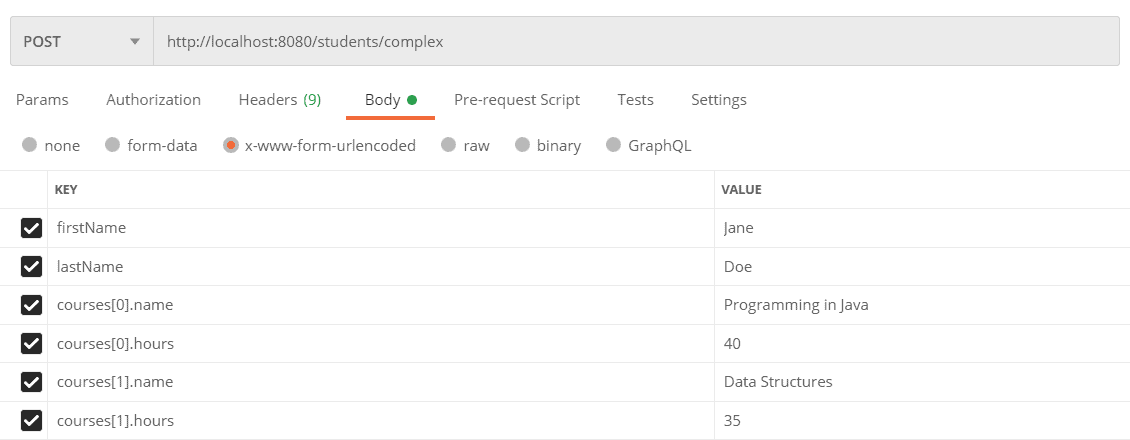
Here, the square brackets with indexes are mandatory. To set the value to each instance variable, we need to use the dot (‘.’) operator followed by the name of the variable.
Again, we can test the endpoint using the cURL request:
curl -X POST \
  http://localhost:8080/students/complex \
  -H 'Content-Type: application/x-www-form-urlencoded' \
  -d 'firstName=Jane&lastName=Doe&
        courses[0].name=Programming+in+Java&
        courses[0].hours=40&
        courses[1].name=Data+Structures&
        courses[1].hours=35'
4. 結論
在本文中,我們學習瞭如何正確地在服務器端設置 Content-Type 以避免 Unsupported Media Type 錯誤。 此外,我們還解釋瞭如何使用 x-www-form-urlencoded 內容類型在 Postman 中發送簡單和複雜數組。
