1. 簡介
在本教程中,我們將使用 Spring Boot 創建一個 Telegram Bot。
Telegram Bot 是一種在 Telegram 消息傳遞平台上運行的自動化程序。 它利用 Telegram Bot API 與用户交互並執行各種任務。 我們將使用 Java 庫,而不是直接與 API 交互。 Bot 幫助我們響應用户命令、提供信息並執行自動化操作。
我們將首先設置一個新的 Bot,然後介紹如何使用 Java 庫來實現簡單的操作。
2. 創建 Telegram 機器人
首先,我們需要在 Telegram 平台上創建一個新的機器人。我們直接使用 Telegram 消息應用程序,並在搜索欄中搜索 BotFather。打開 BotFather 後,我們輸入 /newbot 命令來創建機器人並按照 BotFather 的指示操作。它會要求我們指定機器人的用户名,該用户名必須以 bot 結尾,以符合 Telegram 的政策:
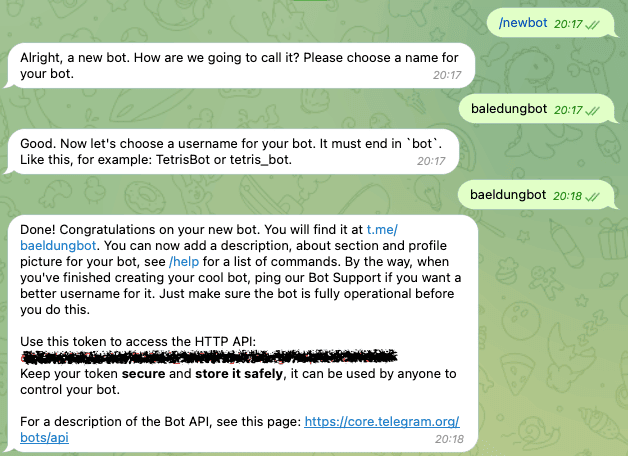
上方,BotFather 生成了一個令牌,我們需要將其安全地保存起來,稍後用於配置我們的應用程序。
3. 設置應用程序
首先,我們需要一個 Spring Boot 項目,以便集成 Telegram Bot。 我們將修改 pom.xml 文件,幷包含 telegrambots-spring-boot-starter 和 telegrambots-abilities 庫:
<dependency>
    <groupId>org.telegram</groupId>
    <artifactId>telegrambots-spring-boot-starter</artifactId>
    <version>6.7.0</version>
</dependency>
<dependency>
    <groupId>org.telegram</groupId>
    <artifactId>telegrambots-abilities</artifactId>
    <version>6.7.0</version>
</dependency>在幕後,AbilityBot 使用 Webhooks 與 Telegram 的 API 進行通信,但您無需擔心這些細節。事實上,該庫實現了 Telegram Bot API 提供的所有接口。Telegram Bot API。
現在,我們可以實現我們的 Bot。
4. 解釋 PizzaBot
我們將實現一個簡單的機器人,模擬一家披薩店,以演示如何使用該庫與 Spring Boot 結合使用。 此外,我們還將預定義一系列與機器人交互的流程:
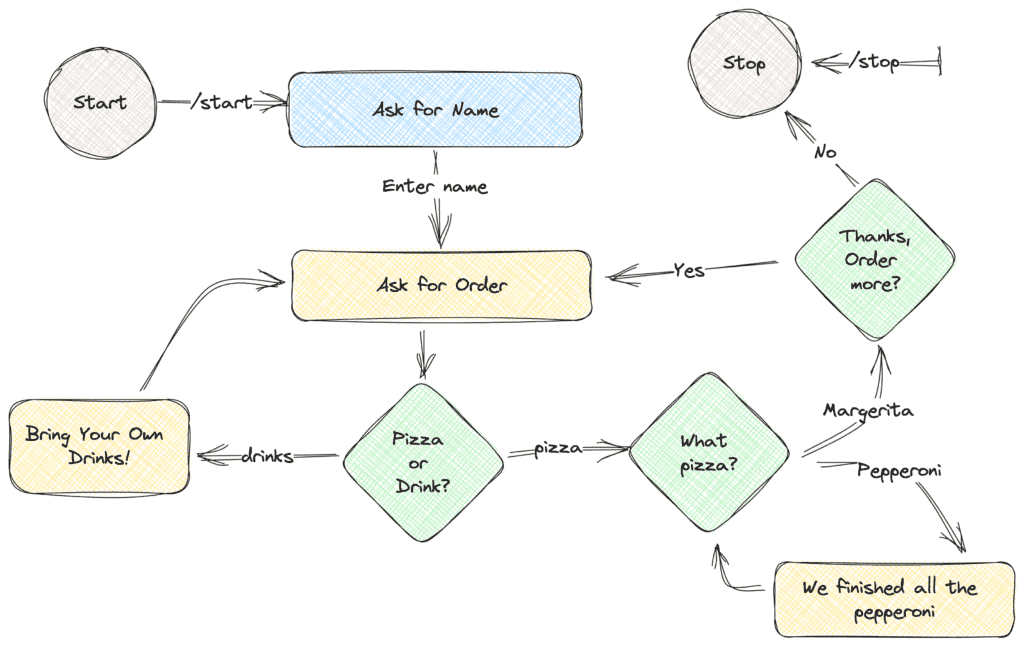
簡而言之,我們首先會要求用户輸入他們的姓名。 然後,我們會提示用户選擇披薩或飲料。 在飲料選項中,我們會顯示一條消息表示我們不銷售飲料。 否則,我們會要求他們選擇披薩的配料。 選擇配料後,我們會確認用户是否想要再次訂購。 如果用户想要再次訂購,我們會重複這個流程。 否則,我們會感謝他們並使用結束消息結束聊天。
5. 配置並註冊 PizzaBot
讓我們首先為我們的 PizzaShop 配置一個 AbilityBot:
@Component
public class PizzaBot extends AbilityBot {
    private final ResponseHandler responseHandler;
    @Autowired
    public PizzaBot(Environment env) {
        super(env.getProperty("botToken"), "baeldungbot");
        responseHandler = new ResponseHandler(silent, db);
    }
    @Override
    public long creatorId() {
        return 1L;
    }
}
我們讀取 botToken 屬性,該屬性作為構造函數中的環境變量注入。 我們必須確保令牌的安全,不要將其推入代碼庫。 在本示例中,我們將其導出到我們的環境之前。 另一種方法是在屬性文件中定義它。 此外,我們必須提供一個唯一的 creatorId,它描述我們的機器人。
我們還擴展了 AbilityBot 類,從而減少了樣板代碼,並提供了常用的工具,如狀態機通過 ReplyFlow。 但是,我們只會使用嵌入式數據庫並在 ResponseHandler 中顯式管理狀態:
public class ResponseHandler {
    private final SilentSender sender;
    private final Map<Long, UserState> chatStates;

    public ResponseHandler(SilentSender sender, DBContext db) {
        this.sender = sender;
        chatStates = db.getMap(Constants.CHAT_STATES);
    }

}
5.1. Spring Boot 3 兼容性問題
在使用 Spring Boot 3 版本時,該庫不會自動配置機器人,當它被聲明為 <em >@Component</em> 時。因此,我們必須在主應用程序類中手動初始化它:
TelegramBotsApi botsApi = new TelegramBotsApi(DefaultBotSession.class);
botsApi.registerBot(ctx.getBean("pizzaBot", TelegramLongPollingBot.class));
我們創建一個新的 TelegramBotsApi 實例,然後將 pizzaBot 組件實例從 Spring Application 應用程序上下文中提供。
6. 實現 PizzaBot
Telegram API 功能強大,但使用起來可能會變得重複,尤其是在實現新的命令時。因此,我們使用能力(abilities)來簡化開發新功能的流程。在設計交互流程時,我們應該考慮最終用户、必要條件以及執行過程。
在我們的 PizzaBot 中,我們將僅使用一個能力 start</em/> 來啓動與 bot 的對話。
public Ability startBot() {
    return Ability
      .builder()
      .name("start")
      .info(Constants.START_DESCRIPTION)
      .locality(USER)
      .privacy(PUBLIC)
      .action(ctx -> responseHandler.replyToStart(ctx.chatId()))
      .build();
}
我們使用構建器模式來構建 Ability。首先,我們定義 Ability 的名稱,該名稱與 Ability 的命令相同。其次,我們提供此新 Ability 的描述字符串,這將有助於我們在運行 /commands 命令時獲取我們的機器人 Ability。第三,我們定義機器人的 locality 和 privacy。最後,我們定義在收到命令時必須採取的行動。對於此示例,我們將聊天 ID 轉發到 ResponseHandler 類。按照圖表的設計,我們將要求用户的姓名並將其保存到映射中,初始狀態為:
public void replyToStart(long chatId) {
    SendMessage message = new SendMessage();
    message.setChatId(chatId);
    message.setText(START_TEXT);
    sender.execute(message);
    chatStates.put(chatId, AWAITING_NAME);
}
在本方法中,我們創建了一個 SendMessage 命令並使用 sender 執行它。然後,我們將聊天狀態設置為 AWAITING_NAME,,表示我們正在等待用户姓名。
private void replyToName(long chatId, Message message) {
    promptWithKeyboardForState(chatId, "Hello " + message.getText() + ". What would you like to have?",
      KeyboardFactory.getPizzaOrDrinkKeyboard(),
      UserState.FOOD_DRINK_SELECTION);
}
在用户輸入姓名後,我們發送一個 ReplyKeyboardMarkup,提示用户兩個選項:
public static ReplyKeyboard getPizzaToppingsKeyboard() {
    KeyboardRow row = new KeyboardRow();
    row.add("Margherita");
    row.add("Pepperoni");
    return new ReplyKeyboardMarkup(List.of(row));
}
這將隱藏鍵盤並向用户顯示一個帶有兩個按鈕的界面:
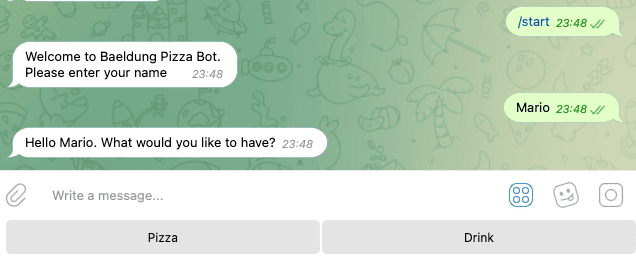
對於圖表中所有綠色菱形元素,我們遵循類似的過程。因此,我們不會在此處重複它。相反,讓我們專注於處理按鈕的響應。
7. 處理用户回覆
對於所有傳入的消息和當前的聊天狀態,我們會在我們的 PizzaBot 類內部以不同的方式處理回覆:
public Reply replyToButtons() {
    BiConsumer<BaseAbilityBot, Update> action = (abilityBot, upd) -> responseHandler.replyToButtons(getChatId(upd), upd.getMessage());
    return Reply.of(action, Flag.TEXT,upd -> responseHandler.userIsActive(getChatId(upd)));
}`.replyToButtons() 獲取所有TEXT類型的回覆,並將它們轉發到ResponseHandler,同時包含chatId和傳入的Message對象。然後,在ResponseHandler內部,.replyToButtons()方法決定如何處理消息:
public void replyToButtons(long chatId, Message message) {
    if (message.getText().equalsIgnoreCase("/stop")) {
        stopChat(chatId);
    }

    switch (chatStates.get(chatId)) {
        case AWAITING_NAME -> replyToName(chatId, message);
        case FOOD_DRINK_SELECTION -> replyToFoodDrinkSelection(chatId, message);
        case PIZZA_TOPPINGS -> replyToPizzaToppings(chatId, message);
        case AWAITING_CONFIRMATION -> replyToOrder(chatId, message);
        default -> unexpectedMessage(chatId);
    }
}在<em >switch</em >>內部,我們檢查當前聊天狀態並相應地回覆用户。例如,當用户的當前狀態為<em >FOOD_DRINK_SELECTION</em >>時,我們處理響應並當用户點擊選項<em >pizza</em >>時,移動到下一個狀態:
private void replyToFoodDrinkSelection(long chatId, Message message) {
    SendMessage sendMessage = new SendMessage();
    sendMessage.setChatId(chatId);
    if ("drink".equalsIgnoreCase(message.getText())) {
        sendMessage.setText("We don't sell drinks.\nBring your own drink!! :)");
        sendMessage.setReplyMarkup(KeyboardFactory.getPizzaOrDrinkKeyboard());
        sender.execute(sendMessage);
    } else if ("pizza".equalsIgnoreCase(message.getText())) {
        sendMessage.setText("We love Pizza in here.\nSelect the toppings!");
        sendMessage.setReplyMarkup(KeyboardFactory.getPizzaToppingsKeyboard());
        sender.execute(sendMessage);
        chatStates.put(chatId, UserState.PIZZA_TOPPINGS);
    } else {
        sendMessage.setText("We don't sell " + message.getText() + ". Please select from the options below.");
        sendMessage.setReplyMarkup(KeyboardFactory.getPizzaOrDrinkKeyboard());
        sender.execute(sendMessage);
    }
}
此外,在 <em>replyToButtons()</em> 中,我們立即檢查用户是否發送了 <em>/stop</em> 命令。如果是,則停止聊天並從 <em>chatStates</em> 地圖中移除 <em>chatId</em>:
private void stopChat(long chatId) {
    SendMessage sendMessage = new SendMessage();
    sendMessage.setChatId(chatId);
    sendMessage.setText("Thank you for your order. See you soon!\nPress /start to order again");
    chatStates.remove(chatId);
    sendMessage.setReplyMarkup(new ReplyKeyboardRemove(true));
    sender.execute(sendMessage);
}
此操作會從數據庫中移除用户的狀態。若要再次交互,用户必須輸入 /start 命令。
8. 結論
在本教程中,我們討論了使用 Spring Boot 實現 Telegram 機器人的方法。
首先,我們使用 BotFather 在 Telegram 平台上創建了一個新的機器人。其次,我們設置了我們的 Spring Boot 項目,並解釋了 PizzaBot 的功能以及它如何與用户交互。然後,我們使用能力簡化了 PizzaBot 的開發,並實現了 PizzaBot。最後,我們處理了來自用户的回覆,並根據聊天狀態提供了適當的響應。
