1. 概述
在本教程中,我們將使用 Spring Cloud Gateway 和 spring-addons 實現前端(BFF)模式中的 OAuth2 後端,以從三個不同的單頁應用程序(Angular、React 和 Vue)消費無狀態 REST API。
使用調試工具進行檢查時,我們不會在任何使用 OAuth2 的知名網站上找到 Bearer 令牌(Google、Facebook、Github 或 LinkedIn)。原因是什麼呢?
根據安全專家 的觀點,即使使用 PKCE,也不應將在用户設備上運行的應用程序配置為“公共” OAuth2 客户端。推薦的替代方案是使用我們信任的 BFF(後端前端)對移動應用程序和 Web 應用程序進行會話授權。
我們將看到單頁應用程序(SPA)如何通過 OAuth2 BFF 輕鬆地消費 REST API。我們還將瞭解到現有的資源服務器(使用 Bearer 訪問令牌進行授權的無狀態 REST API)不需要進行任何修改。
2. OAuth2 後端對前端模式
在深入研究實現之前,讓我們探討一下 OAuth2 BFF 是什麼,它帶來什麼,以及它的代價是什麼。
2.1. 定義
對於前端和 REST API 之間的中間層,後端對前端(BFF)是一種用途不同的中間層。在這裏,我們對 OAuth2 BFF 感興趣,它 在請求授權時使用會話 Cookie(與前端)和使用 Bearer 令牌(作為資源服務器所期望的方式)之間建立橋樑。它的職責是:
- 使用“受信任的”OAuth2客户端驅動授權碼和刷新令牌流程
- 維護會話並將其中的令牌存儲在其中
- 在將請求從前端轉發到資源服務器之前,用訪問令牌替換會話 Cookie
2.2. 與公共 OAuth2 客户端相比的優勢
主要增值是安全性:
- 在 BFF 運行在可信服務器上,授權服務器令牌端點可以使用密鑰和防火牆規則來僅允許來自我們後端的請求。這極大地降低了令牌被惡意客户端頒發造成的風險。
- 令牌存儲在服務器上(在會話中),從而防止惡意程序在用户設備上竊取它們。使用會話 Cookie 需要與 CSRF 進行保護,但可以使用 HttpOnly、Secure 和 SameSite 屬性標記 Cookie,在這種情況下,瀏覽器本身會強制執行設備上的 Cookie 保護。與作為公共客户端配置的 SPA 相比,我們必須非常小心地處理這些令牌。如果惡意程序能夠讀取訪問令牌,後果將對用户來説不堪設想。刷新令牌的情況更糟,因為身份欺騙可以持續很長時間。
另一個好處是它能完全控制用户會話並立即撤銷訪問權限。請記住,JSON Web Tokens (JWT) 不能被無效化,我們幾乎無法在終止服務器會話時刪除存儲在用户設備上的令牌。如果我們通過網絡將 JWT 訪問令牌發送出去,我們所能做的就是等待它過期,直到資源服務器繼續授權,直到那時。但是,如果令牌永遠不會離開後端,那麼我們可以與 BFF 中的用户會話一起刪除它們,從而立即撤銷對資源的訪問。
2.3. 成本
BFF 是一種系統中的額外層,並且是關鍵路徑。在生產環境中,這意味着需要更多的資源和更多的延遲。它還需要一些監控。
此外,在 BFF 的後面運行的資源服務器可以(並且應該)是無狀態的,但 OAuth2 BFF 本身需要會話,這需要採取特定措施來實現可擴展性和容錯性。
我們可以輕鬆地將 Spring Cloud Gateway 打包成原生鏡像。這使得它超輕量級且可啓動,只需幾分之一秒,但單個實例可以吸收的流量總是有極限的。 當流量增加時,我們需要在 BFF 實例之間共享會話。Spring Session 將對我們大有幫助。另一種選擇是使用智能代理來將所有請求從同一設備路由到同一 BFF 實例。
2.4. 實現的選擇
某些框架在沒有明確説明或調用它時,就實現了 OAuth2 BFF 模式。這種情況發生在 NextAuth 庫中,該庫使用服務器組件來實現 OAuth2(在服務器上的節點實例中運行一個受信任的客户端)。這已經足夠來從 OAuth2 BFF 模式中受益。
但是,由於 Spring 生態系統,像 Spring Cloud Gateway 這樣具有監控、可擴展性和容錯性等優勢的解決方案非常方便:
- spring-boot-starter-actuator 依賴項提供強大的審計功能。
- Spring Session 是用於分佈式會話的簡單解決方案。
- spring-boot-starter-oauth2-client 和 oauth2Login() 處理授權碼和刷新令牌流程。它還會在會話中存儲令牌。
- TokenRelay= 過濾器在將請求從前端轉發到資源服務器時,會用訪問令牌替換會話 Cookie。
3. 架構
此前,我們列出了許多服務:前端(SPA)、REST API、BFF 和授權服務器。讓我們看看這些如何構成一個連貫的系統。
3.1. 系統概述
以下是對服務、端口和路徑前綴的表示,我們將使用主配置文件:
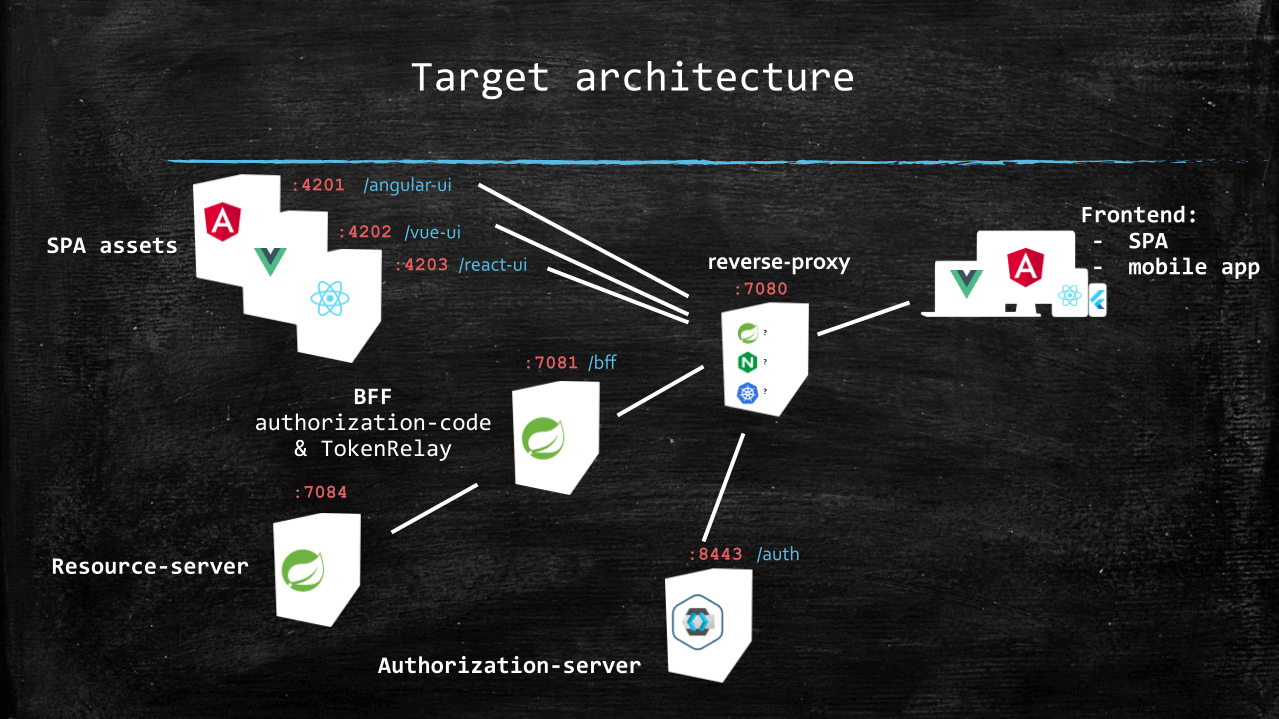
從該模式中可以看出以下兩點很重要:
- 從終端用户的設備角度來看,BFF 和 SPA 資產的唯一接觸點是反向代理。
- 資源服務器通過 BFF 訪問。
正如我們稍後所看到的那樣,通過反向代理提供授權服務器是可選的。
在轉向生產環境時,我們可以使用(子)域名而不是路徑前綴,以區分 SPA。
3.2. 快速上手
配套倉庫包含用於構建和啓動上述每個服務的 Docker 鏡像的構建腳本。
要使一切正常運行,我們應該確保:
- JDK 位於 17 到 21 之間,可以使用 java –version 檢查此項。
- Docker Desktop 已安裝並正在運行。
- 最新 LTS Node 版本位於路徑中 (nvm 或 nvm-windows 在此方面非常有幫助)。
然後我們可以運行以下 shell 腳本(在 Windows 上,我們可能使用 Git bash):
git clone https://github.com/eugenp/tutorials.git
cd tutorials/spring-security-modules/spring-security-oauth2-bff/
sh ./build.sh
在下一部分中,我們將看到如何用現有的東西替換每個容器。
4. BFF Implementation With Spring Cloud Gateway and spring-addons-starter-oidc
First, using our IDE or https://start.spring.io/, we create a new Spring Boot project named bff with Reactive Gateway , and OAuth2 client as dependencies.
Then, we rename src/main/resources/application.properties to src/main/resources/application.yml.
Last, we’ll add spring-addons-starter-oidc to our dependencies:
com.c4-soft.springaddons spring-addons-starter-oidc 7.7.0 4.1. Re-Used Properties
Let’s start with a few constants in application.yml that will help us in other sections and when needing to override some values on the command line or IDE launch configuration:
scheme: http
hostname: localhost
reverse-proxy-port: 7080
reverse-proxy-uri: ${scheme}://${hostname}:${reverse-proxy-port}
authorization-server-prefix: /auth
issuer: ${reverse-proxy-uri}${authorization-server-prefix}/realms/baeldung
client-id: baeldung-confidential
client-secret: secret
username-claim-json-path: $.preferred_username
authorities-json-path: $.realm_access.roles
bff-port: 7081
bff-prefix: /bff
resource-server-port: 7084
audience:
Of course, we’ll have to override the value of client-secret with, for instance, an environment variable, a command-line argument, or an IDE launch configuration.
4.2. Server Properties
Now come the usual server properties:
server:
 port: ${bff-port}
4.3. Spring Cloud Gateway Routing
As we have a single resource server behind the gateway, we need only one route definition:
spring:
 cloud:
  gateway:
   routes:
    - id: bff
     uri: ${scheme}://${hostname}:${resource-server-port}
     predicates:
      - Path=/api/**
     filters:
      - DedupeResponseHeader=Access-Control-Allow-Credentials Access-Control-Allow-Origin
      - TokenRelay=
      - SaveSession
      - StripPrefix=1
The most important parts are the SaveSession and TokenRelay= which form a cornerstone for the OAuth2 BFF pattern implementation. The first ensures that the session is persisted, with the tokens fetched by oauth2Login(), and the second replaces the session cookie with the access token in session when routing a request.
The StripPrefix=1 filter removes the /api prefix from the path when routing a request. Notably, the /bff prefix was already stripped during the reverse-proxy routing. As a consequence, a request sent from the frontend to /me on the resource server.
4.4. Spring Security
We can now get into configuring OAuth2 client security with the standard Boot properties:
spring:
 security:
  oauth2:
   client:
    provider:
     baeldung:
      issuer-uri: ${issuer}
      registration:
       baeldung:
        provider: baeldung
        authorization-grant-type: authorization_code
        client-id: ${client-id}
        client-secret: ${client-secret}
        scope: openid,profile,email,offline_access
There’s really nothing special here, just a standard OpenID Provider declaration with a single registration using an authorization code and refresh token.
4.5. spring-addons-starter-oidc
com:
 c4-soft:
  springaddons:
   oidc:
    # Trusted OpenID Providers configuration (with authorities mapping)
    ops:
     - iss: ${issuer}
      authorities:
       - path: ${authorities-json-path}
      aud: ${audience}
    # SecurityFilterChain with oauth2Login() (sessions and CSRF protection enabled)
    client:
     security-matchers:
      - /api/**
      - /login/**
      - /oauth2/**
      - /logout
     permit-all:
      - /api/**
      - /login/**
      - /oauth2/**
     csrf: cookie-accessible-from-js
     oauth2-redirections:
      rp-initiated-logout: ACCEPTED
    # SecurityFilterChain with oauth2ResourceServer() (sessions and CSRF protection disabled)
    resourceserver:
     permit-all:
      - /login-options
      - /error
      - /actuator/health/readiness
      - /actuator/health/liveness
Let’s understand the three main sections:
- ops, with OpenID Provider(s) specific values: This enables us to specify the JSON path of the claims to convert to Spring authorities (with optional prefixes and case transformation for each). If the aud property is not empty, spring-addons adds an audience validator to the JWT decoder(s).
- client: When security-matchers are not empty, this section triggers the creation of a SecurityFilterChain bean with oauth2Login(). Here, with the client-uri property, we force the usage of the reverse-proxy URI as a base for all redirections (instead of the BFF internal URI). Also, as we are using SPAs, we ask the BFF to expose the CSRF token in a cookie accessible to Javascript. Last, to prevent CORS errors, we ask that the BFF respond to the RP-Initiated Logout with 201 status (instead of 3xx), which gives SPAs the ability to intercept this response and ask the browser to process it in a request with a new origin.
- resourceserver: This requests a second SecurityFilterChain bean with oauth2ResourceServer(). This filter chain having an @Order with the lowest precedence will process all of the requests that weren’t matched by the security matchers from the client SecurityFilterChain. We use it for all resources for which a session is not desirable: endpoints that aren’t involved in login or routing with TokenRelay.
4.6. /login-options Endpoint
The BFF is where we define login configuration: Spring OAuth2 client registration(s) with authorization code. To avoid configuration duplication in each SPA (and possible inconsistencies), we’ll host on the BFF a REST endpoint exposing the login option(s) it supports for users.
@RestController
public class LoginOptionsController {
 private final List<LoginOptionDto> loginOptions;

 public LoginOptionsController(OAuth2ClientProperties clientProps, SpringAddonsOidcProperties addonsProperties) {
  final var clientAuthority = addonsProperties.getClient()
  .getClientUri()
  .getAuthority();
  this.loginOptions = clientProps.getRegistration()
  .entrySet()
  .stream()
  .filter(e -> "authorization_code".equals(e.getValue().getAuthorizationGrantType()))
  .map(e -> {
  final var label = e.getValue().getProvider();
  final var loginUri = "%s/oauth2/authorization/%s".formatted(addonsProperties.getClient().getClientUri(), e.getKey());
  final var providerId = clientProps.getRegistration()
  .get(e.getKey())
  .getProvider();
  final var providerIssuerAuthority = URI.create(clientProps.getProvider()
  .get(providerId)
  .getIssuerUri());
  return new LoginOptionDto(label, loginUri, Objects.equals(clientAuthority, providerIssuerAuthority));
  })
  .toList();
 }

 @GetMapping(path = "/login-options", produces = MediaType.APPLICATION_JSON_VALUE)
 public Mono<List<LoginOptionDto>> getLoginOptions() throws URISyntaxException {
  return Mono.just(this.loginOptions);
 }

 public static record LoginOptionDto(@NotEmpty String label, @NotEmpty String loginUri, boolean isSameAuthority) {
 }
}
We can now stop the baeldung-bff.bff docker container and run the BFF application, carefully providing on the command line or run configuration:
- hostname: the value of the hostname command or HOSTNAME environment variable, transformed to lowercase
- client-secret: the value of the secret for the baeldung-confidential client registered in the authorization-server (“secret” unless explicitly changed)
4.7. Non-Standard RP-Initiated Logout
RP-Initiated Logout is part of the OpenID standard, but some providers don’t implement it strictly. This is the case of Auth0 and Amazon Cognito, for instance, which don’t provide an end_session endpoint in their OpenID configuration and use their own query parameters for logout.
---
spring:
 cloud:
  gateway:
   routes:
    - id: bff
     uri: ${scheme}://${hostname}:${resource-server-port}
     predicates:
      - Path=/api/**
     filters:
      - DedupeResponseHeader=Access-Control-Allow-Credentials Access-Control-Allow-Origin
      - TokenRelay=
      - Save入れる
      - StripPrefix=1
5. Resource Server With spring-addons-starter-oidc
Our need for this system is simple: a stateless REST API authorized with JWT access tokens, exposing a single endpoint to reflect some user info contained in the token (or a payload with empty values if the request isn’t authorized).
For that, we’ll create a new Spring Boot project named resource-server with Spring Web and OAuth2 Resource Server as dependencies.
Then, we rename src/main/resources/application.properties to src/main/resources/application.yml.
Last, we’ll add spring-addons-starter-oidc to our dependencies:
<dependency>
    <groupId>com.c4-soft.springaddons</groupId>
    <artifactId>spring-addons-starter-oidc</artifactId>
    <version>7.7.0</version>
</dependency>
5.1. Configuration
Let’s look at the properties we need for our resource server:
scheme: http
hostname: localhost
reverse-proxy-port: 7080
reverse-proxy-uri: ${scheme}://${hostname}:${reverse-proxy-port}
authorization-server-prefix: /auth
issuer: ${reverse-proxy-uri}${authorization-server-prefix}/realms/baeldung
username-claim-json-path: $.preferred_username
authorities-json-path: $.realm_access.roles
resource-server-port: 7084
audience:

server:
  port: ${resource-server-port}

com:
  c4-soft:
    springaddons:
      oidc:
        ops:
        - iss: ${issuer}
          username-claim: ${username-claim-json-path}
          authorities:
          - path: ${authorities-json-path}
          aud: ${audience}
        resourceserver:
          permit-all:
          - /me
Thanks to spring-addons-starter-oidc, this is enough to declare a stateless resource server with:
- Authorities mapping from a claim of our choice (realm_access.roles in the case of Keycloak with realm roles)
- Making /me accessible to anonymous requests
The application.yaml in the companion repo contains profiles for other OpenID Providers using other private claims for roles.
5.2. @RestController
Let’s implement a REST endpoint returning some data from the Authentication in the security context (if any):
@RestController
public class MeController {

    @GetMapping("/me")
    public UserInfoDto getMe(Authentication auth) {
        if (auth instanceof JwtAuthenticationToken jwtAuth) {
            final var email = (String) jwtAuth.getTokenAttributes()
                .getOrDefault(StandardClaimNames.EMAIL, "");
            final var roles = auth.getAuthorities()
                .stream()
                .map(GrantedAuthority::getAuthority)
                .toList();
            final var exp = Optional.ofNullable(jwtAuth.getTokenAttributes()
                .get(JwtClaimNames.EXP)).map(expClaim -> {
                    if(expClaim instanceof Long lexp) {
                        return lexp;
                    }
                    if(expClaim instanceof Instant iexp) {
                        return iexp.getEpochSecond();
                    }
                    if(expClaim instanceof Date dexp) {
                        return dexp.toInstant().getEpochSecond();
                    }
                    return Long.MAX_VALUE;
                }).orElse(Long.MAX_VALUE);
            return new UserInfoDto(auth.getName(), email, roles, exp);
        }
        return UserInfoDto.ANONYMOUS;
    }

    /**
     * @param username a unique identifier for the resource owner in the token (sub claim by default)
     * @param email OpenID email claim
     * @param roles Spring authorities resolved for the authentication in the security context
     * @param exp seconds from 1970-01-01T00:00:00Z UTC until the specified UTC date/time when the access token expires
     * @return a UserInfoDto object containing the user's information
     */
    public static record UserInfoDto(String username, String email, List<String> roles, Long exp) {
        public static final UserInfoDto ANONYMOUS = new UserInfoDto("", "", List.of(), Long.MAX_VALUE);
        }
}
Just as we did for the BFF, we can now stop the baeldung-bff.resource-server docker container, providing hostname on the command line or run configuration.
5.3. Resource Server Multi-Tenancy
What if the frontends consuming our REST API don’t all authorize their users on the same authorization server or realm (or if they offer a choice of authorization servers)?
With spring-security-starter-oidc, this is dead simple: com.c4-soft.springaddons.oidc.ops configuration property is an array, and we can add as many issuers as we trust, each with its mapping for user name and authorities. A valid token issued by any of these issuers will be accepted by our resource server and roles correctly mapped to Spring authorities.
6. SPAs
由於 SPAs 與 OAuth2 BFF 的連接存在一些差異,因此我們將涵蓋三大主要框架:Angular,React 和 Vue。
但是,創建 SPAs 不屬於本文檔的範圍。 之後,我們將僅關注在 OAuth2 BFF 上登錄和註銷 Web 應用程序,以及查詢在其後方的 REST API。 請參考配套倉庫以獲取完整實現。
為了使應用程序具有相同結構,已做出努力:
- 有兩個路由來演示如何在身份驗證後恢復當前路由。
- 一個 Login 組件提供在兩個 iframe 和 default 均可用時選擇登錄體驗的選項。 它還處理 iframe 的顯示狀態或將用户重定向到授權服務器。
- 一個 Logout 組件向 BFF 的 /logout 端點發送 POST 請求,然後將用户重定向到授權服務器以進行 RP-Initiated Logout
- 一個 UserService 通過 BFF 從資源服務器獲取當前用户數據。 它還包含在訪問令牌在 BFF 上到期之前安排刷新此數據的邏輯。
然而,由於框架處理狀態的方式存在很大差異,因此用户數據管理方式有所不同:
- 在 Angular 應用程序中,UserService 是一個單例,用於管理當前用户,並使用 BehaviorSubject。
- 在 React 應用程序中,我們使用 createContext 在 app/layout.tsx 中暴露當前用户,並使用 useContext 在需要訪問它時。
- 在 Vue 應用程序中,UserService 是一個單例(在 main.ts 中實例化),用於使用 ref 管理當前用户。
6.1. 在 Companion 倉庫中運行 SPAs
首先,我們需要進入我們想要運行的項目文件夾。
然後,我們應該運行 “npm install” 以拉取所有必需的 npm 包。
最後,在停止相應的 Docker 容器之後,具體取決於框架:
- Angular:運行 “npm run start” 並打開 http://{hostname}:7080/angular-ui/
- Vue:運行 “npm run dev” 並打開 http://{hostname}:7080/vue-ui/
- React (Next.js):運行 “npm run dev” 並打開 http://{hostname}:7080/react-ui/
我們應該只使用指向反向代理的 URL,而不是 SPAs 的 dev-servers (http://{hostname}:7080,而不是 http://{hostname}:4201,http://{hostname}:4202 或 http://{hostname}:4203)。
6.2. 用户服務
UserService 的職責是:
- 定義用户表示 (內部和 DTO)。
- 提供一個函數,用於通過 BFF 從資源服務器獲取用户數據。
- 在訪問令牌在 BFF 上到期之前安排刷新此數據的 refresh() 調用 (保持會話活躍)。
6.3. 登錄
正如我們已經看到的那樣,在可能的情況下,我們提供兩個不同的登錄體驗:
- 用户將被重定向到授權服務器,使用當前瀏覽器標籤頁 (SPA 暫時“退出”)。 這是一個默認行為,並且始終可用。
- 授權服務器表單在 SPA 中的 iframe 內部顯示,需要 SPA 和授權服務器都支持 SameOrigin,因此只有在 BFF 和資源服務器運行具有默認配置文件(帶有 Keycloak)時才有效。
- 邏輯由 Login 組件實現,該組件顯示用於選擇登錄體驗的下拉菜單 (iframe 或 default) 和一個按鈕。
- 登錄選項在組件初始化時從 BFF 獲取。 在本教程中,我們預計只有一個選項,因此我們僅選擇響應生成器中的第一個條目。
- 當用户單擊 Login 按鈕時,取決於所選擇的登錄體驗:
- 如果選擇了 iframe,則將 iframe 的源設置為登錄 URI,並且包含 iframe 的模態 div 會顯示。
- 否則,window.location.href 將設置為登錄 URI,這將“退出”SPA 並使用當前標籤頁設置一個新的起源。
當用户選擇 iframe 登錄體驗時,我們註冊了 load 事件監聽器,用於檢查身份驗證是否成功,並在隱藏模態框。 此回調在 iframe 中每次發生重定向時運行。
最後,我們可以注意到 SPAs 在身份驗證代碼流程初始化請求中添加了一個 post_login_success_uri 請求參數。 spring-addons-starter-oidc 存儲了此參數的值在會話中,並在授權代碼與令牌交換後,使用它來構建返回到前端的重定向 URI。
6.4. 註銷
註銷按鈕和相關邏輯由 Logout 組件處理。
默認情況下,Spring 的 /logout 端點期望一個 POST 請求,並且,就像任何修改服務器會話狀態的請求一樣,它需要一個 CSRF 令牌。 Angular 和 React 透明地處理帶有 http-only=false 標誌的 CSRF cookie 和請求頭。 但是,我們必須手動讀取 XSRF-TOKEN cookie 併為 Vue 設置 X-XSRF-TOKEN header,對於所有 POST、PUT、PATCH 和 DELETE 請求。 我們還應該始終參考前端框架的文檔,因為其中可能存在微妙的障礙。 例如,Angular 將僅為不帶權威的 URL 設置 X-XSRF-TOKEN header,但我們應該查詢 /bff/api/me ,即使窗口位置是 http://localhost:7080/angular-ui/,即使它。
當涉及 Spring OAuth2 客户端時,RP-Initiated Logout 發生在兩個請求中:
- 首先,向 Spring OAuth2 客户端發送 POST 請求,以關閉自己的會話。
- 第一個請求的響應包含授權服務器上的一個 URI,用於關閉用户在其中存在的其他會話。
默認的 Spring 行為是為第一個請求使用 302 狀態碼,這會使瀏覽器自動跟隨,保持相同的起源。 為了避免 CORS 錯誤,我們已配置 BFF 以在 2xx 字段中使用狀態碼。 這需要 SPA 自動跟隨,但它提供了使用 window.location.href (使用新起源) 的機會。
最後,我們可以注意到在退出登錄請求中,SPAs 使用 X-POST-LOGOUT-SUCCESS-URI header 來傳遞退出登錄請求。 spring-addons-starter-oidc 使用此 header 中的值來插入授權服務器的退出登錄請求中的參數。
6.5. 客户端多租户
在 Companion 項目中,有一個註冊的 OAuth2 客户端,並使用一個授權碼。 但是,如果我們在多個前端上共享一個 BFF,並且每個前端可能具有不同的頒發者或範圍,則會發生什麼?
用户應該只被提示選擇一個提供商,並且在許多情況下,我們可以過濾登錄選項,理想情況下將其減少到 1 個,以便用户不必做出選擇:
- SPA 配置為使用特定選項。
- 有多個反向代理,並且每個反向代理可以設置類似 header,例如,可以設置選項。
- 例如,設備前端 IP 的技術信息可以告訴我們用户應該在哪個位置進行授權。
在這種情況下,我們有兩種選擇:
- 向 /login-options 發送過濾標準,並在 BFF 控制器中進行過濾。
- 在前端中過濾 /login-options 響應。
7. 後台通道註銷
如果在一個 SSO 配置中,一個擁有在 BFF 上打開會話的用户通過另一個 OAuth2 客户端註銷,會發生什麼?
在 OIDC 中,後台通道註銷 規範是為了處理此類場景而設計的:在授權服務器聲明客户端時,我們可以註冊一個在用户註銷時調用的 URL。
由於 BFF 運行在服務器上,它可以暴露一個端點以接收註銷事件通知。自版本 6.2 以來,Spring Security 支持後台通道註銷,並且 spring-addons-starter-oidc 暴露了一個標誌以啓用它。
在 BFF 上使用後台通道註銷結束會話後,前端對資源服務器(們)的請求將不再被授權(即使在令牌未過期之前)。因此,為了獲得完美的用户體驗,在 BFF 上啓用後台通道註銷時,我們可能也應該添加諸如 WebSockets 之類的機制,以通知前端的用户狀態變化。
8. 反向代理
我們需要 SPA 和其 BFF 具有相同的源
,因為:- 請求通過前端和 BFF 之間的會話 cookie 進行授權。
- Spring session cookies 標記為 SameSite=Lax。
為此,我們將使用反向代理作為瀏覽器的一個單一聯繫點。但是,實現這種反向代理有許多不同的解決方案,我們的選擇將取決於上下文:
- 在 Docker 中,我們使用 Nginx 容器。
- 在 K8s 中,我們可能會配置 Ingress。
- 當從我們的 IDE 工作時,我們可能會更喜歡 Spring Cloud Gateway 實例。如果運行的服務數量很重要,我們甚至可以使用 Gateway 實例作為 BFF 的額外路由,而不是像本文檔中那樣使用專用實例。
8.1. 是否應該隱藏授權服務器在反向代理後面
出於安全原因,授權服務器應始終設置 X-Frame-Options 標頭。由於 Keycloak 允許將其設置為 SAMEORIGIN,如果授權服務器和 SPA 具有相同的源,則可以顯示 Keycloak 登錄和註冊表單在 SPA 中嵌入的 iframe 中。
從用户角度來看,在與授權表單在模態框中顯示的一致應用程序中,而不是在 SPA 和授權服務器之間來回重定向,可能是一個更好的體驗。
另一方面,X-Frame-Options 標頭 依賴於單點登錄 (SSO)。由於 Cookie 標記為 SameOrigin,因此兩個 SPA 可以從 SSO 中獲益,不僅需要在同一授權服務器上對用户進行身份驗證,還應使用相同的權威 (例如,https://appa.net 和 https://appy.net 認證用户在 https://sso.net)。
解決方案是為所有 SPA 和授權服務器使用相同的源,例如:
- https://domain.net/appa
- https://domain.net/appy
- https://domain.net/auth
這就是我們將在與 Keycloak 一起使用時使用的選項,但 SPA 和授權服務器之間共享源並非 BFF 模式所需的唯一要求,僅需要 SPA 和 BFF 之間共享源。
隨附的倉庫中的項目已預先配置為使用 Amazon Cognito 和 Auth0,並帶有其源(沒有在運行時動態重寫 URL),因此 iframe 登錄僅在默認配置文件(使用 Keycloak)中使用時可用。
8.2. 使用 Spring Cloud Gateway 的實現
首先,使用我們的 IDE 或 https://start.spring.io/,我們創建一個名為 reverse-proxy 的新 Spring Boot 項目,並添加 Reactive Gateway 作為依賴項。
然後我們重命名 src/main/resources/application.properties 為 src/main/resources/application.yml
然後我們應該定義 Spring Cloud Gateway 的路由屬性:
# Custom properties to ease configuration overrides
# on command-line or IDE launch configurations
scheme: http
hostname: localhost
reverse-proxy-port: 7080
angular-port: 4201
angular-prefix: /angular-ui
angular-uri: http://${hostname}:${angular-port}${angular-prefix}
vue-port: 4202
vue-prefix: /vue-ui
vue-uri: http://${hostname}:${vue-port}${vue-prefix}
react-port: 4203
react-prefix: /react-ui
react-uri: http://${hostname}:${react-port}${react-prefix}
authorization-server-port: 8080
authorization-server-prefix: /auth
authorization-server-uri: ${scheme}://${hostname}:${authorization-server-port}${authorization-server-prefix}
bff-port: 7081
bff-prefix: /bff
bff-uri: ${scheme}://${hostname}:${bff-port}

server:
    port: ${reverse-proxy-port}

spring:
    cloud:
        gateway:
            default-filters:
                - DedupeResponseHeader=Access-Control-Allow-Credentials Access-Control-Allow-Origin
            routes:
                # SPAs assets
                - id: angular-ui
                    uri: ${angular-uri}
                    predicates:
                        - Path=${angular-prefix}/**
                - id: vue-ui
                    uri: ${vue-uri}
                    predicates:
                        - Path=${vue-prefix}/**
                - id: react-ui
                    uri: ${react-uri}
                    predicates:
                        - Path=${react-prefix}/**
                # Authorization-server
                - id: authorization-server
                    uri: ${authorization-server-uri}
                    predicates:
                        - Path=${authorization-server-prefix}/**
                # BFF
                - id: bff
                    uri: ${bff-uri}
                    predicates:
                        - Path=${bff-prefix}/**
                    filters:
                        - StripPrefix=1
現在我們可以啓動反向代理反向代理 (在停止 Docker 容器後,通過命令行或運行配置提供 hostname)
9. 授權服務器
在 GitHub 上的配套項目,默認配置文件針對 Keycloak,但由於 spring-addons-starter-oidc,切換到任何其他 OpenID 提供程序只需編輯 application.yml。配套項目提供的文件包含配置文件,以幫助我們輕鬆上手 Auth0 和 Amazon Cognito。
無論我們選擇哪個 OpenID 提供程序,我們應該:
- 聲明一個機密客户端
- 確定用於用户角色作為來源的私有聲明
- 更新 BFF 和資源服務器屬性
10. 使用 spring-addons-starter-oidc 的理由?
在本文中,我們修改了 spring-boot-starter-oauth2-client 和 spring-boot-starter-oauth2-resource-server 的許多默認行為:
- 將 OAuth2 重定向 URI 指向反向代理,而不是內部 OAuth2 客户端。
- 給予 SPAs 控制用户在登錄/註銷後重定向的位置。
- 在 JavaScript 代碼在瀏覽器中運行時,將 CSRF 令牌暴露在可訪問的 Cookie 中。
- 適應非完全標準的 啓動後重定向 (例如 Auth0 和 Amazon Cognito) 。
- 向授權請求添加可選參數 (例如 Auth0 的 觀眾)。
- 將 OAuth2 重定向的 HTTP 狀態更改為 SPAs 可以選擇遵循 Location 標頭的方式。
- 註冊兩個不同的 SecurityFilterChain Bean,分別使用 oauth2Login() (帶有基於會話的安全性及 CSRF 保護) 和 oauth2ResourceServer() (無狀態,帶有基於令牌的安全性) 來安全不同的資源組。
- 定義哪些端點對匿名用户開放。
- 在資源服務器上,接受來自超過一個 OpenID 提供的令牌。
- 向 JWT 解碼器添加觀眾驗證器。
- 將權限從任何聲明 (以及添加前綴或強制大小寫) 映射。
這通常需要大量的 Java 代碼以及對 Spring Security 的深入瞭解。但在這裏,我們僅使用應用程序屬性就完成了它,並可以利用 IDE 自補全的指導!
我們應該參考 GitHub 啓動器 README 以獲取完整的功能列表、自動配置調整以及默認值覆蓋。
11. 結論
在本教程中,我們學習瞭如何使用 Spring Cloud Gateway 和 spring-addons 實現 OAuth2 後端對前端模式。
我們還看到了:
- 為什麼我們應該優先選擇這種方案,而不是將 SPA 配置為“公共”的 OAuth2 客户端。
- 引入 BFF 對 SPA 本身影響甚小。
- 這種模式完全不改變資源服務器的狀態。
- 由於我們使用服務器端 OAuth2 客户端,即使在單點登錄配置中,我們也能完全控制用户會話,這要歸功於 背通道註銷。
最後,我們開始探索 spring-addons-starter-oidc 的便捷性,只需通過屬性配置,即可完成通常需要大量 Java 配置的任務。
