

大家好,我是半夏之沫 😁😁 一名金融科技領域的JAVA系統研發😊😊
我希望將自己工作和學習中的經驗以最樸實,最嚴謹的方式分享給大家,共同進步👉💓👈
👉👉👉👉👉👉👉👉💓寫作不易,期待大家的關注和點贊💓👈👈👈👈👈👈👈👈
👉👉👉👉👉👉👉👉💓關注微信公眾號【技術探界】 💓👈👈👈👈👈👈👈👈
前言
Mybatis中的插件又叫做攔截器,通過插件可以在Mybatis某個行為執行時進行攔截並改變這個行為。通常,Mybatis的插件可以作用於Mybatis中的四大接口,分別為Executor,ParameterHandler,ResultSetHandler和StatementHandler,歸納如下表所示。
| 可作用接口 | 可作用方法 | 攔截器用途 |
|---|---|---|
Executor |
update(),query(),flushStatements(),commit(),rollback(),getTransaction(),close(),isClosed() |
攔截執行器中的方法 |
ParameterHandler |
getParameterObject(),setParameters() |
攔截對參數的處理 |
ResultSetHandler |
handleResultSets(),handleOutputParameters() |
攔截對結果集的處理 |
StatementHandler |
prepare(),parameterize(),batch(),update(),query() |
攔截SQL構建的處理 |
本篇文章將對插件怎麼用和插件的執行原理進行分析。
正文
一. 插件的使用
插件的使用比較簡單,在Mybatis配置文件中將插件配置好,Mybatis會自動將插件的功能植入到插件對應的四大接口中。本小節將以一個例子,對自定義插件,插件的配置和插件的執行效果進行説明。
首先創建兩張表,語句如下所示。
CREATE TABLE bookstore(
    id INT(11) PRIMARY KEY AUTO_INCREMENT,
    bs_name VARCHAR(255) NOT NULL
);

CREATE TABLE book(
    id INT(11) PRIMARY KEY AUTO_INCREMENT,
    b_name VARCHAR(255) NOT NULL,
    b_price FLOAT NOT NULL,
    bs_id INT(11) NOT NULL,
    FOREIGN KEY book(bs_id) REFERENCES bookstore(id)
)
往表中插入若干數據,如下所示。
INSERT INTO bookstore (bs_name) VALUES ("XinHua");
INSERT INTO bookstore (bs_name) VALUES ("SanYou");

INSERT INTO book (b_name, b_price, bs_id) VALUES ("Math", 20.5, 1);
INSERT INTO book (b_name, b_price, bs_id) VALUES ("English", 21.5, 1);
INSERT INTO book (b_name, b_price, bs_id) VALUES ("Water Margin", 30.5, 2)現在開始搭建測試工程(非Springboot整合工程),新建一個Maven項目,引入依賴如下所示。
<dependencies>
    <dependency>
        <groupId>org.projectlombok</groupId>
        <artifactId>lombok</artifactId>
        <version>1.18.16</version>
        <optional>true</optional>
    </dependency>

    <dependency>
        <groupId>org.mybatis</groupId>
        <artifactId>mybatis</artifactId>
        <version>3.5.6</version>
    </dependency>

    <dependency>
        <groupId>mysql</groupId>
        <artifactId>mysql-connector-java</artifactId>
        <version>8.0.16</version>
    </dependency>
</dependencies>還需要在POM文件中添加如下配置,以滿足打包時能將src/main/java下的XML文件(主要想打包映射文件)進行打包。
<build>
    <resources>
        <resource>
            <directory>src/main/java</directory>
            <includes>
                <include>**/*.xml</include>
            </includes>
            <filtering>false</filtering>
        </resource>
    </resources>
    <plugins>
        <plugin>
            <groupId>org.apache.maven.plugins</groupId>
            <artifactId>maven-compiler-plugin</artifactId>
            <configuration>
                <source>8</source>
                <target>8</target>
            </configuration>
        </plugin>
    </plugins>
</build>Mybatis的配置文件mybatis-config.xml如下所示,主要是開啓日誌打印,配置事務工廠,配置數據源和註冊映射文件/映射接口。
<?xml version="1.0" encoding="UTF-8" ?>
<!DOCTYPE configuration PUBLIC "-//mybatis.org//DTD Config 3.0//EN"
"http://mybatis.org/dtd/mybatis-3-config.dtd">
<configuration>
<settings>
<setting name="logImpl" value="STDOUT_LOGGING" />
</settings>
<environments default="development">
<environment id="development">
<transactionManager type="JDBC"/>
<dataSource type="POOLED">
<property name="driver" value="com.mysql.cj.jdbc.Driver"/>
<property name="url" value="jdbc:mysql://localhost:3306/test?characterEncoding=utf-8&serverTimezone=UTC&useSSL=false"/>
<property name="username" value="root"/>
<property name="password" value="root"/>
</dataSource>
</environment>
</environments>
<mappers>
<package name="com.mybatis.learn.dao"/>
</mappers>
</configuration>本示例中,執行一個簡單查詢,將book表中的所有數據查詢出來,查詢出來的每條數據用Book類進行映射,Book類如下所示。
@Data
public class Book {

    private long id;
    private String bookName;
    private float bookPrice;

}
映射接口如下所示。
public interface BookMapper {

    List<Book> selectAllBooks();

}
按照規則,編寫映射文件,如下所示。
<?xml version="1.0" encoding="UTF-8" ?>
<!DOCTYPE mapper PUBLIC "-//mybatis.org//DTD Mapper 3.0//EN"
        "http://mybatis.org/dtd/mybatis-3-mapper.dtd">
<mapper namespace="com.mybatis.learn.dao.BookMapper">
    <resultMap id="bookResultMap" type="com.mybatis.learn.entity.Book">
        <result column="b_name" property="bookName"/>
        <result column="b_price" property="bookPrice"/>
    </resultMap>

    <select id="selectAllBooks" resultMap="bookResultMap">
        SELECT
        b.id, b.b_name, b.b_price
        FROM
        book b
    </select>
</mapper>
最後編寫測試程序,如下所示。
public class MybatisTest {
public static void main(String[] args) throws Exception {
String resource = "mybatis-config.xml";
SqlSessionFactory sqlSessionFactory = new SqlSessionFactoryBuilder()
.build(Resources.getResourceAsStream(resource));
SqlSession sqlSession = sqlSessionFactory.openSession();
BookMapper bookMapper = sqlSession.getMapper(BookMapper.class);
List<Book> books = bookMapper.selectAllBooks();
books.forEach(System.out::println);
}
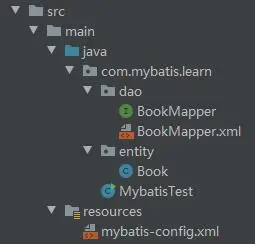
}整個測試工程的目錄結構如下所示。
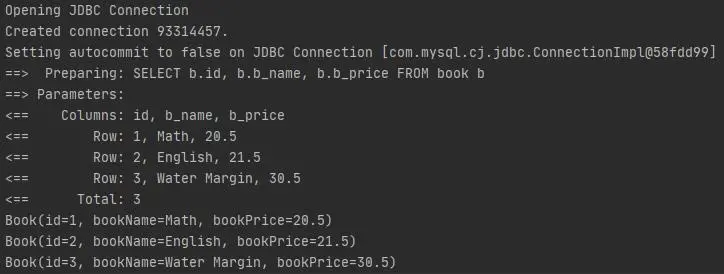
運行測試程序,日誌打印如下。
現在開始自定義插件的編寫,Mybatis官方文檔中給出了自定義插件的編寫示例,如下所示。
@Intercepts({@Signature(type = Executor.class, method = "query",
        args = {MappedStatement.class, Object.class, RowBounds.class, ResultHandler.class})})
public class TestInterceptor implements Interceptor {

    @Override
    public Object intercept(Invocation invocation) throws Throwable {
        // 獲取被攔截的對象
        Object target = invocation.getTarget();
        // 獲取被攔截的方法
        Method method = invocation.getMethod();
        // 獲取被攔截的方法的參數
        Object[] args = invocation.getArgs();

        // 執行被攔截的方法前,做一些事情

        // 執行被攔截的方法
        Object result = invocation.proceed();

        // 執行被攔截的方法後,做一些事情

        // 返回執行結果
        return result;
    }

}現在按照Mybatis官方文檔的示例,編寫一個插件,作用於Executor的query()方法,行為是在query()方法執行前和執行後分別打印一些日誌信息。編寫的插件如下所示。
@Intercepts(
        {
                @Signature(type = Executor.class, method = "query",
                        args = {MappedStatement.class, Object.class, RowBounds.class, ResultHandler.class})
        }
)
public class ExecutorTestPlugin implements Interceptor {

    @Override
    public Object intercept(Invocation invocation) throws Throwable {
        System.out.println("Begin to query.");
        Object result = invocation.proceed();
        System.out.println("End to query.");
        return result;
    }

}在Mybatis配置文件中將編寫好的插件進行配置,如下所示。
<?xml version="1.0" encoding="UTF-8" ?>
<!DOCTYPE configuration PUBLIC "-//mybatis.org//DTD Config 3.0//EN"
"http://mybatis.org/dtd/mybatis-3-config.dtd">
<configuration>
<settings>
<setting name="logImpl" value="STDOUT_LOGGING" />
</settings>
<plugins>
<plugin interceptor="com.mybatis.learn.plugin.ExecutorTestPlugin"/>
</plugins>
<environments default="development">
<environment id="development">
<transactionManager type="JDBC"/>
<dataSource type="POOLED">
<property name="driver" value="com.mysql.cj.jdbc.Driver"/>
<property name="url" value="jdbc:mysql://localhost:3306/test?characterEncoding=utf-8&serverTimezone=UTC&useSSL=false"/>
<property name="username" value="root"/>
<property name="password" value="root"/>
</dataSource>
</environment>
</environments>
<mappers>
<package name="com.mybatis.learn.dao"/>
</mappers>
</configuration>再次運行測試程序,打印日誌信息如下所示。
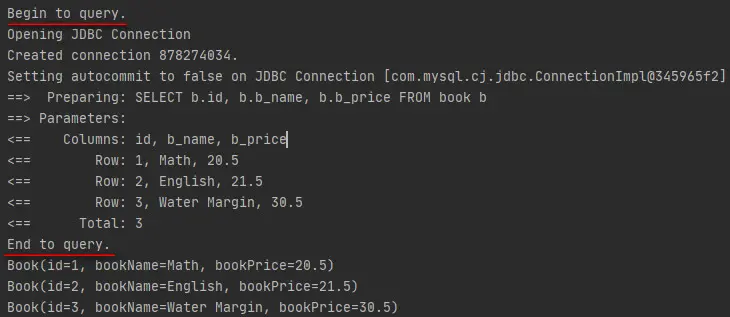
可以看到,插件按照預期執行了。
二. 插件的原理
本小節將分析插件是如何植入Mybatis四大接口以及插件是如何生效的。因為小節一中自定義的插件是作用於Executor,所以本小節主要是以Executor植入插件進行展開討論,其餘三大接口大體類似,就不再贅述。
Mybatis在獲取SqlSession時,會為SqlSession構建Executor執行器,在構建Executor的過程中,會為Executor植入插件的邏輯,這部分內容在Mybatis源碼-SqlSession獲取中已經進行了介紹。構建Executor是發生在Configuration的newExecutor()方法中,如下所示。
public Executor newExecutor(Transaction transaction, ExecutorType executorType) {
    executorType = executorType == null ? defaultExecutorType : executorType;
    executorType = executorType == null ? ExecutorType.SIMPLE : executorType;
    Executor executor;
    // 根據ExecutorType的枚舉值創建對應類型的Executor
    if (ExecutorType.BATCH == executorType) {
        executor = new BatchExecutor(this, transaction);
    } else if (ExecutorType.REUSE == executorType) {
        executor = new ReuseExecutor(this, transaction);
    } else {
        executor = new SimpleExecutor(this, transaction);
    }
    // 如果Mybatis配置文件中開啓了二級緩存
    if (cacheEnabled) {
        // 創建CachingExecutor作為Executor的裝飾器,為Executor增加二級緩存功能
        executor = new CachingExecutor(executor);
    }
    // 將插件邏輯添加到Executor中
    executor = (Executor) interceptorChain.pluginAll(executor);
    return executor;
}將插件邏輯植入到Executor是發生在InterceptorChain的pluginAll()方法中。如果在Mybatis的配置文件中配置了插件,那麼配置的插件會在加載配置文件的時候被解析成攔截器Interceptor並添加到Configuration的InterceptorChain中。InterceptorChain是攔截器鏈,其實現如下所示。
public class InterceptorChain {

    // 插件會添加到集合中
    private final List<Interceptor> interceptors = new ArrayList<>();

    // 為四大接口添加插件邏輯時會調用pluginAll()方法
    // 這裏的target參數就是四大接口的對象
    public Object pluginAll(Object target) {
        for (Interceptor interceptor : interceptors) {
            target = interceptor.plugin(target);
        }
        return target;
    }

    public void addInterceptor(Interceptor interceptor) {
        interceptors.add(interceptor);
    }

    public List<Interceptor> getInterceptors() {
        return Collections.unmodifiableList(interceptors);
    }

}當為Executor添加插件邏輯時,就會調用InterceptorChain的pluginAll()方法,在pluginAll()方法中,會遍歷插件集合並調用每個插件的plugin()方法,所以插件功能的添加在於Interceptor的plugin()方法,其實現如下所示。
default Object plugin(Object target) {
    return Plugin.wrap(target, this);
}Interceptor的plugin()方法中,調用了Plugin的wrap()靜態方法,繼續看該靜態方法的實現。
public static Object wrap(Object target, Interceptor interceptor) {
    // 將插件的@Signature註解內容獲取出來並生成映射結構
    // Map[插件作用的接口的Class對象, Set[插件作用的方法的方法對象]]
    Map<Class<?>, Set<Method>> signatureMap = getSignatureMap(interceptor);
    Class<?> type = target.getClass();
    // 將目標對象實現的所有接口中是當前插件的作用目標的接口獲取出來
    Class<?>[] interfaces = getAllInterfaces(type, signatureMap);
    if (interfaces.length > 0) {
        // 為目標對象生成代理對象並返回
        // 這是JDK動態代理的應用
        // Plugin實現了InvocationHandler接口
        return Proxy.newProxyInstance(
            type.getClassLoader(),
            interfaces,
            new Plugin(target, interceptor, signatureMap));
    }
    return target;
}在Plugin的wrap()靜態方法中,先判斷目標對象實現的接口中是否有當前插件的作用目標,如果有,就為目標對象基於JDK動態代理生成代理對象。同時,Plugin實現了InvocationHandler接口,當代理對象執行方法時,就會調用到Plugin的invoke()方法,接下來看一下invoke()方法做了什麼事情,如下所示。
@Override
public Object invoke(Object proxy, Method method, Object[] args) throws Throwable {
    try {
        // 判斷插件是否作用於當前代理對象執行的方法
        Set<Method> methods = signatureMap.get(method.getDeclaringClass());
        if (methods != null && methods.contains(method)) {
            // 如果作用於,則調用插件執行插件邏輯
            return interceptor.intercept(new Invocation(target, method, args));
        }
        // 如果不作用於,則跳過插件直接執行代理對象的方法
        return method.invoke(target, args);
    } catch (Exception e) {
        throw ExceptionUtil.unwrapThrowable(e);
    }
}Plugin的invoke()方法首先會判斷當前插件是否作用於當前代理對象執行的方法,如果不作用於,則當前代理對象執行的方法直接執行,如果作用於,則生成Invocation並執行插件的邏輯。下面先看一下Invocation是什麼,如下所示。
public class Invocation {

    // 插件作用的目標對象(四大對象)
    private final Object target;
    // 插件作用的目標方法
    private final Method method;
    // 插件作用的目標方法的參數
    private final Object[] args;

    public Invocation(Object target, Method method, Object[] args) {
        this.target = target;
        this.method = method;
        this.args = args;
    }

    public Object getTarget() {
        return target;
    }

    public Method getMethod() {
        return method;
    }

    public Object[] getArgs() {
        return args;
    }

    // 執行目標方法
    public Object proceed() throws
            InvocationTargetException, IllegalAccessException {
        return method.invoke(target, args);
    }

}Invocation用於插件獲取插件作用的目標對象的信息,包括:作用對象本身,作用的方法和參數,同時Invocation的proceed()方法可以執行被插件作用的方法。所以插件可以在其實現的intercept()方法中通過Invocation獲取到插件作用目標的完整信息,也可以通過Invocation的proceed()方法運行作用目標的原本邏輯。
所以到這裏可以知道,為Mybatis的四大對象植入插件邏輯時,就是為Mybatis的四大對象生成代理對象,同時生成的代理對象中的Plugin實現了InvocationHandler,且Plugin持有插件的引用,所以當代理對象執行方法時,就可以通過Plugin的invoke()方法調用到插件的邏輯,從而完成插件邏輯的植入。此外,如果定義了多個插件,那麼會根據插件在Mybatis配置文件中的聲明順序,一層一層的生成代理對象,比如如下的配置中,先後聲明瞭兩個插件。
<plugins>
    <plugin intercepter="插件1"></plugin>
    <plugin intercepter="插件2"></plugin>
</plugins>
那麼生成的代理對象可以用下圖進行示意。

即為四大對象植入插件邏輯時,是根據聲明插件時的順序從裏向外一層一層的生成代理對象,反過來四大對象實際運行時,是從外向裏一層一層的調用插件的邏輯。
總結
Mybatis中的插件可以作用於Mybatis中的四大對象,分別為Executor,ParameterHandler,ResultSetHandler和StatementHandler,在插件的@Signature中可以指定插件的作用目標對象和目標方法,插件是通過為Mybatis中的四大對象生成代理對象完成插件邏輯的植入,Mybatis中的四大對象實際運行時,會先調用到插件的邏輯(如果有插件的話),然後才會調用到四大對象本身的邏輯。
大家好,我是半夏之沫 😁😁 一名金融科技領域的JAVA系統研發😊😊
我希望將自己工作和學習中的經驗以最樸實,最嚴謹的方式分享給大家,共同進步👉💓👈
👉👉👉👉👉👉👉👉💓寫作不易,期待大家的關注和點贊💓👈👈👈👈👈👈👈👈
👉👉👉👉👉👉👉👉💓關注微信公眾號【技術探界】 💓👈👈👈👈👈👈👈👈

