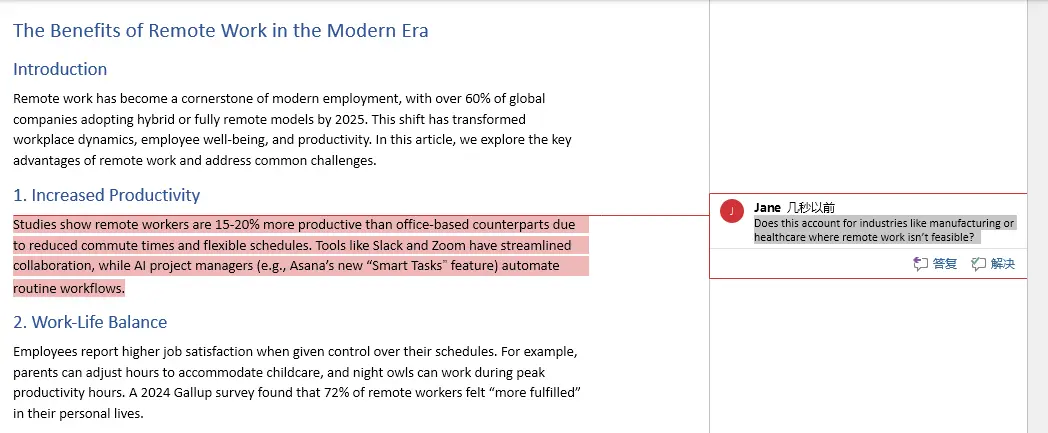
在文檔協作與審閲場景中,高效管理批註是提升團隊效率的關鍵環節。通過編程手段自動化批註操作,不僅能避免人工重複勞動帶來的誤差,還可實現跨版本批註追蹤、批量處理歷史反饋等複雜需求。例如,自動添加批註能將標準化檢查結果嵌入文檔,刪除冗餘批註可保持文檔整潔性,回覆批註可構建完整的審閲對話鏈,對軟件開發文檔審核、學術論文修訂等需要嚴格版本控制的場景具有顯著實用價值。本文將介紹如何使用Python在Word文檔中添加、刪除和回覆批註,提供步驟介紹和代碼示例。
- 用Python在Word文檔中添加批註到段落
- 用Python在Word文檔中添加批註到文本
- 用Python刪除Word文檔中的批註
- 用Python在Word文檔中回覆批註
本文使用的方法需要用到免費的Free Spire.Doc for Python,PyPI:pip install spire.doc。
用Python在Word文檔中添加批註
我們可以使用Paragraph.AppendComment()方法在Word文檔中添加批註,然後使用Comment.Format.Author屬性對批註的作者進行設置,並設置好批註的開始和結束標記,即可完成批註的創建。以下是操作步驟:
- 導入所需模塊。
- 創建
Document對象,使用Document.LoadFromFile()方法載入Word文檔。 - 使用
Document.Sections.get_Item()方法獲取指定節。 - 使用
Section.Paragraphs.get_Item()方法獲取指定段落。 - 使用
Paragraph.AppendComment()方法添加批註到段落。 - 使用
Comment.Format.Author屬性設置批註作者。 - 通過創建
CommentMark對象,創建批註開始和結束標記。 - 使用
CommentMark.CommentId屬性將開始和結束標記設置為新建的批註的開始和結束標記。 - 使用
Paragraph.ChildObjects.Insert和Paragraph.ChildObjects.Add()方法將批註的開始和結束標記分別插入到段落的開始和末尾。 - 使用
Document.SaveToFile()方法保存Word文檔。 - 釋放資源。
代碼示例
from spire.doc import Document, CommentMark, CommentMarkType

# 創建Document對象
doc = Document()
# 載入Word文檔
doc.LoadFromFile("Sample.docx")

# 獲取文檔第一個節
section = doc.Sections.get_Item(0)
# 獲取節中第一個段落
paragraph = section.Paragraphs.get_Item(4)

# 添加一個批註到段落
comment = paragraph.AppendComment("Does this account for industries like manufacturing or healthcare where remote work isn’t feasible?")

# 設置批註作者
comment.Format.Author = "Jane"

# 創建批註起始標記和結束標記,並設置為新建批註的開始和結束標記
commentStart = CommentMark(doc, CommentMarkType.CommentStart)
commentEnd = CommentMark(doc, CommentMarkType.CommentEnd)
commentStart.CommentId = comment.Format.CommentId
commentEnd.CommentId = comment.Format.CommentId

# 將批註起始標記和結束標記分別插入段落開頭和結束位置
paragraph.ChildObjects.Insert(0, commentStart)
paragraph.ChildObjects.Add(commentEnd)

# 保存文檔
doc.SaveToFile("output/ParagraphComment.docx")
doc.Close()
結果
用Python在Word文檔中添加批註到文本
我們可以使用Document.FindString()方法從文檔中查找指定文本,然後將其獲取為文本區域,再使用添加批註到段落,並將批註開始和結束標記插入到文本區域前後,來實現添加批註到指定文本。以下是操作步驟:
- 導入所需模塊。
- 創建
Document對象,使用Document.LoadFromFile()方法載入Word文檔。 - 使用
Document.FindString()方法從文檔查找需要添加批註的文本。 - 通過創建
Comment對象新建一個批註。 - 使用
Comment.Body.AddParagraph().Text屬性設置批註文本,並使用Comment.Format.Author屬性設置批註作者。 - 使用
TextSelection.GetAsOneRange()方法將查找到的文本獲取為文本區域,然後使用TextRange.OwnerParagraph屬性獲取批註所在的段落。 - 使用
CommentMark.CommentId屬性將開始和結束標記設置為新建的批註的開始和結束標記。 - 使用
Paragraph.ChildObjects.Insert和Paragraph.ChildObjects.Add()方法將批註的開始和結束標記分別插入到段落的開始和末尾。 - 使用
Document.SaveToFile()方法保存Word文檔。 - 釋放資源。
代碼示例
from spire.doc import Document, Comment, CommentMark, CommentMarkType

# 創建Document對象
doc = Document()
# 載入Word文檔
doc.LoadFromFile("Sample.docx")

# 查找需要添加批註的文本
text = doc.FindString("over 60% of global companies", True, True)

# 創建批註對象,並設置批註的作者和內容
comment = Comment(doc)
comment.Body.AddParagraph().Text = "Source for the 60% statistic? Is this global or region-specific?"
comment.Format.Author = "Sara"

# 將找到的文本獲取為文本區域,並獲取該文本區域所在的段落
textRange = text.GetAsOneRange()
paragraph =  textRange.OwnerParagraph

# 將批註對象插入到段落中
paragraph.ChildObjects.Insert(paragraph.ChildObjects.IndexOf(textRange) + 1, comment)

# 創建批註開始和結束標記,並將其設置為新建批註的開始和結束標記
commentStart = CommentMark(doc, CommentMarkType.CommentStart)
commentEnd = CommentMark(doc, CommentMarkType.CommentEnd)
commentStart.CommentId = comment.Format.CommentId
commentEnd.CommentId = comment.Format.CommentId

# 將批註開始和結束標記分別插入到文本區域的前面和後面
paragraph.ChildObjects.Insert(paragraph.ChildObjects.IndexOf(textRange), commentStart)
paragraph.ChildObjects.Insert(paragraph.ChildObjects.IndexOf(textRange) + 1, commentEnd)

# 保存文檔
doc.SaveToFile("output/TextComment.docx")
doc.Close()
結果
用Python刪除Word文檔中的批註
Document.Comments屬性可以獲取文檔中的所有批註。我們可以使用Document.Comments.RemoveAt()刪除指定批註,或使用Document.Comments.Clear()刪除所有批註。以下是操作步驟:
- 導入所需模塊。
- 創建
Document對象,使用Document.LoadFromFile()方法載入Word文檔。 - 使用
Document.Comments.RemoveAt()刪除指定批註,或使用Document.Comments.Clear()刪除所有批註。 - 使用
Document.SaveToFile()方法保存Word文檔。 - 釋放資源。
代碼示例
from spire.doc import Document

# 創建Document對象
doc = Document()
# 載入Word文檔
doc.LoadFromFile("output/ParagraphComment.docx")

# 刪除文檔指定批註
doc.Comments.RemoveAt(0)

# 刪除文檔所有批註
doc.Comments.Clear()

# 保存文檔
doc.SaveToFile("output/RemoveComment.docx")
doc.Close()
用Python在Word文檔中回覆批註
通過新建Comment對象,並使用Comment.ReplyToComment()方法將其設置為指定批註的回覆批註,我們可以實現對指定批註進行回覆。以下是操作步驟:
- 導入所需模塊。
- 創建
Document對象,使用Document.LoadFromFile()方法載入Word文檔。 - 使用
Document.Comments.get_Item()方法獲取指定批註。 - 通過創建
Comment對象新建一個批註。 - 使用
Comment.Body.AddParagraph().Text屬性設置批註文本,並使用Comment.Format.Author屬性設置批註作者。 - 使用
Comment.ReplyToComment()方法將新建的批註設置為獲取的批註的回覆。 - 使用
Document.SaveToFile()方法保存Word文檔。 - 釋放資源。
代碼示例
from spire.doc import Document, Comment

# 創建Document對象
doc = Document()
# 載入Word文檔
doc.LoadFromFile("output/ParagraphComment.docx")

# 獲取批註
comment = doc.Comments.get_Item(0)

# 創建批註對象,設置文本及作者
reply = Comment(doc)
reply.Body.AddParagraph().Text = "It includes manufacturing and healthcare."
reply.Format.Author = "Peter"

# 將新建的批註設置為獲取的批註的回覆
comment.ReplyToComment(reply)

# 保存文檔
doc.SaveToFile("output/CommentReply.docx")
doc.Close()
結果


