


註冊應用程序 - Training | Microsoft Learn
本文轉自:Register an application - Training | Microsoft Learn
註冊應用程序
註冊應用程序會在應用與 Microsoft 標識平台之間建立信任關係。 信任是單向的:應用信任 Microsoft 標識平台,但標識平台並不信任應用。
-
使用管理員帳户登錄到 Microsoft Entra 管理中心 。
-
打開門户菜單,然後選擇“標識”。
-
在“標識”菜單上的“應用程序”下,選擇“應用註冊”。
-
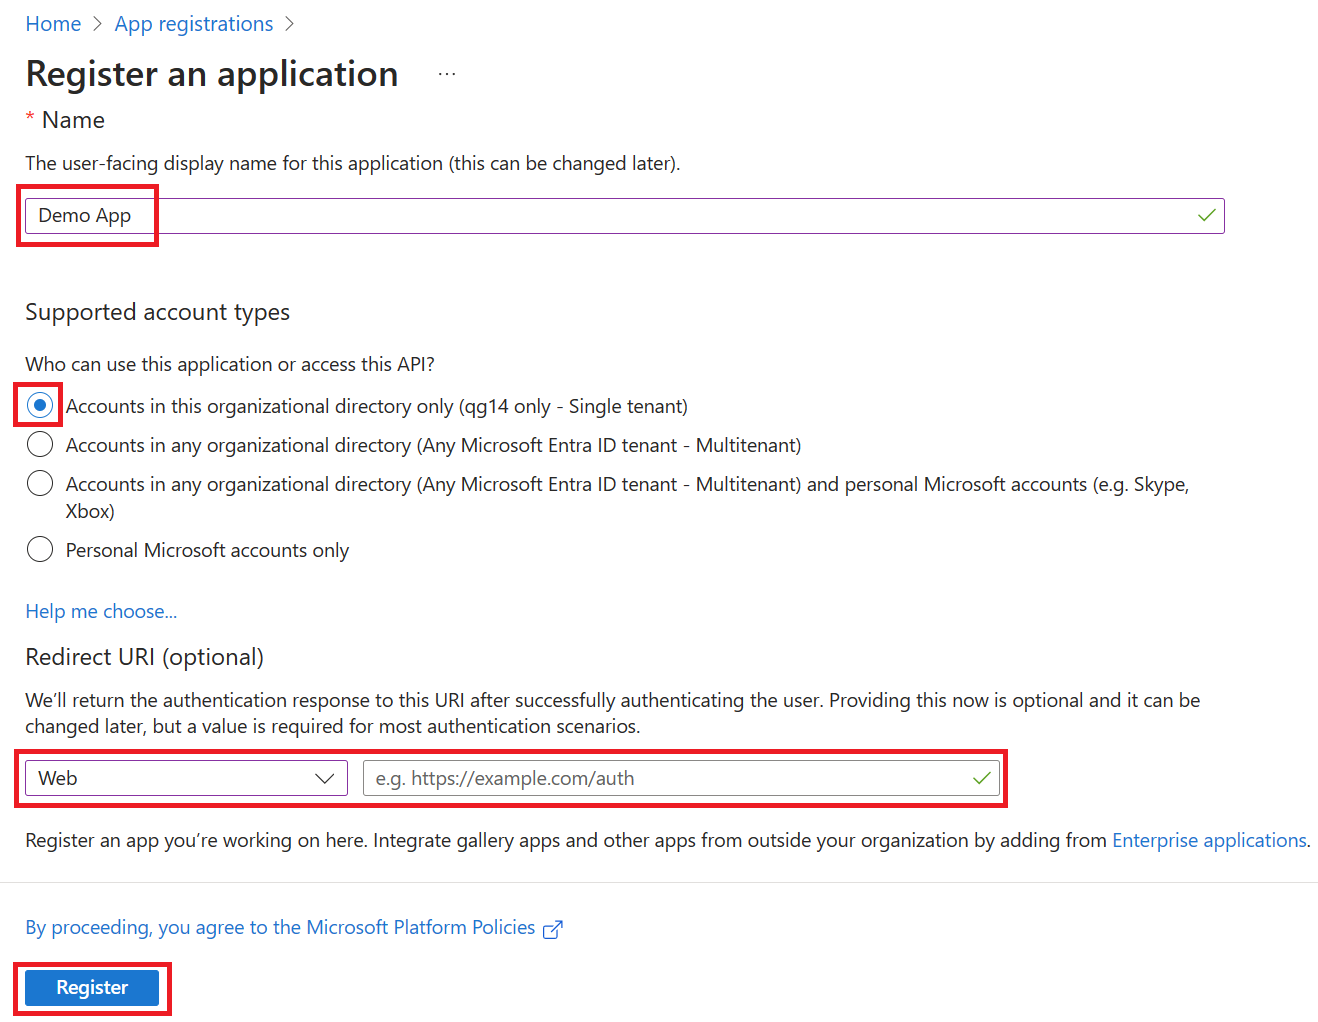
在“應用註冊”頁面上的菜單中,選擇“+新建註冊”。
-
在“註冊應用程序”對話框中,使用默認值註冊一個名為”演示應用”的應用。 無需輸入重定向 URI。
-
完成後,你將轉到“演示應用”屏幕。

添加重定向 URI
重定向 URI 是 Microsoft 標識平台重定向用户客户端並在身份驗證後發送安全令牌的位置。 例如,在生產 Web 應用中,重定向 URI 通常是在其中運行應用的公共終結點。 在開發過程中,通常還會添加用於在本地運行應用的終結點。
配置已註冊的應用程序的平台設置來添加和修改它的重定向 URI。
配置平台設置
在 Azure 門户的“平台配置”中配置每種應用程序類型的設置(包括重定向 URI)。 某些平台(例如 Web 和單頁應用程序)要求手動指定重定向 URI。 對於其他平台(例如移動和桌面),可選擇在配置其他設置時為用户生成的重定向 URI。
要根據面向的平台或設備配置應用程序設置,請執行以下操作:
-
在 Azure 門户中的“應用註冊”中選擇你的應用程序。
-
在“管理”下,選擇“身份驗證”。
-
在“平台配置”下,選擇“添加平台”。
-
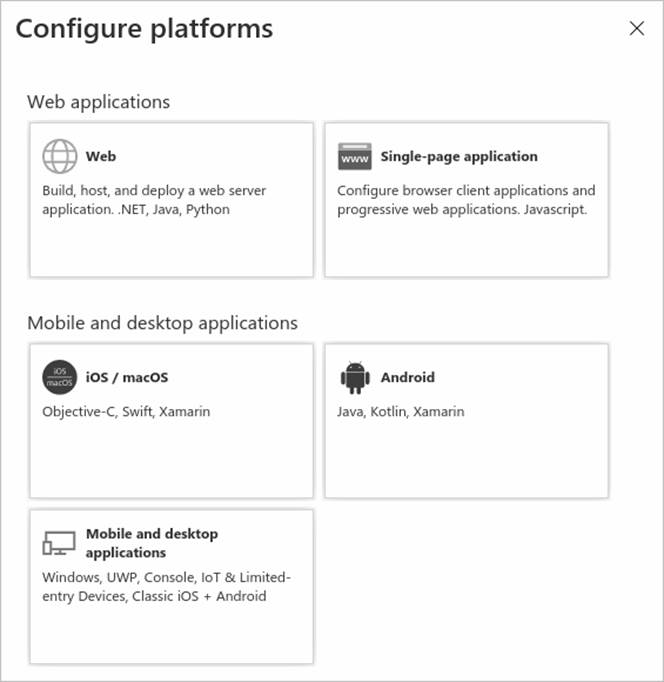
在“配置平台”中,為應用程序類型(平台)選擇磁貼,以配置其設置。
平台 配置設置 Web 輸入應用的重定向 URI,即 Microsoft 標識平台重定向用户客户端並在身份驗證後發送安全令牌的位置。 為服務器上運行的標準 Web 應用程序選擇此平台。 單頁應用程序 輸入應用的重定向 URI,即 Microsoft 標識平台重定向用户客户端並在身份驗證後發送安全令牌的位置。 若要在 JavaScript 中或使用 Angular、Vue.js、React.js 或 Blazor WebAssembly 等框架構建客户端 Web 應用,請選擇此平台。 iOS/macOS 輸入應用捆綁 ID(在 XCode 中的 Info.plist 內或在生成設置中)。在指定捆綁 ID 時,會為你生成一個重定向 URI。 Android 輸入應用包名稱(可在 AndroidManifest.xml 文件中找到),然後生成並輸入簽名哈希。在指定這些設置時,會為你生成一個重定向 URI。 移動和桌面應用程序 選擇一個建議的重定向 URI,或者指定一個自定義重定向 URI。對於桌面應用程序,建議查看 https://login.microsoftonline.com/common/oauth2/nativeclient。對於未在使用最新版 Microsoft 身份驗證庫 (MSAL) 或未在使用代理的移動應用程序,請選擇此平台。 同時也為桌面應用程序選擇此平台。 -
選擇“配置”以完成平台配置。

添加憑據
憑據供訪問 Web API 的機密客户端應用程序使用。 Web 應用、其他 Web API、服務類型的應用程序和守護程序類型的應用程序都是機密客户端。 通過憑據,應用程序可以自己的身份進行身份驗證,無需用户在運行時進行任何交互。
可將證書和客户端密碼(字符串)作為憑據添加到機密客户端應用註冊。
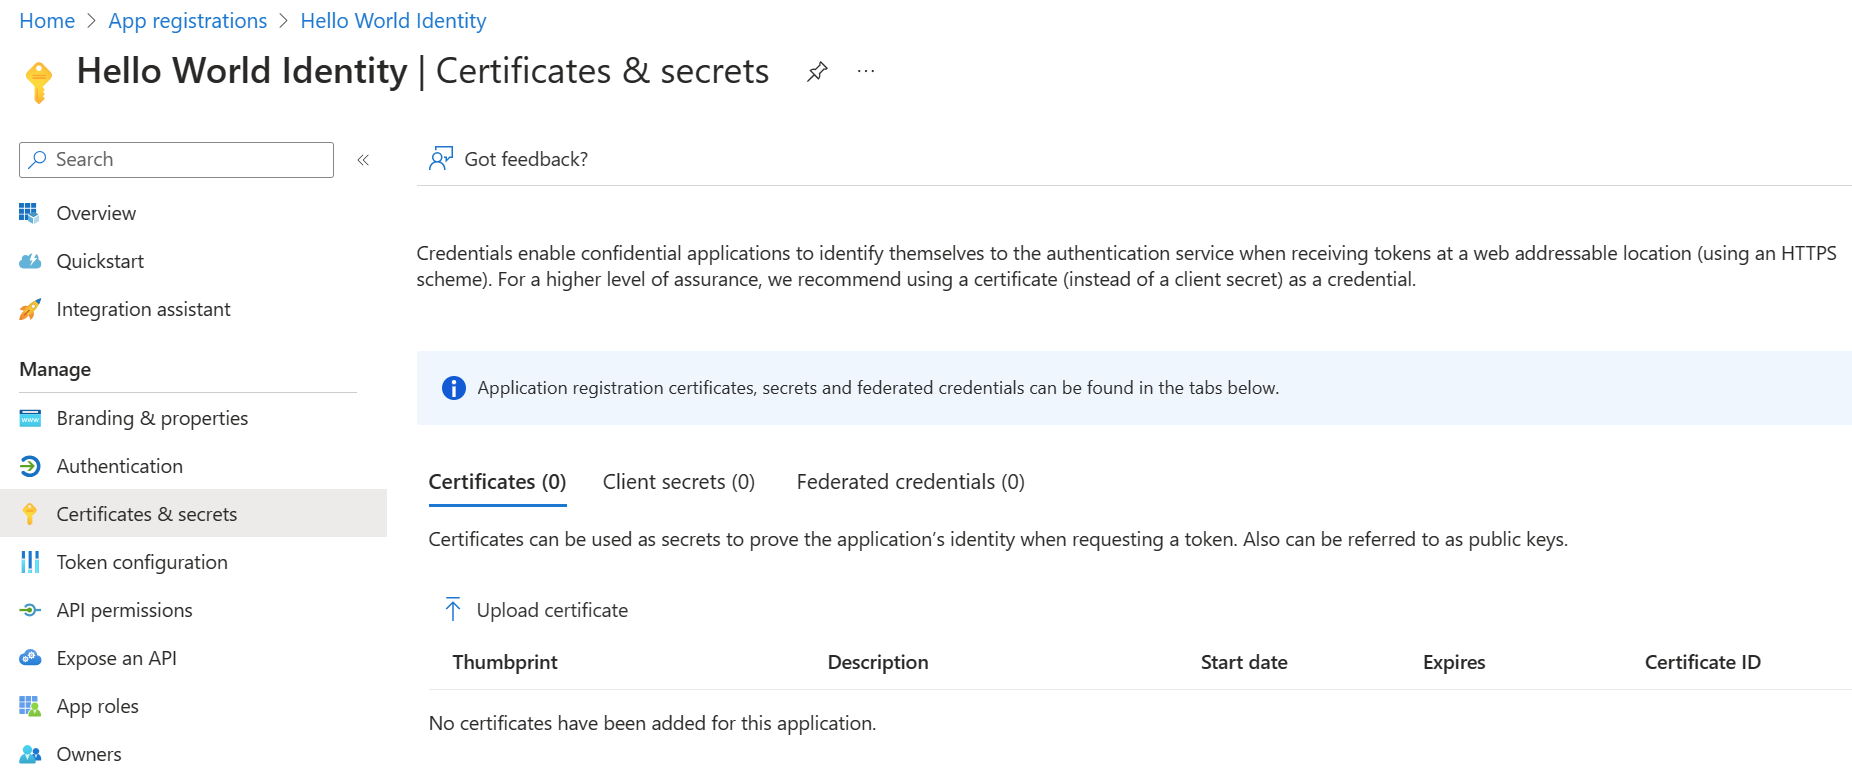
添加證書
證書有時被稱為公鑰,它們是推薦的憑據類型,因為它們提供的保證級別比客户端密碼高。 使用受信任的公共證書時,可使用“證書和密碼”功能添加證書。 證書必須是以下文件類型之一:.cer、.pem、.crt。
添加客户端密碼
客户端密碼也稱為應用程序密碼,它是應用可用於代替證書來標識自身的一個字符串。 在這兩種憑據類型中,它使用起來更加輕鬆。 它常常在開發過程中使用,但它的安全性不如證書。 應在生產環境中運行的應用程序中使用證書。
- 在 Azure 門户中的“應用註冊”中選擇你的應用程序。
- 選擇“證書和密碼”,然後選擇“新建客户端密碼”。
- 添加客户端密碼的説明。
- 選擇持續時間。
- 選擇 “添加”。
- 記錄密碼的值,以供在客户端應用程序代碼中使用;離開此頁面後,它將永不再顯示。
註冊 Web API
若要提供對 Web API 中資源的範圍受限訪問權限,必須先向 Microsoft 標識平台註冊該 API。
- 執行上述步驟。
- 跳過“添加重定向 URI”和“配置平台設置”部分。 無需為 Web API 配置重定向 URI,因為沒有用户以交互方式進行登錄。
- 暫時跳過“添加憑據”部分。 僅當你的 API 訪問下游 API 時,它才需要其自己的憑據 - 本文未涵蓋這一方案。
註冊 Web API 後,便可添加範圍,API 的代碼可使用這些範圍向 API 的使用者提供具體權限。
添加範圍
客户端應用程序中的代碼通過將訪問令牌及其請求傳遞到受保護的資源 (Web API) 來請求執行由 Web API 定義的操作的權限。 然後,僅當 Web API 接收的訪問令牌包含操作所需的範圍(也稱為應用程序權限)時,該 API 才會執行請求的操作。
首先,請按照以下步驟創建一個名為 Employees.Read.All 的示例範圍:
-
登錄到 Azure 門户。
-
如果有權訪問多個租户,請使用頂部菜單中的“目錄 + 訂閲”篩選器,選擇包含你的客户端應用註冊的租户。
-
依次選擇“Microsoft Entra ID”和“應用註冊”,然後選擇 API 的應用註冊。
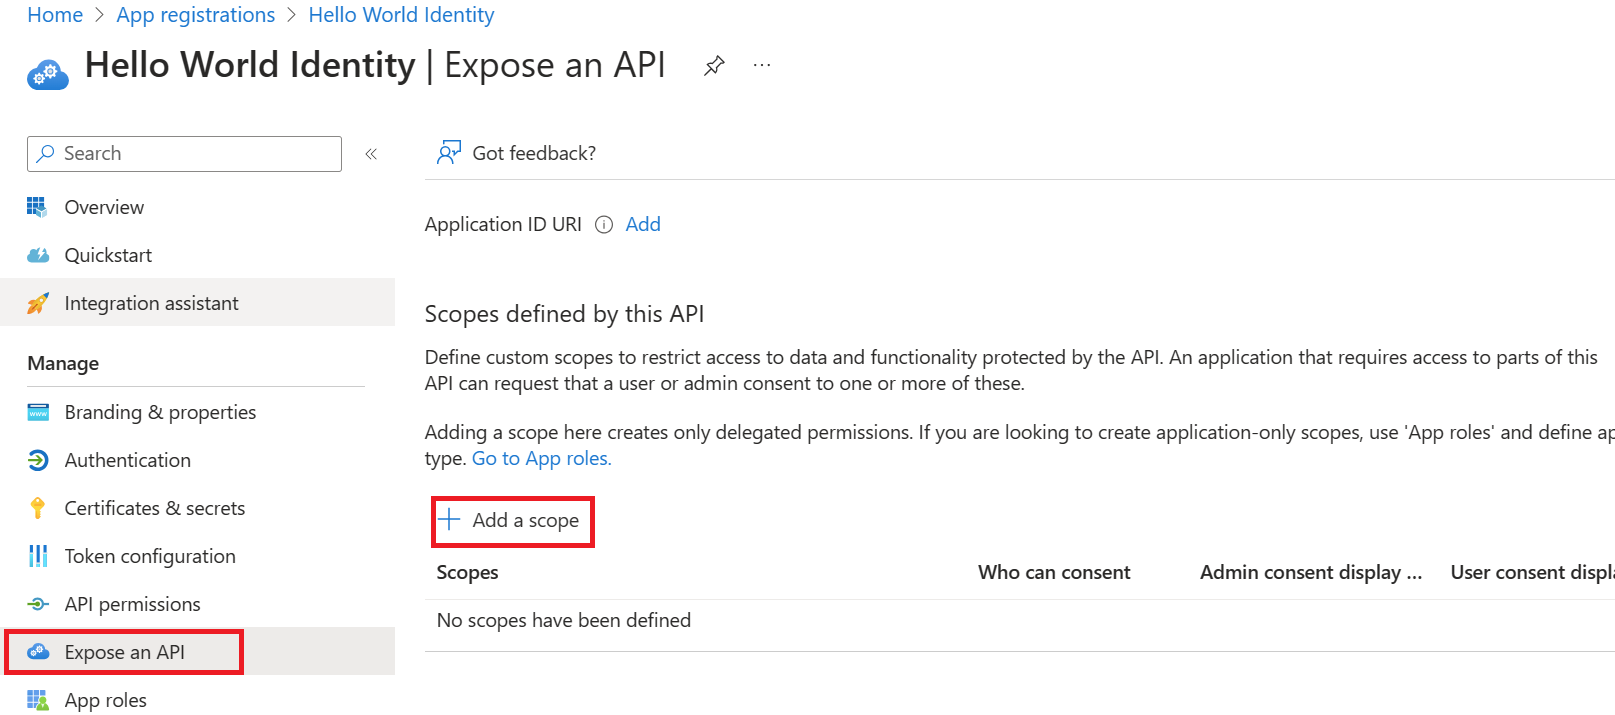
-
依次選擇“公開 API”、“添加範圍”。
-
如果尚未配置應用程序 ID URI,系統會提示你設置一個。 應用 ID URI 充當你將在 API 代碼中引用的範圍的前綴,它必須是全局獨一無二的。 你可以使用提供的默認值(格式為
api://)或指定更具可讀性的 URI,例如https://contoso.com/api。 -
接下來,在“添加範圍”窗格中指定範圍的屬性。 對於本演練,你可以使用示例值或指定自己的值。
字段 描述 例 範圍名稱 範圍的名稱。 公共範圍命名約束為 resource.operation.constraint。 Employees.Read.All 誰可以同意 管理員選擇這個範圍是否可以得到用户同意,或者是否需要管理員同意。 要獲得更高特權,請選擇“僅管理員”。 管理員和用户 管理員同意顯示名稱 僅管理員可以看到的範圍用途的簡短説明。 對員工記錄的只讀訪問權限 管理員同意説明 僅管理員可以看到的範圍所授予權限的更詳細説明。 允許應用程序對所有員工數據進行只讀訪問。 用户同意顯示名稱 範圍用途的簡短説明。 只有當你設置了“誰可以同意管理員和用户”時才會顯示給用户。 對員工記錄的只讀訪問權限 用户同意説明 範圍所授予權限的更詳細説明。 只有當你設置了“誰可以同意管理員和用户”時才會顯示給用户。 允許應用程序對員工數據進行只讀訪問。 -
將“狀態”設置為“啓用”,然後選擇“添加範圍”。
-
(可選)要取消嚮應用用户提示同意你定義的範圍,可以預授權客户端應用程序訪問 Web API。 請僅預授權所信任的客户端應用程序,因為用户不會有機會拒絕同意。
- 在“授權的客户端應用程序”下,選擇“添加客户端應用程序”。
- 輸入要預授權的客户端應用程序的“應用程序(客户端) ID”。 例如,以前註冊的 Web 應用程序的 ID。
- 在“授權的範圍”下,選擇要取消顯示同意提示的範圍,然後選擇“添加應用程序”。
- 如果按照此可選步驟操作,客户端應用現在就是一個預授權的客户端應用 (PCA);當用户登錄它時,系統將不提示用户授予同意。

添加需要管理員同意的範圍
接下來,再添加一個名為 Employees.Write.All 的示例範圍,只有管理員才能同意該範圍。 需要管理員同意的範圍通常用於提供對更高特權的操作的訪問權限,通常由作為後端服務運行的客户端應用程序或不以交互方式登錄用户的後台程序使用。
若要添加 Employees.Write.All 示例範圍,請按照上述步驟操作,在“添加範圍”窗格中指定以下值:
| 字段 | 示例值 |
|---|---|
| 範圍名稱 | Employees.Write.All |
| 誰可以同意 | 僅管理員 |
| 管理員同意顯示名稱 | 對員工記錄的寫入訪問權限 |
| 管理員同意説明 | 允許應用程序對所有員工數據進行寫入訪問。 |
| 用户同意顯示名稱 | 無(留空) |
| 用户同意説明 | 無(留空) |
驗證公開的範圍
如果已成功添加先前部分中所介紹的兩個示例範圍,則它們將顯示在 Web API 的應用註冊的“公開 API”窗格中,類似於以下內容:

如圖所示,範圍的完整字符串由 Web API 的“應用程序 ID URI”與範圍的“範圍名稱”串聯而成。
例如,如果 Web API 的應用程序 ID URI 為 https://contoso.com/api,範圍名稱為 Employees.Read.All,則完整範圍為:
https://contoso.com/api/Employees.Read.All
使用公開的範圍
接下來,你將按照上述步驟配置客户端應用的註冊,其中包含對 Web API 的訪問權限和你所定義的範圍。
向客户端應用註冊授予訪問 Web API 的權限後,Microsoft 標識平台可向客户端頒發 OAuth 2.0 訪問令牌。 當客户端調用 Web API 時,它會提供一個訪問令牌,令牌的範圍 (scp) 聲明設置為你在客户端的應用註冊中所指定的權限。
以後可以根據需要公開其他範圍。 請考慮 Web API 可以公開與多個操作關聯的多個範圍。 在運行時,資源可通過評估其收到的 OAuth 2.0 訪問令牌中的範圍 (scp) 聲明,來控制對 Web API 的訪問。
後台發生的情況
- 應用註冊是在主租户中創建的
- 應用將在 Microsoft Entra ID 中通過安全主體實例化
- 根據公開的 API 的設置,安全主體由第一位用户或管理員授予許可
- 當用户訪問應用程序並使用 API 時,安全主體會被授予安全令牌
下一單元: 為應用程序配置權限
Plan your line of business application registration strategy - Training | Microsoft Learn
Register an application
Registering your application establishes a trust relationship between your app and the Microsoft identity platform. The trust is unidirectional: Your app trusts the Microsoft identity platform—not the other way around.
-
Sign in to the Microsoft Entra admin center using an Administrator account.
-
Open the portal menu and then select Identity.
-
On the Identity menu, under Applications, select App registrations.
-
On the App registrations page, on the menu, select + New registration.
-
On the register an application dialog, register an app named Demo app using the default values. You don't need to enter the redirect URI.
-
When complete, you'll be directed to the Demo app screen.
Add a redirect URI
A redirect URI is the location where the Microsoft identity platform redirects a user's client and sends security tokens after authentication. In a production web application, for example, the redirect URI is often a public endpoint where your app is running. During development, it's common to also add the endpoint where you run your app locally.
Add and modify redirect URIs for your registered applications by configuring their platform settings.
Configure platform settings
Settings for each application type, including redirect URIs, are configured in Platform configurations in the Azure portal. Some platforms, like Web and Single-page applications, require you to manually specify a redirect URI. For other platforms, like mobile and desktop, you can select from redirect URIs generated for you when you configure their other settings.
To configure application settings based on the platform or device you're targeting:
-
Select your application in App registrations in the Azure portal.
-
Under Manage, select Authentication.
-
Under Platform configurations, select Add a platform.
-
In Configure platforms, select the tile for your application type (platform) to configure its settings.
Platform Configuration settings Web Enter a Redirect URI for your app, the location where Microsoft identity platform redirects a user's client and sends security tokens after authentication. Select this platform for standard web applications that run on a server. Single-page application Enter a Redirect URI for your app, the location where Microsoft identity platform redirects a user's client and sends security tokens after authentication. Select this platform if you're building a client-side web app in JavaScript or with a framework like Angular, Vue.js, React.js, or Blazor WebAssembly. iOS/macOS Enter the app Bundle ID, found in XCode in Info.plist or Build Settings.A redirect URI is generated for you when you specify a Bundle ID. Android Enter the app Package name, which you can find in the AndroidManifest.xml file, and generate and enter the Signature hash.A redirect URI is generated for you when you specify these settings. Mobile and desktop applications Select one of the Suggested redirect URIs or specify a Custom redirect URI.For desktop applications, we recommend:https://login.microsoftonline.com/common/oauth2/nativeclient Select this platform for mobile applications that aren't using the latest Microsoft Authentication Library (MSAL) or aren't using a broker. Also select this platform for desktop applications. -
Select Configure to complete the platform configuration.
Add credentials
Credentials are used by confidential client applications that access a web API. Examples of confidential clients include web apps, other web APIs, and service-type and daemon-type applications. Credentials allow your application to authenticate as itself, requiring no interaction from a user at runtime.
You can add both certificates and client secrets (a string) as credentials to your confidential client app registration.

Add a certificate
Sometimes called a public key, certificates are the recommended credential type, because as they provide a higher level of assurance than a client secret. When using a trusted public certificate, you can add the certificate using the Certificates & secrets feature. Your certificate must be one of the following file types: .cer, .pem, .crt.
Add a client secret
The client secret, also known as an application password, is a string value your app can use in place of a certificate to identity itself. It's the easier of the two credential types to use. It's often used during development, but is considered less secure than a certificate. You should use certificates in your applications running in production.
- Select your application in App registrations in the Azure portal.
- Select Certificates and secrets, then select New client secret.
- Add a description for your client secret.
- Select a duration.
- Select Add.
- Record the secret's value for use in your client application code; It's never displayed again after you leave this page.
Register the web API
To provide scoped access to the resources in your web API, you must first register the API with the Microsoft identity platform.
- Perform the steps above.
- Skip the Add a redirect URI and Configure platform settings sections. You don't need to configure a redirect URI for a web API since no user is logged in interactively.
- Skip the Add credentials section for now. Only if your API accesses a downstream API would it need its own credentials—a scenario not covered in this article.
With your web API registered, you're ready to add the scopes that your API's code can use to provide granular permission to consumers of your API.
Add a scope
The code in a client application requests permission to perform operations defined by your web API by passing an access token along with its requests to the protected resource (the web API). Your web API then performs the requested operation only if the access token it receives contains the scopes (also known as application permissions) required for the operation.
First, follow these steps to create an example scope named Employees.Read.All:
-
Sign in to the Azure portal.
-
If you have access to multiple tenants, use the Directory + subscription filter in the top menu to select the tenant containing your client app's registration.
-
Select Microsoft Entra ID, then App registrations, and then select your API's app registration.
-
Select Expose an API, then Add a scope.
-
You're prompted to set an Application ID URI if you haven't yet configured one. The App ID URI acts as the prefix for the scopes you'll reference in your API's code, and it must be globally unique. You can use the default value provided, which is in the form
api://, or specify a more readable URI likehttps://contoso.com/api. -
Next, specify the scope's attributes in the Add a scope pane. For this walk-through, you can use the example values or specify your own.
Field Description Example Scope name The name of your scope. A common scope naming convention is resource.operation.constraint. Employees.Read.All Who can consent The admin chooses if this scope can be consented to by users, or if admin consent is required. Select Admins only for higher-privileged permissions. Admins and users Admin consent display name A short description of the scope's purpose that only admins will see. Read-only access to employee records Admin consent description A more detailed description of the permission granted by the scope that only admins will see. Allow the application to have read-only access to all employee data. User consent display name A short description of the scope's purpose. Shown to users only if you set the Who can consent to Admins and users. Read-only access to your employee records User consent description A more detailed description of the permission granted by the scope. Shown to users only if you set the Who can consent to Admins and users. Allow the application to have read-only access to your employee data. -
Set the State to Enabled, and then select Add scope.
-
(Optional) To suppress prompting for consent by users of your app to the scopes you've defined, you can pre-authorize the client application to access your web API. Pre-authorize only those client applications you trust since your users won't have the opportunity to decline consent.
- Under Authorized client applications, select Add a client application.
- Enter the Application (client) ID of the client application you want to pre-authorize. For example, that of a web application you've previously registered.
- Under Authorized scopes, select the scopes for which you want to suppress consent prompting, then select Add application.
- If you followed this optional step, the client app is now a pre-authorized client app (PCA), and users won't be prompted for their consent when signing into it.
Add a scope requiring admin consent
Next, add another example scope named Employees.Write.All that only admins can consent to. Scopes that require admin consent are typically used for providing access to higher-privileged operations, often by client applications that run as backend services or daemons that don't sign in a user interactively.
To add the Employees.Write.All example scope, follow the steps above and specify these values in the Add a scope pane:
| Field | Example value |
|---|---|
| Scope name | Employees.Write.All |
| Who can consent | Admins only |
| Admin consent display name | Write access to employee records |
| Admin consent description | Allow the application to have write access to all employee data. |
| User consent display name | None (leave empty) |
| User consent description | None (leave empty) |
Verify the exposed scopes
If you successfully added both example scopes described in the previous sections, they'll appear in the Expose an API pane of your web API's app registration, similar to this image:

As shown in the image, a scope's full string is the concatenation of your web API's Application ID URI and the scope's Scope name.
For example, if your web API's application ID URI is https://contoso.com/api and the scope name is Employees.Read.All, the full scope is:
https://contoso.com/api/Employees.Read.All
Using the exposed scopes
Next, you'll configure a client app's registration with access to your web API and the scopes you defined by following the steps above.
Once a client app registration is granted permission to access your web API, the client can be issued an OAuth 2.0 access token by the Microsoft identity platform. When the client calls the web API, it presents an access token whose scope (scp) claim is set to the permissions you've specified in the client's app registration.
You can expose additional scopes later as necessary. Consider that your web API can expose multiple scopes associated with several operations. Your resource can control access to the web API at runtime by evaluating the scope (scp) claim(s) in the OAuth 2.0 access token it receives.
What is going on behind the scenes
- The app registration is created in the home tenant
- The app is instantiated with a security principal in Microsoft Entra ID
- The security principal is granted consent by either the first user or admin, based on the setup of the exposed API
- The security principal is granted the security token as the user accesses the application and uses the API
Next unit: Configure permission for an application

