

Web 無障礙工程化實戰:VSCode 擴展 + AI 自動修復全解析
在大型Web系統開發中,界面是否符合無障礙設計標準,直接影響着不同能力用户的使用體驗。
然而在功能複雜、界面繁多的Web系統中,開發團隊往往將重心集中在業務邏輯實現和功能完整性上,容易忽視界面的可訪問性設計,導致特殊用户羣體無法正常使用系統功能。
通過遵循無障礙設計原則,可以確保視覺障礙、聽覺障礙、運動障礙等不同需求的用户都能平等地訪問和使用Web應用。
本文將從理論到實踐,全面闡述無障礙開發的核心概念與實施方案。首先介紹無障礙開發的基本理念和重要意義,然後解析WCAG等主流無障礙規範標準,梳理當前可用的無障礙檢測和修復工具生態。最後,本文將通過實現一個功能完整的VSCode擴展插件,為Web開發人員提供集成化的無障礙開發輔助工具,幫助開發團隊在日常編碼過程中更好地識別和解決無障礙問題。
引言
WCAG(Web Content Accessibility Guidelines) 是由 W3C 的 WAI 組織制定的網絡內容無障礙標準。這套指南主要為殘障人士提供更好的網絡訪問體驗,同時也能改善所有用户和設備(包括數字助理等受限設備)的使用體驗。
目前 WCAG 2.2 是最新的正式版本,而 WCAG 2.1 和 2.0 仍在廣泛使用中。
WCAG 3.0 還處於工作草案階段。新版本並不會取代舊版本,但 WAI 建議開發者優先使用最新版本,以確保網站獲得最佳的無障礙訪問效果。
無障礙指南:https://www.w3.org/TR/WCAG21/
Web界面案例分析
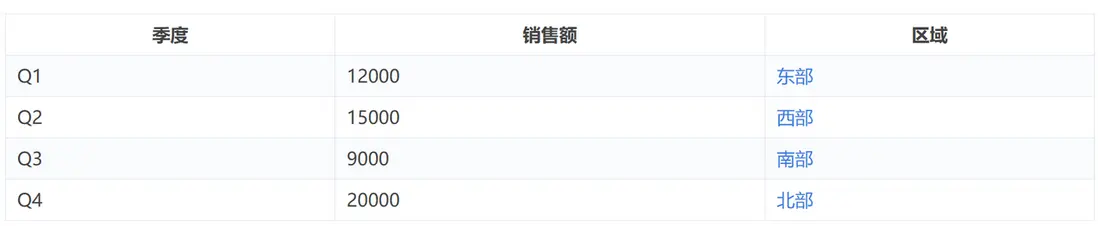
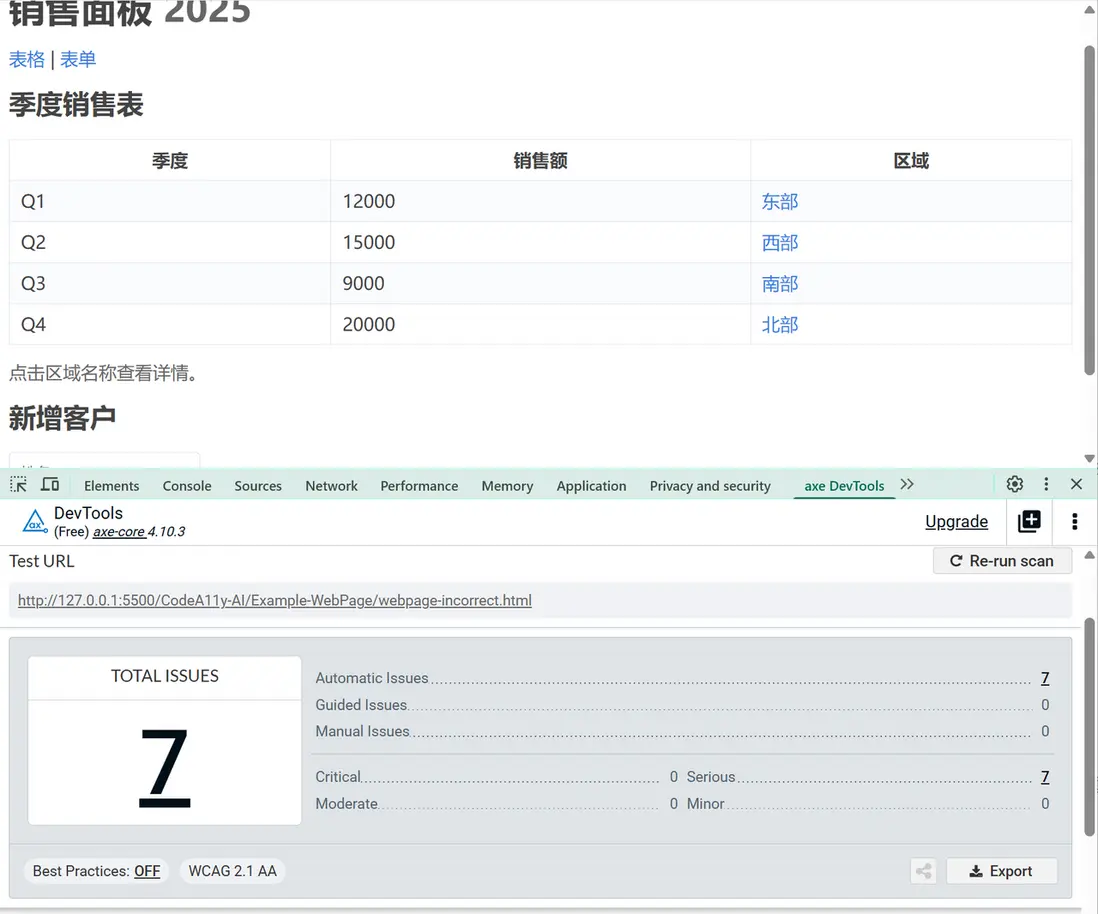
下圖是一個存在多個問題的Web界面和修復後的結果

從直觀上看,左側的web界面給人的印象是模糊混亂的,右側的web界面給人的印象是簡潔美觀的。原因在於左側的web界面沒有考慮無障礙指南中提到的多個要點,下面我們將逐一分析界面存在的問題。
以下是左側界面表格部分源碼:
<h2>季度銷售表</h2>
<table>
    <tr>
        <th>季度</th>
        <th>銷售額</th>
        <th>區域</th>
    </tr>
    <tr>
        <td>Q1</td>
        <td>12000</td>
        <td><a href="#">東部</a></td>
    </tr>
    <tr>
        <td>Q2</td>
        <td>15000</td>
        <td><a href="#">西部</a></td>
    </tr>
    <tr>
        <td>Q3</td>
        <td>9000</td>
        <td><a href="#">南部</a></td>
    </tr>
    <tr>
        <td>Q4</td>
        <td>20000</td>
        <td><a href="#">北部</a></td>
    </tr>
</table>
在設計表格時,由於缺少 <caption> 標籤,表格標題用 <h2> 寫在外面。也沒有使用 <thead> 和 <tbody> 區分表頭和數據區域,這將導致屏幕閲讀器無法將標題與表格關聯。
當表格沒有正確標記的表頭時,屏幕閲讀器只能逐個朗讀單元格內容,用户聽到的是一串沒有上下文的數據,完全不知道每個數據代表什麼意思。除此之外,表格的樣式設計也存在問題,雖然使用了奇偶行顏色差異,但是色差較小,最終給人的直觀印象不夠清晰明瞭
tbody tr:nth-child(even) {
    background: #FAFBFE;
}
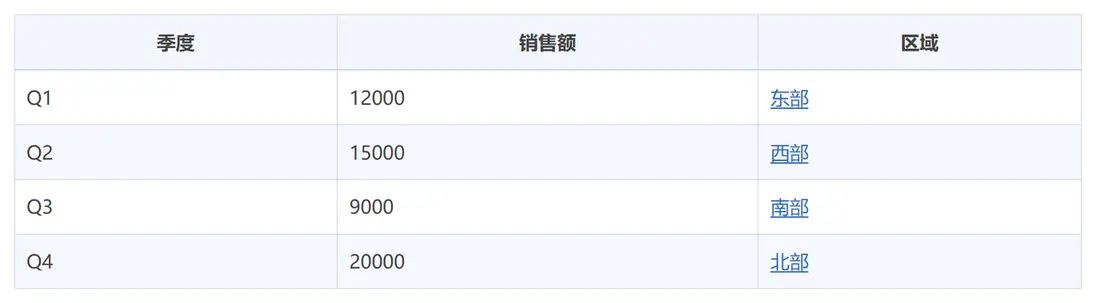
修改後的代碼如下:
<table>
    <caption class="visually-hidden">2025 年各季度按區域的銷售額(單位:元)</caption>
    <thead>
        <tr>
            <th scope="col">季度</th>
            <th scope="col">銷售額</th>
            <th scope="col">區域</th>
        </tr>
    </thead>
    <tbody>
        <tr>
            <td>Q1</td>
            <td>12000</td>
            <td><a href="#">東部</a></td>
        </tr>
        <tr>
            <td>Q2</td>
            <td>15000</td>
            <td><a href="#">西部</a></td>
        </tr>
        <tr>
            <td>Q3</td>
            <td>9000</td>
            <td><a href="#">南部</a></td>
        </tr>
        <tr>
            <td>Q4</td>
            <td>20000</td>
            <td><a href="#">北部</a></td>
        </tr>
    </tbody>
</table>
除此之外,對顏色也做了調整:
tbody tr:nth-child(even) {
    background: #F5F8FF;
}
最終效果如下:
再來觀察原界面的表單部分,輸入框得到焦點後,樣式設計也不夠直觀。

此外按鈕的背景色和前景色的對比度也較小,不夠清晰。
:focus {
    outline: none;
    box-shadow: 0 0 0 2px rgba(26, 115, 232, 0.25);
    border-radius: 4px;
}

.btn {
    display: inline-block;
    background: #4A90E2;
    color: #fff;
    padding: 5px;
    border: 0;
    border-radius: 3px;
    cursor: pointer;
}
讓我們使用以下代碼,修正表單樣式,突出文本框得到焦點後的樣式,讓按鈕的對比度更強烈
:focus-visible {
    outline: 3px solid #1A73E8;
    outline-offset: 2px;
}

.btn {
    background: #2F6BC2;
    color: #fff;
    padding: 8px;
    border: 0;
    border-radius: 6px;
    cursor: pointer;
}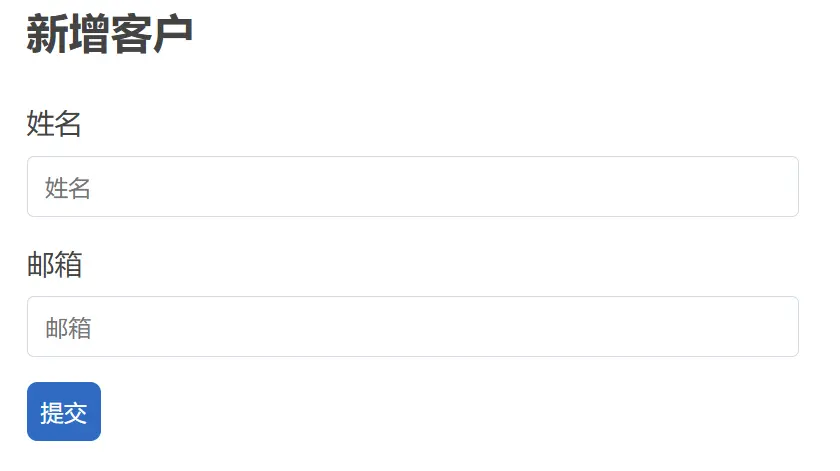
修改之後的界面明顯更清晰直觀。
無障礙指南
基於以上分析,我們瞭解到web界面存在多種設計細節,每一處缺陷都可能讓整個界面的用户體驗大打折扣。
那麼標準的無障礙指南都制定了那些規範呢?
讓我們看看下總結的內容:
1)對比度達標
- 設計原則1:對比度達標
- 設計思路1:保證文字和背景有足夠的對比度,用户能很容易分辨出頁面的組件
-
代碼分析1:
/* ❌ 對比度不足 */
.bad-contrast {
  color: #999999;
  background: #ffffff; /* 對比度約 2.85:1 */
}

/* ✅ 符合 AA 標準 */
.good-contrast {
  color: #595959;
  background: #ffffff; /* 對比度約 4.54:1 */
}

/* ✅ 符合 AAA 標準 */
.excellent-contrast {
  color: #333333;
  background: #ffffff; /* 對比度約 7.73:1 */
}
2)圖片設置替代文本
- 設計原則2:圖片設置替代文本
- 設計思路2:所有非文本內容提供合適的 alt,供讀屏器朗讀,輔助用户理解含義
-
代碼分析2:
<!-- ✅ 描述圖片傳達的信息 -->
<img src="sales-chart.png" alt="2023年第四季度銷售額增長25%">

<!-- ❌ 不設置alt屬性 -->
<img src="sales-chart.png">
3)鍵盤無障礙
- 設計原則3:鍵盤無障礙
- 設計思路3:所有功能可用鍵盤操作,焦點順序合理且樣式清晰可見
-
代碼分析3:
/* ✅ 清晰的焦點指示 */
button:focus {
  outline: 2px solid #005fcc;
  outline-offset: 2px;
}

/* ✅ 高對比度焦點樣式 */
.custom-focus:focus {
  box-shadow: 0 0 0 3px rgba(0, 95, 204, 0.3);
  border: 2px solid #005fcc;
}

/* ❌ 移除焦點樣式 */
button:focus {
  outline: none;
}
4)表單可理解
- 設計原則4:表單可理解
- 設計思路4:每個輸入有 <label> 程序化關聯,使用aria-describedby屬性描述組件的輸入信息和錯誤提示,供讀屏器朗讀
-
代碼分析4:
<!-- ✅ 使用 fieldset 和 legend -->
<fieldset>
  <legend>聯繫方式</legend>
  <label for="phone">電話</label>
  <input type="tel" id="phone">

  <label for="email2">郵箱</label>
  <input type="email" id="email2">
</fieldset>

<!-- ✅ 單選按鈕組 -->
<fieldset>
  <legend>選擇付款方式</legend>
  <input type="radio" id="credit" name="payment" value="credit">
  <label for="credit">信用卡</label>

  <input type="radio" id="paypal" name="payment" value="paypal">
  <label for="paypal">PayPal</label>
</fieldset>
5)語義結構與原生優先
- 設計原則5:語義結構與原生優先
- 設計思路5:正確使用標題層級、列表、表格表頭/範圍;優先使用 <button>/ 等原生控件,而不是div代替
-
代碼分析5:
<!-- ✅ 使用原生按鈕 -->
<button type="button" onclick="submitForm()">提交</button>

<!-- ❌ 用 div 模擬按鈕 -->
<div class="fake-button" onclick="submitForm()">提交</div>

<!-- ✅ 原生鏈接 -->
<a href="/products">查看產品</a>

<!-- ❌ 用其他標籤模擬鏈接 -->
<span class="fake-link" onclick="location.href='/products'">查看產品</span>
6)響應式與可重排
- 設計原則6:響應式與可重排
- 設計思路6:在窄屏(如 320px)內容清晰可讀、不需水平滾動<button>/ 等原生控件,而不是div代替
-
代碼分析6:
/* ✅ 相對單位確保可縮放 */
body {
  font-size: 1rem; /* 16px */
  line-height: 1.5;
}

h1 {
  font-size: 2rem; /* 32px */
}

/* ✅ 在小屏幕上適當調整 */
@media (max-width: 320px) {
  body {
      font-size: 0.9rem;
  }

  h1 {
      font-size: 1.75rem;
  }
}
axe掃描器工具
除了上文詳細介紹的各種無障礙界面設計原則,開發中我們可以借用掃描器工具,檢查web界面是否存在問題。
axe DevTools 是由 Deque 開發的Chrome 瀏覽器擴展,專為開發者、測試人員和設計師打造的無障礙檢測工具。它基於業界知名的 axe-core 引擎,能夠快速、準確地發現並修復網站無障礙問題。
axe DevTools 安裝地址:https://chromewebstore.google.com/detail/axe-devtools-web-acc...
安裝上述擴展後,可以按照如下步驟檢測:
首先,打開開發者調試窗口:
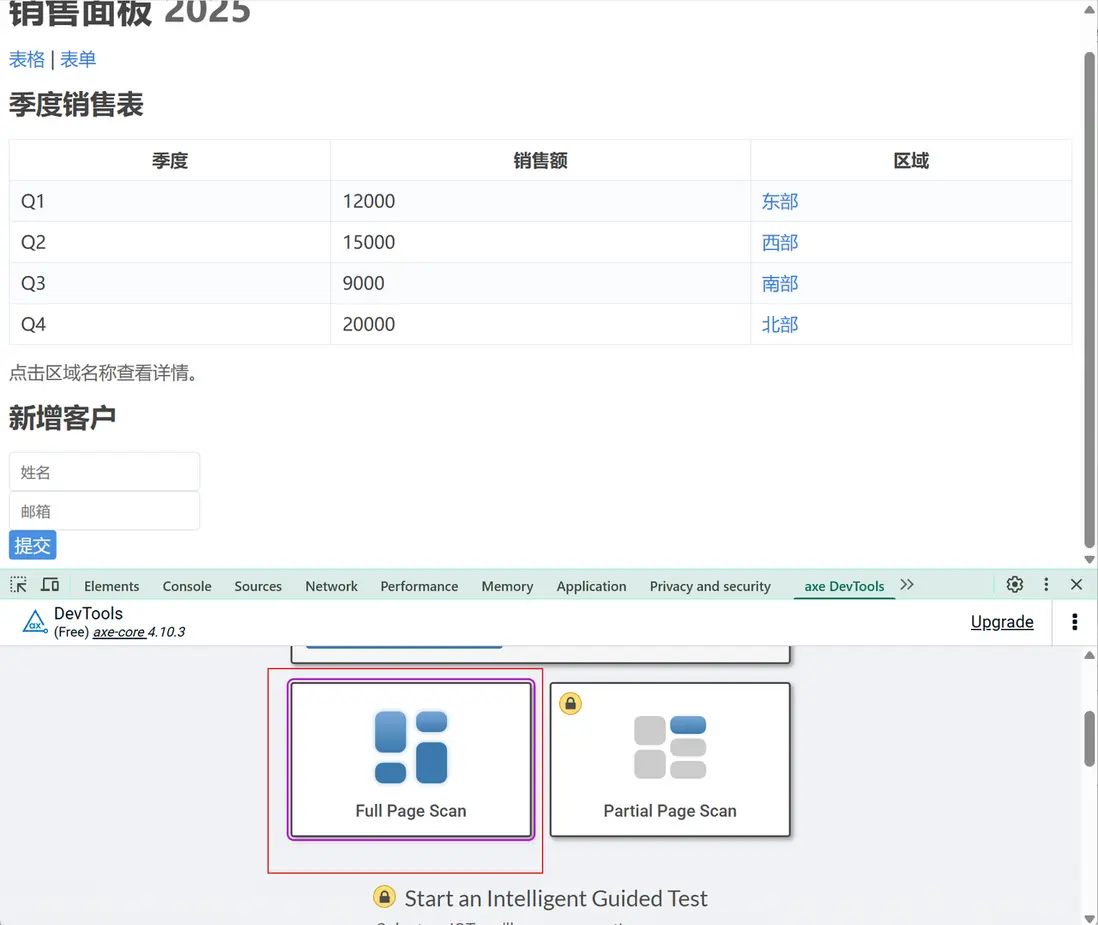
找到新增的axe DevTools的tab標籤,點擊後即可打開axe 工具的界面
框選界面某個部分,即可開始檢測。例如下圖檢測出表單存在一些問題:
VSCode 擴展實現界面無障礙檢測
除了使用 axe DevTools工具,我們還可以使用其他工具進行檢測
axe-core 是一個專為網站和 HTML 界面設計的無障礙測試引擎,支持 WCAG 2.0、2.1、2.2 各級別標準,具有快速、安全、輕量級的特點,能夠無縫集成到現有測試環境中。
下面是一個簡單的介紹:
首先安裝 axe-core這個npm包:
npm install axe-core --save-devaxe-core包提供了axe模塊,該模塊提供了一個run方法,運行之後可以檢查出頁面所有的無障礙問題,實現的JS代碼如下:
axe
  .run()
  .then(results => {
    if (results.violations.length) {
      console.log('發現無障礙問題:', results.violations);
      throw new Error('Accessibility issues found');
    } else {
      console.log('未發現無障礙問題!');
    }
  })
  .catch(err => {
    console.error('檢測過程中出錯:', err.message);
  });
除此之外,我們還可以配置檢測的具體規則,以及某條規則檢測失敗後,如何彙報警告消息
// 配置檢測規則和級別
axe.configure({
  branding: {
    brand: "測試應用",
    application: "accessibility-checker"
  },
  rules: {
    // 禁用某些規則
    'color-contrast': { enabled: false },
    // 只檢查 AA 級別
    'wcag2aa': { enabled: true }
  },
  // 只運行指定標籤的規則
  tags: ['wcag2a', 'wcag2aa']
});

// 應用中文本地化
axe.configure({
  locale: {
    lang: 'zh',
    rules: {
      'missing-headings': {
        help: '頁面應該包含至少一個 h1 標題'
      }
    },
    checks: {
      'color-contrast': {
        fail: '文本顏色與背景顏色對比度不足'
      }
    }
  }
});
基於以上對axe的基本使用,我們可以創建一個vscode擴展用來在編寫web界面時檢測無障礙問題。
1 使用如下命令搭建環境:
npm install -g yo generator-codeYeoman 是微軟推薦的腳手架工具,它會為我們生成完整的擴展項目結構:
yo: Yeoman 命令行工具,用於運行代碼生成器generator-code: 微軟官方的 VSCode 擴展生成器,包含了擴展開發的最佳實踐模板
生成的項目結構包含:
src/extension.ts: 擴展的主入口文件,包含activate和deactivate函數package.json: 擴展的清單文件,定義擴展的功能、命令、配置等tsconfig.json: TypeScript 編譯配置.vscode/: 包含調試配置,讓我們能夠直接在 VSCode 中調試擴展
2 安裝依賴包
運行如下命令
cd accessibility-checker
npm install axe-core jsdom
npm install --save-dev @types/vscode-
axe-core- 一個純 JavaScript 庫,可以在任何 JavaScript 環境中運行
- 包含了 WCAG 2.0/2.1/2.2 的完整規則集,覆蓋 A、AA、AAA 三個等級
-
jsdom: Node.js 環境下的 DOM 模擬器- 由於 axe-core 需要 DOM 環境才能運行,而 VSCode 擴展運行在 Node.js 中
- jsdom 創建一個完整的虛擬 DOM 環境,讓我們能在後端運行前端代碼
- 支持大部分 Web API,包括
document、window、Element等
-
@types/vscode: VSCode API 的 TypeScript 類型定義- 提供完整的 VSCode 擴展 API 類型提示
- 包含所有命令、事件、UI 組件的類型定義
- 讓我們能夠安全地使用 VSCode 的各種功能
3 創建 axe-core 掃描器
axe-core 原本設計在瀏覽器中運行,需要 DOM 環境,我們需要將瀏覽器環境下的 axe-core 移植到 VSCode 擴展的 Node.js 環境,將 axe-core 的檢測結果映射到 VSCode 的診斷系統。
import * as vscode from "vscode";

// 定義數據結構 - 映射 axe-core 的返回結果
export interface AxeResults {
  violations: AxeViolation[];
}

export interface AxeViolation {
  id: string;           // 規則ID,如 'missing-headings'
  help: string;         // 簡短的幫助信息
  description: string;  // 詳細的問題描述
  nodes: AxeNode[];     // 有問題的 DOM 節點
}

export interface AxeNode {
  html: string;         // 節點的 HTML 源碼
  target: string[];     // CSS 選擇器路徑
  failureSummary?: string; // 失敗原因總結
}

export class AxeScanner {
  async scanDocument(doc: vscode.TextDocument): Promise<AxeResults | null> {
    const html = doc.getText();

    try {
      const { JSDOM } = await import("jsdom");
      const axe = await import("axe-core");
      // 創建虛擬 DOM 環境
      const { document } = new JSDOM(html).window;

      // 運行 axe-core 檢測整個頁面內容
      const results = await axe.run(document.body as any, {
        rules: {
          "color-contrast": { enabled: false },
        }
      });

      // 數據轉換
      // 將 axe-core 結果轉換為VSCode中需要的數據結構
      return {
        violations: results.violations.map((v: any) => ({
          id: v.id,
          help: v.help,
          description: v.description,
          nodes: v.nodes.map((n: any) => ({
            html: n.html,
            target: n.target ?? [],
            failureSummary: n.failureSummary,
          }))
        }))
      };
    } catch (error) {
      console.error('掃描過程中發生錯誤:', error);
      throw error;
    }
  }
}
4 實現掃描功能
import * as vscode from "vscode";
import { AxeScanner } from "./axe-scanner";

export async function performScan(
  textEditor: vscode.TextEditor,
  axeScanner: AxeScanner,
  context: vscode.ExtensionContext
) {
  const doc = textEditor.document;

  vscode.window.showInformationMessage("開始檢測無障礙問題...");

  try {
    // 使用上文中創建的 AxeScanner類進行無障礙檢測
    const results = await axeScanner.scanDocument(doc);

    // 處理無問題的情況
    if (!results?.violations.length) {
      vscode.window.showInformationMessage("✅ 未發現無障礙問題!");
      // 清除之前的診斷信息
      const collection = vscode.languages.createDiagnosticCollection("accessibility-checker");
      collection.set(doc.uri, []);
      context.subscriptions.push(collection);
      return;
    }

    // 轉換檢測結果為 VSCode 診斷格式
    const diagnostics: vscode.Diagnostic[] = [];
    for (const violation of results.violations) {
      for (const node of violation.nodes) {
        // 定位問題在源碼中的位置
        const range = findElementRange(doc, node.html);

        // 創建診斷對象
        const diagnostic = new vscode.Diagnostic(
          range ?? new vscode.Range(0, 0, 0, 1),  // 默認位置防止錯誤
          `${violation.help}\n${violation.description}`, // 完整的問題描述
          vscode.DiagnosticSeverity.Warning              // 警告級別
        );

        // 添加錯誤代碼和來源信息
        diagnostic.code = violation.id;
        diagnostic.source = 'accessibility-checker';

        diagnostics.push(diagnostic);
      }
    }

    // 將診斷信息註冊到 VSCode 系統
    const collection = vscode.languages.createDiagnosticCollection("accessibility-checker");
    collection.set(doc.uri, diagnostics);
    context.subscriptions.push(collection);

    // 向用户報告檢測結果
    vscode.window.showWarningMessage(
      `⚠️ 發現 ${results.violations.length} 個無障礙問題`,
      '查看問題'
    ).then(selection => {
      if (selection === '查看問題') {
        vscode.commands.executeCommand('workbench.action.problems.focus');
      }
    });
  } catch (error: any) {
    // 錯誤處理 - 提供有意義的錯誤信息
    vscode.window.showErrorMessage(`掃描失敗: ${error.message}`);
    console.error('掃描失敗:', error);
  }
}

// 源碼定位算法
function findElementRange(doc: vscode.TextDocument, html: string): vscode.Range | undefined {
  const text = doc.getText();
  const index = text.indexOf(html);
  if (index === -1) return undefined;

  // 將字符索引轉換為行列位置
  const start = doc.positionAt(index);
  const end = doc.positionAt(index + html.length);
  return new vscode.Range(start, end);
}
5 在入口文件中註冊掃描功能
export function activate(context: vscode.ExtensionContext) {
  // 創建掃描器實例
  const axeScanner = new AxeScanner();

  // 註冊掃描命令
  const scanCommand = vscode.commands.registerTextEditorCommand(
    "accessibility-checker.scan",
    async (textEditor: vscode.TextEditor) => {
      // 檢查是否是 HTML 文件
      if (textEditor.document.languageId !== 'html') {
        vscode.window.showWarningMessage('此功能僅支持 HTML 文件');
        return;
      }

      // 調用掃描函數
      await performScan(textEditor, axeScanner, context);
    }
  );

  // 將命令註冊到擴展生命週期中
  context.subscriptions.push(scanCommand);

  // 可選:添加狀態欄項
  const statusBarItem = vscode.window.createStatusBarItem(vscode.StatusBarAlignment.Right, 100);
  statusBarItem.command = 'accessibility-checker.scan';
  statusBarItem.text = '$(accessibility) A11Y';
  statusBarItem.tooltip = '檢查無障礙問題 (Ctrl+Alt+A)';

  // 只在 HTML 文件中顯示狀態欄項
  const updateStatusBar = () => {
    const editor = vscode.window.activeTextEditor;
    if (editor && editor.document.languageId === 'html') {
      statusBarItem.show();
    } else {
      statusBarItem.hide();
    }
  };

  // 監聽編輯器切換事件
  vscode.window.onDidChangeActiveTextEditor(updateStatusBar);
  updateStatusBar(); // 初始化狀態欄

  context.subscriptions.push(statusBarItem);
}
6 在package.json中綁定步驟5的命令
"contributes": {
  "commands": [
    {
      "command": "accessibility-checker.scan",
      "title": "掃描無障礙問題",
      "category": "無障礙檢查",
      "icon": "$(accessibility)"
    }
  ],
  "menus": {
    "editor/context": [
      {
        "command": "accessibility-checker.scan",
        "when": "resourceExtname == .html",
        "group": "accessibility@1"
      }
    ],
    "commandPalette": [
      {
        "command": "accessibility-checker.scan",
        "when": "editorLangId == html",
        "title": "無障礙檢查: 掃描當前文件"
      }
    ],
    "explorer/context": [
      {
        "command": "accessibility-checker.scan",
        "when": "resourceExtname == .html",
        "group": "accessibility@1"
      }
    ]
  },
  "keybindings": [
    {
      "command": "accessibility-checker.scan",
      "key": "ctrl+alt+a",
      "mac": "cmd+alt+a",
      "when": "editorLangId == html"
    }
  ]
}
最終效果如下:
安裝該擴展,打開html文件,在右鍵菜單中找到無障礙檢測
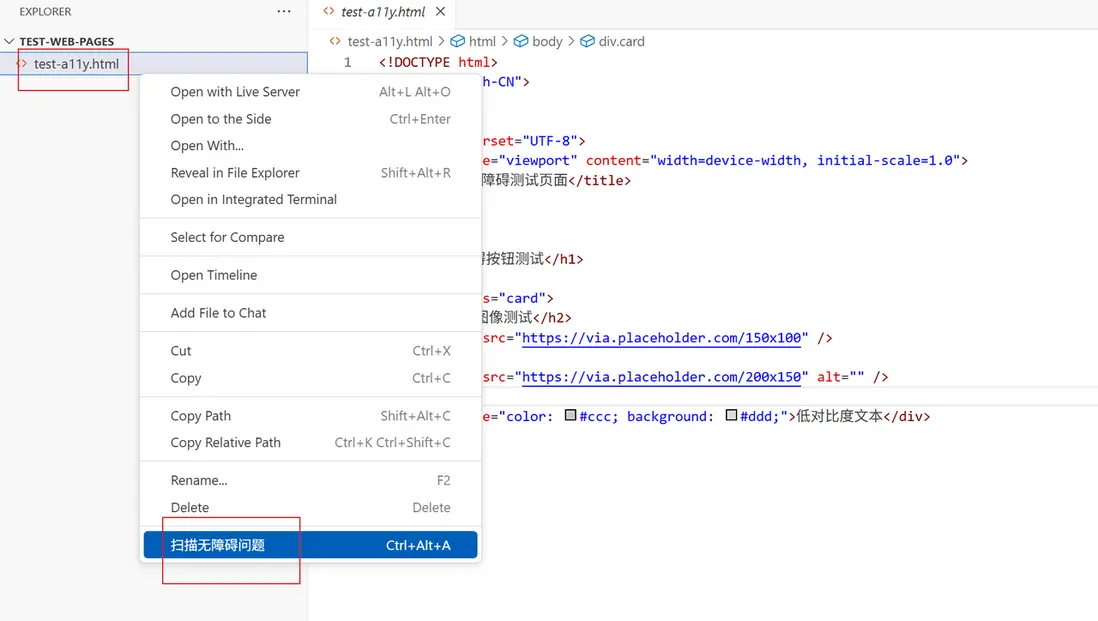
點擊該菜單項,啓動無障礙檢測
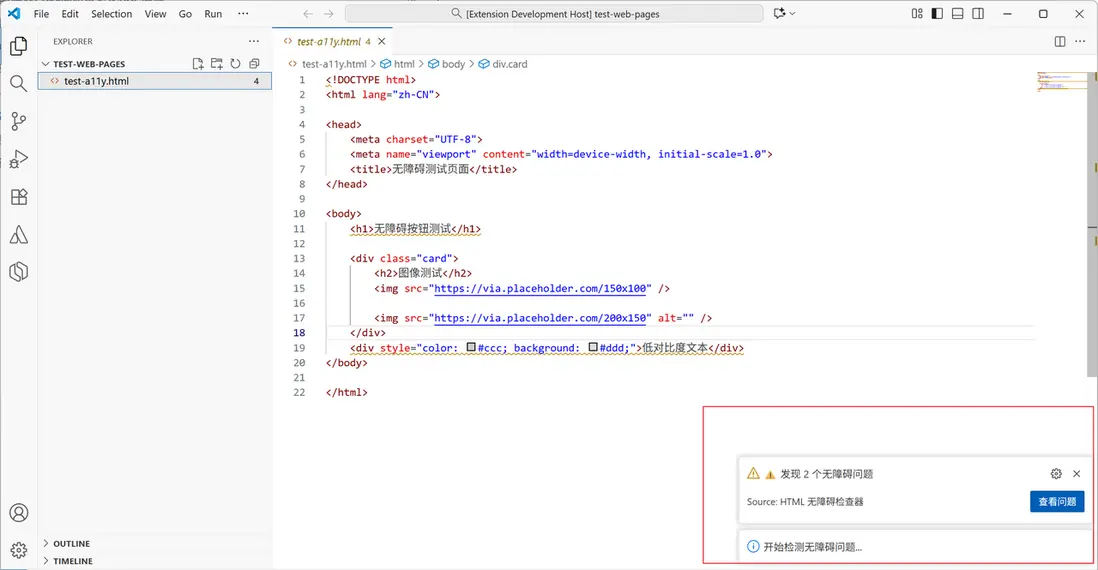
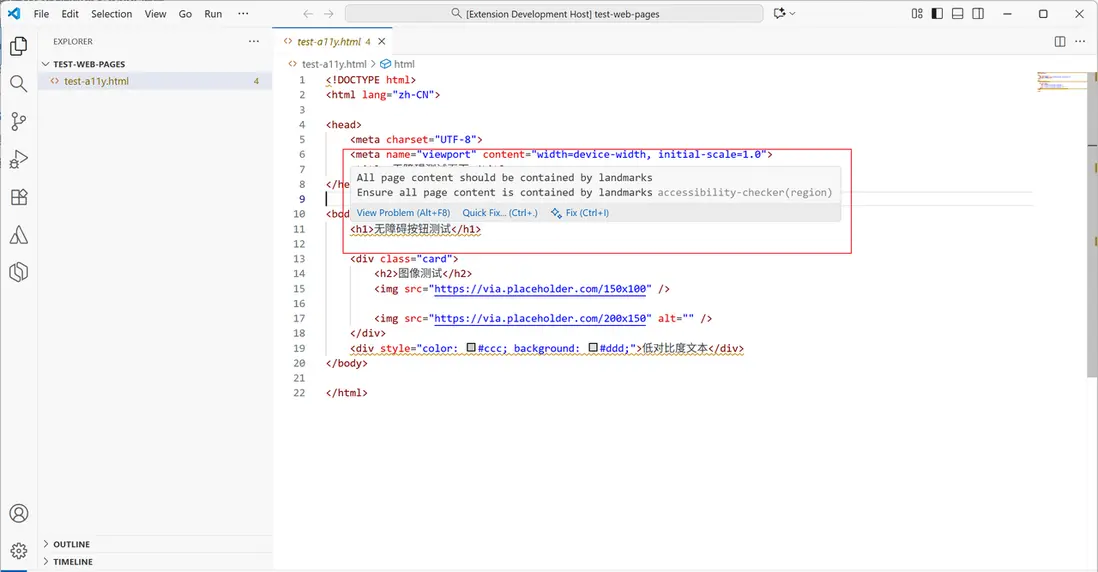
檢測到該問題後,插件會在響應代碼行處添加黃色波浪線
鼠標懸停在某一行,可以看到無障礙問題
AI賦能無障礙檢測與修復
由於上述插件僅利用axe工具檢測了無障礙問題,開發者需要逐一修復這些問題。
考慮到VSCode提供了AI大語言模型 API ,我們還可以實現了從"發現問題"到"自動解決"的完整閉環。
設計思路如下:
- 首先通過 axe-core 引擎掃描當前 HTML 文檔,獲取具體的無障礙違規項目和詳細描述。然後將檢測結果與原始源碼結合,構建結構化的上下文提示詞,為 AI 模型提供完整的問題背景和修復目標。
- 利用 VS Code 的語言模型 API 進行異步調用,確保 AI 能夠基於具體問題生成針對性的修復方案。
- 智能代碼提取與格式處理:針對 AI 模型輸出的不確定性,設計多重正則表達式匹配策略,能夠從不同格式的響應中準確提取 HTML 代碼。通過代碼清理算法去除多餘的標記和格式,確保得到可直接使用的代碼。
- 應用與狀態同步:使用 WorkspaceEdit API 進行文檔級別的完整替換操作,確保修復過程的原子性。修復完成後自動清除相關的診斷信息,並通過進度條和通知消息向用户反饋修復狀態。
具體思路如下:
// AI修復無障礙問題的處理函數
export async function handleFixCommand(
  textEditor: vscode.TextEditor,
  axeScanner: AxeScanner,
  context: vscode.ExtensionContext
) {
  const editor = textEditor;
  if (!editor) {
    vscode.window.showErrorMessage("❌ 請先打開HTML文件");
    return;
  }

  // 檢查是否是 HTML 文件
  if (editor.document.languageId !== "html") {
    vscode.window.showWarningMessage("此功能僅支持 HTML 文件");
    return;
  }

  // 顯示進度提示
  await vscode.window.withProgress(
    {
      location: vscode.ProgressLocation.Notification,
      title: "AI修復無障礙問題",
      cancellable: false,
    },
    async (progress) => {
      // 第一階段:問題檢測
      progress.report({ increment: 0, message: "🔍 正在掃描問題..." });

      const results = await axeScanner.scanDocument(editor.document);
      if (!results?.violations.length) {
        vscode.window.showInformationMessage("✅ 未發現問題!");
        return;
      }

      progress.report({
        increment: 30,
        message: `發現 ${results.violations.length} 個問題`,
      });

      // 構造修復提示詞 - 結合具體問題和源碼
      const fixPrompt = `修復以下HTML的無障礙問題:

當前代碼:
${editor.document.getText()}

檢測到的問題:
${results.violations
  .map((v, i) => `${i + 1}. ${v.help} - ${v.description}`)
  .join("\n")}

請返回修復後的完整HTML代碼,只返回代碼,不要解釋。`;

      // 第二階段:AI 修復
      progress.report({ increment: 50, message: "🔧 正在AI修復..." });

      try {
        // 獲取可用的語言模型
        const models = await vscode.lm.selectChatModels({
          vendor: "copilot",
          family: "gpt-4o",
        });

        if (models.length === 0) {
          vscode.window.showErrorMessage(
            "❌ 未找到可用的AI模型,請確保已登錄GitHub Copilot"
          );
          return;
        }

        const model = models[0];
        const messages = [
          vscode.LanguageModelChatMessage.User(A11Y_SYSTEM_PROMPT),
          vscode.LanguageModelChatMessage.User(fixPrompt),
        ];

        // 調用 VSCode 的語言模型 API
        const response = await model.sendRequest(messages, {});
        let fixedCode = "";
        for await (const fragment of response.text) {
          fixedCode += fragment;
        }

        progress.report({ increment: 80, message: "🔧 處理修復結果..." });

        // 代碼提取算法 - 處理 AI 返回的格式化內容
        const codeMatch =
          fixedCode.match(/```html\n([\s\S]*?)\n```/) ||
          fixedCode.match(/```\n([\s\S]*?)\n```/);
        const cleanCode = codeMatch ? codeMatch[1].trim() : fixedCode.trim();

        // 第三階段:應用修復
        progress.report({ increment: 90, message: "✅ 應用修復..." });

        if (cleanCode && cleanCode !== editor.document.getText()) {
          const edit = new vscode.WorkspaceEdit();
          const fullRange = new vscode.Range(
            0,
            0,
            editor.document.lineCount,
            0
          );
          edit.replace(editor.document.uri, fullRange, cleanCode);
          await vscode.workspace.applyEdit(edit);

          // 清除所有診斷信息 - 表示問題已解決
          const collection = vscode.languages.createDiagnosticCollection(
            "accessibility-checker"
          );
          collection.set(editor.document.uri, []);
          context.subscriptions.push(collection);

          progress.report({ increment: 100, message: "✅ 修復完成!" });
          vscode.window.showInformationMessage("✅ 修復完成!問題已自動解決。");
        } else {
          vscode.window.showWarningMessage("❌ 修復失敗,請手動檢查代碼。");
        }
      } catch (error: any) {
        vscode.window.showErrorMessage(`❌ AI修復失敗: ${error.message}`);
        console.error("AI修復失敗:", error);
      }
    }
  );
}
最終效果如下:
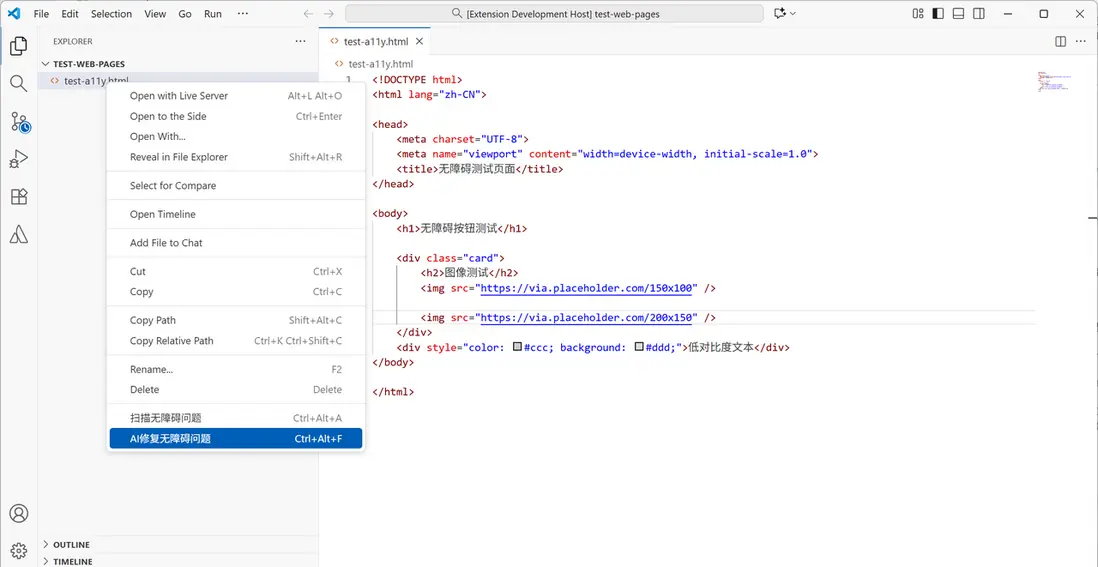
在需要進行無障礙檢測的頁面右鍵,選擇AI修復無障礙問題
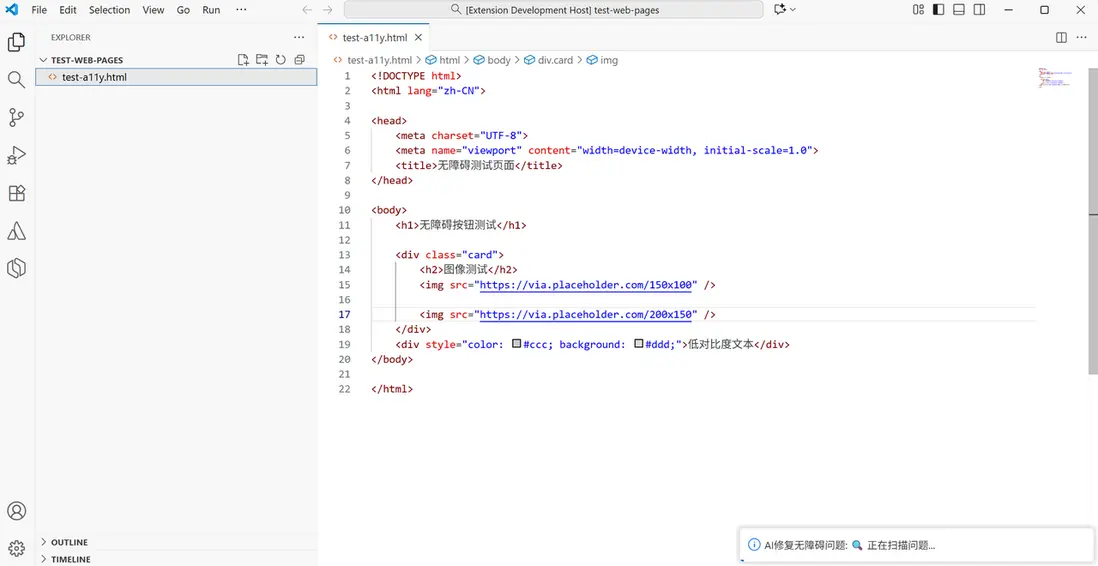
在右下角顯示狀態和進度
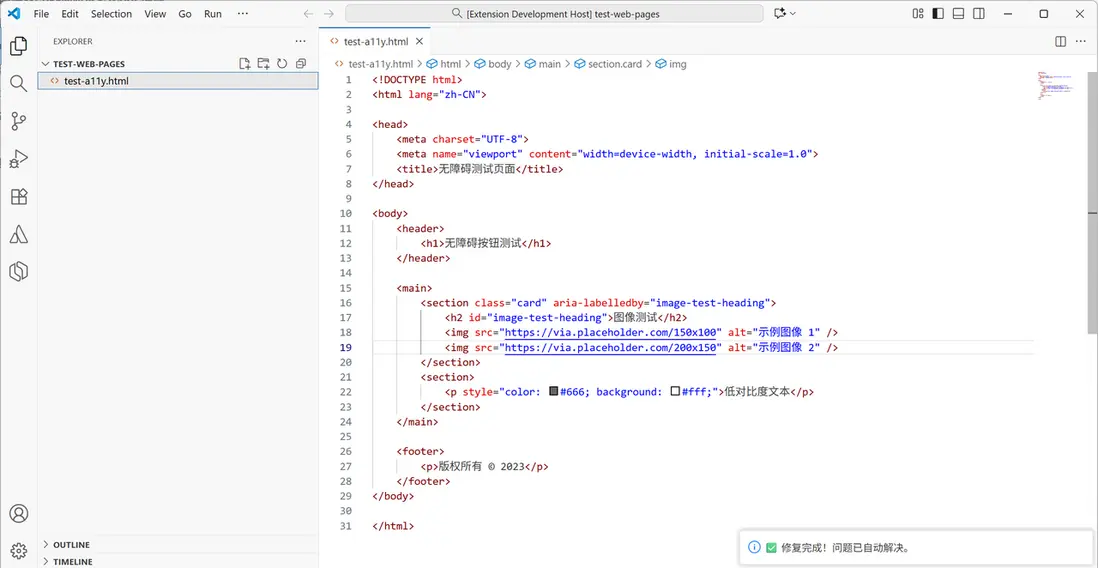
修復完成後,顯示提示信息
總結與展望
在本文中,我們學習到了web界面設計中的無障礙功能,同時瞭解了最基本的無障礙設計原則。通過vscode提供的API,我們可以快速搭建一個擴展應用,輔助開發人員查找界面存在的問題。最後我們藉助AI能力,可以自動修復無障礙缺陷。以下是一個本文使用的源碼工程:https://gitee.com/GrapeCity/accessibility-checker
