

前言
實現多線程(win32 API、pthread、std::thread)、線程同步(互斥量、原子變量、讀寫鎖、條件變量、線程局部存儲)、如何調試。
多線程
線程:是操作系統能夠進行運算調度的最小單位。它被包含在進程之中,是進程中的實際運作單位。一條線程指的是進程中一個單一順序的控制流,一個進程中可以併發多個線程,每條線程並行執行不同的任務。
多線程:是多任務處理的一種特殊形式。
一般情況下,兩種類型的多任務處理:基於進程和基於線程。
- 基於進程的多任務處理是程序的併發執行。
- 基於線程的多任務處理是同一程序的片段的併發執行。
- 併發:多個任務在時間片段內交替執行,表現出同時進行的效果。
- 並行:多個任務在多個處理器或處理器核上同時執行。
C++ 多線程編程涉及在一個程序中創建和管理多個併發執行的線程。
實現多線程
在C++ 11 新特性中std::thread對linux中的pthread和windows中的Win32 API進行封裝,支持跨平台、移動語義等特點,本文主要使用std::thread,對pthread和Thread簡單使用。
使用<windows.h>實現
windows下的原生API進行創建線程。
- 接口
//創建線程
HANDLE CreateThread(
    _In_opt_ LPSECURITY_ATTRIBUTES lpThreadAttributes,  // 安全屬性
    _In_ SIZE_T dwStackSize,                           // 堆棧大小
    _In_ LPTHREAD_START_ROUTINE lpStartAddress,        // 線程函數地址
    _In_opt_ LPVOID lpParameter,                       // 線程參數
    _In_ DWORD dwCreationFlags,                        // 創建標誌
    _Out_opt_ LPDWORD lpThreadId                       // 接收線程ID
);

//關閉句柄
CloseHandle(
    _In_ _Post_ptr_invalid_ HANDLE hObject
    );

//待線程結束
//等待事件、信號量等同步對象
DWORD WaitForSingleObject(
    _In_ HANDLE hHandle,        // 要等待的對象句柄
    _In_ DWORD dwMilliseconds   // 超時時間(毫秒)
);

// 使用標誌變量讓線程自然退出
// 使用事件對象通知線程退出
BOOL TerminateThread(
    _In_ HANDLE hThread,   // 要終止的線程句柄
    _In_ DWORD dwExitCode  // 線程退出碼
);

// 檢查線程是否仍在運行
// 獲取線程的執行結果
// 調試和錯誤處理
BOOL GetExitCodeThread(
    _In_ HANDLE hThread,         // 線程句柄
    _Out_ LPDWORD lpExitCode     // 接收退出碼的指針
);

// 設置當前線程屬性(優先級、親和性等)
// 在線程函數中操作自身
HANDLE GetCurrentThread(VOID);  // 無參數,返回當前線程偽句柄
- 實現
#include <windows.h>
#include <iostream>
using namespace std;

DWORD WINAPI threadrun(LPVOID lpParamter)
{
    for (int i = 0; i < 10; i++) {
        cout << "Threadrun:" << i << endl;
        Sleep(50);
    }
    return 0;
}

int main()
{
    HANDLE hThread = CreateThread(NULL, 0, threadrun, NULL, 0, NULL);
    CloseHandle(hThread); //CloseHandle只是關閉了句柄,並不會終止線程。但是,如果主線程退出,進程會終止,所有線程都會結束。

    for (int i = 0; i < 10; i++) {
        cout << "Main:" << i << endl;
        Sleep(10);
    }

    //WaitForSingleObject(hThread, INFINITE); //等待線程完成 ,前提是hThread沒有關閉
    return 0;
}
使用pthread實現
- 接口
// 創建線程
int pthread_create(pthread_t *thread, const pthread_attr_t *attr,
                   void *(*start_routine)(void *), void *arg);

// 線程退出
void pthread_exit(void *retval);

// 等待線程結束
int pthread_join(pthread_t thread, void **retval);

// 分離線程
int pthread_detach(pthread_t thread);


// 取消線程
int pthread_cancel(pthread_t thread);

// 獲取當前線程ID
pthread_t pthread_self(void);

// 比較線程ID
int pthread_equal(pthread_t t1, pthread_t t2);

// 初始化線程屬性
int pthread_attr_init(pthread_attr_t *attr);

// 銷燬線程屬性
int pthread_attr_destroy(pthread_attr_t *attr);

// 設置分離狀態
int pthread_attr_setdetachstate(pthread_attr_t *attr, int detachstate);

// 獲取分離狀態
int pthread_attr_getdetachstate(const pthread_attr_t *attr, int *detachstate);

// 設置堆棧大小
int pthread_attr_setstacksize(pthread_attr_t *attr, size_t stacksize);

// 設置調度策略
/*
 * 參數:policy -
 *   SCHED_FIFO    先進先出
 *   SCHED_RR      輪轉
 *   SCHED_OTHER   其他(默認)
 */
int pthread_attr_setschedpolicy(pthread_attr_t *attr, int policy);
- 實現
#include <pthread.h>      // POSIX 線程庫頭文件
#include <stdio.h>        // 標準輸入輸出頭文件
#include <stdlib.h>       // 標準庫頭文件(包含exit等函數)
#include <unistd.h>       // Unix標準庫頭文件,包含getpid(), sleep()等系統調用
#include <iostream>       // C++標準輸入輸出流
#include <cstring>
using namespace std;      // 使用std命名空間

// 線程函數 - 子線程的入口點
// 參數:threadid - 傳遞給線程的參數(這裏用作線程標識符)
// 返回值:void* - 線程退出時可以返回一個指針(這裏返回NULL)
void *PrintThread(void *threadid)
{
    // 獲取當前線程ID的方式:
    // 使用pthread_self()獲取POSIX線程ID(pthread_t類型)
    pthread_t id = pthread_self();
    pid_t tid = getpid();  // 這獲取的是進程ID,不是線程ID

    cout << "ChildThread:" << " pid=" << tid << endl;  // 這裏打印的是進程ID
        cout << "ChildSelf:" << " id=" << id << endl;
    for(int i = 0; i < 100; i++){
        cout << i << endl;
        sleep(1);              // 休眠1秒,模擬耗時操作
    }

    // 線程退出
    pthread_exit(NULL);        // 顯式退出線程,參數NULL表示不返回任何值
    // 或者直接: return NULL;  // 等效的退出方式
}


int main(int argc, char *argv[])
{
    // 獲取當前進程ID(注意:主線程也在同一個進程中)
    pid_t tid = getpid();  // 獲取當前進程ID
    cout << "main thread" << " pid=" << tid << endl;  // 打印主線程所在進程的ID
    pthread_t id = pthread_self();
    cout << "main Self:" << " id=" << id << endl;

    pthread_t thread;    // 線程句柄/標識符(用於引用創建的線程)
    pthread_attr_t attr; //線程屬性對象
    int result;              // 存儲函數返回碼(return code)
    long param = 1;          // 線程參數,這裏作為線程ID使用(值為1)

    result = pthread_attr_init(&attr); //初始化屬性
    if (result != 0) {
        cerr << "Error: pthread_attr_init failed: " << strerror(result) << endl;
        return 0;
    }

    //設置分離狀態 PTHREAD_CREATE_JOINABLE 或 PTHREAD_CREATE_DETACHED
    result = pthread_attr_setdetachstate(&attr, PTHREAD_CREATE_JOINABLE);
    if (result == 0) {
        cout << "設置線程為可連接狀態(JOINABLE)" << endl;
    }

    // 設置堆棧大小(256KB)
    size_t stacksize = 256 * 1024;  // 256KB
    result = pthread_attr_setstacksize(&attr, stacksize);
    if (result == 0) {
        size_t actual_stacksize;
        pthread_attr_getstacksize(&attr, &actual_stacksize);
        cout << "設置堆棧大小: " << actual_stacksize << " bytes" << endl;
    }

    // 設置調度策略  普通應用用 SCHED_OTHER分時調度
    result = pthread_attr_setschedpolicy(&attr, SCHED_OTHER);
    if (result == 0) {
        cout << "設置調度策略: SCHED_OTHER" << endl;
    }

    // 設置繼承調度屬性(使用顯式設置而非繼承)
    result = pthread_attr_setinheritsched(&attr, PTHREAD_EXPLICIT_SCHED);
    if (result == 0) {
        cout << "設置顯式調度繼承" << endl;
    }

    //設置競爭範圍(Linux只支持系統級)  Linux只支持 PTHREAD_SCOPE_SYSTEM
    result = pthread_attr_setscope(&attr, PTHREAD_SCOPE_SYSTEM);
    if (result == 0) {
        cout << "設置競爭範圍: PTHREAD_SCOPE_SYSTEM" << endl;
    }

    // 創建新線程
    // &thread: 用於存儲新線程的標識符
    // NULL: 線程屬性(使用默認屬性)
    // PrintThread: 線程函數指針(新線程執行的函數)
    // (void *)param: 傳遞給線程函數的參數(將long轉換為void*)
    result = pthread_create(&thread, &attr, PrintThread, (void *)param);

    // 檢查線程創建是否成功
    if (result)  // rc != 0 表示創建失敗
    {
        // pthread_create返回錯誤碼(非零)
        // 通常應該處理錯誤,這裏直接返回
        return 0;
    }

    result = pthread_attr_destroy(&attr);

    // 主線程繼續執行自己的工作(與子線程併發執行)
    for(int i = 0; i < 5; i++){
        cout << "Main thread " << i << endl;  // 主線程輸出
        sleep(2);  // 休眠2秒(子線程休眠1秒,所以子線程輸出更頻繁)
    }

    pthread_join(thread, NULL);

    return 0;
}
- out
main thread pid=6255
main Self: id=139668265477952
設置線程為可連接狀態(JOINABLE)
設置堆棧大小: 262144 bytes
設置調度策略: SCHED_OTHER
設置顯式調度繼承
設置競爭範圍: PTHREAD_SCOPE_SYSTEM
Main thread 0
ChildThread: pid=6255
ChildSelf: id=139668265473792
調用普通函數
pthread_create接收的是函數指針,傳入普通函數會報錯參數類型錯誤,必須接收
void * ( * )(void * )
採用外面線程包裝函數
error: invalid conversion from ‘void (*)()’ to ‘void* (*)(void*)’ [-fpermissive]
  rc = pthread_create(&thread, &attr, &PrintThread_1, NULL);
void PrintThread_1()
{
    for(int i = 0; i < 100; i++){
        cout << i << endl;
        sleep(1);
    }

 	return;
}

void* thread_wrapper(void* arg) {
    (void)arg;  // 忽略參數(防止編譯器警告)

    // 調用真正的無參數函數
    PrintThread_1();

    return NULL;  // 線程返回值
}

int result = pthread_create(&thread, &attr, thread_wrapper, NULL);
調用靜態函數
static void* PrintThread_2(void* arg) {
    (void)arg;

    for(int i = 0; i < 100; i++){
        cout << i << endl;
        sleep(1);
    }
    return NULL;
}

int result = pthread_create(&thread, &attr, PrintThread_2, (void*)param);
調用 類靜態函數
#include <pthread.h>
#include <iostream>
#include <unistd.h>
using namespace std;
class MyClass {
public:
// 靜態成員函數 - 可以作為線程函數
static void* PrintThread_3(void* arg) {
cout << "Static member function called" << endl;
for(int i = 0; i < 10; i++){
cout << "fun: " << i << endl;
sleep(1);
}
cout << "Static member function finished" << endl;
return nullptr;
}
};
int main() {
pthread_t thread;
int param = 42;
// 直接調用類的靜態成員函數
//pthread_create(&thread, NULL, &MyClass::PrintThread_3,¶m);
// 通過類名調用靜態函數
pthread_create(&thread, NULL, MyClass::PrintThread_3, ¶m);
for(int i = 0; i < 10; i++){
cout << "main:" << i << endl;
sleep(1);
}
pthread_join(thread, nullptr);
cout << "Main: Thread completed" << endl;
return 0;
}
C++11 std::thread 實現
- std::thread主要接口
thread() noexcept;  // 創建不表示線程的空線程對象

template< class Function, class... Args >
explicit thread( Function&& f, Args&&... args );  // 創建新線程並執行函數

thread( const thread& ) = delete;  // 不可複製構造
thread( thread&& other ) noexcept;  // 移動構造

join()		//阻塞當前線程,直到目標線程執行完畢

detach()	//分離線程,允許線程獨立執行;分離後線程對象不再管理該線程

joinable()	//檢查線程是否可合併
//返回 true 的情況:
//1.通過構造函數創建且未調用 join/detach
//2.已移動但未管理的線程對象

get_id()	//返回線程的唯一標識符,如果線程不可合併,返回默認構造的 id

hardware_concurrency()	//返回硬件支持的併發線程數,用於指導線程池大小設置

void swap(thread& _Other) noexcept//交換兩個 std::thread 對象的底層句柄
-實例
#include <stdio.h>        // 標準輸入輸出頭文件
#include <stdlib.h>       // 標準庫頭文件(包含exit等函數)
#include <iostream>       // C++標準輸入輸出流
#include <cstring>
#include <thread>
#include <chrono>

using namespace std;      // 使用std命名空間

// 線程函數 - 子線程的入口點
void PrintThread(int param)
{
    thread::id thread_id = this_thread::get_id();
    cout << "ChildThread:" << " id="  << thread_id<< endl;  // 這裏打印的是進程ID
    for (int i = 0; i < 100; i++) {
        cout << i << endl;
        this_thread::sleep_for(chrono::seconds(1));              // 休眠1秒,模擬耗時操作
    }

}
//靜態函數
static void staticPrintThread(int param){
	return PrintThread(param);
}


int main(int argc, char* argv[])
{
    thread::id main_id = this_thread::get_id();  // 獲取當前進程ID
    cout << "main Self:" << " id=" << main_id << endl;
	int temp = 50;
    // 創建新線程
    thread t(PrintThread,temp);
    //thread t(staticPrintThread,temp);
    //引用傳遞
    //thread t(PrintThread,ref(temp);

    // 主線程繼續執行自己的工作(與子線程併發執行)
    for (int i = 0; i < 5; i++) {
        cout << "Main thread " << i << endl;  // 主線程輸出
        this_thread::sleep_for(chrono::seconds(2));  // 休眠2秒(子線程休眠1秒,所以子線程輸出更頻繁)
    }

    if (t.joinable()) {
        t.join();
    }

    return 0;
}
Lambda表達式
int temp = 5;
thread t([temp](int count){
 for (int i = temp; i < count; i++) {
        cout << i << endl;
        this_thread::sleep_for(chrono::seconds(1));              // 休眠1秒,模擬耗時操作
    }
},30);
調用類普通方法、類靜態方法
#include <iostream>
#include <thread>
#include <chrono>
#include <functional>

using namespace std;
class ProgramA{
public:
        void PrintThread(){
                thread::id thread_id = this_thread::get_id();
                cout <<"thread_id: "<<thread_id<<endl;
                for(int i = 0;i<50;i++){
                        cout<<"fun" << i <<endl;
                        this_thread::sleep_for(chrono::seconds(1));
                }
                return;
        };

        static void staticPrintThread(){
                thread::id thread_id = this_thread::get_id();
                cout <<"thread_id: "<<thread_id<<endl;
                for(int i = 0;i<50;i++){
                        cout<<"static" << i <<endl;
                        this_thread::sleep_for(chrono::seconds(1));
                }
                return ;
        }


};


int main(){
        thread t1(ProgramA::staticPrintThread);

        ProgramA PA;

        thread t2(&ProgramA::PrintThread,&PA);

        thread t3(bind(&ProgramA::PrintThread,&PA));

        thread t4(&ProgramA::PrintThread,&PA);
        t1.join();
        t2.join();
        t3.join();
        t4.join();

}
promise、future、async
問題:如果有一個使用場景計算A需要5min,計算B需要4分鐘,執行C動作需要完成A和B。不使用多線程時需要9min
才能執行C,使用多線程時只需要5min就可以完成前面步驟。
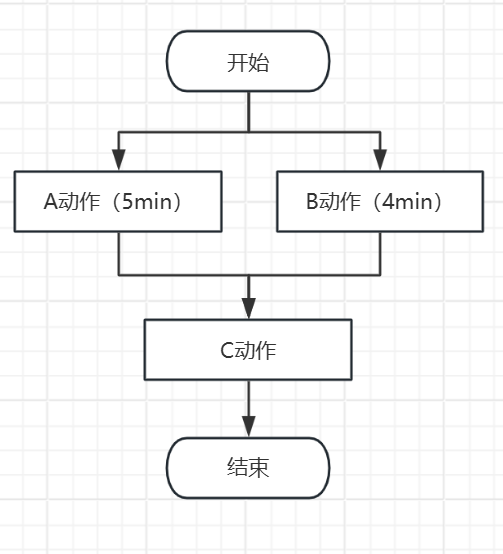
但是如何保證AB完成後才讓C執行。
-
在執行C之前讓A、B join();
-
使用promise、future、async
promise-future 對是通過共享狀態,來幫助線程間傳遞值或異常的一種溝通通道。是實現線程同步的一種方式。
std::promise:數據提供者;用於存儲一個值或異常,之後可以通過與之關聯的std::future來獲取這個值或異常。
std::future: 數據接收者;提供一個異步操作結果的訪問。它可以等待(阻塞)直到std::promise設置好值,然後獲取該值。
std::async :用於異步執行任務,並返回一個 std::future 對象來獲取結果
- promise、future示例
promise
get_future(): 返回一個與該promise關聯的future對象。每個 promise 只能調用一次
get_future(),多次調用會拋出std::future_error異常。
set_value(value): 設置異步操作的結果值。如果多次調用會拋出std::future_error異常。
set_exception(exception_ptr): 設置異步操作的異常。
set_value_at_thread_exit(value): 設置異步操作的結果值,但該值會在當前線程退出時才變得可用。
set_exception_at_thread_exit(exception_ptr): 設置異步操作的異常,但該異常會在當前線程退出時才變得可用。
future
get(): 阻塞當前線程,直到異步操作完成並返回結果。
get()只能調用一次,第二次調用會拋出std::future_error異常。
wait(): 阻塞當前線程,直到異步操作完成,但不獲取結果。
wait_for(duration): 阻塞當前線程,直到異步操作完成或指定的時間已過。
wait_until(time_point): 阻塞當前線程,直到異步操作完成或到達指定的時間點。
設置返回值
1 #include <iostream>
2 #include <thread>
3 #include <chrono>
4 #include <functional>
5 #include <future>
6
7 using namespace std;
8 void computeA(promise<int> &&prom){
9         this_thread::sleep_for(chrono::seconds(5));//5s
10         cout<< "A執行完成!  5s" <<endl;
11         prom.set_value(1);//設置結果值
12 }
13
14
15 void computeB(promise<float> &&prom){
16         this_thread::sleep_for(chrono::seconds(4));//4s
17         cout<< "B執行完成!  4s" <<endl;
18         prom.set_value(1);//設置結果值
19 }
20
21
22 void computeC(future<int> &&futi,future<float> &&futf){
23         cout<< "C開始!" <<endl;
24         futi.get();
25         futf.get();
26         cout<< "C接受A B結果後執行!" <<endl;
27 }
28
29 int main(){
30
31         promise<int> prom_i;
32         future<int> resultFutI = prom_i.get_future();
33
34         promise<float> prom_f;
35         future<float> resultFutF= prom_f.get_future();
36
37
38         thread threadA = thread(computeA , move(prom_i));
39
40         thread threadB = thread(computeB , move(prom_f));
41
42         thread threadC = thread(computeC , move(resultFutI) , move(resultFutF));
43
44
45         threadA.join();
46
47         threadB.join();
48
49         threadC.join();
50 }
設置異常
  1 #include <iostream>
  2 #include <thread>
  3 #include <chrono>
  4 #include <functional>
  5 #include <future>
  6 using namespace std;
  7 void funAThrowException(std::promise<int>&& prom) {
  8     try {
  9         throw std::runtime_error("An error occurred");
 10     } catch (...) {
 11         prom.set_exception(std::current_exception());
 12     }
 13 }
 14
 15 void funBReceiveException(std::future<int>&& fut) {
 16     try {
 17         int value = fut.get();
 18     } catch (const std::exception& e) {
 19         std::cout << "Caught exception: " << e.what() << std::endl;
 20     }
 21 }
 22
 23
 24 int main(){
 25         cout<<"main fun! "<<endl;
 26         promise<int> prom;
 27         future<int> fut = prom.get_future();
 28         thread threadA = thread(funAThrowException,move(prom));
 29         thread threadB = thread(funBReceiveException,move(fut));
 30         threadA.join();
 31         threadB.join();
 32         return 0;
 33
 34 }
shared_future
- 若需要使用一個線程的結果,讓多個線程獲取呢?
可以使用shared_future
可多次調用
get():與std::future不同,shared_future的get()可多次調用線程安全:多個線程可同時調用
get(),但返回引用類型時要小心數據競爭異常傳播:異常會被存儲,每次
get()都會重新拋出生命週期:共享狀態由所有副本共同管理,最後一個副本銷燬時釋放資源
複製廉價:複製操作只增加引用計數,適合傳遞到多個線程
值語義優先:儘量返回值類型而非引用類型,避免懸掛引用
檢查有效性:使用前檢查
valid(),避免操作空的shared_future內存模型:
get()提供memory_order_acquire語義,確保結果可見性
  1 #include <iostream>
  2 #include <thread>
  3 #include <chrono>
  4 #include <functional>
  5 #include <future>
  6
  7 using namespace std;
  8 void computeA(promise<int> &&prom){
  9         cout<< "進入A!" <<endl;
 10         this_thread::sleep_for(chrono::seconds(5));//5s
 11         cout<< "A完成!  5s" <<endl;
 12         prom.set_value(1);//設置結果值
 13 }
 14
 15
 16 void computeB(shared_future<int> shared_fut){
 17         cout<< "進入B!"<< endl;
 18         shared_fut.get();       //等待A完成
 19         this_thread::sleep_for(chrono::seconds(4));//4s
 20         cout<< "B完成!  4s" <<endl;
 21
 22 }
 23
 24
 25 void computeC(shared_future<int> shared_fut){
 26         cout<< "進入C!" <<endl;
 27         shared_fut.get();
 28         cout<< "C完成!" <<endl;
 29 }
 30
 31 int main(){
 32
 33         promise<int> prom_i;
 34         future<int> resultFutI = prom_i.get_future();
 35         shared_future<int> shared_fut = resultFutI.share();//兩步獲取shared_future
 36 		// 直接從 promise 獲取 shared_future
 37         //share_future<int> share_fut = prom_i.get_future().share();
 38
 39         thread threadA = thread(computeA , move(prom_i));
 40
 41         thread threadB = thread(computeB , shared_fut);
 42
 43         thread threadC = thread(computeC , shared_fut);
 44
 45
 46         threadA.join();
 47
 48         threadB.join();
 49
 50         threadC.join();
 51 }
- aysnc
  1 #include <iostream>
  2 #include <thread>
  3 #include <chrono>
  4 #include <functional>
  5 #include <future>
  6
  7 using namespace std;
  8 int  computeA(){
  9         cout<< "進入A!" <<endl;
 10         this_thread::sleep_for(chrono::seconds(5));//5s
 11         cout<< "A完成!  5s" <<endl;
 12         return 100;
 13 }
 14
 15
 16 void computeB(shared_future<int> shared_fut){
 17         cout<< "進入B!"<< endl;
 18         int result = shared_fut.get();  //等待A完成
 19         this_thread::sleep_for(chrono::seconds(4));//4s
 20         cout<< "B完成!  4s result = "<< result <<endl;
 21
 22 }
 23
 24 int main(){
 25         cout<<"main fun! "<<endl;
 26         future<int> fut = async(launch::async,computeA);
 27         shared_future<int> shared_fut = fut.share();
 28         thread threadA = thread(computeB,shared_fut);
 29         for(int i = 0;i<50;i++){
 30                 cout<<"main:  i = "<< i <<endl;
 31         }
 32         threadA.join();
 33         return 0;
 34
 35 }
線程同步
線程同步是多線程編程中協調線程執行順序的機制,通過控制多個線程對共享資源的訪問順序,防止數據競爭與不可預知的數據損壞。其核心在於保證同一時刻僅有一個線程操作關鍵數據段。
為什麼要線程同步
解決競爭條件和數據不一致性。線程同步的本質就是保證數據操作原子性。
線程同步的方法:
互斥鎖、讀寫鎖、條件變量、原子變量、線程局部存儲。
互斥鎖 mutex和原子變量 atomic
mutex:提供基本的鎖定和解鎖功能;
recursive_mutex:遞歸互斥鎖,允許同一個線程多次鎖定同一個互斥鎖,避免自死鎖。
timed_mutex:帶超時功能的互斥鎖,可以嘗試鎖定一段時間,避免永久阻塞。
recursive_timed_mutex:結合遞歸和超時功能的互斥鎖.
-
鎖管理器 (RAII機制)
- lock_guard:輕量級,自動釋放,構造時加鎖
- unique_lock:支持延時鎖定,手動鎖定/解鎖,所有權轉移
- 延遲鎖定:
std::unique_lock<std::mutex> lock(mtx, std::defer_lock);
- 延遲鎖定:
- scoped_lock - 多鎖管理 C++ 17
	std::mutex mtx1, mtx2, mtx3;
    // 同時鎖定多個互斥鎖,避免死鎖
    std::scoped_lock lock(mtx1, mtx2, mtx3);
atomic內存序
內存序(Memory Order)是因為編譯器和 CPU 為了性能,會進行指令重排(Instruction Reordering)。
memory_order_relaxed
relaxed讀/寫無同步,僅保證操作原子化(常用於計數器)。
consume讀比 acquire 更輕,只同步有數據依賴的變量(不推薦初學者使用)。
acquire讀配合 release,防止讀操作被重排到後面。
release寫配合 acquire,防止寫操作被重排到前面。
acq_rel讀-改-寫同時具有 acquire 和 release 的特性。
seq_cst讀/寫最嚴格,所有線程看到完全一致的順序。默認。
實例:
  1 #include <iostream>
  2 #include <thread>
  3 #include <chrono>
  4 #include <functional>
  5 #include <future>
  6 #include <mutex>
  7 #include <atomic>
  8
  9 using namespace std;
 10 //atomic<int> shared_data(0); atomic適用於基本類型
 11 int shared_data = 0;
 12 mutex g_mutex;
 13
 14 //測試不準確
 15 //不加鎖          0ms  結果錯誤
 16 //atomic          3ms
 17 //mutex 加鎖      12ms
 18 //lock_guard      13ms
 19 //unique_lock     15ms
 20
 21 void addValue() {
 22         for(int i = 0;i<100000;++i){
 23 //              mutex加鎖
 24 //              g_mutex.lock();
 25 //              ++shared_data;
 26 //              g_mutex.unlock();
 27
 28                 unique_lock<mutex> lock(g_mutex,defer_lock);
 29                 lock.lock();
 30                 ++shared_data;
 31                 lock.unlock();
 32
 33         }
 34 }
 35
 36
 37 int main(){
 38         auto startTime = chrono::high_resolution_clock::now();
 39         cout<<"main fun! "<<endl;
 40         thread threadA = thread(addValue);
 41         thread threadB = thread(addValue);
 42         threadA.join();
 43         threadB.join();
 44         auto stopTime = chrono::high_resolution_clock::now();
 45         auto duration = chrono::duration_cast<chrono::milliseconds>(stopTime-startTime).count();
 46         cout<<"sharedData: "<<shared_data<<" 時間:"<<duration<< "ms"<<endl;
 47         return 0;
 48
 49 }
讀寫鎖
允許多個讀線程同時訪問共享資源,但只允許一個寫線程獨佔訪問
- 讀鎖(共享鎖):多個線程可以同時持有讀鎖
- 寫鎖(獨佔鎖):同一時間只能有一個線程持有寫鎖,且持有寫鎖時不能有讀鎖
// 讀寫鎖的狀態轉換
// 無鎖狀態 -> 可以加讀鎖或寫鎖
// 有讀鎖時 -> 可以再加讀鎖,不能加寫鎖
// 有寫鎖時 -> 不能加讀鎖,也不能加寫鎖
// 寫者優先(Writer-preference) 或防止寫飢餓(Write starvation prevention) 的策略。
  1 #include <iostream>
  2 #include <thread>
  3 #include <shared_mutex>
  4 #include <vector>
  5 #include <chrono>
  6
  7 class ThreadCounter {
  8 private:
  9     mutable std::shared_mutex mutex_;
 10     int value_ = 0;
 11
 12 public:
 13     // 讀取操作:使用共享鎖
 14     int read(int i) const {
 15         std::cout<<"讀線程調用!"<<std::endl;
 16         std::shared_lock<std::shared_mutex> lock(mutex_);  // 共享鎖
 17         std::cout << " (線程ID: " << std::this_thread::get_id() << ") 讀操作 順序號:"<< i << std::end    l;
 18         std::this_thread::sleep_for(std::chrono::milliseconds(1000));
 19         return value_;
 20     }
 21
 22     // 寫入操作:使用獨佔鎖
 23     void write(int i) {
 24         std::cout<< "寫線程調用!"<<std::endl;
 25         std::unique_lock<std::shared_mutex> lock(mutex_);  // 獨佔鎖
 26         std::cout << " (線程ID: " << std::this_thread::get_id() << ") 寫操作 順序號:" << i << std::en    dl;
 27         std::this_thread::sleep_for(std::chrono::milliseconds(5000));
 28         ++value_;
 29     }
 30
 31     // 寫入操作:重置值
 32     void reset() {
 33         std::unique_lock<std::shared_mutex> lock(mutex_);  // 獨佔鎖
 34         std::cout << " (線程ID: " << std::this_thread::get_id() << ") 重置操作" << std::endl;
 35         std::this_thread::sleep_for(std::chrono::milliseconds(10));
 36         value_ = 0;
 37     }
 38 };
 39
 40 int main() {
 41     std::cout << "=== 基本讀寫鎖示例 ===" << std::endl;
 42
 43     ThreadCounter counter;
 44     std::vector<std::thread> threads;
 45
 46     // 啓動多個讀線程
 47     for (int i = 0; i < 5; ++i) {
 48         threads.emplace_back([&counter, i]() {
 49             for (int j = 0; j < 3; ++j) {
 50                 counter.read(i);
 51             }
 52         });
 53     }
 54
 55     // 啓動寫線程
 56     threads.emplace_back([&counter]() {
 57         for (int i = 0; i < 2; ++i) {
 58             counter.write(i);
 59         }
 60     });
 61
 62     for (auto& t : threads) {
 63         t.join();
 64     }
 65     return 0;
 66 }
條件變量 condition_variable
條件變量實現多個線程間的同步操作,當條件不滿足時,相關線程被一直阻塞,直到某種條件出現,這些線程才會被喚醒
典型流程
mutex 條件變量運行狀態切換時的同步
condition_variable 等待/喚醒
共享數據
條件
  1 #include <iostream>
  2 #include <queue>
  3 #include <thread>
  4 #include <mutex>
  5 #include <condition_variable>
  6 #include <vector>
  7
  8 class ProducerConsumer {
  9 private:
 10     std::queue<int> queue;          // 共享資源:緩衝區隊列
 11     std::mutex mtx;                 // 互斥鎖,保護隊列
 12     std::condition_variable cv_prod; // 條件變量:控制生產者(當隊列滿時等待)
 13     std::condition_variable cv_cons; // 條件變量:控制消費者(當隊列空時等待)
 14     size_t capacity;                // 緩衝區最大容量
 15
 16 public:
 17     explicit ProducerConsumer(size_t capacity) : capacity(capacity) {}
 18
 19     // 生產者調用的入隊函數
 20     void prod(int value) {
 21         // 獲取鎖:保護共享資源 queue
 22         std::unique_lock<std::mutex> lock(mtx);
 23
 24         // 等待判斷:如果隊列滿了,生產者阻塞並釋放鎖,直到消費者消費後喚醒
 25         // 使用 lambda 表達式防止虛假喚醒
 26         //wait()的謂詞返回true時繼續等待,返回false時才退出等待
 27         cv_prod.wait(lock, [this]() { return queue.size() < capacity; });
 28
 29         // 執行生產
 30         queue.push(value);
 31         std::cout << "Produced: " << value << " | Queue size: " << queue.size() << std::endl;
 32
 33         // 喚醒:告訴正在等待的消費者,現在有貨了
 34         cv_cons.notify_one();
 35
 36         // 作用域結束,lock 自動析構並釋放鎖
 37     }
 38
 39     // 消費者調用的出隊函數
 40     int cons() {
 41         std::unique_lock<std::mutex> lock(mtx);
 42
 43         // 等待判斷:如果隊列空了,消費者阻塞並釋放鎖,直到生產者生產後喚醒
 44         cv_cons.wait(lock, [this]() { return !queue.empty(); });
 45
 46         // 執行消費
 47         int value = queue.front();
 48         queue.pop();
 49         std::cout << "Consumed: " << value << " | Queue size: " << queue.size() << std::endl;
 50
 51         // 通知:告訴正在等待的生產者,現在有空位了
 52         cv_prod.notify_one();
 53
 54         return value;
 55     }
 56 };
 57
 58 // --- 測試代碼 ---
 59 void producer_task(ProducerConsumer& q, int id) {
 60     for (int i = 0; i < 5; ++i) {
 61         q.prod(id * 100 + i); // 生產數據
 62         std::this_thread::sleep_for(std::chrono::milliseconds(100)); // 模擬生產耗時
 63     }
 64 }
 65
 66 void consumer_task(ProducerConsumer& q) {
 67     for (int i = 0; i < 10; ++i) {
 68         q.cons(); // 消費數據
 69         std::this_thread::sleep_for(std::chrono::milliseconds(150)); // 模擬消費耗時
 70     }
 71 }
 72
 73 int main() {
 74     ProducerConsumer q(5); // 緩衝區容量為 3
 75
 76     // 開啓 2 個生產者線程和 1 個消費者線程
 77     std::thread p1(producer_task, std::ref(q), 1);
 78     std::thread p2(producer_task, std::ref(q), 2);
 79     std::thread c1(consumer_task, std::ref(q));
 80
 81     p1.join();
 82     p2.join();
 83     c1.join();
 84
 85     return 0;
 86 }
wait-notify之間做了什麼
釋放鎖並進入等待(原子性階段)
當你調用 cv.wait(lock) 時,底層會立即執行以下操作:
- 釋放鎖:自動釋放當前線程持有的
std::unique_lock<std::mutex>。 - 加入隊列:將當前線程放入該條件變量的等待隊列中。
- 進入休眠:掛起當前線程,不再消耗 CPU 資源。
核心細節:釋放鎖和進入等待這兩個動作是原子性的。這意味着不會出現“剛釋放鎖,還沒進入等待隊列,通知就來了”的情況(即錯失信號)。
被喚醒並嘗試重新獲取鎖
當另一個線程調用 cv.notify_one() 或 cv.notify_all() 時:
- 喚醒:操作系統將線程從等待隊列中移出,狀態變為“就緒”。
- 重新搶鎖:線程在
wait內部嘗試重新獲取(acquire)之前釋放的那個mutex。 - 阻塞等待鎖:如果鎖此時被其他線程持有(比如通知者還沒釋放鎖),被喚醒的線程會停在
wait內部,直到它搶到了鎖。
返回階段
只有當成功重新持有鎖後,cv.wait(lock) 才會結束阻塞並返回。此時,你的線程恢復了對共享資源的獨佔訪問權限。
信號丟失&虛假喚醒
信號丟失:A發送信號喚醒B,A已經發送信號,但是B還沒進入等待,就會倒是B收不到A的信號,這個信號就丟失了。
虛假喚醒:感官上是程序中沒有調用notify,喚醒某些處於阻塞的線程。
- 如何解決
在調用wait前檢查條件,生產者只有在隊列滿的情況下阻塞;消費者在隊列空的情況下阻塞;
使用if檢查條件可以避免信號丟失。使用while檢查變量可以解決信號丟失和虛假喚醒。
為什麼 if 可以防止信號丟失?
信號丟失(Lost Wake-up) 發生在:生產者發出了“隊列已滿”的信號,但消費者此時並沒有在等待,或者生產者在消費者還沒來得及進入 wait 狀態時就發送notify。
- 檢查條件的必要性: 在調用
wait()之前 檢查條件(無論是if還是while),本質上是為了確認當前是否真的需要阻塞。 - 邏輯: 消費者進入臨界區後,先看一眼隊列。如果隊列不為空,它直接拿走數據,根本不調用
wait()。這樣即使生產者之前發過信號,消費者也已經處理了數據,不會因為錯過信號而死鎖。
為什麼 while 是金標準?
使用 while 循環檢查條件被稱為 "Mesa-style monitoring"。它的邏輯是:被喚醒後,必須再次檢查條件。
使用while檢查狀態等效於 cv.wait(unique_lock(mutex),pred)
// 偽代碼:cv.wait(lock, pred) 的等效實現
while (!pred()) {
    wait(lock);
}
線程局部存儲
thread_local 每一個線程都是獨立的副本變量,線程銷燬時臨時變量銷燬。
truct ThreadContext {
    int thread_id;
    std::string name;
    std::vector<int> local_data;

    ThreadContext() : thread_id(0) {
        std::cout << "構造線程局部結構體" << std::endl;
    }

    ~ThreadContext() {
        std::cout << "析構線程局部結構體,線程ID: " << thread_id << std::endl;
    }
};

// C++11 thread_local
thread_local ThreadContext ctx;
如何調試
gdb命令
## 編譯生成 加-g
g++ -g test.cpp test -pthread

## 幫助
help /h
## 啓動調試
gdb test

## 查看代碼
list

## 運行
run /r  運行到第一個斷點
start  運行到第一行執行程序
## 打斷點
break / b 行號/函數名

## 查看所有斷點
info b
info breakpoints

## 執行
next / n 下一步 不進函數 逐過程
step / s 下一步 進函數   逐語句
continute /c 跳轉下一個斷點
finish 結束當前函數
info 查看函數局部變量的值
## 退出
quit /q

## 輸出
print / p 變量
p m_vector
p m_map
p *(m_vector._M_impl._start_)@m_vector.size()
display 追蹤具體變量值
undisplay 取消追蹤
watch 設置觀察點 變量修改時打印顯示

# x 查看內存
## 查看所有進程
info thread

## 跳轉進程
thread i

## 打印調用獨佔
bt
## 打印所有線程的調用堆棧
thread apply all bt

## 生成日誌文件,開啓日誌模式
set logging on # 日誌功能開啓

## 觀察點 watchpoint
watch

set scheduler-locking on  #鎖定調度。設置後,當你 next 時,只有當前線程運行,其他線程暫停。防止你在調試 A 線程時,B 線程也在跑,導致輸出混亂。
# 查找線程id
ps -ef | grep hello
gdb hello -p pid
- set scheduler-locking on/step/off
| 模式 | 命令 | 行為 |
|---|---|---|
| off (默認) | set scheduler-locking off |
所有線程自由運行,GDB可能在任何線程停止時切換 |
| step | set scheduler-locking step |
單步執行時鎖定當前線程,其他情況不鎖定 |
| on | set scheduler-locking on |
只運行當前線程,其他線程被凍結 |