


項目背景
最近我們團隊自研了一個基於 React 的 H5 前端框架,領導讓我來負責編寫框架的使用文檔。我選擇了 dumi 來搭建文檔站點,大部分內容都是手動寫 Markdown 來介紹各種功能,包括:初始化、目錄結構、生命週期、狀態管理、插件系統 等等。
框架裏有個很重要的子包,主要負責多個 App 的橋接能力,深度集成了各端環境的監測和橋接邏輯。這個子包對外提供了一個 App 實例對象,裏面封裝了很多原生能力,比如: 設置導航欄、錄音、保存圖片到相冊 等
這些 API 代碼格式都比較統一,領導希望避免在框架源碼和文檔裏重複定義相同的接口,最好能直接從源代碼自動生成文檔內容。需要提取的信息包括:API支持的App版本、功能描述、開發狀態、使用方式,如果是函數的話還要有參數説明和返回值説明。
我的解決方案
經過一番思考,我想到了一個方案:
核心思路:在不改動源代碼邏輯的前提下,通過增加註釋信息來補充文檔需要的元數據
具體實現路徑:
- 定義一套規範的註釋標籤
- 編寫解析腳本提取信息,生成 JSON 文件
- 在文檔項目中讀取 JSON,動態渲染成 API 文檔
定義註釋規範
我定義了一系列標準的註釋標籤:
- @appVersion —— 支持該API的App版本
- @description —— API的功能描述
- @apiType —— API類型,默認是函數,可選property(屬性)和function(函數)
- @usage —— 使用示例
- @param —— 函數參數説明(只有函數類型需要)
- @returns —— 函數返回值説明(只有函數類型需要)
- @status —— 發佈狀態
在實際代碼中這樣使用,完全不會影響原來的業務邏輯:
const app = {
  /**
   * @appVersion 1.0.0
   * @description 判斷設備類型
   * @apiType property
   * @usage app.platform // notInApp | ios | android | HarmonyOS
   * @status 已上線
   */
   platform: getPlatform(),

   /**
   * @appVersion 1.0.6
   * @description 註冊事件監聽
   * @param {Object} options - 配置選項
   * @param {string} options.title - 事件名稱
   * @param {Function} options.callback - 註冊事件時的處理函數邏輯
   * @param {Function} options.onSuccess - 設置成功的回調函數(可選)
   * @param {Function} options.onFail - 設置失敗的回調函數(可選)
   * @param {Function} options.onComplete - 無論成功失敗都會執行的回調函數(可選)
   * @usage app.monitor({ eventName: 'onOpenPage', callback: (data)=>{ console.log('端上push消息', data ) } })
   * @returns {String} id - 綁定事件的id
   * @status 已上線
   */
    monitor: ({ onSuccess, onFail, onComplete, eventName = "", callback = () => { } }) => {
        let _id = uuid();
        // 業務代碼省略
        return _id;
    },
}
解析腳本
接下來要寫一個解析腳本,把註釋內容提取成鍵值對格式,主要用正則表達式來解析註釋:
const fs = require('fs');
const path = require('path');

/**
 * 解析參數或返回值標籤
 * @param {string} content - 標籤內容
 * @param {string} type - 類型 ('param' 或 'returns')
 * @returns {Object} 解析後的參數或返回值對象
 */
function parseParamOrReturn(content, type = 'param') {
  const match = content.match(/{([^}]+)}\s+(\w+)(?:\.(\w+))?\s*-?\s*(.*)/);
  if (!match) return null;

  const paramType = match[1];
  const parentName = match[2];
  const childName = match[3];
  const description = match[4].trim();
  const isParam = type === 'param';

  if (childName) {
    // 嵌套參數或返回值 (options.title 或 data.result 格式)
    return {
      name: parentName,
      type: 'Object',
      description: isParam ? `${parentName} 配置對象` : `${parentName} 返回對象`,
      required: isParam ? true : undefined,
      children: [{
        name: childName,
        type: paramType,
        description: description,
        required: isParam ? (!paramType.includes('?') && !description.includes('可選')) : undefined
      }]
    };
  } else {
    // 普通參數或返回值
    return {
      name: parentName,
      type: paramType,
      description: description,
      required: isParam ? (!paramType.includes('?') && !description.includes('可選')) : undefined
    };
  }
}

/**
 * 合併嵌套對象
 * @param {Array} items - 參數或返回值數組
 * @returns {Array} 合併後的數組
 */
function mergeNestedItems(items) {
  const merged = {};

  items.forEach(item => {
    if (item.children) {
      // 嵌套對象
      if (!merged[item.name]) {
        merged[item.name] = { ...item };
      } else {
        // 合併子元素
        if (!merged[item.name].children) merged[item.name].children = [];
        merged[item.name].children.push(...item.children);
      }
    } else {
      // 普通參數
      if (!merged[item.name]) {
        merged[item.name] = item;
      }
    }
  });

  return Object.values(merged);
}

/**
 * 保存標籤內容到註解對象
 */
function saveTagContent(annotation, tag, content) {
  // 確保 parameters 和 returns 數組存在
  if (!annotation.parameters) annotation.parameters = [];
  if (!annotation.returns) annotation.returns = [];

  switch (tag) {
    case 'appVersion':
      annotation.appVersion = content;
      break;
    case 'sxzVersion':
      annotation.sxzVersion = content;
      break;
    case 'mddVersion':
      annotation.mddVersion = content;
      break;
    case 'description':
      annotation.description = content;
      break;
    case 'status':
      annotation.status = content;
      break;
    case 'usage':
      annotation.usage = content.trim();
      break;
    case 'apiType':
      // 解析類型:property 或 method
      annotation.type = content.toLowerCase();
      break;
    case 'param':
      const param = parseParamOrReturn(content, 'param');
      if (param) {
        annotation.parameters.push(param);
        // 合併嵌套對象
        annotation.parameters = mergeNestedItems(annotation.parameters);
      }
      break;
    case 'returns':
      const returnItem = parseParamOrReturn(content, 'returns');
      if (returnItem) {
        annotation.returns.push(returnItem);
        // 合併嵌套對象
        annotation.returns = mergeNestedItems(annotation.returns);
      }
      break;
  }
}

/**
 * 解析 JSDoc 註釋中的註解信息 - 逐行解析
 */
function parseJSDocAnnotation(comment) {
  if (!comment) return null;

  const annotation = {};

  // 按行分割註釋
  const lines = comment.split('\n');

  let currentTag = '';
  let currentContent = '';

  for (const line of lines) {
    // 清理行內容,移除 * 和首尾空格,但保留內部的換行意圖
    const cleanLine = line.replace(/^\s*\*\s*/, '').trimRight();

    // 跳過空行和註釋開始結束標記
    if (!cleanLine || cleanLine === '/' || cleanLine === '*/') continue;

    // 檢測標籤開始
    const tagMatch = cleanLine.match(/^@(\w+)\s*(.*)$/);
    if (tagMatch) {
      // 保存前一個標籤的內容
      if (currentTag) {
        saveTagContent(annotation, currentTag, currentContent);
      }

      // 開始新標籤
      currentTag = tagMatch[1];
      currentContent = tagMatch[2];
    } else if (currentTag) {
      // 繼續當前標籤的內容,但保留換行
      // 對於 @usage 標籤,我們保留原始格式
      if (currentTag === 'usage') {
        currentContent += '\n' + cleanLine;
      } else {
        currentContent += ' ' + cleanLine;
      }
    }
  }

  // 保存最後一個標籤的內容
  if (currentTag) {
    saveTagContent(annotation, currentTag, currentContent);
  }

  // 確保 parameters 和 returns 數組存在(即使為空)
  if (!annotation.parameters) annotation.parameters = [];
  if (!annotation.returns) annotation.returns = [];

  return Object.keys(annotation).length > 0 ? annotation : null;
}

/**
 * 使用 @apiType 標籤指定類型
 */
function extractAnnotationsFromSource(sourceCode) {
  const annotations = { properties: {}, methods: {} };

  // 使用更簡單的邏輯:按行分析
  const lines = sourceCode.split('\n');

  for (let i = 0; i < lines.length; i++) {
    const line = lines[i].trim();

    // 檢測 JSDoc 註釋開始
    if (line.startsWith('/**')) {
      let jsdocContent = line + '\n';
      let j = i + 1;

      // 收集完整的 JSDoc 註釋
      while (j < lines.length && !lines[j].trim().startsWith('*/')) {
        jsdocContent += lines[j] + '\n';
        j++;
      }

      if (j < lines.length) {
        jsdocContent += lines[j] + '\n'; // 包含結束的 */

        // 查找註釋後面的代碼行
        for (let k = j + 1; k < lines.length; k++) {
          const codeLine = lines[k].trim();
          if (codeLine && !codeLine.startsWith('//') && !codeLine.startsWith('/*')) {
            // 解析註解
            const annotation = parseJSDocAnnotation(jsdocContent);
            if (annotation) {
              // 從註解中獲取類型(property 或 method)
              let itemType = annotation.type;
              let name = null;

              // 如果沒有明確指定類型,默認設為 method
              if (!itemType) {
                itemType = 'method';
              }

              // 提取名稱
              const nameMatch = codeLine.match(/^(\w+)\s*[:=]/);
              if (nameMatch) {
                name = nameMatch[1];
              } else {
                // 如果沒有匹配到名稱,嘗試其他模式
                const funcMatch = codeLine.match(/^(?:async\s+)?(\w+)\s*\(/);
                if (funcMatch) {
                  name = funcMatch[1];
                }
              }

              if (name) {
                if (itemType === 'property') {
                  annotations.properties[name] = annotation;
                } else if (itemType === 'method') {
                  annotations.methods[name] = annotation;
                } else {
                  console.warn(`未知的類型: ${itemType},名稱: ${name}`);
                }
              } else {
                console.warn(`無法提取名稱: ${codeLine.substring(0, 50)}`);
              }
            }
            break;
          }
        }

        i = j; // 跳過已處理的行
      }
    }
  }

  return annotations;
}

/**
 * 從文件提取註解
 */
function extractAnnotationsFromFile(filePath) {
  if (!fs.existsSync(filePath)) {
    console.error('文件不存在:', filePath);
    return { properties: {}, methods: {} };
  }

  const sourceCode = fs.readFileSync(filePath, 'utf-8');
  return extractAnnotationsFromSource(sourceCode);
}

/**
 * 提取所有文件的註解
 */
function extractAllAnnotations(filePaths) {
  const allAnnotations = {};

  filePaths.forEach(filePath => {
    if (fs.existsSync(filePath)) {
      const fileName = path.basename(filePath, '.js');
      console.log(`\n=== 處理文件: ${fileName} ===`);

      const annotations = extractAnnotationsFromFile(filePath);

      if (Object.keys(annotations.properties).length > 0 ||
        Object.keys(annotations.methods).length > 0) {
        allAnnotations[fileName] = {
          fileName,
          ...annotations
        };
      }
    }
  });

  return allAnnotations;
}

module.exports = {
  parseJSDocAnnotation,
  extractAnnotationsFromSource,
  extractAnnotationsFromFile,
  extractAllAnnotations
};
集成到構建流程
然後創建一個腳本,指定要解析的源文件,把生成的 JSON 文件 輸出到 build 目錄裏:
const { extractAllAnnotations } = require('./jsdoc-annotations');
const fs = require('fs');
const path = require('path');

/**
 * 主函數 - 提取註解並生成JSON文件
 */
function main() {
  const filePaths = [
    path.join(process.cwd(), './app.js'),
    path.join(process.cwd(), './xxx.js'),
    path.join(process.cwd(), './yyy.js'),
  ].filter(fs.existsSync);

  if (filePaths.length === 0) {
    console.error('未找到任何文件,請檢查文件路徑');
    return;
  }

  const annotations = extractAllAnnotations(filePaths);
  const outputPath = path.join(process.cwd(), './build/api-annotations.json');

  // 保存為JSON文件
  fs.writeFileSync(outputPath, JSON.stringify(annotations, null, 2));
}

main();
在 package.json 裏定義構建指令,確保 build 的時候自動運行解析腳本:
{
    "scripts": {
      "build:annotations": "node scripts/extract-annotations.js",
      "build": "(cd template/main-app && npm run build) && npm run build:annotations"
  },
}
執行效果:運行 npm run build 後,會生成結構化的 JSON 文件:
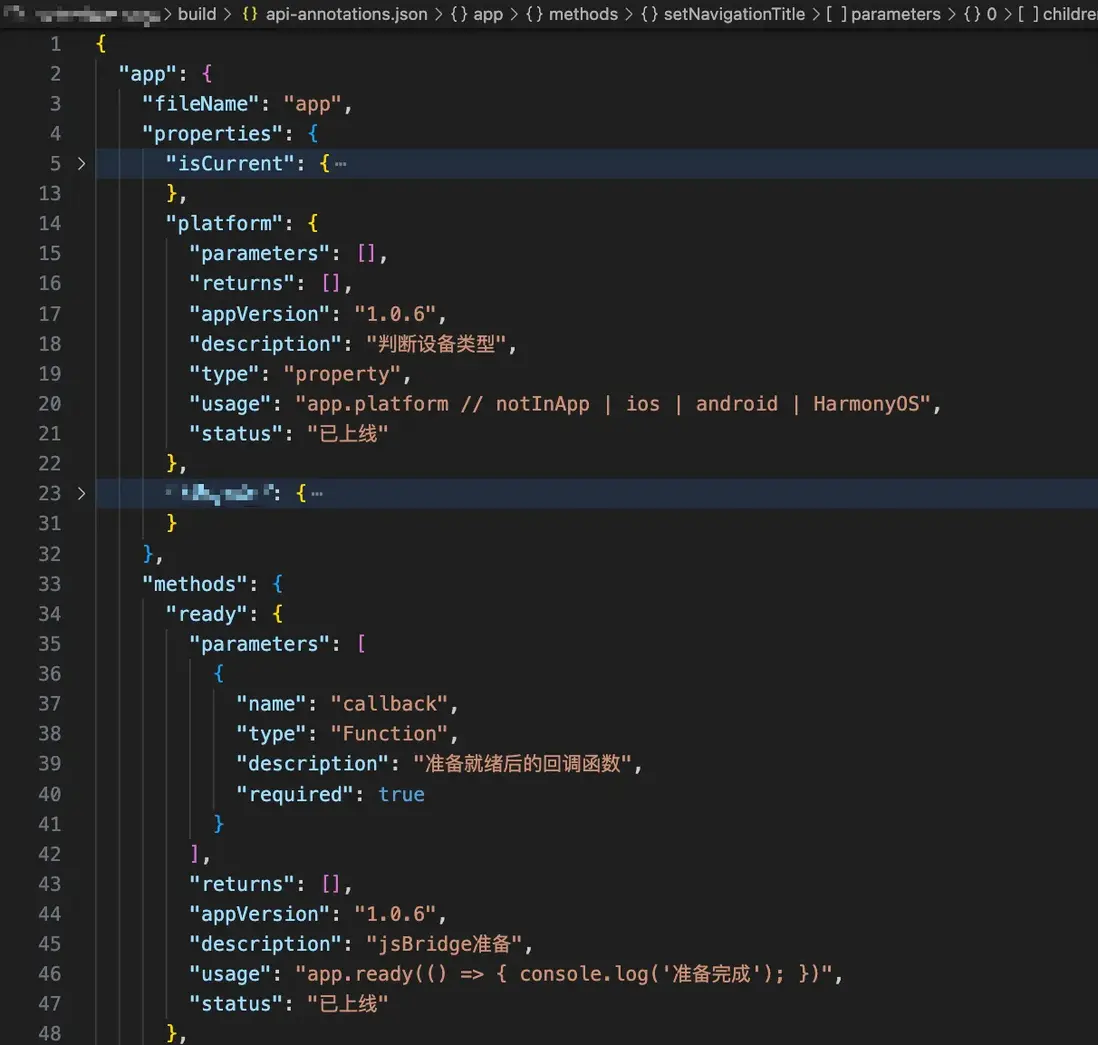
## 在文檔中展示
框架項目和文檔項目是分開的,把 JSON 文件生成到 build 文件夾,上傳到服務器後提供固定訪問路徑。
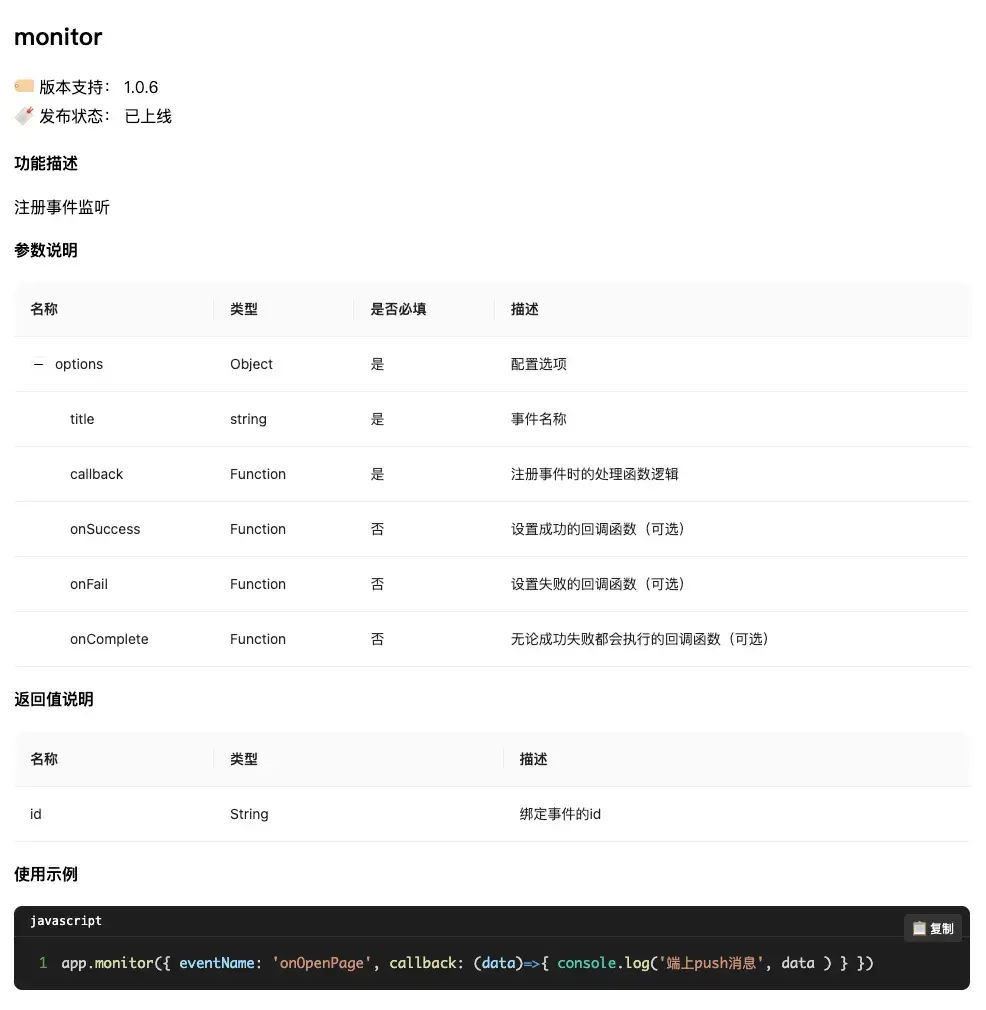
有了結構化的 JSON 數據,生成文檔頁面就很簡單了。在 dumi 文檔裏,把解析邏輯封裝成組件:
---
title: xxx
order: 2
---

```jsx
/**
 * inline: true
 */
import JsonToApi from '/components/jsonToApi/index.jsx';

export default () => <JsonToApi type="app" title="xxx" desc="App原生 api 對象"/>;
```
渲染效果如圖所示
在將 JSON 數據解析並渲染到頁面的過程中,有兩個關鍵的技術點需要特別關注:
要點一:優雅的代碼展示體驗
直接使用 dangerouslySetInnerHTML 來呈現代碼片段會導致頁面樣式簡陋、缺乏可讀性。我們需要藉助代碼高亮工具來提升展示效果,同時添加便捷的複製功能,讓開發者能夠輕鬆複用示例代碼。
import React from 'react';
import { Prism as SyntaxHighlighter } from 'react-syntax-highlighter';
import { vscDarkPlus } from 'react-syntax-highlighter/dist/esm/styles/prism';

const CodeBlock = ({
  children,
  language = 'javascript',
  showLineNumbers = true,
  highlightLines = []
}) => {

  const [copied, setCopied] = React.useState(false);

  // 可靠的複製方法
  const copyToClipboard = async (text) => {
    try {
      // 方法1: 使用現代 Clipboard API
      if (navigator.clipboard && window.isSecureContext) {
        await navigator.clipboard.writeText(text);
        return true;
      } else {
        // 方法2: 使用傳統的 document.execCommand(兼容性更好)
        const textArea = document.createElement('textarea');
        textArea.value = text;
        textArea.style.position = 'fixed';
        textArea.style.left = '-999999px';
        textArea.style.top = '-999999px';
        document.body.appendChild(textArea);
        textArea.focus();
        textArea.select();

        const success = document.execCommand('copy');
        document.body.removeChild(textArea);
        return success;
      }
    } catch (err) {
      console.error('複製失敗:', err);
      // 方法3: 備用方案 - 提示用户手動複製
      prompt('請手動複製以下代碼:', text);
      return false;
    }
  };

  const handleCopy = async () => {
    const text = String(children).replace(/\n$/, '');
    const success = await copyToClipboard(text);

    if (success) {
      setCopied(true);
      setTimeout(() => setCopied(false), 2000);
    }
  };

  return (
    <div className="code-container" style={{ position: 'relative', margin: '20px 0' }}>
      {/* 語言標籤 */}
      <div style={{
        background: '#1e1e1e',
        color: '#fff',
        padding: '8px 16px',
        borderTopLeftRadius: '8px',
        borderTopRightRadius: '8px',
        borderBottom: '1px solid #333',
        fontSize: '12px',
        fontFamily: 'monospace',
        display: 'flex',
        justifyContent: 'space-between',
        alignItems: 'center'
      }}>
        <span>{language}</span>
        <button
          onClick={handleCopy}
          style={{
            position: 'absolute',
            top: '8px',
            right: '8px',
            background: copied ? '#52c41a' : '#333',
            color: 'white',
            border: 'none',
            padding: '4px 8px',
            borderRadius: '4px',
            fontSize: '12px',
            cursor: 'pointer',
            zIndex: 10,
            transition: 'all 0.3s'
          }}
        >
          {copied ? '✅ 已複製' : '📋 複製'}
        </button>
      </div>

      {/* 代碼區域 */}
      <SyntaxHighlighter
        language={language}
        style={vscDarkPlus}
        showLineNumbers={showLineNumbers}
        wrapLines={true}
        lineProps={(lineNumber) => ({
          style: {
            backgroundColor: highlightLines.includes(lineNumber)
              ? 'rgba(255,255,255,0.1)'
              : 'transparent',
            padding: '2px 0'
          }
        })}
        customStyle={{
          margin: 0,
          borderTopLeftRadius: 0,
          borderTopRightRadius: 0,
          borderBottomLeftRadius: '8px',
          borderBottomRightRadius: '8px',
          padding: '16px',
          fontSize: '14px',
          lineHeight: '1.5',
          background: '#1e1e1e',
          border: 'none',
          borderTop: 'none'
        }}
        codeTagProps={{
          style: {
            fontFamily: '"Fira Code", "Monaco", "Consolas", "Courier New", monospace',
            fontSize: '14px'
          }
        }}
      >
        {String(children).replace(/\n$/, '')}
      </SyntaxHighlighter>
    </div>
  );
};

export default CodeBlock;
要點二:錨點導航方案
由於我們是通過組件方式動態渲染內容,無法直接使用 dumi 內置的錨點導航功能。這就需要我們自主實現一套導航系統,並確保其在不同屏幕尺寸下都能保持良好的可用性,避免出現佈局錯亂的問題。
import React, { useEffect, useRef } from 'react';
import { Anchor } from 'antd';
export default function readJson(props){

  const anchorRef = useRef(null);
  const anchorWrapperRef = useRef(null);

  useEffect(() => {
  // 使用更長的延遲確保 DOM 完全渲染
  const timer = setTimeout(() => {
    const contentElement = document.querySelector('.dumi-default-content');
    const anchorElement = anchorRef.current;

    if (!contentElement || !anchorElement) return;

    // 創建錨點容器
    const anchorWrapper = document.createElement('div');
    anchorWrapper.className = 'custom-anchor-wrapper';
    Object.assign(anchorWrapper.style, {
      position: 'sticky',
      top: '106px',
      width: '184px',
      marginInlineStart: '24px',
      maxHeight: '80vh',
      overflow: 'auto',
      overscrollBehavior: 'contain'
    });

    // 插入到內容元素後面
    if (contentElement.nextSibling) {
      contentElement.parentNode.insertBefore(anchorWrapper, contentElement.nextSibling);
    } else {
      contentElement.parentNode.appendChild(anchorWrapper);
    }

    // 移動錨點
    anchorWrapper.appendChild(anchorElement);

    // 記錄錨點容器,用於清理
    anchorWrapperRef.current = anchorWrapper;
  }, 500); // 500ms 延遲,確保 DOM 完全渲染

  return <div ref={anchorRef}>
      <Anchor
        targetOffset={80}
        items={[
          {
            key: 'properties',
            href: '#properties',
            title: '屬性',
            children: Object.keys(properties).map(item => ({
              key: item,
              href: `#${item}`,
              title: item
            }))
          },
          {
            key: 'methods',
            href: '#methods',
            title: '方法',
            children: Object.keys(methods).map(item => ({
              key: item,
              href: `#${item}`,
              title: item
            }))
          }
        ]}
      />
    </div>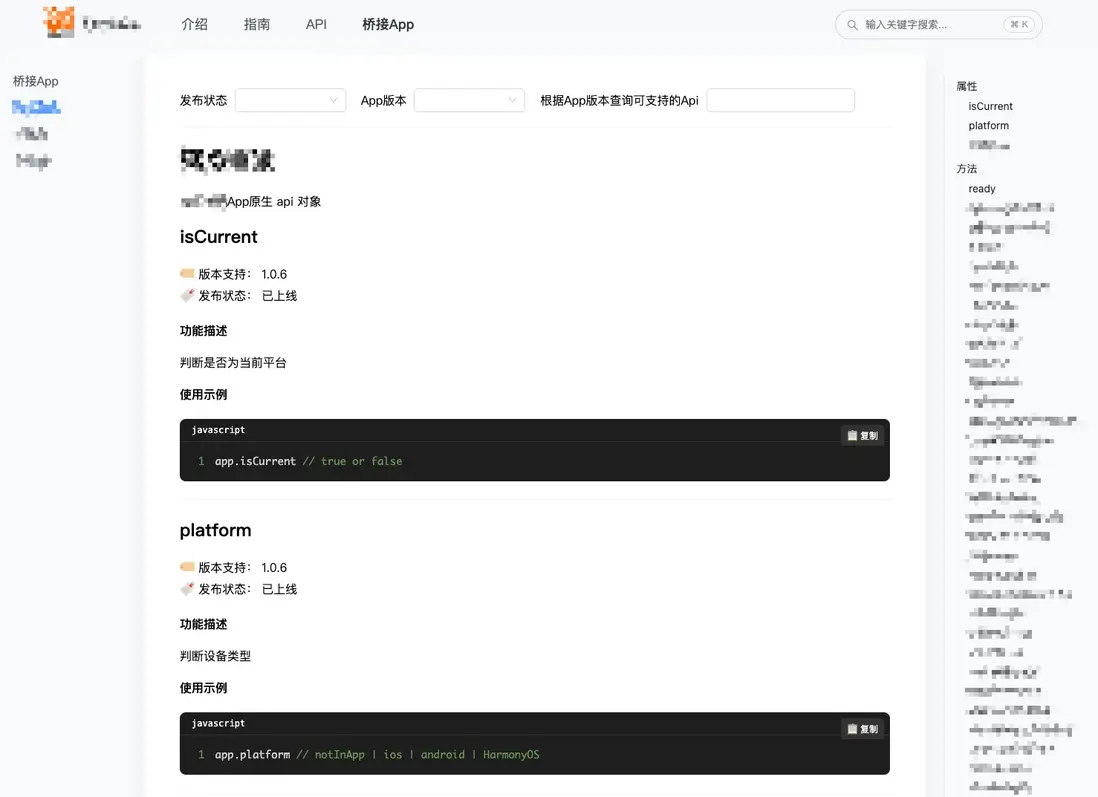
}當然,在頁面功能上我們還可以進一步豐富,比如增加實用的篩選功能。比如快速查看特定 App 版本支持的 API、篩選"已上線"、"開發中"或"已廢棄"的接口,這些篩選能力讓文檔不再是靜態的參考手冊,而變成了一個API 探索工具,最終呈現效果如下:
通過這套自動化文檔方案,我們實現了代碼和文檔的實時同步,大大減少了維護成本,同時給開發者提供了出色的使用體驗。現在開發同學只需要在代碼裏寫好註釋,文檔就會自動更新,再也不用擔心文檔落後於代碼了。
如果你對前端工程化有興趣,或者想了解更多前端相關的內容,歡迎查看我的其他文章,這些內容將持續更新,希望能給你帶來更多的靈感和技術分享~


