項目背景:vue2老項目,使用vue-cli4搭建的,創建項目時eslint校驗使用的是eslint+standard。
問題:項目統一配置了eslint,但是prettier配置各不相同,導致格式化後總會有衝突,而且有的電腦配置了git提交校驗不生效,提交的代碼沒有經過eslint驗證,其他同事拉取代碼後提交不成功。
配置1:.editorconfig
該文件是針對不同IDE進行配置的初始化格式。
# EditorConfig is awesome: http://EditorConfig.org

# top-most EditorConfig file
root = true

# Unix-style newlines with a newline ending every file
[*] # 表示所有文件使用
charset = utf-8 # 設置文件字符集為 utf-8
end_of_line = lf # 控制換行類型(lf | cr | crlf)
trim_trailing_whitespace = true # 去除行尾的任意空白字符
insert_final_newline = true # 始終在文件末尾插入一個新行

# 2 space indentation
[*.{js,jsx,ts,tsx,vue}]
indent_style = space # 縮進風格(tab | space)
indent_size = 2 # 縮進大小
配置2:eslint相關
1、vscode安裝eslint插件
2、vscode配置保存時修復
點擊vscode左下角設置-->搜索settings --> 打開setting.json文件,配置eslint保存。


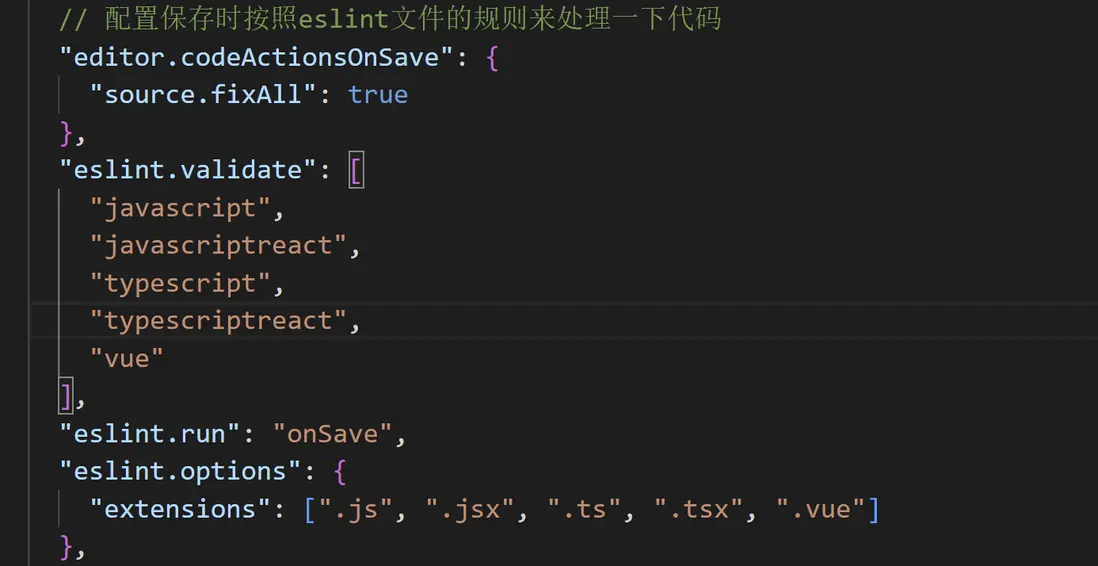
注意:這個setting.json文件是全局的,更改後在其他項目也會生效。如果只需要在當前項目生效,則使用快捷鍵ctrl+shift+p,點擊setting,可以看到項目根目錄下生成了vscode-->setting.json文件,在裏邊進行配置,則只會在當前項目生效。

3、項目根目錄下創建.eslintignore文件,配置如下:
public
.husky
.vscode
node_modules
dist
index.html
.gitignore
*.sh
*.md

src/assets
配置3:prettier
1、安裝
npm i prettier -D
2、vscode安裝prettier

3、項目根目錄下創建.prettierrc.js文件
module.exports = {
  // tab縮進大小,默認為2
  tabWidth: 2,
  // 使用tab縮進,默認false
  useTabs: false,
  // 使用分號,默認true
  semi: true,
  // 使用單引號, 默認false,(在jsx中配置無效, 默認都是雙引號)
  singleQuote: false,
  // 單行代碼最長字符長度,超過之後會自動格式化換行。
  printWidth: 80,
  // 行尾逗號,默認none,可選(none|es5|all),es5 包括es5中的數組、對象,all 包括函數對象等所有可選
  trailingComma: "all",
  // 對象中的空格 默認true,true: { foo: bar },false: {foo: bar}
  bracketSpacing: true,
  // JSX標籤閉合位置 默認false
  jsxBracketSameLine: false,
  // 箭頭函數參數括號 默認avoid 可選(avoid|always),avoid 能省略括號的時候就省略 例如x => x ,always 總是有括號
  arrowParens: "avoid",
  // 與 `.editorconfig` 保持一致設置。
  endOfLine: "lf",
  // 指定要使用的解析器,不需要寫文件開頭的 @prettier
  requirePragma: false,
  // 不需要自動在文件開頭插入 @prettier
  insertPragma: false,
  // 使用默認的折行標準 always\never\preserve
  proseWrap: "preserve",
};
4、.prettierignore配置
dist
node_modules
public
.husky
.vscode
*.md
*.sh

src/assets
5、vscode配置prettier
// prettier可以格式化很多種格式,所以需要在這裏對應配置下
  "[html]": {
    "editor.defaultFormatter": "esbenp.prettier-vscode"
  },
  "[css]": {
    "editor.defaultFormatter": "esbenp.prettier-vscode"
  },
  "[scss]": {
    "editor.defaultFormatter": "esbenp.prettier-vscode"
  },
  "[vue]": {
    "editor.defaultFormatter": "esbenp.prettier-vscode"
  },
  "[javascript]": {
    "editor.defaultFormatter": "esbenp.prettier-vscode"
  },
  "[json]": {
    "editor.defaultFormatter": "esbenp.prettier-vscode"
  },
  "editor.formatOnSave": true
最後的"editor.formatOnSave": true是保存時格式化設置。
6、設置使用prettier格式化代碼
右鍵選擇使用...格式化代碼

在彈窗中選擇prettier

7、解決eslint和prettier衝突
7.1安裝依賴:
npm i -D eslint-config-prettier@6.0.0
這裏選擇6.0.0版本是和項目中的eslint版本對應的,要不然版本不兼容會報錯;
7.2 設置規則
把prettier設置的規則添加到extends數組中:

配置4:husky配置
1、安裝husky
npm i husky@8.0.3 -D
注意:這個版本也是根據當前node版本安裝的。
2、創建.husky/目錄並指定該目錄為 git hooks 所在的目錄
npm set-script prepare "husky install" && npm run prepare執行該命令後,會看到 package.json 文件中 scripts 對象中新增一條 prepare:"husky install"命令,項目根目錄會生成一個.husky 文件夾
注: 需要 npm 版本 Version 7.x(npm set-script 命令需要 7.x),建議 node 版本升級到 16.x
3、創建預提交腳本
執行該命令後,會看到.husky/目錄下新增了一個名為 pre-commit 的 shell 腳本
這樣,在之後執行 git commit 命令時會先觸發 pre-commit 這個腳本

配置5:commitlint進行校驗
npx husky add .husky/commit-msg 'npx --no-install commitlint --edit "$1"'執行該命令後,會看到.husky/目錄下新增了一個名為 commit-msg 的 shell 腳本

配置6:lint-staged安裝配置
lint-staged 用於預提交時要進行代碼檢查的規範,比如 eslint
npm install lint-staged@13.2.3 -D
在 package.json 新增 lint-staged

配置7:commitlint提交校驗安裝配置
npm i @commitlint/config-conventional@17.6.6 @commitlint/cli@17.6.6 -D在項目根目錄下創建 commitlint.config.js 文件,並設置如下信息

配置8:commitzen適配器
用於命令交互式提交的插件,方便大家進行提交
1、全局安裝 commitzen
npm install -g commitizen@4.3.0
2、安裝自定義項目提交配置適配器
npm install cz-customizable@6.3.0 -D
3、package.json 中添加 commitizen 配置

4、配置 cz-customizable 配置項
在項目根目錄創建.cz-config.js 配置文件,文件內容參考如下
module.exports = {
// 可選類型
types: [
{ value: "feat", name: "feat: 新功能" },
{ value: "fix", name: "fix: 修復一個bug" },
{ value: "docs", name: "docs: 文檔變更" },
{ value: "style", name: "style: 代碼格式(不影響代碼運行的變動)" },
{ value: "conflict", name: "conflict: 修復代碼衝突" },
{ value: "font", name: "font: 字體文件更新" },
{ value: "refactor", name: "refactor: 重構(既不是增加feature,也不是修復bug)" },
{ value: "perf", name: "perf: 性能優化" },
{ value: "test", name: "test: 增加測試" },
{ value: "chore", name: "chore: 構建過程或輔助工具或配置工具修改" },
{ value: "revert", name: "revert: 回退" },
{ value: "build", name: "build: 影響構建系統或外部依賴項的更改(如:webpack、npm)" }
],
// 交互式消息提示步驟
messages: {
type: "請選擇提交類型:",
customScope: "請輸入修改範圍(可選):",
subject: "請簡要描述提交(必填):",
body: "請輸入詳細描述(可選):",
footer: "請輸入要關閉的issue(可選):",
confirmCommit: "確認使用以上信息提交?(y/n/e/h)"
},
// 跳過問題
skipQuestions: ["body", "footer"],
// subject文字長度默認是72
subjectLimit: 72
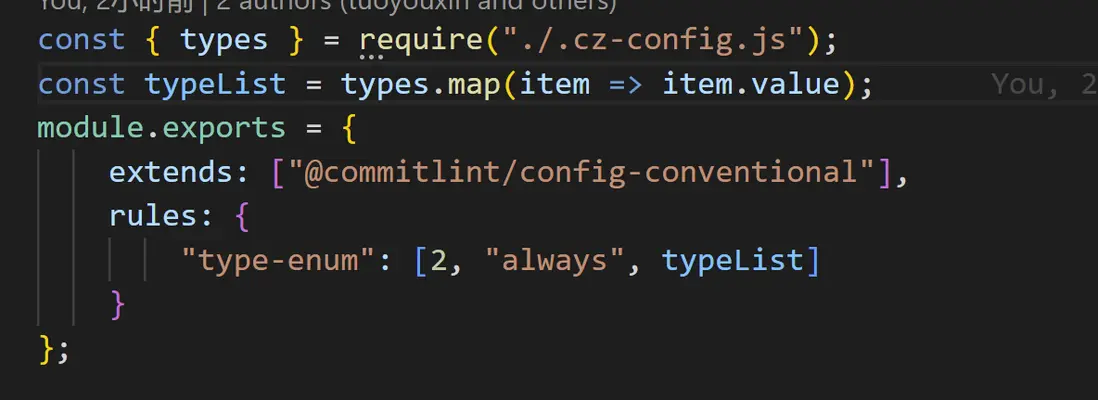
}配置9:增加自定義校驗規則到 commitlint 配置
編輯 commitlint.config.js,導入.cz-config.js 中的自定義的規則項
10、FAQ
Q:配置mac電腦配置husky校驗不生效
A:mac電腦需要給husky添加權限,可以執行chmod +x .husky/pre-commit進行嘗試