
本來這個打算髮布在csdn上來着,但是想到這幾年csdn越來越不當人,好多內容都在未經博主的同意下改為vip可見,他的作為,簡直令人噁心,從此以後我也不打算在那上邊寫了。
官方的oms的oracle收費,只能找替代品,datax是個不錯選擇,但是隻能支持單表,datax不支持多表,那我們就寫腳本,去批量執行多個指令。以下沒有視圖與函數存儲過程的導入,只有表數據。
我找了網上所有相關,沒有批量導入的方法,datax也不支持,只能自己想辦法了。
如果你只有五張十張表,不如直接去手動執行命令來的快,如果幾十張表,那可以參考一下我的腳本
必要軟件:
datax
navicat(navicat執行速度比官方軟件執行速度更快,而且還有很多便捷工具,如果是win環境,建議裝一個,即便不裝其實也有解決方案不過麻煩一點)
python2(datax使用的是python2編寫的腳本,所以需要裝python2,同樣如果你聰明的話,並且已經安裝了3,可以將官方的datax腳本從python2轉化為python3在執行)
步驟:
1,查出所有表
首先你需要你先在oracle的用户裏查出所有表獲取到相關表名稱
select * from all_tables where owner = '登陸的用户名';
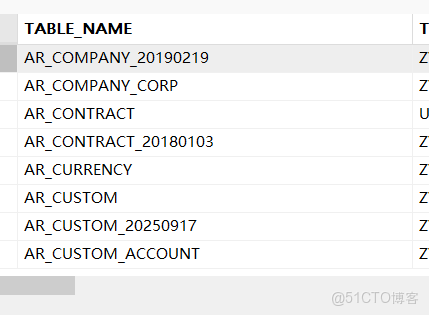
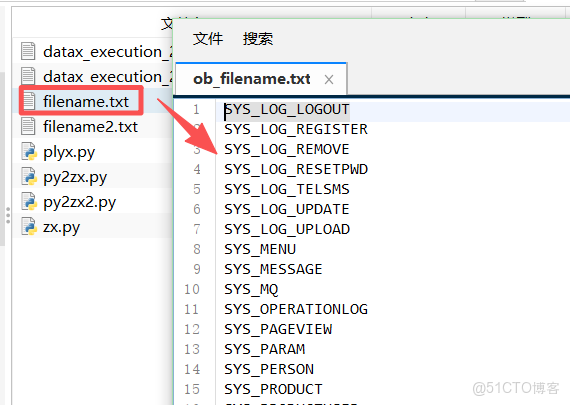
將這一列直接複製到一個filename.txt文件內(直接在表頭,右鍵複製就行,如果原oracle庫中,某些表不需要往ob數據庫中導入,那就可以在filename.txt文件中將其刪除,不會影響後續操作)效果如下
2,導出表結構(表結構與索引導出)
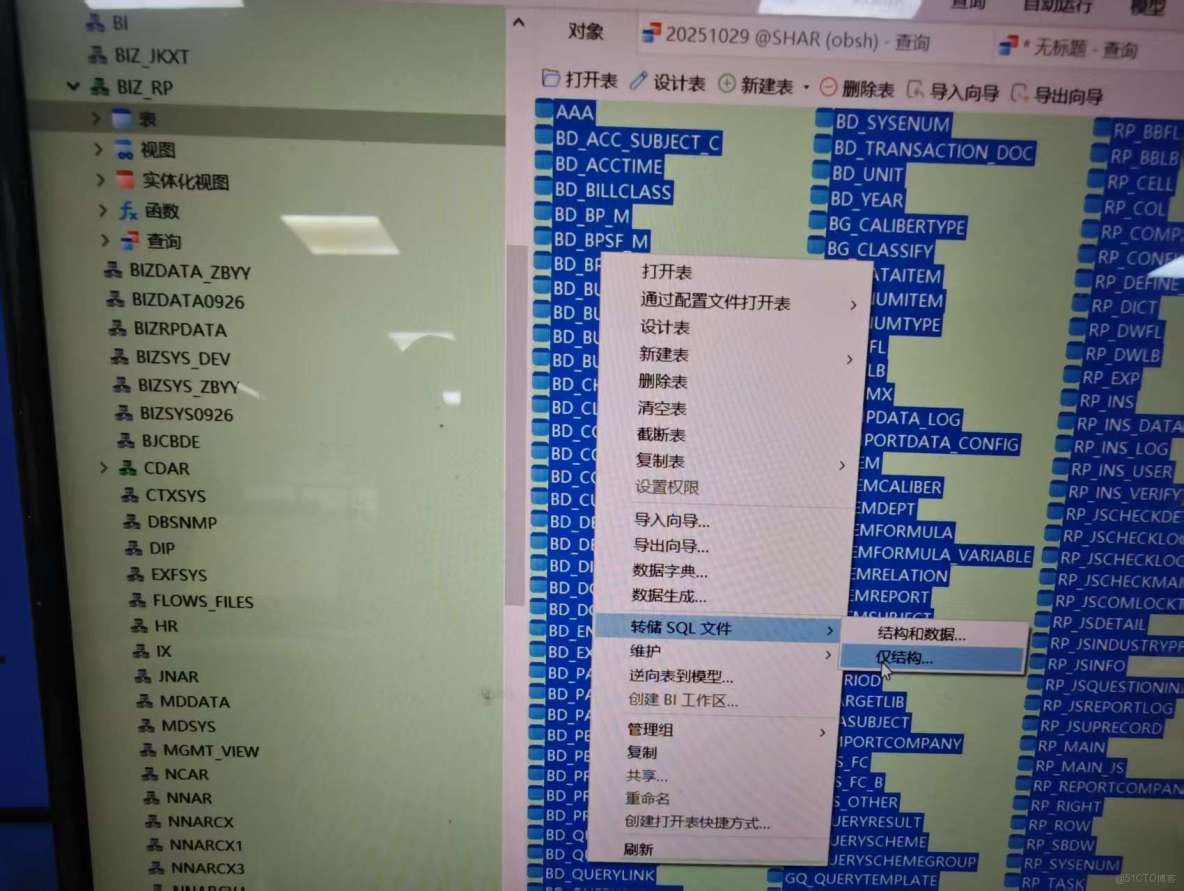
oracle庫,雙擊目標用户的表,點對象,在所有表的框裏全選(ctrl+A)後右鍵,點擊轉儲sql文件,僅結構,這樣就會把所有表結構導出來了。
注意:導出的文件,上半部分是表結構,下半部分是索引,需要將這兩塊分成兩文件,稍後分開執行。
如果你沒安裝navicat,那你需要用查詢拼接一個導出的sql,然後再複製出來,如果我有時間會後續補充
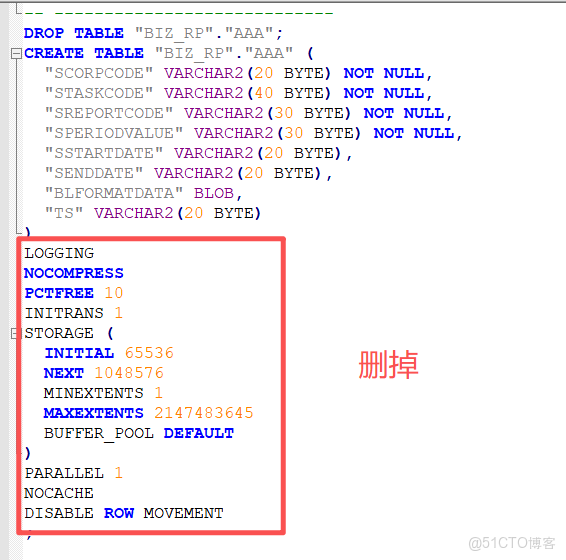
友情提示:導出的表結構與索引如果在navicat裏執行,也可以,如果在oceanbase官方軟件裏執行,需要刪除部分內容才能執行,索引也同樣如此,刪除那部分你看不懂的部分就對了。
3,表結構入庫
用navicat連接ob庫後,將剛才導出的表結構直接執行,但是索引先不執行,(上一步讓你將導出內容拆分為了表結構與索引)
datax,需要先在目標庫內創建好表才能導入數據,真的是非常麻煩,datax也只僅僅提供了導數據的功能。
4,執行批量腳本
找個文件夾,在裏邊將第一步創建的表名稱txt文件複製進去,在創建的一個plzx.py文件,將以下內容複製進去(注意下邊第八行是表txt文件名稱,第九行要替換的部分我會用漢字表明,不要原封不動的摘抄)
# -*- coding: utf-8 -*-
#!/usr/bin/env python
import os
import json

def main():
    # 定義源文件路徑
    source_file = r"filename.txt"
    template = {"job":{"setting":{"speed":{"channel":3},"errorLimit":{"record":10,"percentage":0.02}},"content":[{"reader":{"name":"oraclereader","parameter":{"username":"oracle庫的用户名","password":"oracle庫的密碼","column":["*"],"connection":[{"table":["SYS_LOG_LOGOUT"],"jdbcUrl":["jdbc:oracle:thin:@oracle庫的ip:1521/orcl"]}]}},"writer":{"name":"oceanbasev10writer","parameter":{"writeMode":"insert","batchSize":5000,"memstoreThreshold":"90","username":"ob用户名@ob租户如果有集羣需要加#集羣名","password":"ob密碼","column":["*"],"connection":[{"table":["SYS_LOG_LOGOUT"],"jdbcUrl":"jdbc:oceanbase://ob的ip:2881/shar"}]}}}]}}

    # 檢查源文件是否存在
    if not os.path.exists(source_file):
        print "錯誤:找不到源文件 {0}".format(source_file)
        return

    try:
        # 讀取源文件內容
        with open(source_file, 'r') as file:
            lines = file.readlines()

        # 處理每一行內容
        for line_num, line_content in enumerate(lines, 1):
            # 去除行尾換行符和空白字符
            clean_content = line_content.strip()

            # 跳過空行
            if not clean_content:
                print "跳過第{0}行空行".format(line_num)
                continue

            # 生成新文件名
            new_filename = "{0}.json".format(clean_content)

            # 構建JSON內容
            config = template.copy()
            config["job"]["content"][0]["reader"]["parameter"]["connection"][0]["table"][0] = clean_content
            config["job"]["content"][0]["writer"]["parameter"]["connection"][0]["table"][0] = clean_content

            # 寫入新文件
            with open(new_filename, 'w') as json_file:
                json.dump(config, json_file, indent=2, ensure_ascii=False)

            print "成功創建文件:{0}".format(new_filename)

    except Exception as e:
        print "處理文件時出錯:{0}".format(str(e))

if __name__ == "__main__":
    main()
然後當前文件夾下cmd(linux同理)窗口直接執行:
python plzx.py 然後你會發現在這個文件夾下 ,會多出很多json文件,而這些json文件是dataX必要的工作文件,把當前文件夾位置複製下來,接下來要用。
再在當前文件夾下創建一個py2zx2.py文件,然後將以下內容複製進去(注意第67行路徑,第一個路徑必須是datax的安裝位置,第二個路徑是生成json文件的位置)
# -*- coding: utf-8 -*-
#!/usr/bin/env python

import os
import subprocess
import datetime
import sys

# 設置編碼,確保中文字符正常顯示
reload(sys)
sys.setdefaultencoding('utf-8')

def setup_logging():
    """設置日誌記錄"""
    # 獲取當前時間作為日誌文件名
    current_time = datetime.datetime.now().strftime("%Y%m%d_%H%M%S")
    log_filename = "datax_execution_{0}.log".format(current_time)

    # 創建日誌文件並返回文件對象
    log_file = open(log_filename, 'w')
    return log_file

def log_message(message, log_file):
    """記錄消息到控制枱和日誌文件"""
    print(message)
    log_file.write(message + '\n')
    log_file.flush()

def main():
    # 設置日誌記錄
    log_file = setup_logging()

    try:
        # 定義文件名
        filename = "filename.txt"

        # 記錄開始時間
        start_time = datetime.datetime.now()
        log_message("=== DataX批量執行開始於: {0} ===".format(start_time.strftime("%Y-%m-%d %H:%M:%S")), log_file)

        # 檢查文件是否存在
        if not os.path.exists(filename):
            log_message("錯誤:找不到文件 {0}".format(filename), log_file)
            return

        # 記錄使用的文件名
        log_message("使用配置文件: {0}".format(filename), log_file)

        # 讀取文件內容並遍歷每一行
        with open(filename, 'r') as file:
            lines = file.readlines()
            total_tasks = len([line for line in lines if line.strip()])
            log_message("共發現 {0} 個任務需要執行".format(total_tasks), log_file)

            completed_tasks = 0
            failed_tasks = 0

            for line in lines:
                # 去除行首尾的空白字符
                config_name = line.strip()

                # 跳過空行
                if not config_name:
                    continue

                # 構建命令 - 使用Python 2兼容的字符串格式化
                command = "python /home/datax/bin/datax.py /home/datax/piliang/{0}.json".format(config_name)

                log_message("正在執行: {0}".format(command), log_file)

                # 執行命令
                try:
                    result = subprocess.Popen(command, shell=True, stdout=subprocess.PIPE, stderr=subprocess.PIPE)
                    stdout, stderr = result.communicate()
                    returncode = result.returncode

                    if returncode == 0:
                        log_message("執行成功: {0}".format(command), log_file)
                        log_message("輸出: {0}".format(stdout), log_file)
                        completed_tasks += 1
                    else:
                        log_message("執行失敗: {0}".format(command), log_file)
                        log_message("錯誤: {0}".format(stderr), log_file)
                        failed_tasks += 1
                        # 根據需求決定是否繼續執行後續命令
                        # 如需遇到錯誤就停止,可取消下一行的註釋
                        # break

                except Exception as e:
                    log_message("執行異常: {0}".format(command), log_file)
                    log_message("異常信息: {0}".format(str(e)), log_file)
                    failed_tasks += 1
                    # 如需遇到錯誤就停止,可取消下一行的註釋
                    # break

            # 記錄執行統計
            end_time = datetime.datetime.now()
            duration = end_time - start_time

            log_message("=== DataX批量執行完成於: {0} ===".format(end_time.strftime("%Y-%m-%d %H:%M:%S")), log_file)
            log_message("執行統計:", log_file)
            log_message("  - 總任務數: {0}".format(total_tasks), log_file)
            log_message("  - 成功任務: {0}".format(completed_tasks), log_file)
            log_message("  - 失敗任務: {0}".format(failed_tasks), log_file)
            log_message("  - 總耗時: {0}".format(duration), log_file)

    finally:
        # 確保日誌文件被正確關閉
        log_file.close()
        print("日誌已保存到: {0}".format(log_file.name))

if __name__ == "__main__":
    main()
在當前文件夾下執行:
python py2zx2.py然後就是等待漫長的數據導入時間,直到看到下邊這樣,就導入成功了。
=== DataX批量執行完成於: 2025-11-20 18:40:05 ===
執行統計:
• 總任務數: 186
• 成功任務: 186
• 失敗任務: 0
• 總耗時: 0:44:50.279777
日誌已保存到: datax_execution_20251120_175514.log
5,添加索引
最後執行一下第二步生成的索引sql,時間漫長慢慢等。執行完畢後數據就導入成功了。
6.視圖函數等相關
可以使用來查詢,像第一步那樣複製出來再在ob中執行
select * from all_views where owner = ‘’;自建函數存儲過程等我們用的比較少,是一個一個複製出來執行的,我這邊就不獻醜了。
============================
內容完結,我這是為了最快實現數據遷移組合的方式,麻煩肯定是麻煩一點,但是,這樣是最傻瓜式,不用學習額外的內容,不用看官方的代碼,就可以實現,如果有能力,各位可以在原datax基礎上進行改造,datax是開源的。
吐槽部分:因為信創原因,客户需要將oracle數據庫遷移到oceanbase(以下簡稱ob),客户所用內網,無法鏈接oceanbase數據庫對代碼進行適配測試。只能本地搭建相關測試數據庫,導入整庫數據,進行測試。
這項任務真的折磨了我很長時間,先是熟悉ob,ob出錯反饋平台,就讓我重裝,當重裝好了,去看數據遷移,又搭oms,oms建好了,窮逼版不支持oracle,又去找代替。。。
如果有問題,也希望各位指正,如果有幫助麻煩各位點個贊