
3.2. 響應式佈局
響應式佈局
自適應佈局可以保證窗口尺寸在【一定範圍內變化】時,頁面的顯示是正常的。但是將窗口尺寸【變化較大】時(如窗口寬度從400vp變化為1000vp),僅僅依靠自適應佈局可能出現圖片異常放大或頁面內容稀疏、留白過多等問題,此時就需要藉助響應式佈局能力調整頁面結構。
響應式佈局是指頁面內的元素可以根據特定的特徵(如窗口寬度、屏幕方向等)自動變化以適應外部容器變化的佈局能力。
響應式佈局中最常使用的特徵是窗口寬度,可以將窗口寬度劃分為不同的範圍(下文中稱為斷點)。當窗口寬度從一個斷點變化到另一個斷點時,改變頁面佈局(如將頁面內容從單列排布調整為雙列排布甚至三列排布等)以獲得更好的顯示效果。
編輯
編輯
編輯
三種響應式佈局能力:
|
響應式佈局能力 |
簡介 |
|
斷點 |
將窗口寬度劃分為不同的範圍(即斷點),監聽窗口尺寸變化,當斷點改變時同步調整頁面佈局。 |
|
媒體查詢 |
媒體查詢支持監聽窗口寬度、橫豎屏、深淺色、設備類型等多種媒體特徵,當媒體特徵發生改變時同步調整頁面佈局。 |
|
柵格佈局 |
柵格組件將其所在的區域劃分為有規律的多列,通過調整不同斷點下的柵格組件的參數以及其子組件佔據的列數等,實現不同的佈局效果。 |
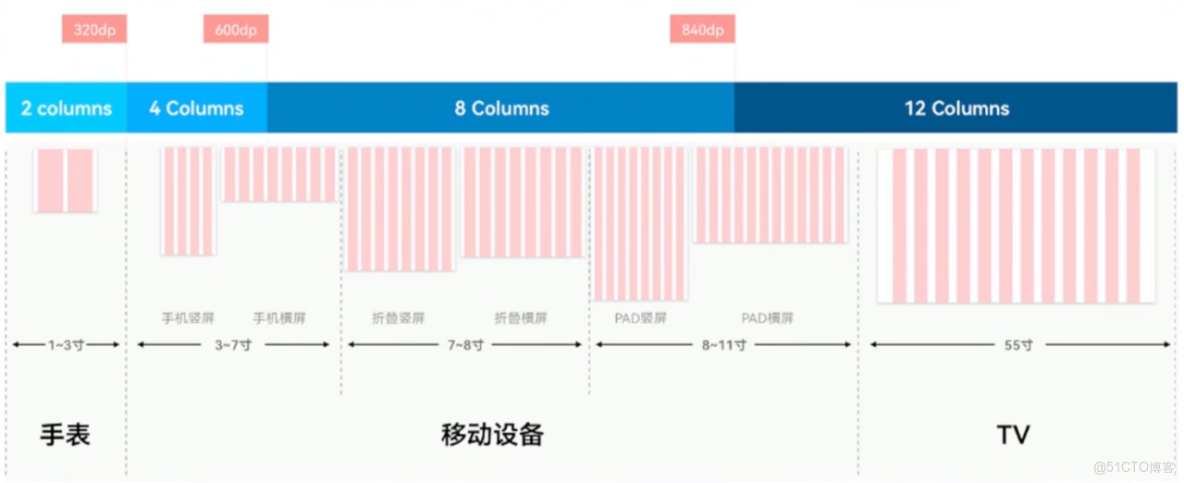
3.2.1. 斷點
斷點以應用窗口寬度為切入點,將應用窗口在寬度維度上分成了幾個不同的區間即不同的斷點,在不同的區間下,開發者可根據需要實現不同的頁面佈局效果。
|
斷點名稱 |
取值範圍(vp) |
設備 |
|
xs |
[0, 320) |
手錶等超小屏 |
|
sm |
[320, 600) |
手機豎屏 |
|
md |
[600, 840) |
手機橫屏,摺疊屏 |
|
lg |
[840, +∞) |
平板,2in1 設備 |
tips:
- 不需要記住範圍
- 記住斷點名稱及設備的關係即可
系統提供了多種方法,判斷應用當前處於何種斷點,進而可以調整應用的佈局。常見的監聽斷點變化的方法如下所示:
- 獲取窗口對象並監聽窗口尺寸變化(瞭解)
- 通過媒體查詢監聽應用窗口尺寸變化(掌握)
- 藉助柵格組件能力監聽不同斷點的變化(掌握)
通過窗口對象,監聽窗口尺寸變化(瞭解)
- 在 EntryAbility 中添加監聽
import window from '@ohos.window'
import display from '@ohos.display'
import UIAbility from '@ohos.app.ability.UIAbility'

export default class EntryAbility extends UIAbility {
  private windowObj?: window.Window
  private curBp: string = ''
  //...
  // 根據當前窗口尺寸更新斷點
  private updateBreakpoint(windowWidth: number) :void{
    // 將長度的單位由px換算為vp
    let windowWidthVp = windowWidth / display.getDefaultDisplaySync().densityPixels
    let newBp: string = ''
    if (windowWidthVp < 320) {
      newBp = 'xs' // 超小屏
    } else if (windowWidthVp < 600) {
      newBp = 'sm' // 小屏
    } else if (windowWidthVp < 840) {
      newBp = 'md' // 中屏
    } else {
      newBp = 'lg' // 大屏
    }
    if (this.curBp !== newBp) {
      this.curBp = newBp
      // 使用狀態變量記錄當前斷點值
      AppStorage.setOrCreate('currentBreakpoint', this.curBp)
    }
  }

  onWindowStageCreate(windowStage: window.WindowStage) :void{
    windowStage.getMainWindow().then((windowObj) => {
      this.windowObj = windowObj
      // 獲取應用啓動時的窗口尺寸
      this.updateBreakpoint(windowObj.getWindowProperties().windowRect.width)
      // 註冊回調函數,監聽窗口尺寸變化
      windowObj.on('windowSizeChange', (windowSize)=>{
        this.updateBreakpoint(windowSize.width)
      })
    });
   // ...
  }

  //...
}
- 頁面中使用斷點信息
@Entry
@Component
struct Index {
  @StorageProp('currentBreakpoint') curBp: string = 'sm'

  build() {
    Flex({justifyContent: FlexAlign.Center, alignItems: ItemAlign.Center}) {
      Text(this.curBp).fontSize(50).fontWeight(FontWeight.Medium)
    }
    .width('100%')
    .height('100%')
  }
}
注意:
調試要在真機或者模擬器上, 在預覽器中無法監聽
3.2.2. 媒體查詢
媒體查詢
媒體查詢常用於下面兩種場景:
- 針對設備和應用的屬性信息(比如顯示區域、深淺色、分辨率),設計出相匹配的佈局。
- 當屏幕發生動態改變時(比如分屏、橫豎屏切換),同步更新應用的頁面佈局。
相比於上一節演示的 通過窗口對象監聽尺寸變化,媒體查詢的功能會更為強大
3.2.2.1. 核心用法
咱們分 2 個角度來看看如何使用媒體查詢
- 整合步驟(重要)
導入模塊 ---> 創建監聽器 ---> 註冊監聽器 ---> 移除監聽器
- 調整媒體查詢條件(瞭解)
// 1. 導入 模塊
import { mediaquery } from '@kit.ArkUI'

// 2. 創建監聽器
const listenerXS: mediaquery.MediaQueryListener = mediaquery.matchMediaSync('(0vp<=width<320vp)');
const listenerSM: mediaquery.MediaQueryListener = mediaquery.matchMediaSync('(320vp<=width<600vp)');

// 3. 註冊監聽器
// 組件即將創建出來
aboutToAppear(): void {
  // 添加回調函數
  listenerXS.on('change', (res: mediaquery.MediaQueryResult) => {
    console.log('changeRes:', JSON.stringify(res))
    // 執行邏輯
  })
  listenerSM.on('change', (res: mediaquery.MediaQueryResult) => {
    console.log('changeRes:', JSON.stringify(res))
    // 執行邏輯
  })
}

// 4. 移除監聽器
// 即將銷燬
aboutToDisappear(): void {
  // 移除監聽 避免性能浪費
  listenerXS.off('change')
  listenerSM.off('change')
}
注意:寫範圍的時候不要省略小括號試一試:參考示例代碼:完成 4 個斷點的監聽
|
斷點名稱 |
取值範圍(vp) |
設備 |
|
xs |
[0, 320) |
手錶等超小屏 |
|
sm |
[320, 600) |
手機豎屏 |
|
md |
[600, 840) |
手機橫屏,摺疊屏 |
|
lg |
[840, +∞) |
平板,2in1 設備 |
// 1. 導入媒體查詢模塊
import { mediaquery } from '@kit.ArkUI'

// 2. 創建監聽器
const listenerXS: mediaquery.MediaQueryListener = mediaquery.matchMediaSync('(0vp<=width<320vp)')
const listenerSM: mediaquery.MediaQueryListener = mediaquery.matchMediaSync('(320vp<=width<600vp)')
const listenerMD: mediaquery.MediaQueryListener = mediaquery.matchMediaSync('(600vp<=width<840vp)')
const listenerLG: mediaquery.MediaQueryListener = mediaquery.matchMediaSync('(840vp<=width)')


@Entry
@Component
struct Demo09 {
  @State breakPoint: string = ''
  @State bgColor: Color = Color.White

  aboutToAppear(): void {
    // 3. 註冊監聽器
    listenerXS.on('change', (res: mediaquery.MediaQueryResult)=>{
      // 尺寸符合要求則結果為true {"matches":true,"media":"(0vp<=width<320vp)"}
      // console.log('mkLog', JSON.stringify(res))
      if(res.matches){
        this.breakPoint = 'XS'
        this.bgColor = Color.Red
      }
    })
    listenerSM.on('change', (res: mediaquery.MediaQueryResult)=>{
      // console.log('mkLog', JSON.stringify(res))
      if(res.matches){
        this.breakPoint = 'SM'
        this.bgColor = Color.Green
      }
    })
    listenerMD.on('change', (res: mediaquery.MediaQueryResult)=>{
      // console.log('mkLog', JSON.stringify(res))
      if(res.matches){
        this.breakPoint = 'MD'
        this.bgColor = Color.Blue
      }
    })
    listenerLG.on('change', (res: mediaquery.MediaQueryResult)=>{
      // console.log('mkLog', JSON.stringify(res))
      if(res.matches){
        this.breakPoint = 'LG'
        this.bgColor = Color.Pink
      }
    })
  }

  aboutToDisappear(): void {
    // 4. 移除監聽器
    listenerXS.off('change')
    listenerSM.off('change')
    listenerMD.off('change')
    listenerLG.off('change')
  }

  build() {
    RelativeContainer() {
      Text(this.breakPoint)
        .id('Demo09HelloWorld')
        .fontSize(20)
        .fontWeight(FontWeight.Bold)

        .alignRules({
          center: { anchor: '__container__', align: VerticalAlign.Center },
          middle: { anchor: '__container__', align: HorizontalAlign.Center }
        })
    }
    .height('100%')
    .width('100%')
    .expandSafeArea([SafeAreaType.SYSTEM])
    .backgroundColor(this.bgColor)
  }

}
3.2.2.2. 使用查詢結果
目前查詢的內容只在當前頁面可以使用,如果希望應用中任意位置都可以使用,咱們可以使用AppStorage 進行共享
核心步驟:
- 事件中通過 AppStorage.set(key,value)的方式保存當前斷點值
- 需要使用的位置通過 AppStorage 來獲取即可
// 添加回調函數
listenerXS.on('change', (res: mediaquery.MediaQueryResult) => {
  console.log('changeRes:', JSON.stringify(res))
  if (res.matches == true) {
    // this.currentBreakpoint = 'xs'
    AppStorage.set('currentBreakpoint', 'xs')
  }
})
// 組件中引入 AppStorage
@StorageProp('currentBreakpoint') currentBreakpoint: CurrentBreakpoint = 'xs'

// 在需要的位置使用 AppStorage 中保存的斷點值
Text(this.currentBreakpoint)
// 1. 導入模塊
import { mediaquery } from '@kit.ArkUI'

// 2. 創建監聽器
const listenerXS: mediaquery.MediaQueryListener = mediaquery.matchMediaSync('(0vp<=width<320vp)')
const listenerSM: mediaquery.MediaQueryListener = mediaquery.matchMediaSync('(320vp<=width<600vp)')
const listenerMD: mediaquery.MediaQueryListener = mediaquery.matchMediaSync('(600vp<=width<840vp)')
const listenerLG: mediaquery.MediaQueryListener = mediaquery.matchMediaSync('(800vp<=width)')


@Entry
@Component
struct Index {
  // @State curBp: string = ''

  @StorageProp('currentBreakPoint') currentBreakPoint: string = 'sm'

  aboutToAppear(): void {
    listenerXS.on('change', (res: mediaquery.MediaQueryResult)=>{
      console.log('changeRes:', JSON.stringify(res))
        if(res.matches){
          // this.curBp = 'xs'
          AppStorage.set('currentBreakPoint', 'xs')
        }
    })

    listenerSM.on('change', (res: mediaquery.MediaQueryResult)=>{
      console.log('changeRes:', JSON.stringify(res))
      if(res.matches){
         // this.curBp = 'sm'
        AppStorage.set('currentBreakPoint', 'sm')
      }
    })

    listenerMD.on('change', (res: mediaquery.MediaQueryResult)=>{
      console.log('changeRes:', JSON.stringify(res))
      if(res.matches){
        // this.curBp = 'md'
        AppStorage.set('currentBreakPoint', 'md')
      }
    })

    listenerLG.on('change', (res: mediaquery.MediaQueryResult)=>{
      console.log('changeRes:', JSON.stringify(res))
      if(res.matches){
        // this.curBp = 'lg'
        AppStorage.set('currentBreakPoint', 'lg')
      }
    })
  }

  aboutToDisappear(): void {
    listenerXS.off('change')
    listenerSM.off('change')
    listenerMD.off('change')
    listenerLG.off('change')
  }


  build() {
    Column(){
      Text(this.currentBreakPoint).fontSize(50).fontWeight(FontWeight.Bold)
    }
    .width('100%')
    .height('100%')
    .justifyContent(FlexAlign.Center)
  }
}
試一試:
- 參考文檔,增加深色模式查詢
深色模式
// 1. 引入模塊
import { mediaquery } from '@kit.ArkUI'

// 2. 創建監聽器
const listenerDark: mediaquery.MediaQueryListener = mediaquery.matchMediaSync('(dark-mode: true)')

@Entry
@Component
struct Demo09 {
  @State message: string = '';

  aboutToAppear(): void {
    // 3. 註冊監聽器
    listenerDark.on('change', (res: mediaquery.MediaQueryResult)=>{
      console.log('深色模式', JSON.stringify(res))
      this.message = res.matches ? '深色模式' : '亮色模式'
    })
  }

  // 4. 移除監聽器
  aboutToDisappear(): void {
    listenerDark.off('change')
  }

  build() {
    RelativeContainer() {
      Text(this.message)
        .id('Demo09HelloWorld')
        .fontSize(50)
        .fontWeight(FontWeight.Bold)
        .alignRules({
          center: { anchor: '__container__', align: VerticalAlign.Center },
          middle: { anchor: '__container__', align: HorizontalAlign.Center }
        })
    }
    .height('100%')
    .width('100%')
  }
}
3.2.2.3. 系統工具-BreakpointSystem
媒體查詢
瞭解了媒體查詢的核心語法之後,咱們來看看一個 媒體查詢監聽斷點的小工具,這個工具是基於官方代碼調整而來
工具代碼:
import { mediaquery } from '@kit.ArkUI'

interface Breakpoint {
  name: string
  size: number
  mediaQueryListener?: mediaquery.MediaQueryListener
}

export const BreakpointKey: string = 'currentBreakpoint'

export class BreakpointSystem {
  private currentBreakpoint: string = 'md'
  private breakpoints: Breakpoint[] = [
    { name: 'xs', size: 0 }, { name: 'sm', size: 320 },
    { name: 'md', size: 600 }, { name: 'lg', size: 840 }
  ]

  public register() {
    this.breakpoints.forEach((breakpoint: Breakpoint, index) => {
      let condition: string
      if (index === this.breakpoints.length - 1) {
        condition = '(' + breakpoint.size + 'vp<=width' + ')'
      } else {
        condition = '(' + breakpoint.size + 'vp<=width<' + this.breakpoints[index + 1].size + 'vp)'
      }
      console.log(condition)
      breakpoint.mediaQueryListener = mediaquery.matchMediaSync(condition)
      breakpoint.mediaQueryListener.on('change', (mediaQueryResult) => {
        if (mediaQueryResult.matches) {
          this.updateCurrentBreakpoint(breakpoint.name)
        }
      })
    })
  }

  public unregister() {
    this.breakpoints.forEach((breakpoint: Breakpoint) => {
      if (breakpoint.mediaQueryListener) {
        breakpoint.mediaQueryListener.off('change')
      }
    })
  }

  private updateCurrentBreakpoint(breakpoint: string) {
    if (this.currentBreakpoint !== breakpoint) {
      this.currentBreakpoint = breakpoint
      AppStorage.set<string>(BreakpointKey, this.currentBreakpoint)
      console.log('on current breakpoint: ' + this.currentBreakpoint)
    }
  }
}
核心用法:
- 導入 BreakpointSystem
- 實例化BreakpointSystem
- aboutToAppear中註冊監聽事件 aboutToDisappear中移除監聽事件
- 通過 AppStorage,結合 獲取斷點值即可
// 1. 導入斷點查詢類
import { BreakpointSystem, BreakpointKey} from '../common/BreakpointSystem'

@Entry
@Component
struct Demo10 {

  // 5. 獲取斷點值
  @StorageProp(BreakpointKey) currentBreakpoint: string = 'sm'

  // 2. 實例化斷點查詢類
  breakpointSystem = new BreakpointSystem()

  // 3. 註冊事件監聽
  aboutToAppear(): void {
    this.breakpointSystem.register()
  }

  // 4. 移除事件監聽
  aboutToDisappear(): void {
    this.breakpointSystem.unregister()
  }

  build() {
    RelativeContainer() {
      Text(this.currentBreakpoint)
        .id('Demo10HelloWorld')
        .fontSize(50)
        .fontWeight(FontWeight.Bold)
        .alignRules({
          center: { anchor: '__container__', align: VerticalAlign.Center },
          middle: { anchor: '__container__', align: HorizontalAlign.Center }
        })
    }
    .height('100%')
    .width('100%')
  }
}
試一試:
- 測試 BreakpointSystem工具的使用
- 測試根據斷點調整頁面結構,比如顏色,比如圖片
- 考慮 2 種情況即可,比如:
- md 為紅色,其他為綠色
- sm 為圖片 A,其他為圖片 B
- ...
3.2.2.4. 系統工具-BreakPointType
上一節演示的工具可以方便的監聽屏幕處於哪個斷點範圍,咱們可以根據斷點調整頁面:
- 如果是 2 個的情況:用 3 元即可
- 如果是 多個的情況:用 3 元就不太方便啦
咱們再來看一個系統提供的工具BreakPointType
下面這份代碼可以拷貝到 BreakpointSystem.ets中,他們本來就是在一起的
/*
 定義一個接口類型
 鍵: 斷點值
 值: 泛型
*/
declare interface BreakPointTypeOption<T> {
  xs?: T
  sm?: T
  md?: T
  lg?: T
  xl?: T
  xxl?: T
}

/*
 對外導出一個類
 在實例化的時候接收一個泛型
*/
export class BreakPointType<T> {
  // 選項對象
  options: BreakPointTypeOption<T>

  constructor(option: BreakPointTypeOption<T>) {
    this.options = option
  }

  getValue(currentBreakPoint: string) {
    if (currentBreakPoint === 'xs') {
      return this.options.xs
    } else if (currentBreakPoint === 'sm') {
      return this.options.sm
    } else if (currentBreakPoint === 'md') {
      return this.options.md
    } else if (currentBreakPoint === 'lg') {
      return this.options.lg
    } else if (currentBreakPoint === 'xl') {
      return this.options.xl
    } else if (currentBreakPoint === 'xxl') {
      return this.options.xxl
    } else {
      return undefined
    }
  }
}
核心用法:
需求:
xs: 紅色, sm: 綠色, md: 藍色, lg:粉色
// 1. 導入BreakPointType
import { BreakPointType } from 'xxx'

@entry
@Component
struct ComB {
  // 2. 通過 AppStorage 獲取斷點值
  @StorageProp('currentBreakpoint') currentBreakpoint: CurrentBreakpoint = 'xs'

  build() {
    Column() {
      Text(this.currentBreakpoint)
    }
    .width(200)
    .height(200)
    .backgroundColor(
      // 3. 實例化 設置不同斷點的取值,並通過 getValue 根據當前斷點值對應的值
      new BreakPointType({
        xs: Color.Red,
        sm: Color.Yellow,
        md: Color.Blue,
        lg: Color.Green
      }).getValue(this.currentBreakpoint)
    )
  }
}
3.2.2.5. 案例-電影列表
使用剛剛學習的媒體查詢工具,結合斷點來完成一個案例效果

編輯
需求:
- xs 及 sm 2 列
- md:3 列
- lg:4 列
自行拓展:
- 設置不同的寬高
- 設置不同的圓角尺寸
- 設置不同的間隙
- 。。。。
基礎模版:
interface MovieItem {
  title: string
  img: ResourceStr
}

@Entry
@Component
struct Demo09_demo {
  items: MovieItem[] = [
    { title: '電影標題1', img: $r('app.media.ic_video_grid_1') },
    { title: '電影標題2', img: $r('app.media.ic_video_grid_2') },
    { title: '電影標題3', img: $r('app.media.ic_video_grid_3') },
    { title: '電影標題4', img: $r('app.media.ic_video_grid_4') },
    { title: '電影標題5', img: $r('app.media.ic_video_grid_5') },
    { title: '電影標題6', img: $r('app.media.ic_video_grid_6') },
    { title: '電影標題7', img: $r('app.media.ic_video_grid_7') },
    { title: '電影標題8', img: $r('app.media.ic_video_grid_8') },
    { title: '電影標題9', img: $r('app.media.ic_video_grid_9') },
    { title: '電影標題10', img: $r('app.media.ic_video_grid_10') },
  ]

  build() {
    Grid() {
      ForEach(this.items, (item: MovieItem) => {
        GridItem() {
          Column({ space: 10 }) {
            Image(item.img)
              .borderRadius(10)
            Text(item.title)
              .width('100%')
              .fontSize(20)
              .fontWeight(600)

          }
        }
      })
    }
    .columnsTemplate('1fr 1fr')
    .rowsGap(10)
    .columnsGap(10)
    .padding(10)
  }
}
參考代碼:
import { BreakPointType, BreakpointSystem, BreakpointKey } from '../../common/breakpointsystem'

interface MovieItem {
  title: string
  img: ResourceStr
}

@Entry
@Component
struct Demo09_demo {
  items: MovieItem[] = [
    { title: '電影標題1', img: $r('app.media.ic_video_grid_1') },
    { title: '電影標題2', img: $r('app.media.ic_video_grid_2') },
    { title: '電影標題3', img: $r('app.media.ic_video_grid_3') },
    { title: '電影標題4', img: $r('app.media.ic_video_grid_4') },
    { title: '電影標題5', img: $r('app.media.ic_video_grid_5') },
    { title: '電影標題6', img: $r('app.media.ic_video_grid_6') },
    { title: '電影標題7', img: $r('app.media.ic_video_grid_7') },
    { title: '電影標題8', img: $r('app.media.ic_video_grid_8') },
    { title: '電影標題9', img: $r('app.media.ic_video_grid_9') },
    { title: '電影標題10', img: $r('app.media.ic_video_grid_10') },
  ]
  breakpointSystem: BreakpointSystem = new BreakpointSystem()
  @StorageProp(BreakpointKey)
  currentBreakpoint: string = 'sm'

  aboutToAppear(): void {
    this.breakpointSystem.register()
  }

  aboutToDisappear(): void {
    this.breakpointSystem.unregister()
  }

  build() {
    Grid() {
      ForEach(this.items, (item: MovieItem) => {
        GridItem() {
          Column({ space: 10 }) {
            Image(item.img)
              .borderRadius(10)
            Text(item.title)
              .width('100%')
              .fontSize(20)
              .fontWeight(600)

          }
        }
      })
    }
    .columnsTemplate(new BreakPointType({
      xs: '1fr 1fr',
      sm: '1fr 1fr ',
      md: '1fr 1fr 1fr ',
      lg: '1fr 1fr 1fr 1fr '
    }).getValue(this.currentBreakpoint))
    .rowsGap(10)
    .columnsGap(10)
    .padding(10)
  }
}
3.2.3. 柵格佈局 Grid
柵格組件的本質是:將組件劃分為有規律的多列,通過調整【不同斷點】下的【柵格組件的列數】,及【子組件所佔列數】實現不同佈局
比如:
編輯
參考柵格列數設置:
編輯
3.2.3.1. 核心用法
// 行
GridRow(屬性){
  // 列
  GridCol(屬性){

  }
}
測試代碼:
優先級從上往下:
- GridRow breakpoints屬性 和 的 onBreakpointChange 事件(瞭解)
- GridRow的 columns 屬性、GridCol 的 span 屬性(掌握)
- GridRow 的 gutter屬性、GridCol 的 offset 屬性(掌握)
@Entry
@Component
struct Demo12 {
  @State currentBreakPoint: string = 'sm'

  build() {
    Column() {
      // GridRow 默認支持 4 個斷點
      //  xs:(0vp<=width<320vp) 智能穿戴,比如手錶
      //  sm:(320vp<=width<600vp) 手機
      //  md:(600vp<=width<840vp) 摺疊屏
      //  lg:(840vp<=width) 平板
      GridRow() {
        ForEach(Array.from({ length: 12 }), (item: string, index: number) => {
          GridCol() {
            Text(index.toString())
          }
          .height(100)
          .border({ width: 1, color: Color.Black })
        })
      }
      .width('90%')
      .height('90%')
      .border({ width: 1, color: Color.Orange })

      Text(`斷點值: ${this.currentBreakPoint}`)
        .fontSize(30)
    }
    .width('100%')
    .height('100%')
    .backgroundColor('#dcdfe8')
    .expandSafeArea([SafeAreaType.SYSTEM])
  }
}
@Entry
@Component
struct Demo12 {
  @State currentBreakPoint: string = ''

  build() {
    Column() {
      // GridRow 默認支持 4 個斷點
      //  xs:(0vp<=width<320vp) 智能穿戴,比如手錶
      //  sm:(320vp<=width<600vp) 手機
      //  md:(600vp<=width<840vp) 摺疊屏
      //  lg:(840vp<=width) 平板
      GridRow({
        breakpoints: {
          value: ['320vp', '600vp', '840vp']
        },
        gutter: 10, // 子項之間的間距
        // columns: 12, // 設置一行的總列數, 默認: 一行12列
        // 可以根據斷點值, 設置每一行的列數
        columns: {
          xs: 2, // 超小屏, 比如: 手錶
          sm: 4, // 小屏幕, 比如: 手機豎屏
          md: 8, // 中等屏幕, 比如: 摺疊屏, 手機橫屏
          lg: 12, // 大屏幕, 比如: pad
        }
      }) {
        ForEach(Array.from({ length: 2 }), (item: string, index: number) => {
          GridCol({
            // 設置一列佔得份數
            // span: 2,
            // 支持不同斷點分別設置不同的佔用列數
            span: {
              xs: 1,
              sm: 1,
              md: 1,
              lg: 1
            },
            // offset 偏移列數 默認為 0
            // offset: 1, // 偏移一列
            // 支持不同斷點分別設置偏移不同的列數
            offset: {
              sm: 1
            }
          }) {
            Text(index.toString())
          }
          .height(100)
          .border({ width: 1, color: Color.Black })
        })
      }
      .width('90%')
      .height('90%')
      .border({ width: 1, color: Color.Orange })
      // 斷點發生變化時觸發回調
      .onBreakpointChange((breakPoint) => {
        console.log('breakPoint', breakPoint)
        this.currentBreakPoint = breakPoint
      })

      Text(`斷點值: ${this.currentBreakPoint}`)
        .fontSize(30)
    }
    .width('100%')
    .height('100%')
    .backgroundColor('#dcdfe8')
  }
}
3.2.3.2. 案例-登錄界面
結合咱們剛剛學習的 柵格佈局。來實現如下效果
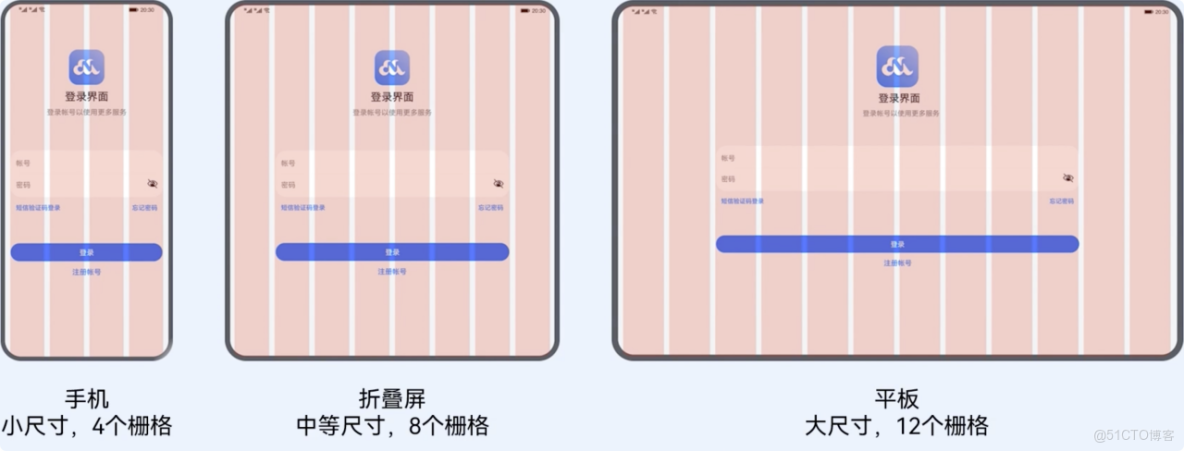
編輯
需求:
- sm:4列,佔 4 列
- md:8 列,佔 6 列,偏移 1
- lg: 12 列,佔 8 列,偏移 2
基礎模版:
@Entry
@Component
struct Demo14 {
  build() {
    Stack() {
      // 輔助用的柵格(頂層粉色區域)
      GridRow({ gutter: 10, columns: { sm: 4, md: 8, lg: 12 } }) {
        ForEach(Array.from({ length: 12 }), () => {
          GridCol()
            .width('100%')
            .height('100%')
            .backgroundColor('#baffa2b4')
        })
      }
      .zIndex(2)
      .height('100%')

      //  內容區域
      GridRow({
        // TODO 分別設置不同斷點的 列數

      }) {
        // 列
        GridCol({
          // TODO 分別設置不同斷點的 所佔列數

          // TODO 分別設置不同斷點的 偏移


        }) {
          Column() {
            // logo+文字
            LogoCom()

            // 輸入框 + 底部提示文本
            InputCom()

            // 登錄+註冊賬號按鈕
            ButtonCom()

          }
        }
      }
      .width('100%')
      .height('100%')
      .backgroundColor('#ebf0f2')
      .expandSafeArea([SafeAreaType.SYSTEM], [SafeAreaEdge.TOP, SafeAreaEdge.BOTTOM])
    }
  }
}

@Component
struct LogoCom {
  build() {
    Column({ space: 5 }) {
      Image($r('app.media.ic_logo'))
        .width(80)
      Text('登錄界面')
        .fontSize(23)
        .fontWeight(900)
      Text('登錄賬號以使用更多服務')
        .fontColor(Color.Gray)
    }
    .margin({ top: 100 })
  }
}

@Component
struct InputCom {
  build() {
    Column() {
      Column() {
        TextInput({ placeholder: '賬號' })
          .backgroundColor(Color.Transparent)
        Divider()
          .color(Color.Gray)
        TextInput({ placeholder: '密碼' })
          .type(InputType.Password)
          .backgroundColor(Color.Transparent)

      }
      .backgroundColor(Color.White)
      .borderRadius(20)
      .padding({ top: 10, bottom: 10 })

      Row() {
        Text('短信驗證碼登錄')
          .fontColor('#006af7')
          .fontSize(14)
        Text('忘記密碼')
          .fontColor('#006af7')
          .fontSize(14)
      }
      .width('100%')
      .justifyContent(FlexAlign.SpaceBetween)
      .margin({ top: 10 })

    }
    .padding(5)
    .margin({ top: 80 })

  }
}

@Component
struct ButtonCom {
  build() {
    Column({ space: 10 }) {
      Button('登錄')
        .width('90%')
      Text('註冊賬號')
        .fontColor('#006af7')
        .fontSize(16)
    }
    .margin({ top: 60 })
  }
}
參考代碼
@Entry
@Component
struct Demo11_login {
  build() {
    Stack() {
      // 輔助用的柵格(頂層粉色區域)
      GridRow({ gutter: 10, columns: { sm: 4, md: 8, lg: 12 } }) {
        ForEach(Array.from({ length: 12 }), () => {
          GridCol()
            .width('100%')
            .height('100%')
            .backgroundColor('#baffa2b4')
        })
      }
      .zIndex(2)
      .height('100%')

      //  內容區域
      GridRow({
        // TODO 分別設置不同斷點的 列數
        columns: {
          sm: 4,
          md: 8,
          lg: 12
        }
      }) {
        // 列
        GridCol({
          // TODO 分別設置不同斷點的 所佔列數
          span: {
            sm: 4,
            md: 6,
            lg: 8
          },
          // TODO 分別設置不同斷點的 偏移
          offset: {
            md: 1,
            lg: 2
          }

        }) {
          Column() {
            // logo+文字
            LogoCom()

            // 輸入框 + 底部提示文本
            InputCom()

            // 登錄+註冊賬號按鈕
            ButtonCom()

          }
        }
      }
      .width('100%')
      .height('100%')
      .backgroundColor('#ebf0f2')
      .expandSafeArea([SafeAreaType.SYSTEM], [SafeAreaEdge.TOP, SafeAreaEdge.BOTTOM])
    }
  }
}

@Component
struct LogoCom {
  build() {
    Column({ space: 5 }) {
      Image($r('app.media.ic_logo'))
        .width(80)
      Text('登錄界面')
        .fontSize(23)
        .fontWeight(900)
      Text('登錄賬號以使用更多服務')
        .fontColor(Color.Gray)
    }
    .margin({ top: 100 })
  }
}

@Component
struct InputCom {
  build() {
    Column() {
      Column() {
        TextInput({ placeholder: '賬號' })
          .backgroundColor(Color.Transparent)
        Divider()
          .color(Color.Gray)
        TextInput({ placeholder: '密碼' })
          .type(InputType.Password)
          .backgroundColor(Color.Transparent)

      }
      .backgroundColor(Color.White)
      .borderRadius(20)
      .padding({ top: 10, bottom: 10 })

      Row() {
        Text('短信驗證碼登錄')
          .fontColor('#006af7')
          .fontSize(14)
        Text('忘記密碼')
          .fontColor('#006af7')
          .fontSize(14)
      }
      .width('100%')
      .justifyContent(FlexAlign.SpaceBetween)
      .margin({ top: 10 })

    }
    .padding(5)
    .margin({ top: 80 })

  }
}

@Component
struct ButtonCom {
  build() {
    Column({ space: 10 }) {
      Button('登錄')
        .width('90%')
      Text('註冊賬號')
        .fontColor('#006af7')
        .fontSize(16)
    }
    .margin({ top: 60 })
  }
}
HarmonyOS賦能資源豐富度建設(第四期)-吳東林
https://developer.huawei.com/consumer/cn/training/classDetail/9fdeeb1a35d64d2fabad3948ae7aab72?type=1?ha_source=hmosclass&ha_sourceId=89000248


