

作者:vivo 互聯網服務器團隊- Jin Kai
本文從Java NIO網絡編程的基礎知識講到了Tars框架使用NIO進行網絡編程的源碼分析。
一、Tars框架基本介紹
Tars是騰訊開源的支持多語言的高性能RPC框架,起源於騰訊內部2008年至今一直使用的統一應用框架TAF(Total Application Framework),目前支持C++、Java、PHP、Nodejs、Go語言。
該框架為用户提供了涉及到開發、運維、以及測試的一整套解決方案,幫助一個產品或者服務快速開發、部署、測試、上線。它集可擴展協議編解碼、高性能RPC通信框架、名字路由與發現、發佈監控、日誌統計、配置管理等於一體,通過它可以快速用微服務的方式構建自己的穩定可靠的分佈式應用,並實現完整有效的服務治理。
官方倉庫地址:
https://github.com/TarsCloud/Tars
vivo推送平台也深度使用了該框架,部署服務節點超過一千個,經過線上每日一百多億消息推送量的考驗。
此前已在vivo互聯網技術公眾號發佈過《Tars Java 客户端源碼分析》,此篇文章為續集。
Tars-java 最新穩定版1.7.2以及之前的版本都使用Java NIO進行網絡編程;本文將分別詳細介紹java NIO的原理和Tars 使用NIO進行網絡編程的細節。
二、Java NIO原理介紹
從1.4版本開始,Java提供了一種新的IO處理方式:NIO (New IO 或 Non-blocking IO) 是一個可以替代標準Java IO 的API,它是面向緩衝區而不是字節流,它是非阻塞的,支持IO多路複用。
2.1 Channels (通道) and Buffers (緩衝區)
標準的IO基於字節流進行操作的,而NIO是基於通道(Channel)和緩衝區(Buffer)進行操作。數據總是從通道讀取到緩衝區中,或者從緩衝區寫入到通道中,下圖是一個完整流程。

Channel類型:
- 支持文件讀寫數據的FileChannel
- 能通過UDP讀寫網絡中的數據的DatagramChannel
- 能通過TCP讀寫網絡數據的SocketChannel
- 可以監聽新進來的TCP連接,對每一個新進來的連接都會創建一個SocketChannel的ServerSocketChannel 。
SocketChannel:
- 打開 SocketChannel:SocketChannel socketChannel = SocketChannel.open();
- 關閉 SocketChannel:socketChannel.close();
- 從Channel中讀取的數據放到Buffer: int bytesRead = inChannel.read(buf);
- 將Buffer中的數據寫到Channel: int bytesWritten = inChannel.write(buf);
ServerSocketChannel:
通過 ServerSocketChannel.accept() 方法監聽新進來的連接,當accept()方法返回的時候,它返回一個包含新進來的連接的SocketChannel,因此accept()方法會一直阻塞到有新連接到達。
通常不會僅僅只監聽一個連接,在while循環中調用 accept()方法. 如下面的例子:
代碼1:
while(true){
    SocketChannel socketChannel = serverSocketChannel.accept();
     //do something with socketChannel...
}
ServerSocketChannel可以設置成非阻塞模式。在非阻塞模式下,accept() 方法會立刻返回,如果還沒有新進來的連接,返回的將是null。因此,需要檢查返回的SocketChannel是否是null。
代碼2:
ServerSocketChannel serverSocketChannel = ServerSocketChannel.open();
serverSocketChannel.socket().bind(new InetSocketAddress(8888));
serverSocketChannel.configureBlocking(false);
while(true){
    SocketChannel socketChannel = serverSocketChannel.accept();
    if(socketChannel != null){
        //do something with socketChannel...
    }
}
Buffer類型:
- ByteBuffer
- CharBuffer
- DoubleBuffer
- FloatBuffer
- IntBuffer
- LongBuffer
- ShortBuffer
Buffer的分配:
ByteBuffer buf = ByteBuffer.allocate(2048);
Buffer的讀寫:
一般是以下四個步驟:
- 寫入數據到Buffer,最大寫入量是capacity,寫模式下limit值即為capacity值,position即為寫到的位置。
- 調用flip()方法將Buffer從寫模式切換到讀模式,此時position移動到開始位置0,limit移動到position的位置。
- 從Buffer中讀取數據,在讀模式下可以讀取之前寫入到buffer的所有數據,即為limit位置。
- 調用clear()方法或者compact()方法。clear()方法將position設為0,limit被設置成capacity的值。compact()方法將所有未讀的數據拷貝到Buffer起始處,然後將position設到最後一個未讀元素後面。

mark() 與 reset()方法 通過調用Buffer.mark()方法,可以標記Buffer中的一個特定position,之後可以通過調用Buffer.reset()方法恢復到這個position。
duplicate() 此方法返回承載先前字節緩衝區內容的新字節緩衝區。
remaining() limit 減去 position的值
2.2 Selector(選擇器)
Java NIO引入了選擇器的概念,選擇器用於監聽多個通道的事件。單個的線程可以監聽多個數據通道。要使用Selector,得向Selector註冊Channel,然後調用它的select()方法。這個方法會一直阻塞到某個註冊的通道有事件就緒。一旦這個方法返回,線程就可以處理這些事件。

代碼3:
channel.configureBlocking(false);
SelectionKey key = channel.register(selector,Selectionkey.OP_READ);
注意register()方法的第二個參數,這是一個監聽的集合,即在通過Selector監聽Channel時關注什麼事件集合。
SelectionKey包含:
1) interest集合:
selectionKey.interestOps() 可以監聽四種不同類型的事件:OP\_ACCEPT、OP\_CONNECT、OP\_WRITE、OP\_READ
2) ready集合:
selectionKey.readyOps(); ready 集合是通道已經準備就緒的操作的集合,提供4個方便的方法:
- selectionKey.isAcceptable();
- selectionKey.isConnectable();
- selectionKey.isReadable();
- selectionKey.isWritable();
3) Channel: selectionKey.channel();
4) Selector: selectionKey.selector();
5) 可選的附加對象:
selectionKey.attachment(); 可以將一個對象或者更多信息附着到SelectionKey上,這樣就能方便的識別特定的通道。
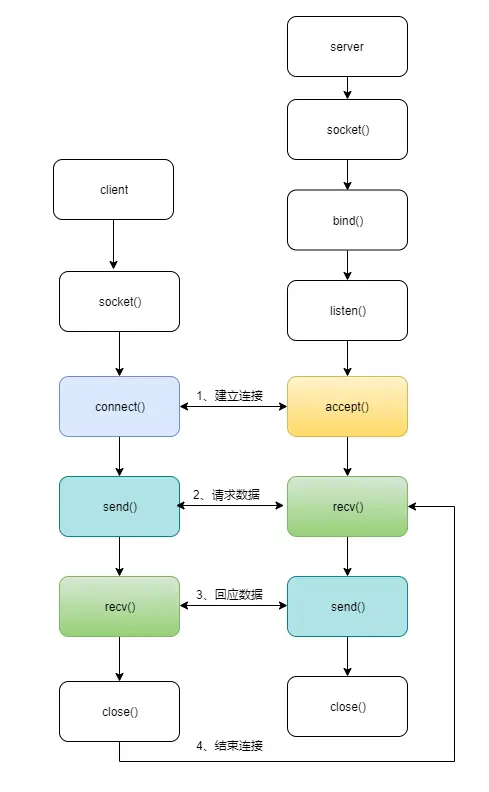
提示:
OP\_ACCEPT和OP\_CONNECT的區別:簡單來説,客户端建立連接是connect,服務器準備接收連接是accept。一個典型的客户端服務器網絡交互流程如下圖
selectedKeys() 一旦調用了select()方法,並且返回值表明有一個或更多個通道就緒了,然後可以通過調用selector的selectedKeys()方法,訪問已選擇鍵集(selected key set)中的就緒通道。
wakeUp() 某個線程調用select()方法後阻塞了,即使沒有通道已經就緒,也有辦法讓其從select()方法返回。只要讓其它線程在阻塞線程調用select()方法的對象上調用Selector.wakeup()方法即可。阻塞在select()方法上的線程會立馬返回。如果有其它線程調用了wakeup()方法,但當前沒有線程阻塞在select()方法上,下個調用select()方法的線程會立即wake up。
close() 用完Selector後調用其close()方法會關閉該Selector,且使註冊到該Selector上的所有SelectionKey實例無效。通道本身並不會關閉。
通過Selector選擇通道:
- int select() 阻塞直到至少有一個通道在你註冊的事件上就緒了
- int select(long timeout) 增加最長阻塞毫秒數
- int selectNow() 不會阻塞,不管什麼通道就緒都立刻返回
三、 Tars NIO網絡編程
瞭解完 Java NIO的原理,我們來看看Tars是如何使用NIO進行網絡編程的。

Tars的網絡模型是多reactor多線程模型。有一點特殊的是tars的reactor線程組裏隨機選一個線程處理網絡事件,並且該線程同時也能處理讀寫。
核心類之間的關係如下:

3.1 一個典型的Java NIO服務端開發流程
- 創建ServerSocketChannel,設置為非阻塞,並綁定端口
- 創建Selector對象
- 給ServerSocketChannel註冊SelectionKey.OP_ACCEPT事件
- 啓動一個線程循環,調用Selector的select方法來檢查IO就緒事件,一旦有IO就緒事件,就通知用户線程去處理IO事件
- 如果有Accept事件,就創建一個SocketChannel,並註冊SelectionKey.OP_READ
- 如果有讀事件,判斷一下是否全包,如果全包,就交給後端線程處理
- 寫事件比較特殊。isWriteable表示的是本機的寫緩衝區是否可寫。這個在絕大多少情況下都是為真的。在Netty中只有寫半包的時候才需要註冊寫事件,如果一次寫就完全把數據寫入了緩衝區就不需要註冊寫事件。
3.2 Tars客户端發起請求到服務器的流程
- Communicator.stringToProxy() 根據servantName等配置信息創建通信器。
- ServantProxyFactory.getServantProxy() 調用工廠方法創建servant代理。
- ObjectProxyFactory.getObjectProxy() 調用工廠方法創建obj代理。
- TarsProtocolInvoker.create() 創建協議調用者。
- ServantProtocolInvoker.initClient(Url url) 根據servantProxyConfig中的配置信息找到servant的ip端口等進行初始化ServantClient。
- ClientPoolManager.getSelectorManager() 如果第一次調用selectorManager是空的就會去初始化selectorManager。
- reactorSet = new Reactor[selectorPoolSize]; SelectorManager初始化構造類中的會根據selectorPoolSize(默認是2)的配置創建Reactor線程數組。線程名稱的前綴是servant-proxy-加上CommunicatorId,CommunicatorId生成規則是由locator的地址生成的UUID。
- 啓動reactor線程。
3.3 Tars服務端啓動步驟
- tars支持TCP和UDP兩種協議,RPC場景下是使用TCP協議。
- new SelectorManager() 根據配置信息初始化selectorManager,線程池大小 processors > 8 ? 4 + (processors * 5 / 8) : processors + 1;線程名稱前綴是server-tcp-reactor,然後啓動reactor線程數組中的所有線程。
- 開啓服務端監聽的ServerSocketChannel,綁定服務端本地ip和監聽的端口號,設置TCP連接請求隊列的最大容量為1024;設置非阻塞模式。
- 選取reactor線程數組中第0個線程作為服務端監聽連接OP_ACCEPT就緒事件的線程。
代碼4:
public void bind(AppService appService) throws IOException {

    // 此處略去非關鍵代碼

    if (endpoint.type().equals("tcp")) {  // 1
        this.selectorManager = new SelectorManager(Utils.getSelectorPoolSize(), new ServantProtocolFactory(codec), threadPool, processor, keepAlive, "server-tcp-reactor", false);     // 2
        this.selectorManager.setTcpNoDelay(serverCfg.isTcpNoDelay());
        this.selectorManager.start();
        ServerSocketChannel serverChannel = ServerSocketChannel.open();
        serverChannel.socket().bind(new InetSocketAddress(endpoint.host(), endpoint.port()), 1024);   // 3
        serverChannel.configureBlocking(false);
              selectorManager.getReactor(0).registerChannel(serverChannel, SelectionKey.OP_ACCEPT);  // 4
    } else if (endpoint.type().equals("udp")) {
        this.selectorManager = new SelectorManager(1, new ServantProtocolFactory(codec), threadPool, processor, false, "server-udp-reactor", true);
        this.selectorManager.start();
        // UDP開啓的是DatagramChannel
        DatagramChannel serverChannel = DatagramChannel.open();
        DatagramSocket socket = serverChannel.socket();
        socket.bind(new InetSocketAddress(endpoint.host(), endpoint.port()));
        serverChannel.configureBlocking(false);
        // UDP協議不需要建連,監聽的是OP_READ就緒事件
        this.selectorManager.getReactor(0).registerChannel(serverChannel, SelectionKey.OP_READ);
    }
}
3.4 Reactor線程啓動流程
- 多路複用器開始輪詢檢查 是否有就緒的事件。
- 處理register隊列中剩餘的channel註冊到當前reactor線程的多路複用器selector中。
- 獲取已選鍵集中所有就緒的channel。
- 更新Session中最近操作時間,Tars服務端啓動時會調用 startSessionManager() , 單線程每30s掃描一次session會話列表,會檢查每個session的 lastUpdateOperationTime 與當前時間的時間差,如果超過60秒會將過期session對應的channel踢除。
- 分發IO事件進行處理。
- 處理unregister隊列中剩餘的channel,從當前reactor線程的多路複用器selector中解除註冊。
代碼5:
public void run() {
        while (!Thread.interrupted()) {
            selector.select();  // 1
            processRegister();  // 2
            Iterator<SelectionKey> iter = selector.selectedKeys().iterator();   //  3
            while (iter.hasNext()) {
                SelectionKey key = iter.next();
                iter.remove();
                if (!key.isValid()) continue;
                try {
                    if (key.attachment() != null && key.attachment() instanceof Session) {
                      ((Session) key.attachment()).updateLastOperationTime(); //4
                    }
                 dispatchEvent(key);    // 5
                } catch (Throwable ex) {
                 disConnectWithException(key, ex);
                }
            }
            processUnRegister();  // 6
        }
}
3.5 IO事件分發處理
每個reactor線程都有一個專門的Accepter類去處理各種IO事件。TCPAccepter可以處理全部的四種事件(OP\_ACCEPT、OP\_CONNECT、OP\_WRITE、OP\_READ)、UDPAccepter由於不需要建立連接所以只需要處理讀和寫兩種事件。

1. 處理OP_ACCEPT
- 獲取channel,處理TCP請求。
- 為這個TCP請求創建TCPSession,會話的狀態是服務器已連接
- 會話註冊到sessionManager中,Tars服務可配置最大連接數maxconns,如果超過就會關閉當前會話。
- 尋找下一個reactor線程進行多路複用器與channel的綁定。
代碼6:
public void handleAcceptEvent(SelectionKey key) throws IOException {
    ServerSocketChannel server = (ServerSocketChannel) key.channel(); // 1
    SocketChannel channel = server.accept();
       channel.socket().setTcpNoDelay(selectorManager.isTcpNoDelay());
    channel.configureBlocking(false);
    Utils.setQosFlag(channel.socket());
    TCPSession session = new TCPSession(selectorManager);    // 2
    session.setChannel(channel);
    session.setStatus(SessionStatus.SERVER_CONNECTED);
    session.setKeepAlive(selectorManager.isKeepAlive());
    session.setTcpNoDelay(selectorManager.isTcpNoDelay());
    SessionManager.getSessionManager().registerSession(session);   // 3
      selectorManager.nextReactor().registerChannel(channel, SelectionKey.OP_READ, session); // 4
}
2. 處理OP_CONNECT
- 獲取客户端連接過來的channel通道
- 獲取Session
- 與服務器建立連接,將關注的興趣OPS設置為ready就緒事件,session中的狀態修改為客户端已連接
- 處理OP_CONNECT
代碼7:
public void handleConnectEvent(SelectionKey key) throws IOException {
    SocketChannel client = (SocketChannel) key.channel();  // 1
    TCPSession session = (TCPSession) key.attachment();   //2
    if (session == null) throw new RuntimeException("The session is null when connecting to ...");
    try {  // 3
        client.finishConnect();
        key.interestOps(SelectionKey.OP_READ);
        session.setStatus(SessionStatus.CLIENT_CONNECTED);
    } finally {
        session.finishConnect();
    }
}
3.處理OP_WRITE、 處理OP_READ
代碼8:
public void handleReadEvent(SelectionKey key) throws IOException {
    TCPSession session = (TCPSession) key.attachment();
    if (session == null) throw new RuntimeException("The session is null when reading data...");
    session.read();
}
public void handleWriteEvent(SelectionKey key) throws IOException {
    TCPSession session = (TCPSession) key.attachment();
    if (session == null) throw new RuntimeException("The session is null when writing data...");
    session.doWrite();
}
3.6 seesion中網絡讀寫的事件詳細處理過程
1. 讀事件處理
申請2k的ByteBuffer空間,讀取channel中的數據到readBuffer中。根據sessionStatus判斷是客户端讀響應還是服務器讀請求,分別進行處理。
代碼9:
protected void read() throws IOException {
    int ret = readChannel();
    if (this.status == SessionStatus.CLIENT_CONNECTED) {
        readResponse();
    } else if (this.status == SessionStatus.SERVER_CONNECTED) {
        readRequest();
    } else {
        throw new IllegalStateException("The current session status is invalid. [status:" + this.status + "]");
    }
    if (ret < 0) {
        close();
        return;
    }
}
private int readChannel() throws IOException {
    int readBytes = 0, ret = 0;
    ByteBuffer data = ByteBuffer.allocate(1024 * 2);  // 1
    if (readBuffer == null) {
        readBuffer = IoBuffer.allocate(bufferSize);
    }
       // 2
    while ((ret = ((SocketChannel) channel).read(data)) > 0) {
        data.flip();  // 3
        readBytes += data.remaining();
        readBuffer.put(data.array(), data.position(), data.remaining());
        data.clear();
    }
    return ret < 0 ? ret : readBytes;
}
① 客户端讀響應
從當前readBuffer中的內容複製到一個新的臨時buffer中,並且切換到讀模式,使用TarsCodec類解析出buffer內的協議字段到response,WorkThread線程通知Ticket處理response。如果response為空,則重置tempBuffer到mark的位置,重新解析協議。
代碼10:
public void readResponse() {
    Response response = null;
    IoBuffer tempBuffer = null;
        tempBuffer = readBuffer.duplicate().flip();
        while (true) {
            tempBuffer.mark();
            if (tempBuffer.remaining() > 0) {
                response = selectorManager.getProtocolFactory().getDecoder().decodeResponse(tempBuffer, this);
            } else {
                response = null;
            }
            if (response != null) {
                if (response.getTicketNumber() == Ticket.DEFAULT_TICKET_NUMBER) response.setTicketNumber(response.getSession().hashCode());
                selectorManager.getThreadPool().execute(new WorkThread(response, selectorManager));
            } else {
                tempBuffer.reset();
                readBuffer = resetIoBuffer(tempBuffer);
                break;
            }
        }
}
② 服務器讀請求
任務放入線程池交給 WorkThread線程,最終交給Processor類出構建請求的響應體,包括分佈式上下文,然後經過FilterChain的處理,最終通過jdk提供的反射方法invoke服務端本地的方法然後返回response。如果線程池拋出拒絕異常,則返回SERVEROVERLOAD = -9,服務端過載保護。如果request為空,則重置tempBuffer到mark的位置,重新解析協議。
代碼11:
public void readRequest() {
    Request request = null;
    IoBuffer tempBuffer = readBuffer.duplicate().flip();
        while (true) {
            tempBuffer.mark();
            if (tempBuffer.remaining() > 0) {
                request = selectorManager.getProtocolFactory().getDecoder().decodeRequest(tempBuffer, this);
            } else {
                request = null;
            }
            if (request != null) {
                try {
                    request.resetBornTime();
                    selectorManager.getThreadPool().execute(new WorkThread(request, selectorManager));
                } catch (RejectedExecutionException e) {
                  selectorManager.getProcessor().overload(request, request.getIoSession());
                } catch (Exception ex) {
                  ex.printStackTrace();
                }
            } else {
                tempBuffer.reset();
                readBuffer = resetIoBuffer(tempBuffer);
                break;
            }
        }
}
2. 寫事件處理
同樣也包括客户端寫請求和服務端寫響應兩種,其實這兩種都是往TCPSession中的LinkedBlockingQueue(有界隊列最大8K)中插入ByteBuffer。LinkedBlockingQueue中的ByteBuffer最終會由TCPAcceptor中的handleWriteEvent監聽寫就緒事件並消費。
代碼12:
protected void write(IoBuffer buffer) throws IOException {
    if (buffer == null) return;
    if (channel == null || key == null) throw new IOException("Connection is closed");
    if (!this.queue.offer(buffer.buf())) {
        throw new IOException("The session queue is full. [ queue size:" + queue.size() + " ]");
    }
    if (key != null) {
        key.interestOps(key.interestOps() | SelectionKey.OP_WRITE);
        key.selector().wakeup();
    }
}
四、總結
本文主要介紹了Java NIO編程的基礎知識 和 Tars-Java 1.7.2版本的網絡編程模塊的源碼實現。
在最新的Tars-Java的master分支中我們可以發現網絡編程已經由NIO改成了Netty,雖然Netty更加成熟穩定,但是作為學習者瞭解NIO的原理也是掌握網絡編程的必經之路。
更多關於Tars框架的介紹可以訪問:
https://tarscloud.org/
本文分析源碼地址(v1.7.x分支):
https://github.com/TarsCloud/TarsJava
