

第六十二章 顏色識別實驗
1)實驗平台:正點原子DNESP32S3開發板
2)章節摘自【正點原子】ESP32-S3使用指南—IDF版 V1.6
3)購買鏈接:https://detail.tmall.com/item.htm?&id=768499342659
4)全套實驗源碼+手冊+視頻下載地址:http://www.openedv.com/docs/boards/esp32/ATK-DNESP32S3.html
5)正點原子官方B站:https://space.bilibili.com/394620890
6)正點原子DNESP32S3開發板技術交流羣:132780729


ESP32可以使用圖像處理技術進行顏色識別。通過攝像頭採集圖像,使用圖像處理算法對圖像進行分析和處理,提取出物體的顏色特徵,並與預設的顏色閾值進行比較,判斷物體的顏色。這種方法可以用於實現智能監控、自動識別等功能。本章,我們使用樂鑫AI庫來實現顏色識別功能。
本章分為如下幾個部分:
62.1 硬件設計
62.2 軟件設計
62.3 下載驗證
62.1 硬件設計
1.例程功能
本章實驗功能簡介:使用樂鑫官方的ESP32-WHO AI庫對OV2640和OV5640攝像頭輸出的數據進行顏色識別。
2.硬件資源
1)LED燈
LED-IO1
2)XL9555
IIC_INT-IO0(需在P5連接IO0)
IIC_SDA-IO41
IIC_SCL-IO42
3)SPILCD
CS-IO21
SCK-IO12
SDA-IO11
DC-IO40(在P5端口,使用跳線帽將IO_SET和LCD_DC相連)
PWR- IO1_3(XL9555)
RST- IO1_2(XL9555)
4)CAMERA
OV_SCL-IO38
OV_SDA- IO39
VSYNC- IO47
HREF- IO48
PCLK- IO45
D0- IO4
D1- IO5
D2- IO6
D3- IO7
D4- IO15
D5- IO16
D6- IO17
D7- IO18
RESET-IO0_5(XL9555)
PWDN-IO0_4(XL9555)
3.原理圖
本章實驗使用的KPU為ESP32-S3的內部資源,因此並沒有相應的連接原理圖。
62.2 軟件設計
62.2.1 程序流程圖
程序流程圖能幫助我們更好的理解一個工程的功能和實現的過程,對學習和設計工程有很好的主導作用。下面看看本實驗的程序流程圖:
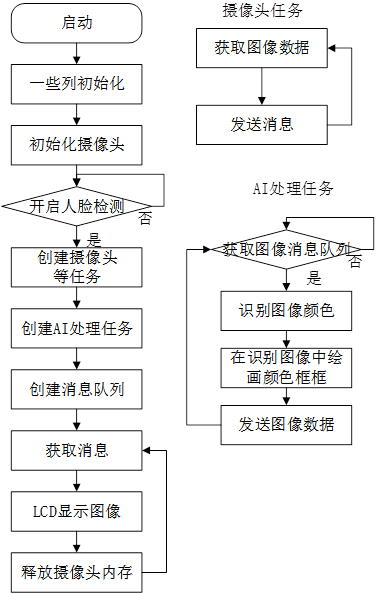
圖62.2.1.1 程序流程圖
62.2.2 程序解析
在本章節中,我們將重點關注兩個文件:esp_color_detection.cpp和esp_color_detection.hpp。其中,esp_color_detection.hpp主要聲明瞭esp_color_detection函數,其內容相對簡單,因此我們暫時不作詳細解釋。本章節的核心關注點是esp_color_detection.cpp文件中的函數。
接下來,我們將詳細解析esp_color_detection_ai_strat函數的工作原理。
vector<color_info_t> std_color_info = {{{156, 10, 70, 255, 90, 255}, 64,"red"},
                                       {{11, 22, 70, 255, 90, 255}, 64, "orange"},
                                       {{23, 33, 70, 255, 90, 255}, 64, "yellow"},
                                       {{34, 75, 70, 255, 90, 255}, 64, "green"},
                                       {{76, 96, 70, 255, 90, 255}, 64, "cyan"},
                                       {{97, 124, 70, 255, 90, 255}, 64, "blue"},
                                       {{125, 155, 70, 255, 90, 255}, 64, "purple"},
                                       {{0, 180, 0, 40, 220, 255}, 64, "white"},
                                       {{0, 180, 0, 50, 50, 219}, 64, "gray"},
                                        {{0, 180, 0, 255, 0, 45}, 64, "black"}
                                       };

static void esp_draw_color_detection_result(uint16_t *image_ptr,
int image_height,
int image_width,
vector<color_detect_result_t>
&results, uint16_t color)
{
    for (int i = 0; i < results.size(); ++i)
    {
        dl::image::draw_hollow_rectangle(image_ptr, image_height, image_width,
                                         results[i].box[0],
                                         results[i].box[1],
                                         results[i].box[2],
                                         results[i].box[3],
                                         color);
    }
}

/**
 * @brief       攝像頭圖像數據獲取任務
 * @param       arg:未使用
 * @retval      無
 */
static void esp_camera_process_handler(void *arg)
{
    arg = arg;
    camera_fb_t *camera_frame = NULL;

    while (1)
    {
        /* 獲取攝像頭圖像 */
        camera_frame = esp_camera_fb_get();

        if (camera_frame)
        {
            /* 以隊列的形式發送 */
            xQueueSend(xQueueFrameO, &camera_frame, portMAX_DELAY);
        }
    }
}

/**
 * @brief       攝像頭圖像數據傳入AI處理任務
 * @param       arg:未使用
 * @retval      無
 */
static void esp_ai_process_handler(void *arg)
{
    arg = arg;
    camera_fb_t *face_ai_frameI = NULL;

    ColorDetector detector;
    detector.set_detection_shape({80, 80, 1});

    for (int i = 0; i < std_color_info.size(); ++i)
    {
        detector.register_color( std_color_info[i].color_thresh,
                                      std_color_info[i].area_thresh,
std_color_info[i].name);
    }

vector<vector<int>> color_thresh_boxes = {{110, 110, 130, 130},
{100, 100, 140, 140},
{90, 90, 150, 150},
{80, 80, 160, 160},
{60, 60, 180, 180},
{40, 40, 200, 200},
{20, 20, 220, 220}};
    int color_thresh_boxes_num = color_thresh_boxes.size();
    int color_thresh_boxes_index = color_thresh_boxes_num / 2;
    vector<int> color_area_threshes = {1, 4, 16, 32, 64, 128, 256, 512, 1024};
    int color_area_thresh_num = color_area_threshes.size();
    int color_area_thresh_index = color_area_thresh_num / 2;

    detector.set_area_thresh({color_area_threshes[color_area_thresh_index]});


    vector<uint16_t> draw_lcd_colors = {RGB565_LCD_RED,
                                        RGB565_LCD_ORANGE,
                                        RGB565_LCD_YELLOW,
                                        RGB565_LCD_GREEN,
                                        RGB565_LCD_CYAN,
                                        RGB565_LCD_BLUE,
                                        RGB565_LCD_PURPLE,
                                        RGB565_LCD_WHITE,
                                        RGB565_LCD_GRAY,
                                        RGB565_LCD_BLACK
                                        };

    int draw_colors_num = draw_lcd_colors.size();
    vector<uint8_t> color_thresh;

    while(1)
    {
        if (xQueueReceive(xQueueFrameO, &face_ai_frameI, portMAX_DELAY))
        {
            std::vector<std::vector<color_detect_result_t>> &results =
detector.detect((uint16_t *)face_ai_frameI->buf,
{(int)face_ai_frameI->height,
(int)face_ai_frameI->width, 3});

            if (draw_box)
            {
                for (int i = 0; i < results.size(); ++i)
                {
                    esp_draw_color_detection_result
((uint16_t *)face_ai_frameI->buf,
(int)face_ai_frameI->height,
(int)face_ai_frameI->width,
results[i], draw_lcd_colors[i % draw_colors_num]);
                }
            }
            else
            {
                detector.draw_segmentation_results
((uint16_t *)face_ai_frameI->buf,
{(int)face_ai_frameI->height,
(int)face_ai_frameI->width, 3},
draw_lcd_colors, true, 0x0000);
            }
            /* 以隊列的形式發送AI處理的圖像 */
            xQueueSend(xQueueAIFrameO, &face_ai_frameI, portMAX_DELAY);
        }
    }
}

/**
 * @brief       AI圖像數據開啓
 * @param       無
 * @retval      1:創建任務及隊列失敗;0:創建任務及對了成功
 */
uint8_t esp_color_detection_ai_strat(void)
{
    /* 創建隊列及任務 */
    xQueueFrameO = xQueueCreate(5, sizeof(camera_fb_t *));
    xQueueAIFrameO = xQueueCreate(5, sizeof(camera_fb_t *));
xTaskCreatePinnedToCore(esp_camera_process_handler,
"esp_camera_process_handler", 6 * 1024,
NULL, 5, &camera_task_handle, 1);
xTaskCreatePinnedToCore(esp_ai_process_handler,
"esp_ai_process_handler", 6 * 1024,
NULL, 5, &ai_task_handle, 1);

    if (xQueueFrameO != NULL
        || xQueueAIFrameO != NULL
        || camera_task_handle != NULL
        || ai_task_handle != NULL)
    {
        return 0;
    }

    return 1;
}
首先,我們創建了兩個消息隊列和兩個任務。這兩個消息隊列的主要功能是傳輸圖像數據,它們的區別在於一個用於傳輸原始圖像數據,另一個用於傳輸經過AI處理後的圖像數據或者未檢測到的圖像數據(原始圖像數據)。而這兩個任務則分別負責圖像數據的獲取和AI處理。在AI處理任務中,當檢測到顏色時,系統會在圖像數據中添加顏色框框用來識別當前顏色,最後使用消息隊列將AI處理後的圖像數據或未檢測到的圖像數據(原始圖像數據)發送到LCD上進行顯示。
62.3 下載驗證
如果在檢測過程中發現比較明顯的顏色物體,該系統會將此幀的圖像數據發送給顏色識別API進行處理。處理成功後,此幀的圖像將被顯示在LCD上,如下圖所示
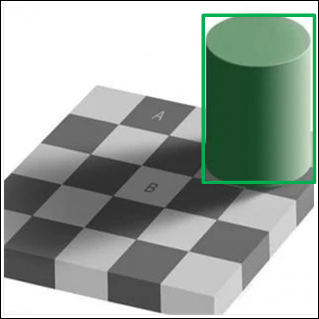
圖62.3.1 顏色識別效果圖