使用前提
本腳本是在使用阿里雲Windows服務器的前提,如果使用其他dns服務,請參看acme.sh的dns相關文檔
配置好cygwin64、acme.sh並配置好阿里雲賬户,openssl最好也安裝上
cygwin64配置參考
acme.sh配置
openssl參考,添加-certpbe PBE-SHA1-3DES -keypbe PBE-SHA1-3DES -nomac 是為了應對pfx輸入密鑰不正確
最終路徑就是項目路徑
一、安裝cygwin64
1. 下載
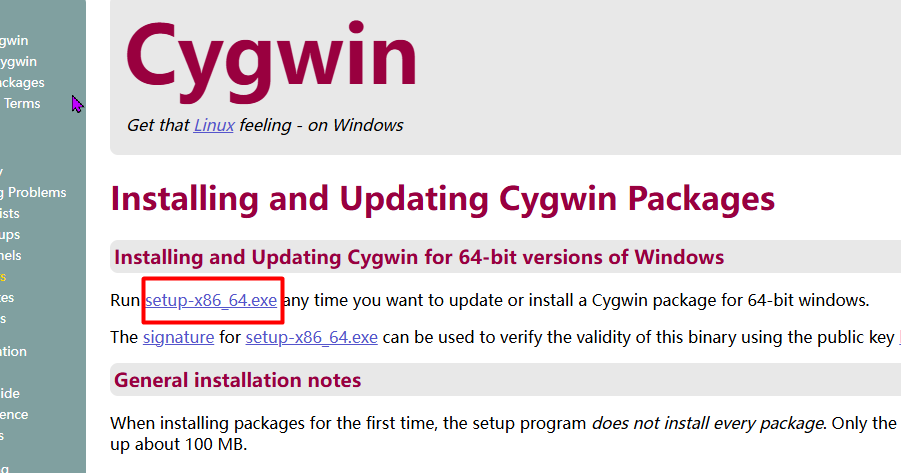
cygwin64官網下載
cygwin64百度雲
如果windows server 08R2啓動安裝程序失敗,請使用cmd運行
setup-x86_64.exe --allow-unsupported-windows --site http://ctm.crouchingtigerhiddenfruitbat.org/pub/cygwin/circa/64bit/2024/01/30/231215 --no-verify
其他老舊系統請參考cygwin64官網網頁的How can I install the last Cygwin version for an old, unsupported Windows回答
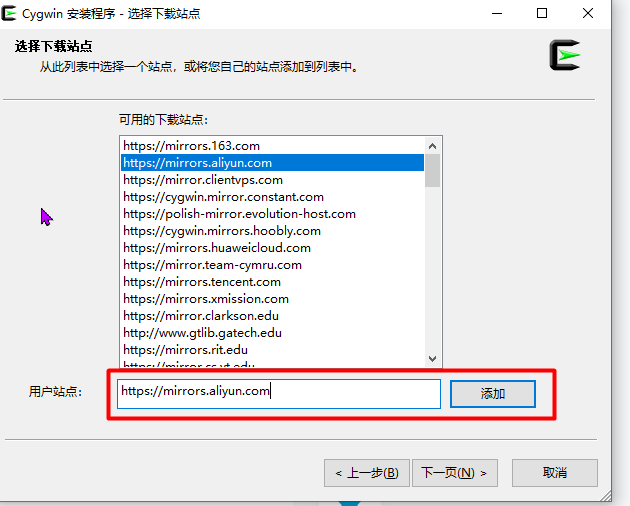
2. 非老舊系統配置鏡像點
如果不是老久系統 ,則可以考慮使用阿里雲鏡像
阿里雲鏡像點: https://mirrors.aliyun.com
3. 安裝包參考列表
curl
cron
bzip2
wget
gcc-core
gcc-g++
make
openssh
openssl
lynx
dos2unix
vim
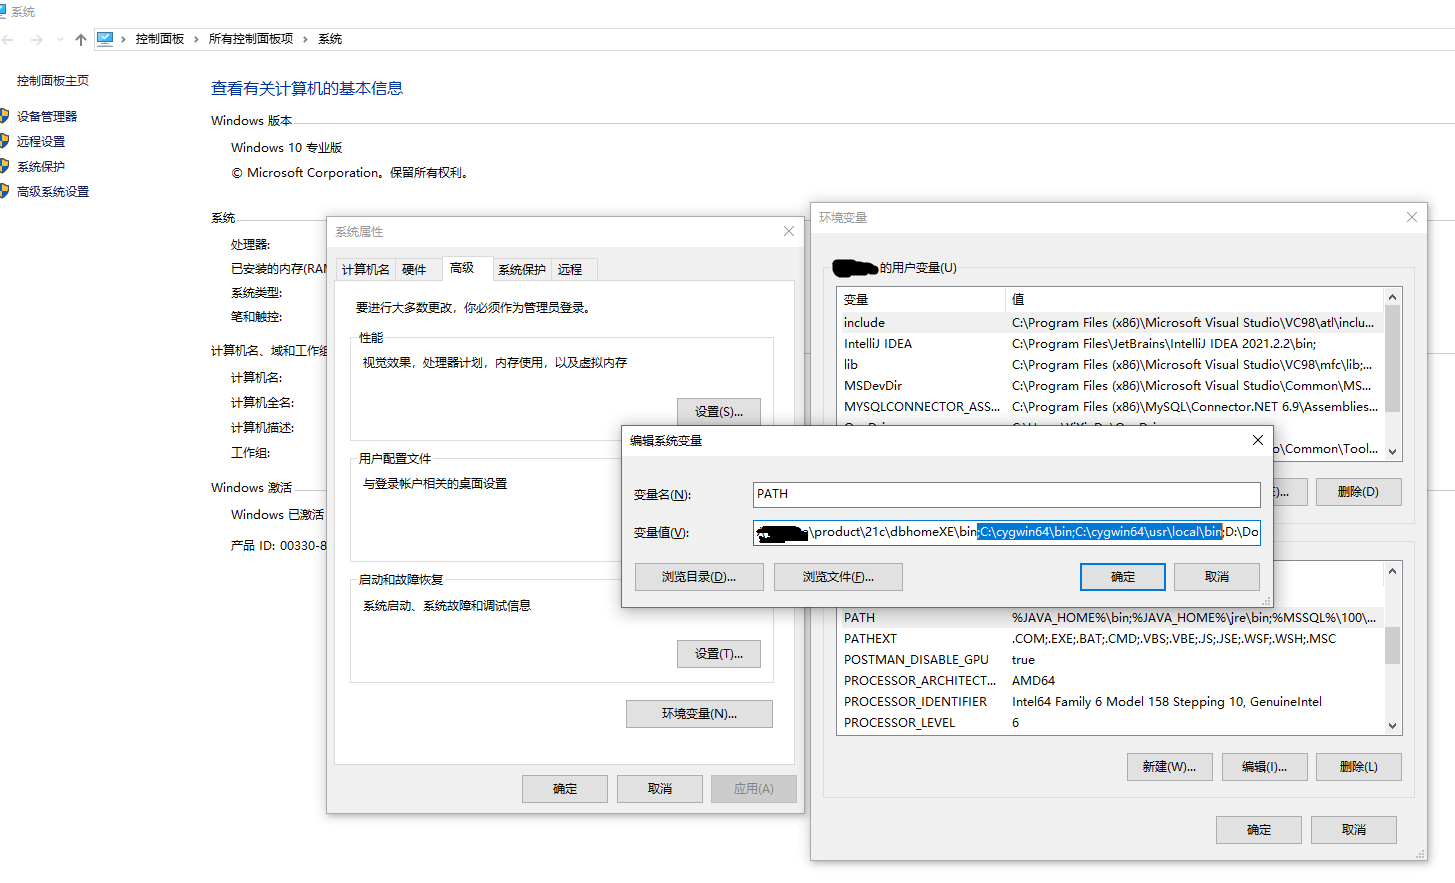
4. Windows配置環境變量
在Path後加;C:\cygwin64\bin;C:\cygwin64\usr\local\bin
5. 如果遇到VIM不能粘貼複製
打開cygwin64桌面圖標Cygwin64 Terminal,進入控制枱
cd /home
vim .vimrc
i鍵進入編輯模式,鍵入以下內容
set mouse=c
syntax on
esc鍵退出編輯模式,輸入:wq即可保存文件
shift+ins 是cygwin64控制枱下的粘貼鍵
二、安裝acme.sh
1. 通過curl命令直接安裝acme.sh
curl -k https://raw.githubusercontent.com/acmesh-official/acme.sh/master/acme.sh | sh -s -- --install-online -m my@example.com
如果報錯如圖

輸入以下,使curl忽略全局ssl認證,成功後 ,再去通過curl安裝acme.sh試試
echo insecure > ~/.curlrc
2. 如果步驟二.1成功則不需要看此條
1)直接去git下載acme.sh的源碼
acme.sh git資源
acme.sh 百度雲
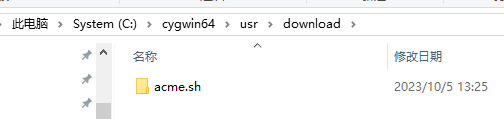
使用解壓軟件如7z將acme.sh-3.0.7.tar.gz解壓兩次放在/usr/download目錄下,並重命名為acme.sh,如圖
2)安裝acme.sh
切換到cygwin64控制枱
cd /usr/download/acme.sh
./acme.sh --install -m example@qq.com
3. 配置acme.sh
0)安裝完成後重新加載 Bash
source ~/.bashrc
1)配置自動更新
acme.sh --upgrade --auto-upgrade
2)切換至Letsencrypt
acme.sh --set-default-ca --server letsencrypt
3)配置DNSApi,這裏是參考阿里雲的dnsapi,其他請參考acme.sh的dns相關文檔
cd /home/Administrator/.acme.sh
vim account.conf
i鍵進入編輯模式,輸入阿里雲帳號的AccessKey相關內容
export Ali_Key="LTAIsadfd8J9qs4fxxxxxxxxxx"
export Ali_Secret="Xp3adgfNDOW0CJcPLKoUwqxxxxxxxxxx"
esc鍵退出編輯模式,輸入 :wq 保存文件並退出
三、準備powershell腳本
PowerShell 腳本,使用前,更改執行策略
關於執行策略:
https://learn.microsoft.com/zh-cn/powershell/module/microsoft.powershell.core/about/about_execution_policies?view=powershell-7.4#powershell-execution-policies
Set-ExecutionPolicy -ExecutionPolicy Unrestricted -Scope CurrentUser
以下是PowerShell腳本,如果亂碼,請將文件保存為GB2312字符文件
1.acme自動申請證書腳本,請保存在cygwin64批量自動簽發證書.ps1文件中
# 設定bash別名,如果系統裝了wsl可能衝突,使用別名強制使用cygwin64命令
Set-Alias -Name bash C:\cygwin64\bin\bash.exe
# 設定openssl別名,如果系統裝了wsl可能衝突,使用別名強制使用cygwin64命令
Set-Alias -Name openssl C:\cygwin64\bin\openssl.exe
# 公共證書備份路徑,務必帶盤符
$commonPath = "E:\cert"
# cygwin64用户路徑,務必帶盤符,Administrator是計算機安裝cygwin64的用户名,不同情況名字不同
$userPath = "C:\Cygwin64\home\Administrator"
# cygwin64內部用户路徑
$cygwinUserPath = "/home/Administrator"
# pfx文件密鑰
$pfxPassword = "dgfdgsdfg"

# 證書在以下列表中添加即可
$data = @(
    [pscustomobject]@{
        # 要申請的域名
        domain = "buy.test.com";
        # 項目路徑,可空
        path   = "D:\Web\Main"
    },
    [pscustomobject]@{
        domain = "go.test.com";
    },
    [pscustomobject]@{
        domain = "*.test.com";
    }
)

# 如果公共路徑不存在,那麼創建,如果路徑已存在,不影響命令繼續執行
if (![System.IO.Directory]::Exists($commonPath)) {
    md $commonPath
}

# 獲取公共證書備份路徑在cygwin64環境下的路徑
$cygwinCommonPath = "/cygdrive/" + $commonPath.Replace(":", "").Replace("\", "/");

# 重試次數
$retryCnt = 0

function IssueKey {
    param (
        [string]$currDomain,
        [string]$currPath,
        [bool]$force
    )
    # 如果重試次數大於2,那麼退出當前函數
    if ($retryCnt -gt 2) {
        return
    }

    # 替換特殊路徑名
    $domain = $currDomain.Replace("*", "_")
    $cygDomain = $currDomain.Replace("*", "\*")

    # 設置執行命令後綴,這裏是acme.sh相關命令,修改dns api就在這裏
    $issueCmd = "--issue --dns dns_ali -d $($currDomain) --key-file $($cygwinCommonPath)/$($domain).key --fullchain-file $($cygwinCommonPath)/$($domain)_fullchain.cer"
    #如果是強制重發
    if ($force) {
        $issueCmd += " --force"
    }
    Write-Host 被執行的acme.sh後綴命令 $issueCmd
    bash --login -i -c "acme.sh $($issueCmd)"

    Write-Host 檢查$currDomain key文件大小和backup目錄是否存在文件

    $commonFullChainPath = "$($commonPath)\$($domain)_fullchain.cer"
    $commonKeyPath = "$($commonPath)\$($domain).key"
    $commonPfxPath = "$($commonPath)\$($domain).pfx"
    $commonPemPath = "$($commonPath)\$($domain).pem"
    # cygwin環境下的目錄
    $cygwinCertPath = "$($cygwinUserPath)/.acme.sh/$($cygDomain)_ecc"

    Write-Host 賦予權限
    bash --login -i -c "chmod -R g+rw $($cygwinCertPath)"

    Write-Host 拷貝Key、Fullchain文件到公共目錄
    bash --login -i -c "cp -f $($cygwinCertPath)/$($cygDomain).key $($cygwinCommonPath)/$($domain).key"
    bash --login -i -c "cp -f $($cygwinCertPath)/fullchain.cer $($cygwinCommonPath)/$($domain)_fullchain.cer"

    # 判斷絕對路徑下證書文件是否存在,如果不存在直接強制重新生成證書
    Write-Host 第一次檢查$commonKeyPath 文件是否存在
    if (![System.IO.File]::Exists($commonKeyPath)) {
        Write-Host 檢查key.bak是否存在
        # 嘗試從備份中恢復文件到原目錄
        bash --login -i -c "cp -f $($cygwinCertPath)/backup/key.bak $($cygwinCertPath)/$($cygDomain).key"
        # 嘗試從原目錄拷貝文件到公共目錄
        bash --login -i -c "cp -f $($cygwinCertPath)/$($cygDomain).key $($cygwinCommonPath)/$($domain).key"
        Write-Host 第二次檢查$commonKeyPath 文件是否存在
        if (![System.IO.File]::Exists($commonKeyPath)) {
            Write-Host 公共路徑證書文件不存在 $commonKeyPath 即將強制重新申請
            # 重試次數+1
            $retryCnt += 1
            IssueKey -currDomain $currDomain -currPath $currPath -force $true
        }
    }

    Write-Host 第一次檢查 $($domain).pfx 文件是否存在
    if (![System.IO.File]::Exists($commonPfxPath)) {
        Write-Host openssl轉換pfx
        # openssl 3.x 版本
        openssl pkcs12 -export -certpbe PBE-SHA1-3DES -keypbe PBE-SHA1-3DES -nomac -out $commonPfxPath -inkey $commonKeyPath -in $commonFullChainPath -password pass:$pfxPassword
        # openssl 1.0 版本
        # openssl pkcs12 -export -out $commonPfxPath -inkey $commonKeyPath -in $commonFullChainPath -password pass:$pfxPassword
    }

    Write-Host 第二次檢查 $($domain).pfx 文件是否存在
    if (![System.IO.File]::Exists($commonPfxPath)) {
        # 如果重試次數大於2,那麼退出當前函數
        if ($retryCnt -gt 2) {
            return
        }
        else {
            # 重試次數+1
            $retryCnt += 1
            IssueKey -currDomain $currDomain -currPath $currPath -force $true
        }
    }

    # 如果pem格式文件不存在,那麼使用openssl轉換成pem格式
    if (![System.IO.File]::Exists($commonPemPath)) {
        Write-Host openssl轉換pem
        openssl pkcs12 -in $commonPfxPath -out $commonPemPath -nodes -password pass:$pfxPassword
    }

    # 如果對象path不為空且存在,將證書拷貝到項目路徑下
    if (![string]::IsNullOrEmpty($currPath)) {
        Write-Host 拷貝$domain 證書文件到項目目錄
        Copy-Item -Path $commonKeyPath -Destination "$($currPath)\$($domain).key" -Force
        Copy-Item -Path $commonPfxPath -Destination "$($currPath)\$($domain).pfx" -Force
        Copy-Item -Path $commonPemPath -Destination "$($currPath)\$($domain).pem" -Force
    }
}

foreach ($curr in $data) {
    # 每次弄新的,就重置次數
    $retryCnt = 0

    try {
        # 登錄到cygwin使用acme.sh簽發證書,並將文件拷貝到公共證書目錄,並轉成pfx格式,密碼統一使用$pfxPassword
        Write-Host 地址 $curr.path
        Write-Host 簽發 $curr.domain 證書
        IssueKey -currDomain $curr.domain -currPath $curr.path -force $false
    }
    catch {
        Write-Host "發生異常:$_"
        break
    }
}
# 執行完後退出
exit
2.iis分配證書腳本,請保存在iis批量重新分配證書.ps1文件中
# 使用前先將策略設置為不嚴格 Set-ExecutionPolicy -ExecutionPolicy Unrestricted -Scope CurrentUser
# 保證證書有效的情況下再運行次腳本,將證書名稱、證書目錄、密鑰放入以下數組
# 公共證書密鑰
$pfxpassword = "dgfdgsdfg"
# 公共證書路徑
$pfxCommandDir= "E:\cert"
# 域名
$domain="test.com"
# 服務器上的證書與端口映射關係
$data = @(
    [pscustomobject]@{subDomain = '*';port=443}
    [pscustomobject]@{subDomain = 'buy';port=8443}
    [pscustomobject]@{subDomain = 'go';port=7443}
)
$certRootStore = "LocalMachine"
$certStore = "My"
# 創建證書存儲
$store = new-object System.Security.Cryptography.X509Certificates.X509Store($certStore, $certRootStore)
$store.open("MaxAllowed")

# 開始循環數組操作
foreach ($element in $data) {
    $currDomain=$element.subDomain.Replace("*","_");
    $pfxPath = "$($pfxCommandDir)\$($currDomain).$($domain).pfx"
    Write-Host $pfxPath
    # 創建pfx對象
    try {
        $certificateObject = New-Object System.Security.Cryptography.X509Certificates.X509Certificate2($pfxPath, $pfxpassword)
        if (!$certificateObject.Verify()) {
            Write-Host $element.subDomain證書驗證失敗, 請檢查相關配置
            break
        }
        else {
            Write-Host 證書驗證成功
        }
        # 存儲證書到個人
        if (!$store.Certificates.Contains($certificateObject)) {
            $store.Add($certificateObject)
            Write-Host 導入證書成功
        }
        $newThumbprint = $certificateObject.Thumbprint
        Write-Host 獲取證書信息成功
        $guid = [System.Guid]::NewGuid()
        $applicationID = "{$($guid)}"
        $addr = "0.0.0.0:$($element.port)"
        Write-Host $addr $newThumbprint
        # netsh刪除原有監聽端口
        netsh http delete sslcert ipport=$addr
        # netsh添加端口
        netsh http add sslcert ipport=$addr certhash=$newThumbprint appid=$applicationID
        # 如果對象path不為空且存在,將證書拷貝到項目路徑下
        if (![string]::IsNullOrEmpty($element.path)) {
            $dest = "$($element.path)\$($currDomain).$($domain).pfx"
            Copy-Item -Path $pfxPath -Destination $dest -Force
            Write-Host 拷貝文件到項目目錄成功
        }
    }
    catch {
        Write-Host "發生異常:$_"
        break
    }
}
# 關閉證書存儲
$store.close()

# 執行完後退出
exit
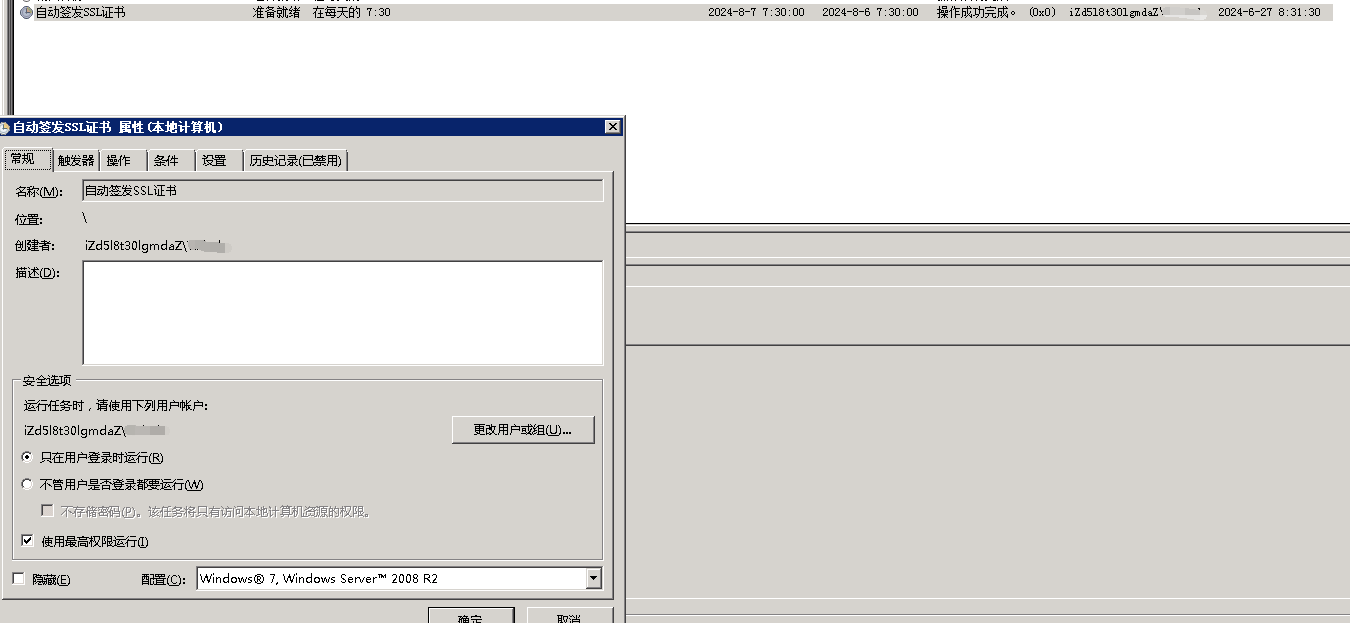
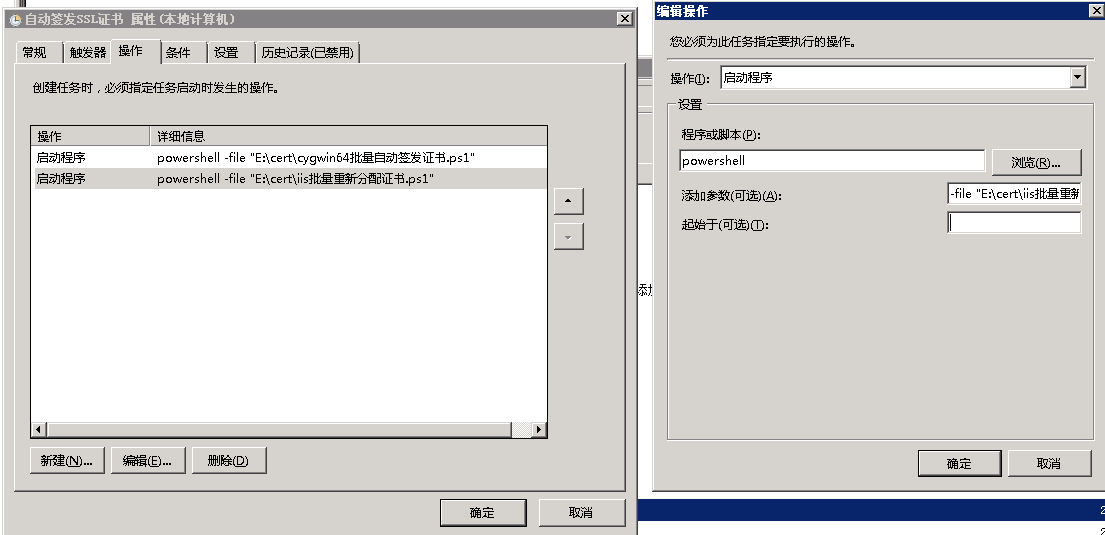
創建任務計劃程序參考
在常規頁面中,勾選“只在用户登錄時運行”以及“使用最高權限”,保存即可
任務計劃程序是按照順序執行的。
任務計劃程序設置界面效果最終如圖
以Windows Server 2008R2所示: