作者:郭奧門
愛可生 DBLE 研發成員,負責分佈式數據庫中間件的新功能開發,回答社區/客户/內部提出的一般性問題。
本文來源:原創投稿
*愛可生開源社區出品,原創內容未經授權不得隨意使用,轉載請聯繫小編並註明來源。
前言
observer調試有三種⽅法:⽇志,gdb調試,vscode調試(本質上是gdb或lldb)。這裏我們關注如何藉助vscode進行調試
調試版本
OB代碼基線:開源版本,社區版,3.1.5
github:https://github.com/oceanbase/...
commit id:99777b4bc94d2cfc6be8ae1dce624e46beefad08
調試方式採用本地開發工具+遠程gdb方式
本地指的是調試者的電腦(windows或mac)
遠程指的是observer和gdb所在的linux服務器
所需工具:
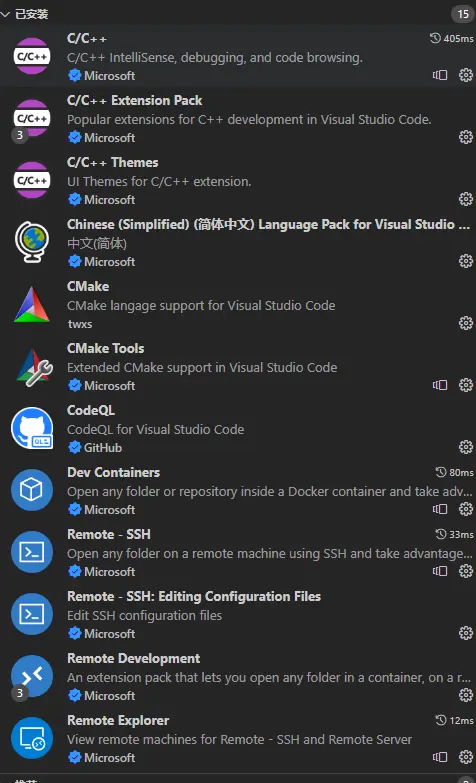
本地:vscode(所需插件:C/C++、CMake、CMake Tools、Remote - SSH、Remote Development)
遠程:gdb
遠程環境
編譯
詳細可參考:https://github.com/oceanbase/...
yum install -y git wget rpm* cpio make glibc-devel glibc-headers binutils m4
cd /opt && git clone https://github.com/oceanbase/oceanbase.git
cd oceanbase && git checkout 99777b4bc94d2cfc6be8ae1dce624e46beefad08
curl http://mirrors.aliyun.com/oceanbase/OceanBase.repo
## 修改編譯選項
## 註釋掉 set(DEBUG_PREFIX "-fdebug-prefix-map=${CMAKE_SOURCE_DIR}=.")
vi cmake/Env.cmake
#時間較長,可以先操作下面的步驟
bash build.sh debug --init --make
#完成後會在當前目錄生成build_debug子目錄,在build_debug/src/observer目錄下會有一個observer二進制文件,此文件為observer的啓動文件
安裝
檢查環境
這裏我的環境只需要調整以下配置,建議按照官方文檔檢查一下自己的服務器:環境和配置檢查-OceanBase 數據庫-OceanBase文檔中心-分佈式數據庫使用文檔(https://www.oceanbase.com/doc...)
vi /etc/security/limits.conf
#追加
root soft nofile 655350
root hard nofile 655350
* soft nofile 655350
* hard nofile 655350
* soft stack 20480
* hard stack 20480
* soft nproc 655360
* hard nproc 655360
* soft core unlimited
* hard core unlimited
#退出當前會話,重新登錄。執行以下命令,查看配置是否生效:
ulimit -a
部署
詳細可參考:https://github.com/oceanbase/...
yum install -y yum-utils
yum-config-manager --add-repo https://mirrors.aliyun.com/oceanbase/OceanBase.repo
yum install -y libtool libaio obclient
/opt/oceanbase/deps/3rd && bash dep_create.sh all
cd /opt/oceanbase/tools/deploy
#該命令會將observer二進制文件(build_debug 或 build_release 都可以)和一些其他組件複製到當前目錄,例如部署配置模板文件。
./obd.sh prepare -p /opt/oceanbase/build_debug/src/observer
./obd.sh deploy -c single.yaml
後續修改源碼再調試時可直接運行:
./obd.sh prepare -p /opt/oceanbase/build_debug/src/observer
./obd.sh deploy -c single.yaml
測試連接:(single.yaml默認mysql端口為10000,RPC端口為10001)
[root@localhost deploy]# obclient -uroot -P10000 -h127.0.0.1
Welcome to the OceanBase.  Commands end with ; or \g.
Your OceanBase connection id is 3221487642
Server version: OceanBase 3.1.5 (r1-99777b4bc94d2cfc6be8ae1dce624e46beefad08) (Built Nov 22 2022 06:09:41)

Copyright (c) 2000, 2018, OB Corporation Ab and others.

Type 'help;' or '\h' for help. Type '\c' to clear the current input statement.

obclient [(none)]>
99777b4bc94d2cfc6be8ae1dce624e46beefad08對應我們編譯的observer版本
啓動過程中發生錯誤,可根據observer.log的相關報錯進行排查
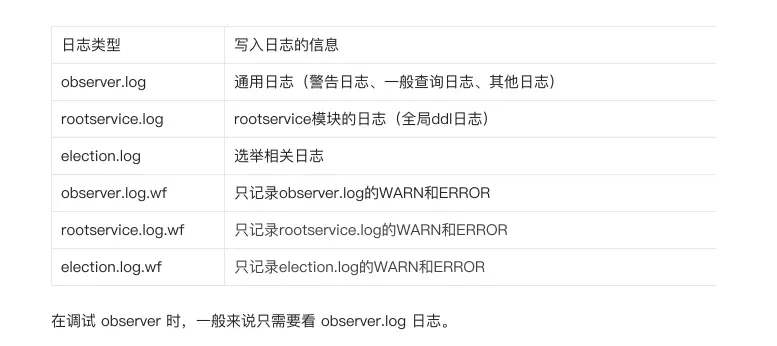
日誌
所在目錄:single.yaml中的home_path目錄中
日誌類型:OceanBase 數據庫的進程⽇志主要分為 observer.log 、 rootservice.log 和 election.log ,以及對應的wf⽇志(只記錄 WARN 和 ERROR),共2類6種⽇志。
安裝gdb
cd /opt && wget http://ftp.gnu.org/gnu/gdb/gdb-7.12.tar.gz
tar zxvf gdb-7.12.tar.gz && cd gdb-7.12
yum -y install gcc gcc-c++ texinfo
./configure
make && make install
gdb --version
gdbserver --version
本地環境
配置vscode
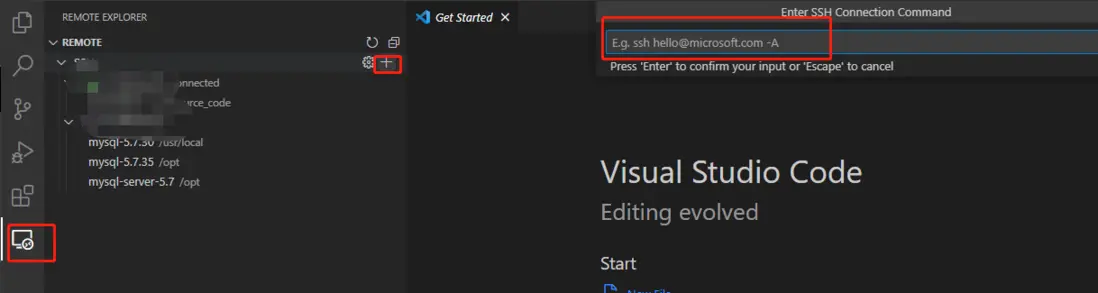
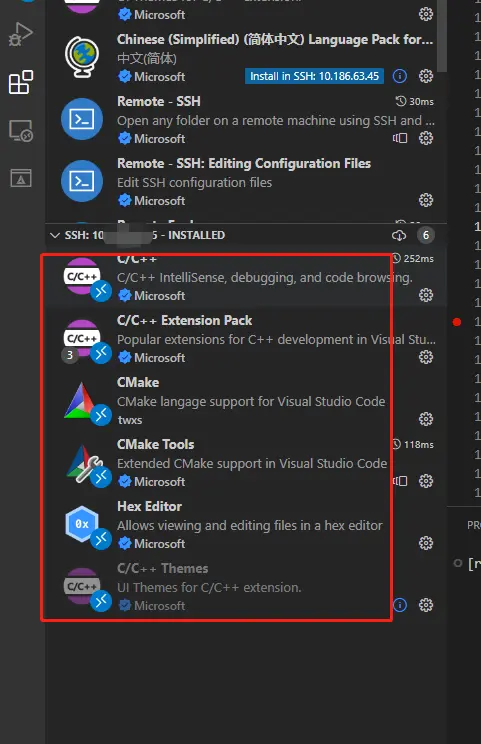
- 本地自行安裝插件:C/C++、CMake、CMake Tools、Remote - SSH、Remote Development
- 安裝成功後,打開遠程管理器,ssh連接observer所在的服務器(不用ssh免密也可以,就是每次指定密碼登錄)
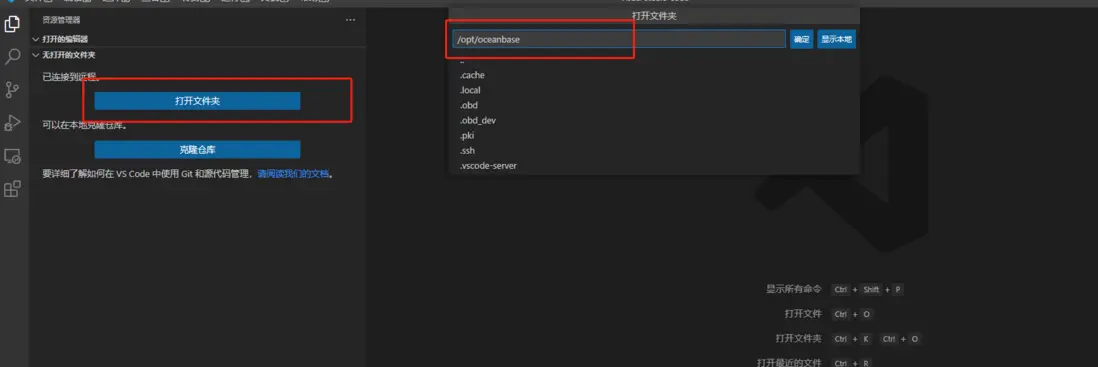
- 打開oceanbase的源碼目錄
- 繼續在遠程服務器上安裝插件:C/C++、CMake、CMake Tools
- 創建並配置launch.json,創建成功後會保存在.vscode目錄下

這裏貼出我的配置:
launch.json- 啓動
選擇 Run->Start Debugging,然後選擇 attach 的進程號,輸⼊ observer 就可以搜索到
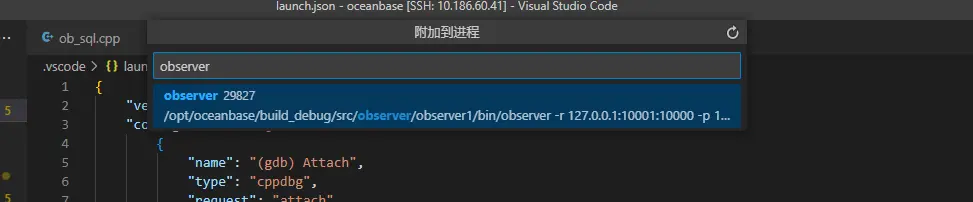
選擇進程後等待半分鐘,進程較多,gdb 加載需要時間。
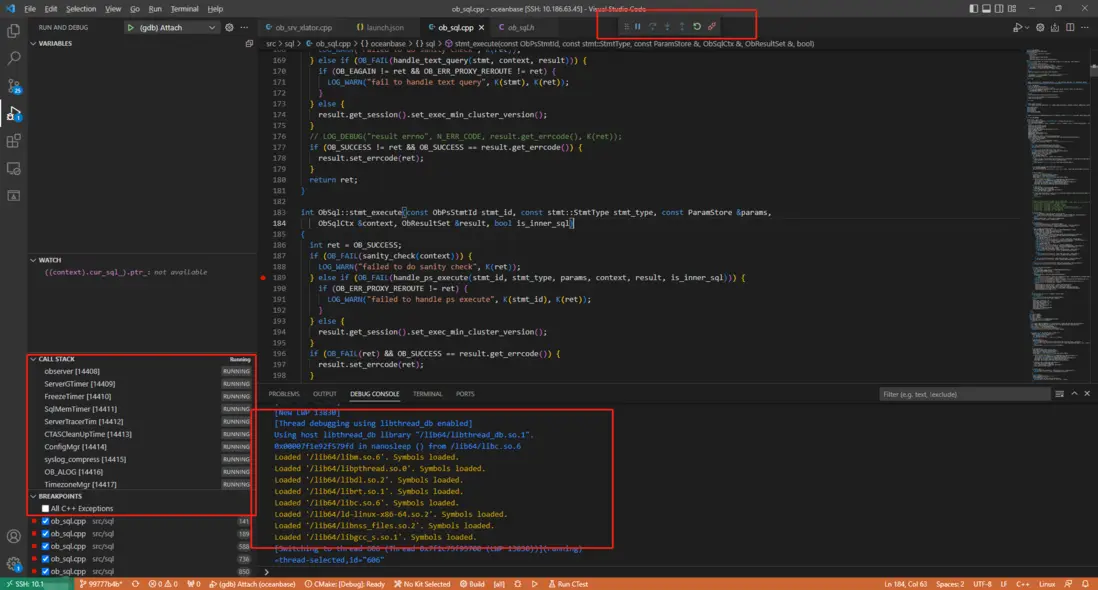
如下圖所以,表示debug已啓動成功
- 調試
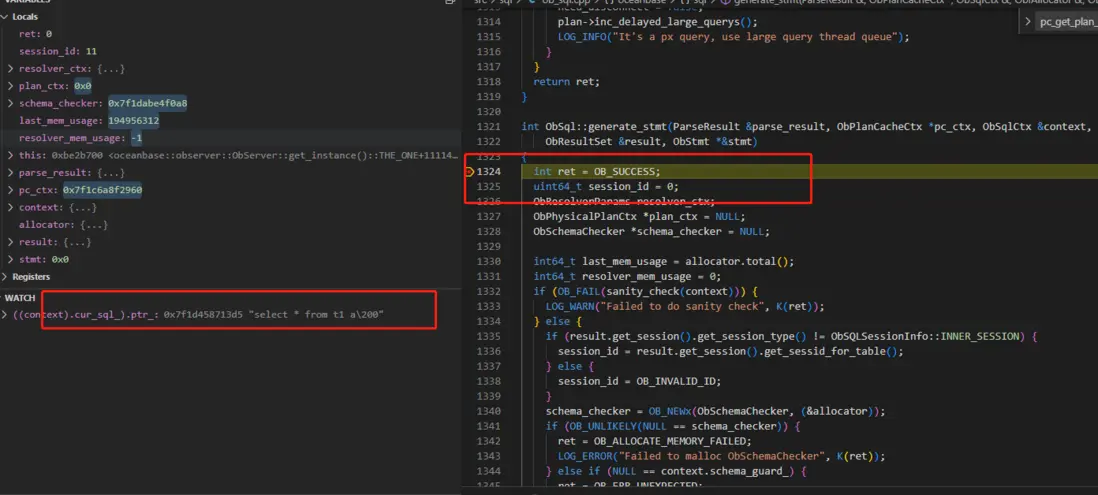
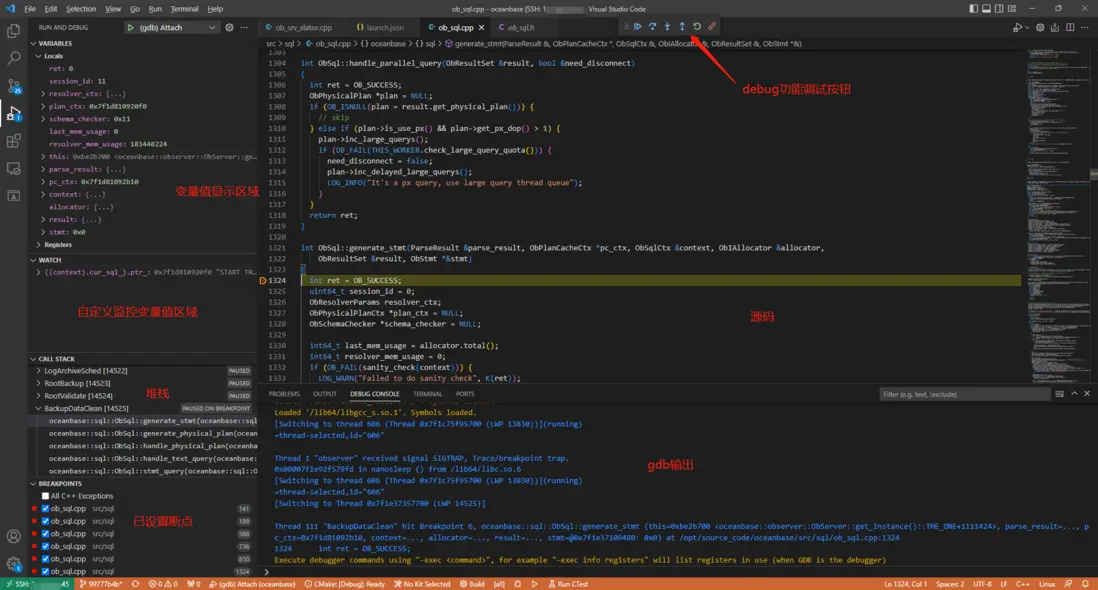
打開ob_sql.cpp文件(快捷鍵ctrl+p 輸入文件名),在1324行增加斷點
注:因為oceanbase有很多後台任務,會定時的執行SQL,所以調試時設置的斷點有可能會命中後台任務執行的SQL,調試起來不是很方便
- 接下來開始愉快的調試吧=-=
參考:
文檔概覽-OceanBase 數據庫-OceanBase文檔中心-分佈式數據庫使用文檔(https://www.oceanbase.com/doc...)
https://github.com/oceanbase/...