從EXTI實現看Embassy: 異步Rust嵌入式框架
原文鏈接:https://decaday.github.io/blog/embassy-exti/
Embassy是一個基於Rust的異步嵌入式開發框架:
Embassy: The next-generation framework for embedded applications
Embassy不僅包含了異步運行時,還提供了STM32、RP2xxx,NRF等芯片的異步HAL實現、usb、藍牙(trouble))等,樂鑫官方的esp-rs也是將embassy作為默認框架使用。
最近研究了embassy-stm32的部分實現,寫在博客裏作為記錄吧。Exti最簡單也有點Async味,就先寫這個吧。
注意:本文撰寫時,Embassy尚未1.0 release,此文可能在您讀的時候已經過時。為了博客的清晰,部分代碼被簡化。
EXTI
EXTI 是 Extended Interrupts and Events Controller 的縮寫,即“擴展中斷和事件控制器”。
它的核心作用可以概括為一句話:讓STM32能夠響應來自外部(或內部通道)的異步信號,如IO上升沿、IO高電平,並在這些事件發生時觸發中斷或事件請求,從而執行特定的任務,尤其擅長將MCU從低功耗模式中喚醒。
embassy-stm32的exti驅動,我們從頂向下看。
源碼鏈接:embassy/embassy-stm32/src · embassy-rs/embassy
整個代碼的邏輯如下:
ExtiInput<'d>
/// EXTI input driver.
///
/// This driver augments a GPIO `Input` with EXTI functionality. EXTI is not
/// built into `Input` itself because it needs to take ownership of the corresponding
/// EXTI channel, which is a limited resource.
///
/// Pins PA5, PB5, PC5... all use EXTI channel 5, so you can't use EXTI on, say, PA5 and PC5 at the same time.
pub struct ExtiInput<'d> {
  pin: Input<'d>,
}這是可被用户直接使用的ExtiInput類型。
其內部包含了一個Input類型(其實Input類型內部也是包含了一個FlexPin類型)
構造函數
impl<'d> ExtiInput<'d> {
    /// Create an EXTI input.
    pub fn new<T: GpioPin>(
        pin: impl Peripheral<P = T> + 'd,
        ch: impl Peripheral<P = T::ExtiChannel> + 'd,
        pull: Pull,
    ) -> Self {
        into_ref!(pin, ch);

        // Needed if using AnyPin+AnyChannel.
        assert_eq!(pin.pin(), ch.number());

        Self {
            pin: Input::new(pin, pull),
        }
    }
    ...
new函數我們主要説一下 impl Peripheral<P = T::ExtiChannel>:
impl Peripheral<...>: 表明pin必須是一個實現了Peripheraltrait 的類型。Peripheral用來標記硬件外設所有權,來自embassy-hal-internal。<P = T>: 這是一個關聯類型約束,意味着這個外設的實體類型就是泛型T(比如peripherals::PA4)。<P = T::ExtiChannel>:T::ExtiChannel是TraitT的關聯類型,這個我們將在下面看到。它意味着這個外設的實體類型要與 “與T對應的ExtiChannel” 的類型匹配。+ 'd: 這是一個生命週期約束,確保傳入的外設引用至少和ExtiInput實例活得一樣長。這在處理外設的可變借用時非常重要。
這個類型限制是這樣的:
T是GpioPin,是某個引腳的類型(比如PA4,PA5,都是單獨的類型,都可以是T)
pin 參數要走了 T 的所有權,目的是使得用户無法直接將PA4再用作I2C。其形式通常是單例Singleton,也就是傳統rust hal庫結構的let p = Peripheral.take() 所獲得的外設的所有權(以後可能單獨寫博客講單例)。
ch 參數限定了其自身必須是T的關聯類型ExtiChannel (P = T::ExtiChannel),我們在下面細説,這要求了channel必須與pin對應,比如PA4必須提供EXTI4。
類型系統
EXTI單例(Singleton)類型的定義在_generated.rs(由build.rs生成的)中的embassy_hal_internal::peripherals_definition!宏中。
// (embassy-stm32/target/thumbv7em-none-eabi/.../out/_generated.rs)
embassy_hal_internal::peripherals_definition!(
    ADC1,
    ...
    EXTI0,
    EXTI1,
    EXTI2,
    EXTI3,
    ...
)
這些外設信息來自芯片的CubeMX數據庫。經過stm32-data和embassy-stm32宏的層層處理,實現了完善的類型限制和不同型號間高度的代碼複用。
Channel Trait
Exit的Channel Trait使用了密封(Sealed)Trait,這樣可以保證Channel Trait在包外可見,但是不能在外部被實現(因為外部實現privite trait SealedChannel )
trait SealedChannel {}
#[allow(private_bounds)]
pub trait Channel: SealedChannel + Sized {
    /// Get the EXTI channel number.
    fn number(&self) -> u8;

    /// Type-erase (degrade) this channel into an `AnyChannel`.
    ///
    /// This converts EXTI channel singletons (`EXTI0`, `EXTI1`, ...), which
    /// are all different types, into the same type. It is useful for
    /// creating arrays of channels, or avoiding generics.
    fn degrade(self) -> AnyChannel {
        AnyChannel { number: self.number() as u8, }
    }
}
在實現上比較簡單,embassy-stm32使用宏來簡化了代碼。
macro_rules! impl_exti {
    ($type:ident, $number:expr) => {
        impl SealedChannel for peripherals::$type {}
        impl Channel for peripherals::$type {
            fn number(&self) -> u8 {
                $number
            }
        }
    };
}

impl_exti!(EXTI0, 0);
impl_exti!(EXTI1, 1);
impl_exti!(EXTI2, 2);
impl_exti!(EXTI3, 3);
// ...
Pin Trait
Pin Trait同樣使用了Sealed Trait。AnyPin部分我們先不研究,我們只看Exti部分:Pin Trait設置了一個關聯類型,指向exti::Channel Trait。
// embassy-stm32/src/gpio.rs

pub trait Pin: Peripheral<P = Self> + Into<AnyPin> + SealedPin + Sized + 'static {
    /// EXTI channel assigned to this pin. For example, PC4 uses EXTI4.
    #[cfg(feature = "exti")]
    type ExtiChannel: crate::exti::Channel;


    #[inline] // Number of the pin within the port (0..31)
    fn pin(&self) -> u8 { self._pin() }

    #[inline] // Port of the pin
    fn port(&self) -> u8 { self._port() }

    /// Type-erase (degrade) this pin into an `AnyPin`.
    ///
    /// This converts pin singletons (`PA5`, `PB6`, ...), which
    /// are all different types, into the same type. It is useful for
    /// creating arrays of pins, or avoiding generics.
    #[inline]
    fn degrade(self) -> AnyPin {
        AnyPin {
            pin_port: self.pin_port(),
        }
    }
}
在Impl上也是用了大量的codegen和宏,其最終是 foreach_pin 這個宏:(foreach_pin的原型在build.rs生成的_macro.rs內,稍微有點繞,不再詳細敍述)
// (embassy-stm32/src/gpio.rs)
foreach_pin!(
    ($pin_name:ident, $port_name:ident, $port_num:expr, $pin_num:expr, $exti_ch:ident) => {
        impl Pin for peripherals::$pin_name {
            #[cfg(feature = "exti")]
            type ExtiChannel = peripherals::$exti_ch;
        }
        impl SealedPin for peripherals::$pin_name { /* ... */}
        impl From<peripherals::$pin_name> for AnyPin { /* ... */}
    };
);
其它IO複用也是通過codegen和宏實現的。比如,經過數據處理後,可能生成這樣的代碼:
// (_generated.rs)
impl_adc_pin!(ADC3, PC2, 12u8);
impl_adc_pin!(ADC3, PC3, 13u8);
pin_trait_impl!(crate::can::RxPin, CAN1, PA11, 9u8);
pin_trait_impl!(crate::can::TxPin, CAN1, PA12, 9u8);
這種情況下就限制死了alternate function,從而在編譯期就能發現問題,而且通過代碼提示就能獲知可用的IO而不用翻手冊。不得不説,這就是人們希望類型系統所做到的!
wait_for_high
/// Asynchronously wait until the pin is high.
///
/// This returns immediately if the pin is already high.
pub async fn wait_for_high(&mut self) {
    let fut = ExtiInputFuture::new(self.pin.pin.pin.pin(), self.pin.pin.pin.port(), true, false);
    if self.is_high() {
        return;
    }
    fut.await
}
...
/// Asynchronously wait until the pin sees a rising edge.
///
/// If the pin is already high, it will wait for it to go low then back high.
pub async fn wait_for_rising_edge(&mut self) {
    ExtiInputFuture::new(self.pin.pin.pin.pin(), self.pin.pin.pin.port(), true, false).await
}
...
這個self.pin.pin.pin.pin()有夠吐槽的。解釋起來是這樣的: ExtiInput.Input.FlexPin.PeripheralRef<AnyPin>.pin()。
我們看見的wait_for_high或是wait_for_rising_edge新建了一個ExtiInputFuture,我們來看看:
ExtiInputFuture<'a>
#[must_use = "futures do nothing unless you `.await` or poll them"]
struct ExtiInputFuture<'a> {
    pin: u8,
    phantom: PhantomData<&'a mut AnyPin>,
}
ExtiInputFuture並不存儲外設實例,而只存一個pin_num,這有利於所有權的編寫和更加靈活。實際上,STM32也只有16個Channel嘛,我們可以用一些全局標誌位。
new和drop
    fn new(pin: u8, port: u8, rising: bool, falling: bool) -> Self {
        critical_section::with(|_| {
            let pin = pin as usize;
            exticr_regs().exticr(pin / 4).modify(|w| w.set_exti(pin % 4, port));
            EXTI.rtsr(0).modify(|w| w.set_line(pin, rising));
            EXTI.ftsr(0).modify(|w| w.set_line(pin, falling));

            // clear pending bit
            #[cfg(not(any(exti_c0, exti_g0, exti_u0, exti_l5, exti_u5, exti_h5, exti_h50)))]
            EXTI.pr(0).write(|w| w.set_line(pin, true));
            #[cfg(any(exti_c0, exti_g0, exti_u0, exti_l5, exti_u5, exti_h5, exti_h50))]
            {
                EXTI.rpr(0).write(|w| w.set_line(pin, true));
                EXTI.fpr(0).write(|w| w.set_line(pin, true));
            }

            cpu_regs().imr(0).modify(|w| w.set_line(pin, true));
        });

        Self {
            pin,
            phantom: PhantomData,
        }
    }
}

impl<'a> Drop for ExtiInputFuture<'a> {
    fn drop(&mut self) {
        critical_section::with(|_| {
            let pin = self.pin as _;
            cpu_regs().imr(0).modify(|w| w.set_line(pin, false));
        });
    }
}new函數使用了一個critical_section。“critical_section::with 創建了一個臨界區。在嵌入式系統中,臨界區是一段在執行期間不會被中斷打斷的代碼。對於單核微控制器,最簡單的實現方式就是臨時禁用所有中斷(這也是默認實現)。這確保了在配置 EXTI 寄存器這種需要多個步驟的操作時,不會被一個突如其來的中斷打亂,從而保證了操作的原子性。
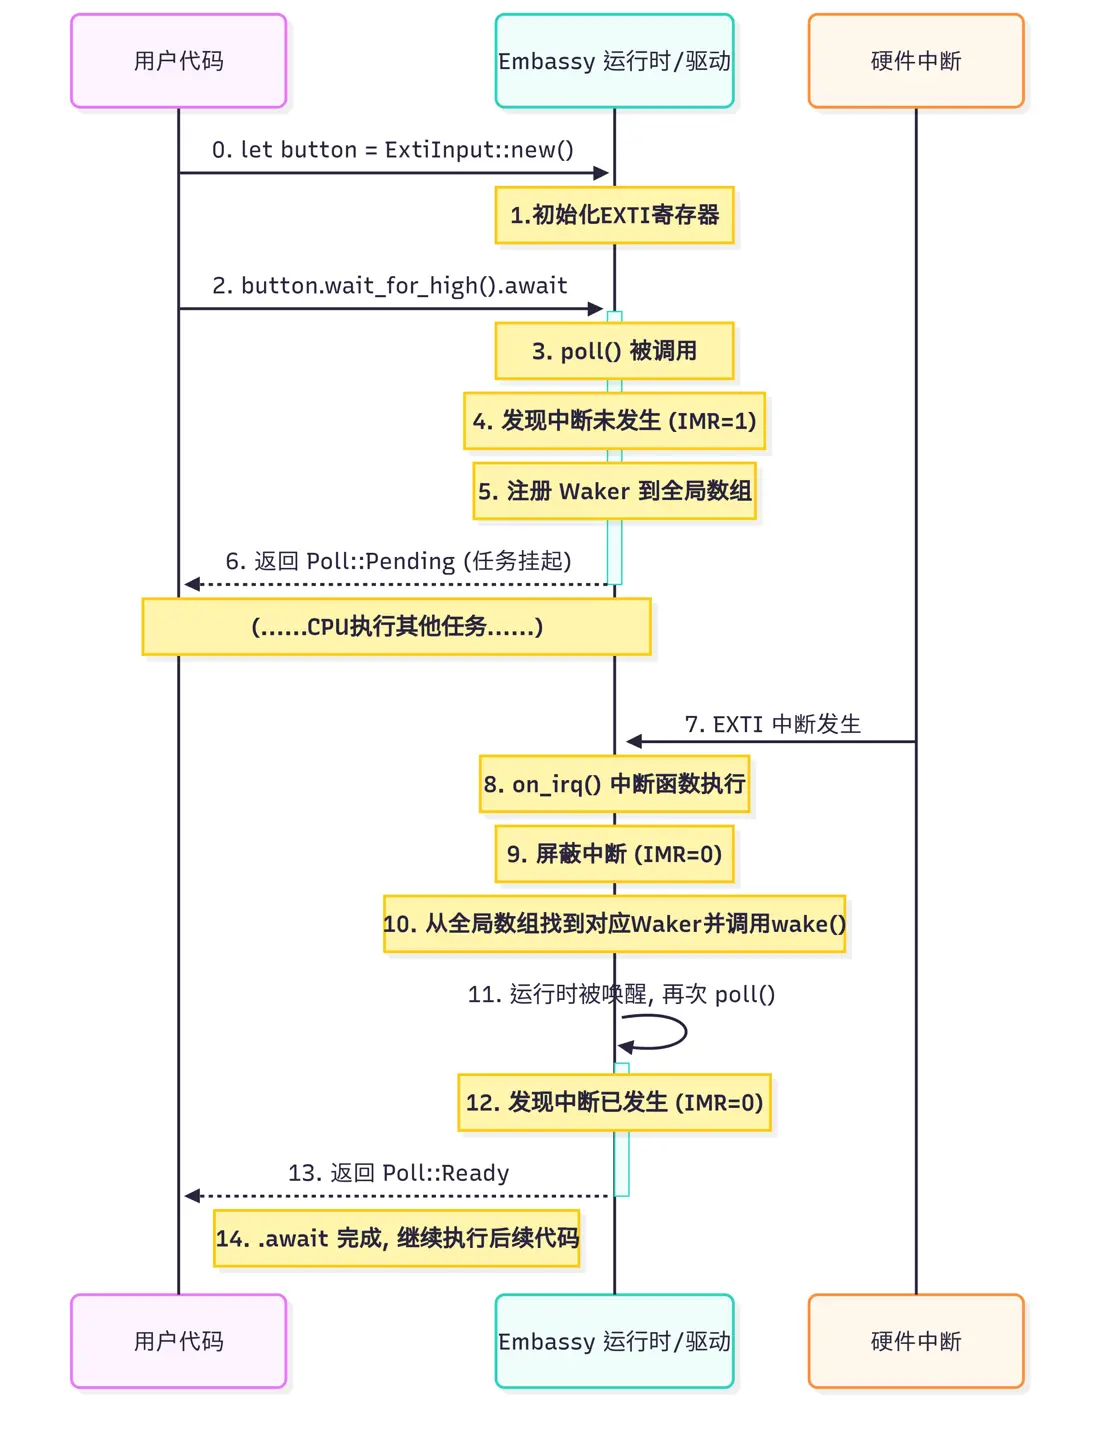
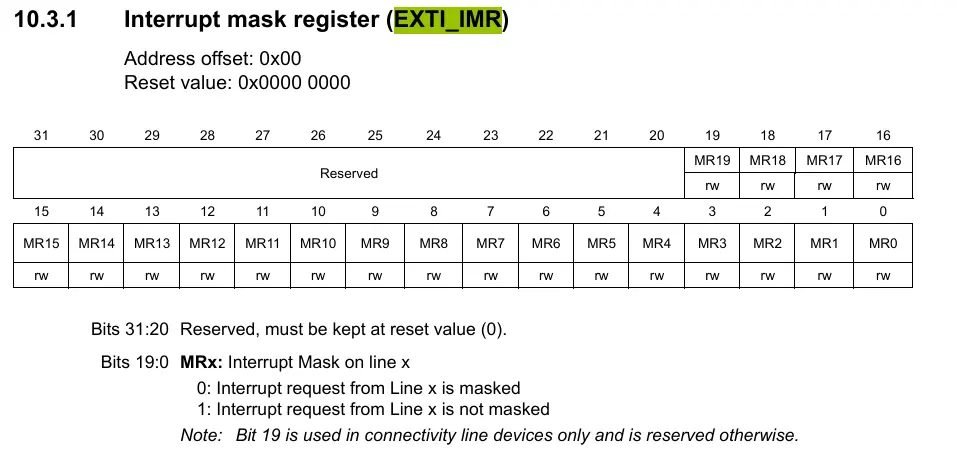
new函數初始化了選擇引腳端口、設置觸發邊沿等與EXTI相關的寄存器(就不展開細看了),最後一行設置了IMR(Interrupt mask register)寄存器,表示取消屏蔽(Mask)該位,此時該通道可產生中斷。
impl Future (poll)
const EXTI_COUNT: usize = 16;
const NEW_AW: AtomicWaker = AtomicWaker::new();
static EXTI_WAKERS: [AtomicWaker; EXTI_COUNT] = [NEW_AW; EXTI_COUNT];
...
...
impl<'a> Future for ExtiInputFuture<'a> {
    type Output = ();

    fn poll(self: Pin<&mut Self>, cx: &mut Context<'_>) -> Poll<Self::Output> {
        EXTI_WAKERS[self.pin as usize].register(cx.waker());

        let imr = cpu_regs().imr(0).read();
        if !imr.line(self.pin as _) {
            Poll::Ready(())
        } else {
            Poll::Pending
        }
    }
}
在這裏我們實現了 Future trait。使得 ExtiInputFuture 可以用於 async/await 機制。
Future trait 代表一個異步計算/運行的結果,可以被執行器(executor)輪詢(poll)以檢查是否完成。 在 poll 方法中,我們做了以下幾件事:
-
註冊
waker: waker是喚醒器。因為持續的輪詢會消耗大量的cpu資源(如果持續poll,那就是nb模式)。所以,一個聰明的executor僅第一次和被waker喚醒後,才會執行一次poll。這裏的喚醒者是中斷函數。EXTI_WAKERS是一個全局的AtomicWaker數組,每個pin對應一個AtomicWaker,用於存儲waker。poll調用時會將waker存入EXTI_WAKERS[self.pine],這樣當中斷髮生時,可以使用這個waker喚醒Future。 - 檢查中斷是否發生:它通過檢查IMR寄存器判斷中斷是否發生。因為我們的中斷函數(
on_irq)在觸發後會立刻通過imr(0).modify(|w| w.0 &= !bits)來屏蔽該中斷線。所以,如果在poll時發現IMR位被清零了(即被屏蔽了),就説明在我們await的這段時間裏,中斷已經來過了。這時就可以返回Poll::Ready了。如果IMR位仍然是1(未屏蔽),則説明中斷還沒來,返回Poll::Pending繼續等待。” 這樣就把poll和on_irq的行為聯繫起來了,邏輯更清晰。
提一下,AtomicWaker這個底層實現在embassy-sync中,平台有Atomic的情況下用AtomicPtr實現,沒有的話用Mutex實現。
中斷
on_irq
unsafe fn on_irq() {
    #[cfg(not(any(exti_c0, exti_g0, exti_u0, exti_l5, exti_u5, exti_h5, exti_h50)))]
    let bits = EXTI.pr(0).read().0;
    #[cfg(any(exti_c0, exti_g0, exti_u0, exti_l5, exti_u5, exti_h5, exti_h50))]
    let bits = EXTI.rpr(0).read().0 | EXTI.fpr(0).read().0;
    // ...

    // Mask all the channels that fired.
    cpu_regs().imr(0).modify(|w| w.0 &= !bits);

    // Wake the tasks
    for pin in BitIter(bits) {
        EXTI_WAKERS[pin as usize].wake();
    }

    // Clear pending
    EXTI.pr(0).write_value(Lines(bits));
    ...
}
on_irq 函數的主要作用是在外部中斷髮生時,處理觸發的 ExtiChannel 並喚醒相應的 Future。
- 讀取
PR(Pending Register)或者RPR/FPR(Rising/Falling Edge Pending Register)因為多個EXTI線可能共用一箇中斷向量,所以on_irq首先讀取PR來確定具體是哪些線觸發了中斷。 - 通過修改
IMR(Interrupt Mask Register),屏蔽已觸發的中斷通道,以防止重複觸發。 - 為了處理多個Channel都觸發的情況,Embassy通過
BitIter(bits)遍歷所有觸發的pin,並調用EXTI_WAKERS[pin as usize].wake()喚醒相應的Future。這個BitIter會在下面講到。 - 在
EXTI.pr或EXTI.rpr/EXTI.fpr中清除對應的位,以便後續的中斷可以正確觸發。
綁定
Embassy通過一系列宏將EXTI中斷綁定到on_irq上。
macro_rules! foreach_exti_irq {
    ($action:ident) => {
        foreach_interrupt!(
            (EXTI0)  => { $action!(EXTI0); };
            (EXTI1)  => { $action!(EXTI1); };
            ...
            // plus the weird ones
            (EXTI0_1)   => { $action!( EXTI0_1 ); };
            (EXTI15_10) => { $action!(EXTI15_10); };
            ...
        );
    };
}

macro_rules! impl_irq {
    ($e:ident) => {
        #[allow(non_snake_case)]
        #[cfg(feature = "rt")]
        #[interrupt]
        unsafe fn $e() {
            on_irq()
        }
    };
}因為EXTI中斷比較複雜,有多個外設共用一箇中斷向量的情況,而且不同的系列共用中斷向量的情況還不一樣,在exti上難以使用bind_irqs!這樣的模式、embassy_stm32的其它外設,以及embassy_rp等hal都是使用的bind_irqs!。這其實是將更多的中斷訪問權交給了用户。
但是exti就不行了,想要讓hal不佔用中斷向量,就只能關閉exti feature來關閉整個模塊,或者關閉rt feature,自行管理啓動和所有中斷。
BitIter
struct BitIter(u32);

impl Iterator for BitIter {
    type Item = u32;

    fn next(&mut self) -> Option<Self::Item> {
        match self.0.trailing_zeros() {
            32 => None,
            b => {
                self.0 &= !(1 << b);
                Some(b)
            }
        }
    }
}
BitIter 是一個簡單的位迭代器,用於遍歷 bits 中的所有 1 位。
trailing_zeros() 返回最低有效位(LSB)之前 0 的個數。然後self.0 &= !(1 << b) 清除該位,以便在下一次 next() 調用時繼續遍歷。
這種方式確保了 on_irq 處理多個 EXTI 事件時能夠逐一喚醒對應的 Future。
embedded_hal
exti.rs還提供了embedded_hal(略) 和 embedded_hal_async Trait的實現:
impl<'d> embedded_hal_async::digital::Wait for ExtiInput<'d> {
    async fn wait_for_high(&mut self) -> Result<(), Self::Error> {
        self.wait_for_high().await;
        Ok(())
    }

    async fn wait_for_low(&mut self) -> Result<(), Self::Error> {
        self.wait_for_low().await;
        Ok(())
    }

    async fn wait_for_rising_edge(&mut self) -> Result<(), Self::Error> {
        self.wait_for_rising_edge().await;
        Ok(())
    }

    async fn wait_for_falling_edge(&mut self) -> Result<(), Self::Error> {
        self.wait_for_falling_edge().await;
        Ok(())
    }

    async fn wait_for_any_edge(&mut self) -> Result<(), Self::Error> {
        self.wait_for_any_edge().await;
        Ok(())
    }
}
然後我們就可以愉快地使用:
button.wait_for_low().await啦!
總結
這個EXTI模塊複雜性比較低,主要用於EXTI最低級也是最常用的用法:等待上升沿、等待高電平等。
但是由於stm32系列太多,又有很多EXTI15_10這種共用向量情況,embassy-stm32直接接管了所有EXTI中斷(對於普通向量則一般使用bind_interrupts的模式),所以如果用户想用EXTI完成更加複雜和即時的操作,就只能關閉exti feature來關閉整個模塊,或者關閉rt feature,自行管理啓動和所有中斷。
Embassy HAL設計了一套優秀的類型系統和HAL範式,為社區提供了學習榜樣。其類型系統一部分在embassy-hal-internal中完成,一部分在HAL內部完成。通過這套類型系統和約束,我們可以避免很多惱人的錯誤,也能很大程度上簡化代碼(比如,永遠不會設置錯、忘設置IO AF,也不用再去查AF表)。
embassy-stm32 的創新主要是其codegen和metapac:使用了複雜的數據預處理和codegen實現了對stm32外設的包羅萬象。stm32-data 通過來自CubeMX等的數據,生成帶有元數據的PAC:stm32-metapac,避免了像stm32-rs 一樣的重複和分散、不統一的代碼。
當然,包羅萬象是有代價的。我們日後可以詳細聊聊。
在Embassy範式的影響下,我編寫和維護了py32-hal 和 sifli-rs ,包含了對embassy大量的直接
Copy
借鑑,這兩套hal分別針對Puya的低成本MCU如PY32F002和SiFli的M33藍牙MCU SF32LB52。瞭解一下?
原文鏈接:https://decaday.github.io/blog/embassy-exti/
我的github: https://github.com/decaday
本文以CC-BY-NC許可發佈,當您轉載該文章時,需要保留署名,且不能用於商業用途。特別地,不能轉載到C**N平台。


