


背景
Leader:現在組內新建系統的API網關,你設計時要充分考慮接口的安全,防止被篡改和暴力攻擊。
Coder:好的,安全方面我們是有充分考慮的,通過驗籤防止入參被篡改,結合時間戳防止暴力攻擊。
知識儲備
基於Token的鑑權方式是無狀態的,服務端不再需要存儲Session信息,是分佈式系統的主要鑑權方案。
1、開發者認證
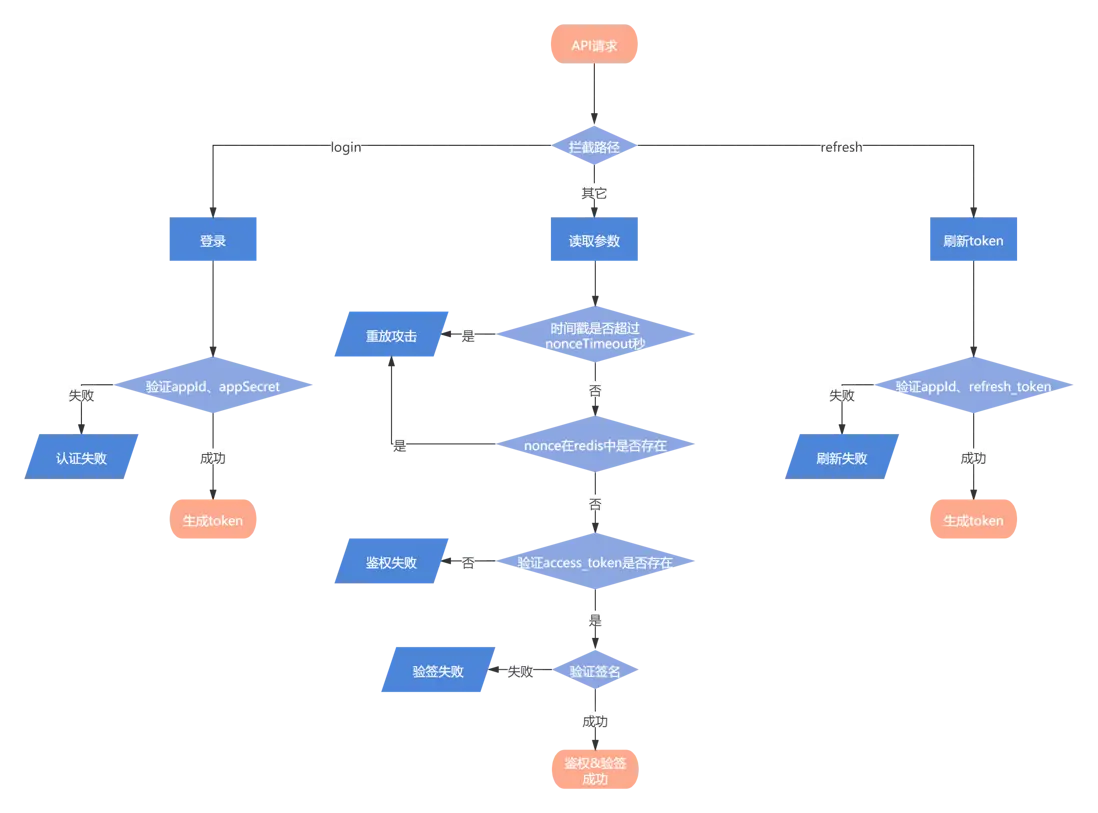
開發者認證也就是登錄校驗,網關校驗用户上送的appId和appSecret,如果跟redis中保存的一致,則生成access_token和refresh_token並返回給用户,用户暫存該token,訪問其它API接口時需要上送access_token。
2、API接口公共請求參數
| 參數 | 參數名 | 備註 |
|---|---|---|
| appId | 應用ID | 標識調用方的身份 |
| access_token | token | 示例是通過UUID生成 |
| sign | 簽名 | |
| timestamp | 時間戳 | 用於防禦重放攻擊 |
| nonce | 隨機數 | 用於防禦重放攻擊 |
3、重放攻擊
重放攻擊是指攻擊者發送目的主機已接收過的數據,以達到欺騙系統的目的,主要用於身份認證過程,破壞認證的正確性。
我們主要通過驗證時間戳和隨機數來防禦重放攻擊。
1)驗證timestamp
判斷時間戳timestamp是否超過nonceTimeout秒,超時則判別為重放攻擊。
2)驗證nonce
驗證隨機數nonce在redis中是否存在,如果存在,則判別為重放攻擊,否則將nonce記錄在redis中(示例中key的生成規則是:"NS"+appId+nonce),失效時間為nonceTimeout秒。
4、鑑權
驗證access_token在redis中是否存在,若已過期,則無權訪問API接口。用户可以刷新token,只要refresh_token在redis中存在,則網關重新生成access_token和refresh_token。通常refresh_token保存的時間較access_token久。
5、驗籤
1)將業務參數和timestamp、nonce、appid按鍵值對字典排序後通過&拼接,例如:appid=appid&key1=value1&key2=value2&nonce=random×atmp=1629777776799,得到stringA;
2)stringA再拼接appsecret,例如:stringA&appsecret=appsecret,得到stringB;
3)最後將stringB通過md5加密並轉大寫,即uppercase(md5(stringB)),得到簽名sign,跟用户請求API接口時上送的簽名對比,如果相同,則驗籤通過;也可以採用SHA256WithRSA簽名算法,調用方生成一對RSA公私鑰,調用方用私鑰加簽,服務方用公鑰驗籤。
實操
我們通過實現過濾器接口完成API接口鑑權驗籤動作。
過濾器是在請求進入Tomcat容器後,但請求進入servlet之前進行預處理的。請求結束返回也是在servlet處理完後,返回給前端之前。
進入servlet之前,主要是兩個參數:ServletRequest,ServletResponse,我們可以通過ServletRequest得到HttpServletRequest,此時就可以對web服務器管理的所有web資源:例如Jsp, Servlet, 靜態圖片文件或靜態html文件等進行攔截,從而實現一些特殊的功能。例如實現URL級別的權限訪問控制、過濾敏感詞彙、壓縮響應信息、字符集統一等一些高級功能。它主要用於對用户請求進行預處理,也可以對HttpServletResponse進行後處理。使用Filter的完整流程:Filter對用户請求進行預處理,接着將請求交給Servlet進行處理並生成響應,最後Filter再對服務器響應進行後處理。它是隨你的web應用啓動而啓動的,只初始化一次,以後就可以攔截相關請求,只有當你的web應用停止或重新部署的時候才銷燬。(每次熱部署後,都會銷燬)。
@WebFilter(urlPatterns = "/api/*")
public class PreFilter implements Filter {
    private static Logger logger = Logger.getLogger("PreFilter");

    private Long nonceTimeout = 300l;

    @Autowired
    private StringRedisTemplate stringRedisTemplate;


    @Override
    public void doFilter(ServletRequest servletRequest, ServletResponse servletResponse, FilterChain filterChain) throws IOException, ServletException {
        logger.info("進入過濾器處理");
        HttpServletRequest request = (HttpServletRequest) servletRequest;
        RedisUtil redisUtil = new RedisUtil(stringRedisTemplate);
        ServletOutputStream out = servletResponse.getOutputStream();
        String outString = null;

        try {
            String appId = request.getHeader("appId");
            String accessToken = request.getHeader("access_token");
            String sign = request.getHeader("sign");
            String timestamp = request.getHeader("timestamp");
            String nonce = request.getHeader("nonce");

            Map<String, String> paramMap = new HashMap<>();

            InputStream in = request.getInputStream();
            String body = StreamUtils.copyToString(in, Charset.forName("UTF-8"));

            /*
            參數來自請求body
             */
            JSONObject json = JSONObject.parseObject(body);
            if (json != null && !json.isEmpty()) {
                logger.info("body = " + json);
                for (String key : json.keySet()) {
                    paramMap.put(key, json.getString(key));
                }
            }
            /*
            參數來自請求url的QueryString
             */
            String query = request.getQueryString();
            if (query != null) {
                logger.info("queryString = " + URLDecoder.decode(query, "UTF-8"));
                String[] arr = query.split("&");
                for (String pair : arr) {
                    String[] ele = pair.split("=");
                    if (ele.length == 2) {
                        paramMap.put(ele[0], ele[1]);
                    }
                }
            }

            paramMap.put("appid", appId);
            paramMap.put("timestamp", timestamp);
            paramMap.put("nonce", nonce);
            String stringA = AuthUtil.concatParam(paramMap);
            Long now = System.currentTimeMillis();
            /*
            判斷時間戳是否超過nonceTimeout秒,超時則判別為重放功擊
             */
            if (timestamp != null && (now - Long.parseLong(timestamp) < nonceTimeout * 1000)) {
                /*
                驗證nonce在redis中是否存在,如果存在,則判別為重放功擊,否則將nonce記錄在redis中(key為:"NS"+appId+nonce),失效時間為nonceTimeout秒
                 */
                if (redisUtil.exists("NS" + appId + nonce)) {
                    outString = String.format("{\"code\": 429, \"message\": \"Too Many Requests\"}");
                    out.write(outString.getBytes());
                    out.flush();
                } else {
                    redisUtil.set("NS" + appId + nonce, nonce, nonceTimeout);
                    /*
                    驗證access_token是否存在
                     */
                    if (redisUtil.exists(accessToken) && redisUtil.exists(appId)) {
                        String redis_appid = (String) redisUtil.get(accessToken);
                        String redis_appsecret = (String) redisUtil.get(redis_appid);
                        String _sign = AuthUtil.getSign(stringA, redis_appsecret);
                        /*
                        驗證簽名是否通過,若通過,則開發者認證也會驗證通過
                         */
                        if (_sign.equals(sign)) {
                            filterChain.doFilter(servletRequest, servletResponse);
                        } else {
                            outString = String.format("{\"code\": 403, \"message\": \"Forbidden\"}");
                            out.write(outString.getBytes());
                            out.flush();
                        }
                    } else {
                        outString = String.format("{\"code\": 401, \"message\": \"Unauthorized\"}");
                        out.write(outString.getBytes());
                        out.flush();
                    }
                }
            } else {
                outString = String.format("{\"code\": 400, \"message\": \"Bad Request\"}");
                out.write(outString.getBytes());
                out.flush();
            }
        } catch (Exception e) {
            e.printStackTrace();
            outString = String.format("{\"code\": 500, \"message\": \"Internal Server Error\"}");
            out.write(outString.getBytes());
            out.flush();
        }
    }
}
需要引入以下依賴:
<dependency>
<groupId>org.springframework.boot</groupId>
<artifactId>spring-boot-starter-data-redis</artifactId>
</dependency>
<dependency>
<groupId>commons-codec</groupId>
<artifactId>commons-codec</artifactId>
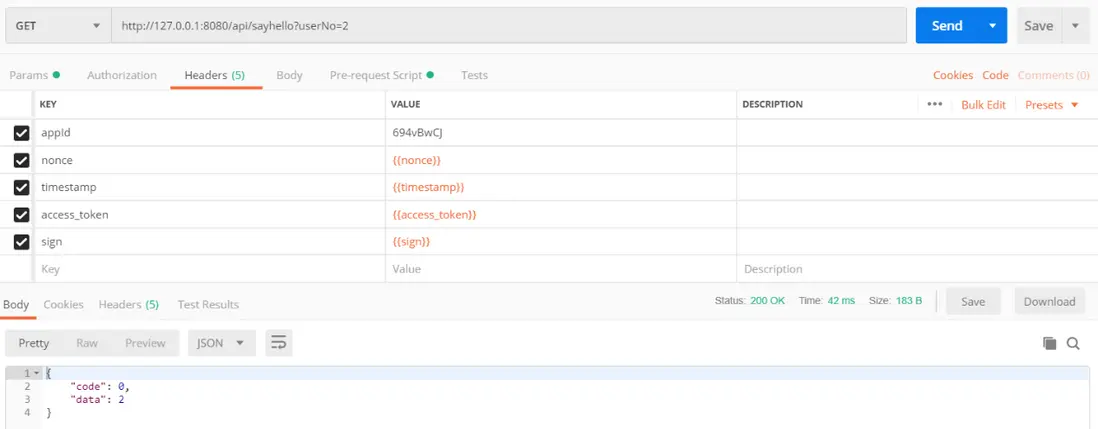
</dependency> 調用登錄接口獲取token後,再調用 http://127.0.0.1:8080/api/sayhello?userNo=2,返回結果正常。
待token失效後,再請求 http://127.0.0.1:8080/api/sayhello?userNo=2,返回結果是未授權。

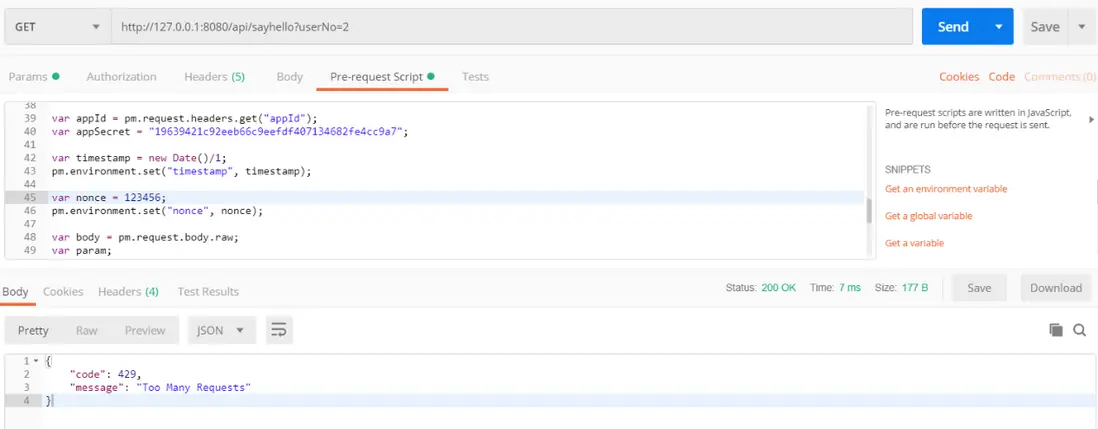
在Postman的Pre-request Script中將nonce寫死為123456,首次請求成功,再次請求則報錯“Too Many Requests”,即多次nonce送值相同時,識別出重放攻擊。
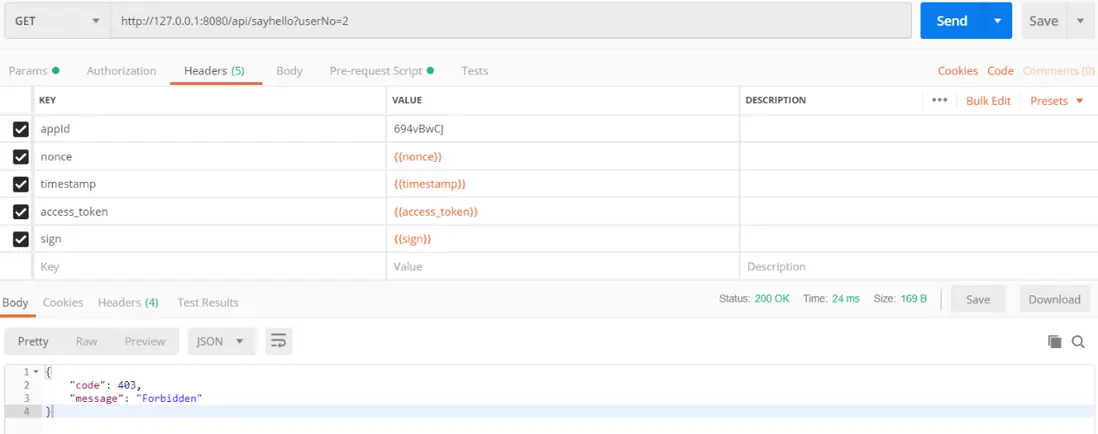
在Postman的Pre-request Script中將簽名sign的值變更,請求報錯“Forbidden”,即驗證簽名不通過。