前言
書接上文,目前環境已經做好了水平拆分,是這個樣子的
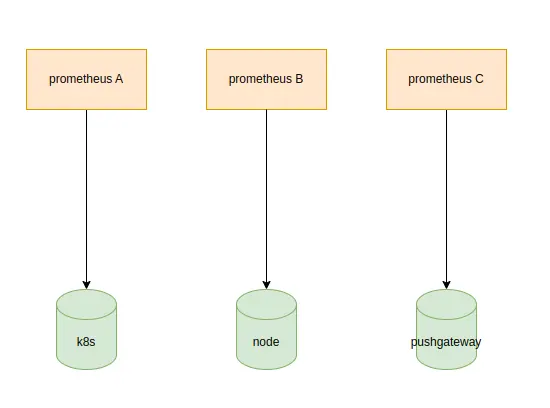
本文使用thanos對這些prometheus進行數據匯聚,並且詳細討論一下thanos
環境準備
| 組件 | 版本 |
|---|---|
| 操作系統 | Ubuntu 22.04.4 LTS |
| docker | 24.0.7 |
| thanos | 0.36.1 |
thanos概述
thanos主要有4個組件
- receive:獨立部署,提供了數據寫入的api,prometheus通過這個api把數據推送到receive的對象存儲
- sidecar:與prometheus部署在一起,成為prometheus的sidecar,負責把prometheus本地的數據上傳至對象存儲當中
- query:獨立部署,是一個兼容了prometheus的查詢組件,彙總了來自不同來源的查詢結果,並且可以從Sidecar和Store中讀取數據
- store:獨立部署,提供了對象數據存儲功能,並且提供相關的api,query通過該api查詢歷史數據
thanos有兩種工作模式,receive與sidecar
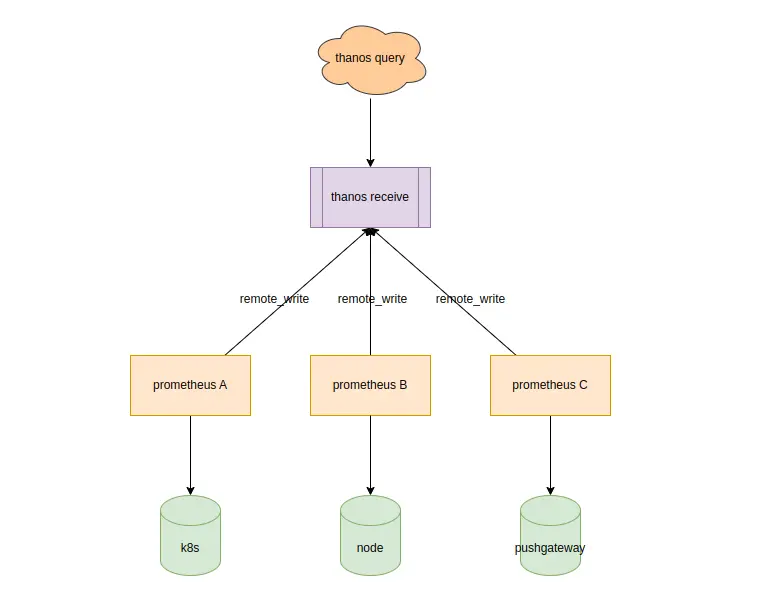
receive模式
Receive 是一個可以接收來自 Prometheus 遠程寫入的數據的組件,主要用於高可用的集羣環境中。它能夠處理來自多個 Prometheus 實例的寫入請求
1. 部署thanos receive
▶ mkdir -p data && chmod 777 data
▶ docker run -d --net=host \
  --name thanos-receive \
  -v "./data:/data" \
  registry.cn-beijing.aliyuncs.com/wilsonchai/thanos:0.36.1 \
  receive \
    --grpc-address 0.0.0.0:10907 \
    --http-address 0.0.0.0:10909 \
    --receive.replication-factor 1 \
    --label "receive_cluster=\"wilson-test\"" \
    --remote-write.address 0.0.0.0:10908
2. 改造prometheus
分別對3個prometheus進行改造,分別修改其configmap
- 負責採集k8s監控數據
...
    scrape_configs:
...
    remote_write:
      - url: "http://10.22.11.156:10908/api/v1/receive"
        write_relabel_configs:
          - action: replace
            source_labels: []
            target_label: from
            replacement: "prometheus-k8s"
- 負責採集node監控數據
...
    scrape_configs:
...
    remote_write:
      - url: "http://10.22.11.156:10908/api/v1/receive"
        write_relabel_configs:
          - action: replace
            source_labels: []
            target_label: from
            replacement: "prometheus-node"
- 負責採集pushgateway監控數據
...
    scrape_configs:
...
    remote_write:
      - url: "http://10.22.11.156:10908/api/v1/receive"
        write_relabel_configs:
          - action: replace
            source_labels: []
            target_label: from
            replacement: "prometheus-pushgateway"
3. 部署thanos query
docker run -d --net=host \
  --name thanos-query \
  registry.cn-beijing.aliyuncs.com/wilsonchai/thanos:0.36.1 \
  query \
    --http-address "0.0.0.0:39090" \
    --grpc-address "0.0.0.0:39091" \
--store "127.0.0.1:10907"登錄thanos-query提供的web界面http://127.0.0.1:39090/,可以看到3個prometheus節點的數據都已匯聚,並且已經標註了來源,from標籤
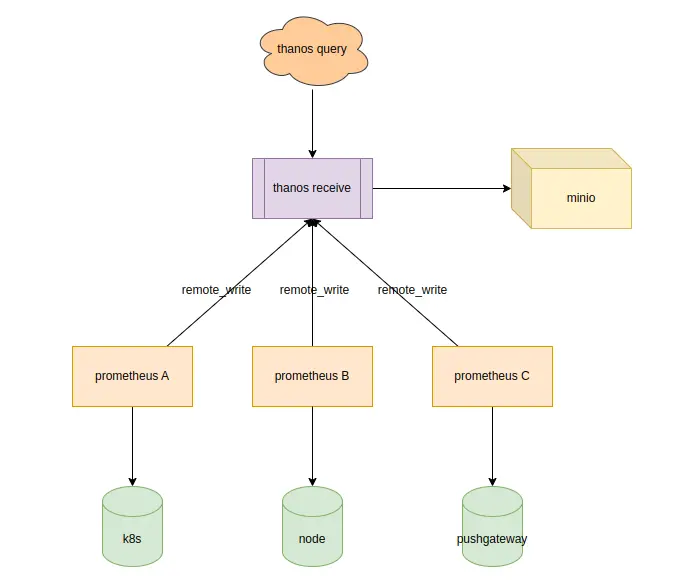
4. 部署對象存儲 minio
目前我們的數據還是存儲在receive的本地磁盤上的,為了長期保留數據,將其推送至自建的對象存儲當中
創建minio
docker run -d --name minio --net host \
  -e "MINIO_ACCESS_KEY=minioadmin" \
  -e "MINIO_SECRET_KEY=minioadmin" \
  -v ./data:/data \
  -v ./config:/root/.minio \
  registry.cn-beijing.aliyuncs.com/wilsonchai/minio:RELEASE.2024-10-13T13-34-11Z \
  server /data --console-address ":9000" -address ":9090"
通過用户名密碼登錄web頁面http://127.0.0.1:9000/,然後創建bucket,再創建access key
回到thanos,創建bucket.yml文件
type: S3
config:
  bucket: "wilson-test"
  endpoint: "127.0.0.1:9090"
  access_key: "zzUrkBzyqcCDXySsMLlS"
  secret_key: "nWCcztESnxnUZIKSKsELGEFdg6l6fjzhtqkARJB8"
  insecure: true
最後重建thanos receive
docker run -d --net=host \
--name thanos-receive \
-v ./bucket.yml:/etc/thanos/bucket.yml \
-v "./data:/data" \
registry.cn-beijing.aliyuncs.com/wilsonchai/thanos:0.36.1 \
receive \
--grpc-address 0.0.0.0:10907 \
--http-address 0.0.0.0:10909 \
--objstore.config-file=/etc/thanos/bucket.yml \
--tsdb.retention=2d \
--label "receive_cluster=\"wilson-test\"" \
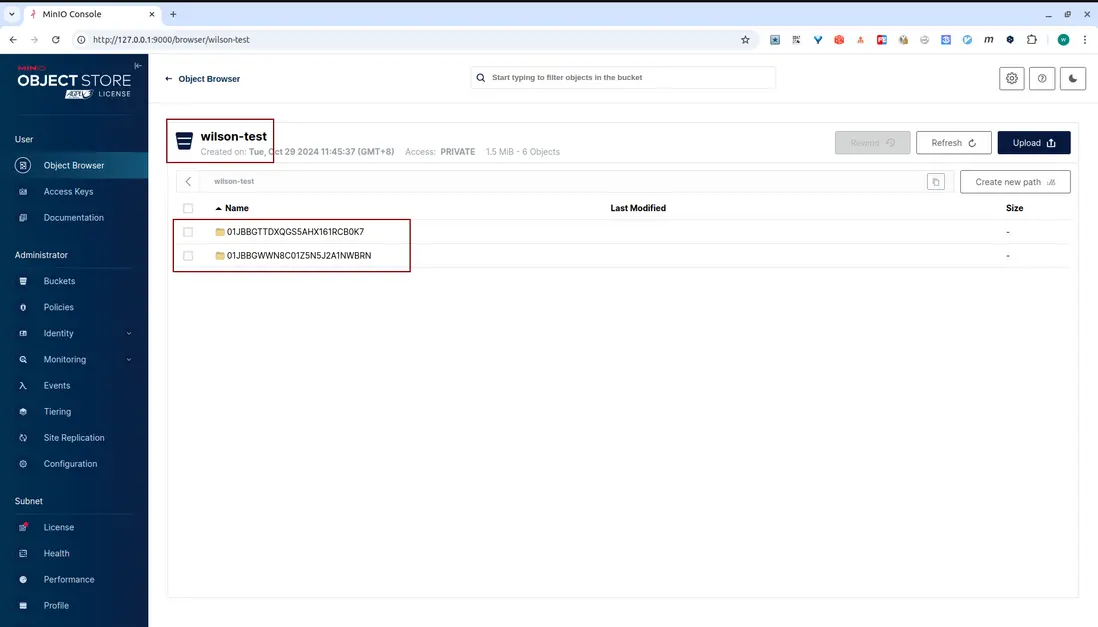
--remote-write.address 0.0.0.0:10908默認情況下每個2小時,thanos就會往對象存儲當中推送數據,這個時間可以調整,只需要調整以下參數即可
    --tsdb.min-block-duration=10m \
    --tsdb.max-block-duration=10m \
檢查minio的控制枱,檢查是否成功上傳
5. 部署thanos-store,直接讀取對象存儲
store gateway就是簡單的去讀取對象存儲當中的數據,通過 api暴露給thanos-query,thanos-query調用store api然後獲取數據,這樣就可以直接讀取對象存儲的數據了

部署store
docker run -d --net=host \
  --name thanos-store \
  -v "./data-store:/data" \
  -v ./bucket.yml:/etc/thanos/bucket.yml \
  registry.cn-beijing.aliyuncs.com/wilsonchai/thanos:0.36.1 \
  store \
    --objstore.config-file "/etc/thanos/bucket.yml"
這裏的bucket.yaml,還是沿用了上面的bucket.yaml,指向同樣的對象存儲
調整thanos-query的配置,新增thanos-store的地址
docker run -d --net=host \
  --name thanos-query \
  registry.cn-beijing.aliyuncs.com/wilsonchai/thanos:0.36.1 \
  query \
    --http-address "0.0.0.0:39090" \
    --grpc-address "0.0.0.0:39091" \
    --store "127.0.0.1:10907" \
--store "127.0.0.1:10901"127.0.0.1:10901就是新增的store的grpc地址,添加完畢後,檢查thanos-query的web頁面
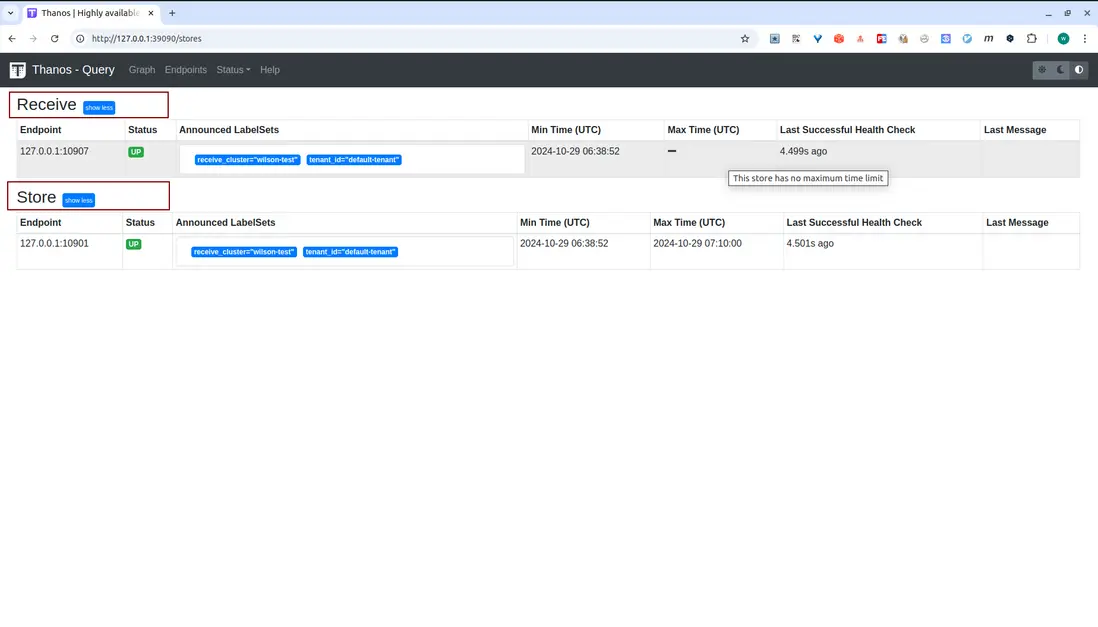
thanos-query的數據源來自兩個地方,一個是receive,一個是store,並且thanos-query有自動去重的功能,真牛皮!
6. 小結
- 以上就是receive模式的基本使用方法,在receive模式中,使用了receive、query、store等組件,並且展示了它們之間如何協調合作
- 上述演示的對象存儲,是自建的minio,在實際工作中,可以使用雲廠商的對象存儲相互配合,易於管理
聯繫我
- 聯繫我,做深入的交流

至此,本文結束
在下才疏學淺,有撒湯漏水的,請各位不吝賜教...