服務端渲染 nextjs@14 項目接入經驗總結,本文重點介紹基本知識點/常用的知識點/關鍵知識點
背景
為提高首屏渲染速度減少白屏時間提高用户體驗及豐富技術面,開始調研和接入nextjs框架
優勢
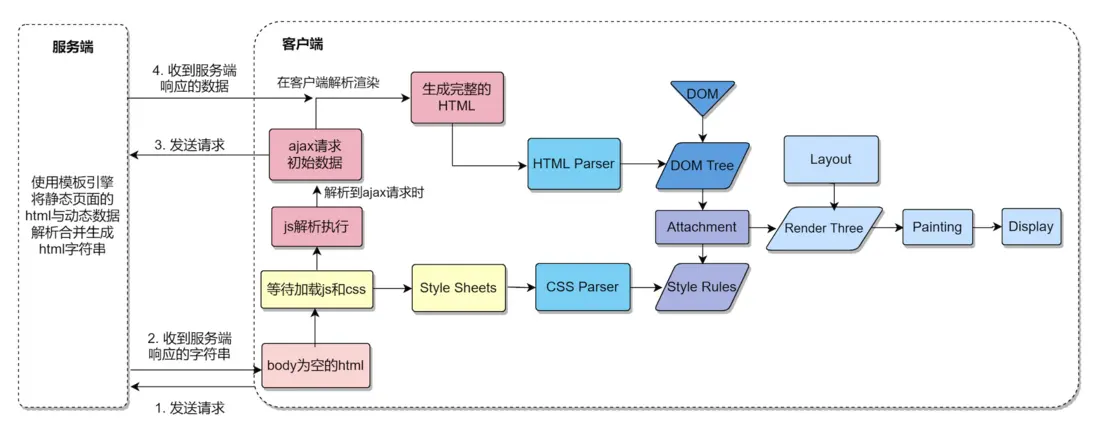
nextjs是一套成熟的同構框架(一套代碼能運行在服務端也能運行在瀏覽器)對比傳統的客户端渲染的核心優勢是首屏是帶數據的和減少跨域帶來的option請求。其它後續操作是一樣的。理論上能比客户端渲染看到數據能快個100-200ms具體看實際統計,
服務端渲染大概流程圖(圖片來源於網絡)
客户端渲染大概流程圖
對比流程圖服務端渲染更加簡潔。
劣勢
有優勢就有劣勢,經過使用經驗發現明顯的劣勢有
- 如果服務端接口時間過長會導致瀏覽器首屏白屏時間長,而客户端可以渲染骨架/loading/其它填充屏幕了。如果服務器到接口的服務器時間在150ms具有優勢
- 如果接口有幾層依賴也會導致在服務器停留時間過長,類似請求A後拿到依賴再去請求B也會導致情況1的出現
- 服務器拿不到瀏覽器/屏幕尺寸有這個依賴的服務器無法判斷
- 消耗服務器資源
- 等等其它的...
使用
環境 Node.js >= 18.17 nextjs14
安裝
npx create-next-app@14
選擇 src/ 目錄 和 使用 App Router
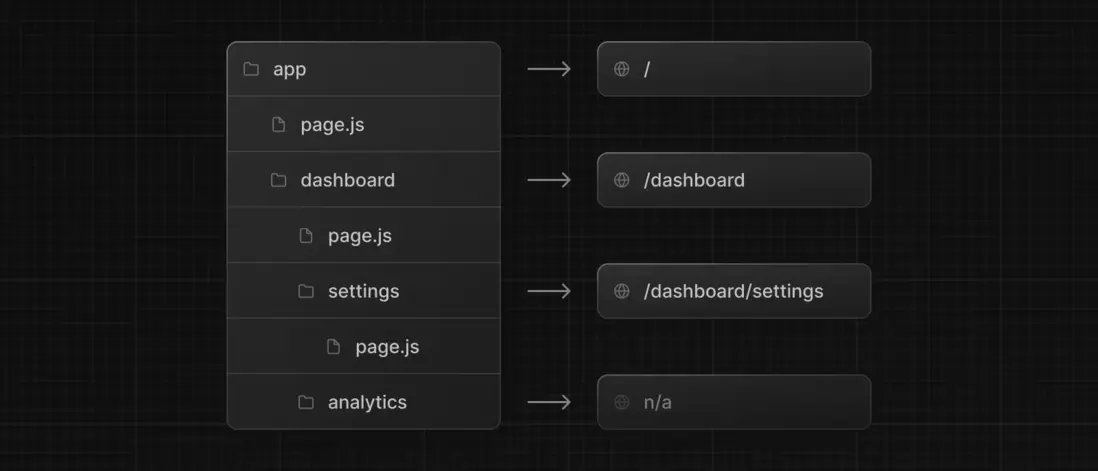
大致目錄結構
...
package.json
public
node_modules
src
|- app
  |- page.tsx
  |- layout.tsx
  |- blog
    |- page.tsx
    |- layout.tsx
  |- docs
    |- page.tsx
    |- layout.tsx
| -services
| -utils
...
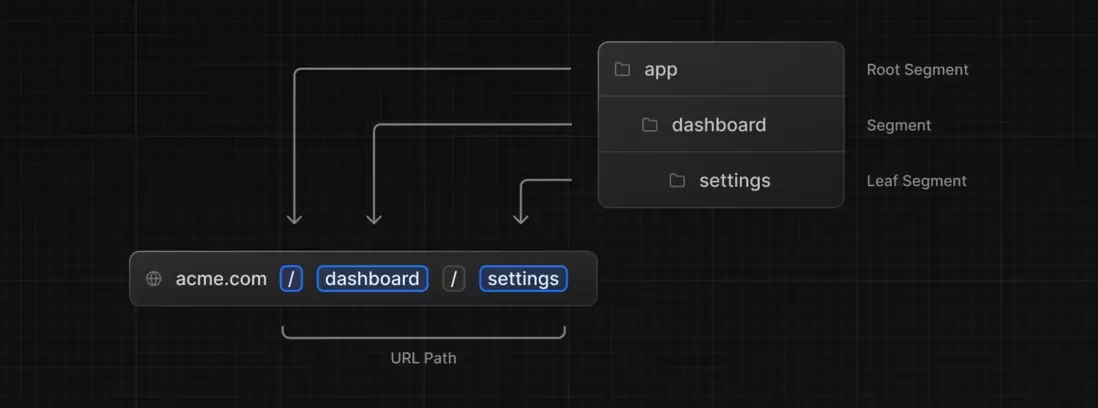
大致路由為
注意這是約定路由 需要用page.tsx layout.tsx文件命名

內置API
head標籤
import Head from 'next/head'
圖片標籤
import Image from 'next/image'
跳轉標籤
import Link from 'next/link'
script
import Script from 'next/script'
路由相關
import { useRouter, useSearchParams, useParams, redirect } from 'next/navigation'
請求頭
import { headers } from 'next/headers'
服務器組件和客户端組件
服務器組件需要運行在服務器
主要特點有請求數據,服務端環境等
客户端組件運行在瀏覽器 標識 文件第一行增加 'use client'
主要特點有事件,瀏覽器環境,react hooks
比較
| 操作 | 服務器組件 | 客户端組件 |
|---|---|---|
| 請求數據 | ✅ | ❌ |
| 訪問後端資源(直接) | ✅ | ❌ |
| 在服務器上保留敏感信息(訪問令牌、API密鑰等) | ✅ | ❌ |
| 保持對服務器的大量依賴性/減少客户端JavaScript | ✅ | ❌ |
添加交互性和事件偵聽器(onClick、onChange等) |
❌ | ✅ |
使用狀態和生命週期(useState、useReducer、useEffect等) |
❌ | ✅ |
| 瀏覽器API | ❌ | ✅ |
| 自定義hooks | ❌ | ✅ |
| 使用React Class組件 | ❌ | ✅ |
開始填充業務代碼
-
修改html頁面
文件位置在/src/app/layout.tsx,可以進行標題修改等一系操作import Head from "next/head"; export default async function RootLayout(props: any) { return ( <html lang="en"> <Head> <title>頁面標題</title> </Head> <body>{props.children}</body> </html> ); } -
獲取數據
async function getData() { const res = await fetch('https://xxxxx.com/', { cache: 'no-store' }) if (!res.ok) { throw new Error('Failed to fetch data') } return res.json() } export default async function Page() { const data = await getData() return <main>{JSON.stringify(data, null, 2)}</main> } - 服務器數據和後面請求的數據銜接
// home.tsx
export default async function Home(p: any) {
  const data = await getData();
  return (
    <main>
      <Link href="/">to home</Link>
      <List list={data} />
    </main>
  );
}

// list.jsx
'use client';

import { useState } from 'react';

export default function List(props: any) {
  const [list, setList] = useState(props.list);
  // 這只是隨意寫的一個例子
  const getPageData = () => {
    fetch('http://xxxx', { }).then((res) => res.json())
    .then((res) => setList([...list, ...res]));
  };

  return (
    <div>
      {list?.map((val: any) => (
        <div key={val.name}>
          <p>
            {val.name}-{val.price}
          </p>
        </div>
      ))}
      <div onClick={getPageData}>加載更多</div>
    </div>
  );
}
-
把瀏覽器的信息轉發到服務端
這個例子是cookie有需求可以用放其它的import { headers } from 'next/headers' const getData = async () => { const headersList = headers(); const cookie = headersList.get('Cookie'); const res = await fetch('https://xxx.com', { cache: 'no-store', headers: { cookie } }); return res.json() }; - 處理全局通訊和數據
在/src/app 目錄下增加context.tsx
/src/app/context.tsx
'use client';

import { createContext, useMemo } from 'react';
import { useImmer } from 'use-immer';

export const PropsContext = createContext({});

export function Context({ children, ...other }: any) {
  const [GlobalState, setGlobalState] = useImmer<any>({
    ...other
  });

  const providerValue = useMemo(
    () => ({ GlobalState, setGlobalState }),
    [GlobalState]
  );

  return (
    <PropsContext.Provider value={providerValue}>
      {children}
    </PropsContext.Provider>
  );
}
/src/app/layout.tsx
import React from 'react';
import { headers } from 'next/headers'
import { Context } from './context';

const getData = async () => {
  const headersList = headers();
  const cookie = headersList.get('Cookie');
  const res = await fetch('https://xxx.com', {headers: {
      cookie
    }});
  return res.json()
};

export default async function RootLayout(props: any) {
  const useInfo = await getData();
  return (
    <html lang="en">
      <body>
        <div>header</div>
        <Context useInfo={useInfo}>{props.children}</Context>
        <div>footer</div>
      </body>
    </html>
  );
}
使用
/src/app/blog/page.tsx
'use client';

import { PropsContext } from '@/app/context';
import { useContext } from 'react';

export default function A2() {
  const { GlobalState, setGlobalState } = useContext<any>(PropsContext);

  return (
    <main>
      {JSON.stringify(GlobalState, null, 2)}

      <div
        onClick={() => {
          setGlobalState((s: any) => {
            s.useInfo.name = '修改之後的名稱';
          });
        }}
      >
        修改名稱
      </div>
    </main>
  );
}
-
跳轉
如果沒有用户信息需要跳轉到登錄頁import { redirect } from 'next/navigation' async function fetchTeam(id) { const res = await fetch('https://...') // 具體邏輯根據實際的來 if (!res.ok) return undefined return res.json() } export default async function Profile({ params }) { const team = await fetchTeam(params.id) if (!team) { redirect('/login') } // ... } - 優化
如果頁面長接口多可以在服務端請求可視區數據下面的數據可以在客户端請求
部署
如果不在根域名下需要在 next.config.js添加
路由名稱根據實際來
{
  basePath: '/router'
}
然後在流水線nginx配置路由 /router* 轉發到這個應用
如果basePath配置的/router/'對應nginx配置/router/*
編寫 Dockerfile
由於 FROM nodejs@xx 過不了鏡像掃描 鏡像裏面又沒有Node.js >= 18.17的只能使用提供最基礎的鏡像了
Dockerfile
FROM hub.xxx.com/basics/alpine:3.18.2

RUN apk add nodejs=18.18.2-r0 npm=9.6.6-r0

WORKDIR /app

ADD . .

RUN npm i

RUN npm run build

EXPOSE 3000

CMD ["sh", "-c", "NODE_ENV=$NODE_ENV npm run start"]
參考文檔
https://nextjs.org/docs
https://vercel.com/guides/react-context-state-management-nextjs


