


寫在前面
搞了近一天的PPT,講真寫英文PPT,確實比中文難多了,中午都沒休息,最後還是在同事的幫忙下才搞完。
值得説的是,我今天算是見到了,做PPT強的人,是真的強,從色彩搭配到一些圖形選擇上,真的很絲滑,沒一點多餘動作,我看他調PPT就像給我化妝一樣,一點點的變好看了。
見證成品那一刻,我就真的有那種,“哇,居然可以這麼好看的感覺!”,心生羨慕!
項目結構
經過昨天的學習,你現在已經掌握了基礎的 Shared Library 概念,接下來我們直接進入 高級實戰 + 最佳實踐案例。
我會一步步講給你聽,像帶你寫項目一樣,所有代碼都能直接放進 Jenkins 跑起來。
在你的共享庫 Git 倉庫中創建以下結構:
jenkins-shared-lib-advanced/
├── vars/
│   ├── ciPipeline.groovy
│   ├── notifySlack.groovy
│   ├── deployApp.groovy
├── src/org/example/
│   └── Utils.groovy
└── resources/templates/
    └── slackMessage.txt
我們會用這套結構完成:
- 參數化構建
- 錯誤處理(try/catch)
- 構建 + 測試 + 部署 + 通知
- 可重用 pipeline 封裝
編寫工具類
📄 src/org/example/Utils.groovy
package org.example

class Utils {
    static void printHeader(script, String msg) {
        script.echo "========== ${msg} =========="
    }

    static String getTimestamp() {
        return new Date().format("yyyy-MM-dd HH:mm:ss")
    }
}
説明:
- 所有公共函數寫這裏(類似工具包)。
- 用
import org.example.Utils即可調用。
Jenkinsfile 調用方式
@Library('my-shared-lib') _
import org.example.Utils
pipeline {
agent any
stages {
stage('Demo') {
steps {
script {
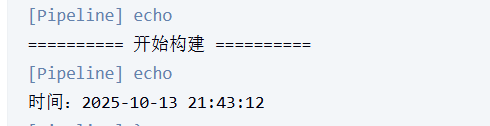
Utils.printHeader(this, "開始構建")
echo "時間:${Utils.getTimestamp()}"
}
}
}
}
}
運行後,你會在控制枱輸出看到:
Slack 通知函數
📄 vars/notifySlack.groovy
// vars/sendSlack.groovy
def call(Map config = [:]) {
def message = config.message ?: "Build finished"
def status = config.status ?: "SUCCESS"
def color = config.color ?: (status == "SUCCESS" ? "good" : "danger")
def channel = config.channel ?: '#builds'
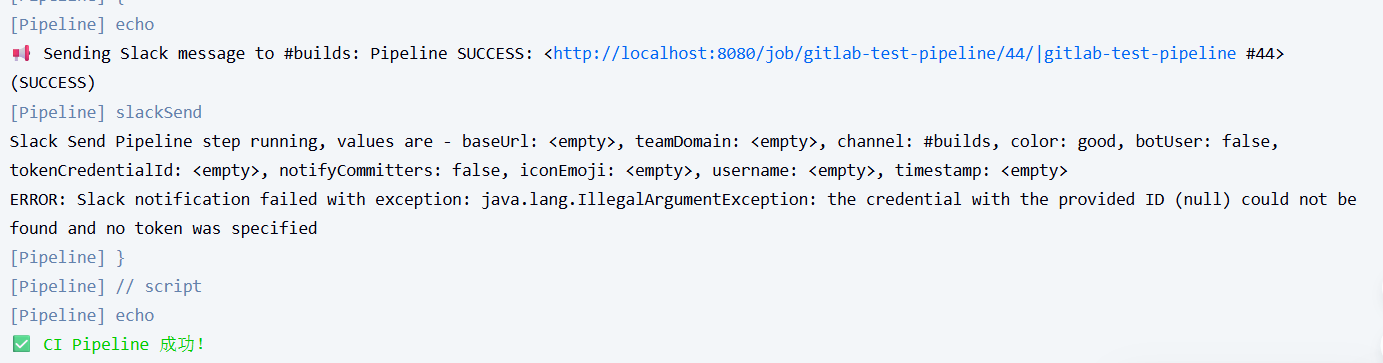
echo "📢 Sending Slack message to ${channel}: ${message} (${status})"
slackSend(
channel: channel,
message: message,
color: color
)
}
説明:
- Jenkins要安裝
Slack Notification Plugin插件 config是參數化對象,可傳入 message、status 等。- 這裏先用
echo模擬發送 Slack 通知。
Jenkinsfile 調用方式
@Library('my-shared-lib') _

pipeline {
    agent any

    // 可選:啓用彩色日誌
    options {
        ansiColor('xterm')  // 需要安裝 AnsiColor 插件
    }

    environment {
        BUILD_TITLE = 'CI Pipeline'
        SLACK_CHANNEL = '#builds'
    }

    stages {
        stage('Build') {
            steps {
                script {
                    echo "🏗️  Building..."
                    // 實際構建命令
                    // sh 'make build'
                }
            }
        }

        stage('Test') {
            steps {
                script {
                    echo "🧪 Running tests..."
                    // sh 'exit 1'  // 模擬失敗,實際替換為 sh 'make test'
                }
            }
        }
    }

    post {
        always {
            script {
                def buildStatus = currentBuild.result ?: 'SUCCESS'
                def color = buildStatus == 'SUCCESS' ? 'good' : 'danger'
                def buildUrl = env.BUILD_URL  // 或 currentBuild.rawBuild.absoluteUrl
                def message = "Pipeline ${buildStatus}: <${buildUrl}|${env.JOB_NAME} #${env.BUILD_NUMBER}>"

                sendSlack(
                    message: message,
                    status: buildStatus,
                    color: color
                )
            }
        }
        success {
            echo "\u001B[32m✅ ${env.BUILD_TITLE} 成功!\u001B[0m"
        }
        failure {
            echo "\u001B[31m❌ ${env.BUILD_TITLE} 失敗!\u001B[0m"
        }
    }
}
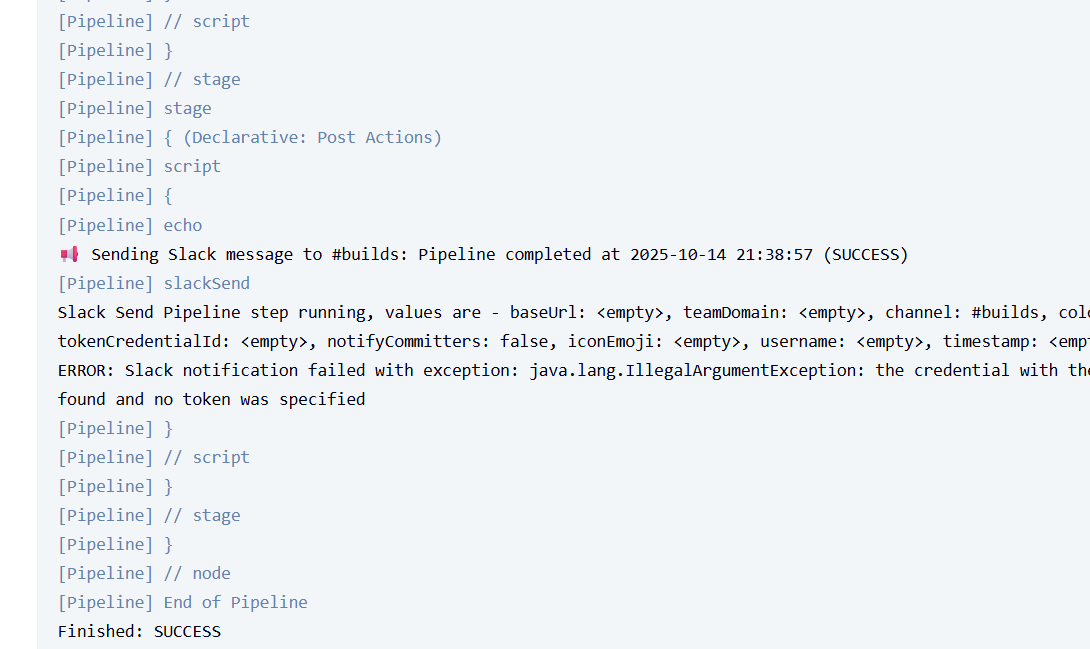
運行後,你會在控制枱輸出看到:
部署函數
📄 vars/deployApp.groovy
def call(Map config = [:]) {
def envName = config.env ?: 'staging'
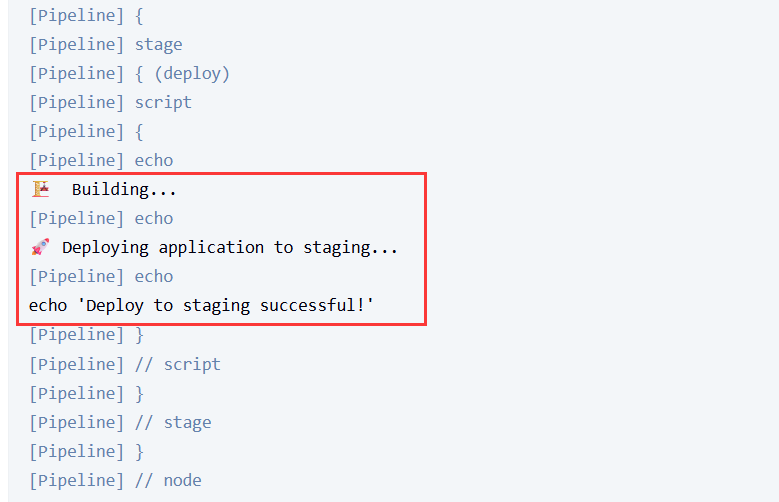
echo "🚀 Deploying application to ${envName}..."
sh "echo 'Deploy to ${envName} successful!'"
}
Jenkinsfile 調用方式
@Library('my-shared-lib') _

pipeline {
    agent any

    stages {
        stage('deploy') {
            steps {
                script {
                    echo "🏗️  Building..."
                    deployApp(
                        envName: 'prod'
                    )
                }
            }
        }

    }

}
運行後,你會在控制枱輸出看到:
核心封裝 Pipeline
📄 vars/ciPipeline.groovy
import org.example.Utils
def call(Map config = [:], Closure body = null) {
pipeline {
agent any
parameters {
string(name: 'BRANCH', defaultValue: 'main', description: 'Git branch to build')
choice(name: 'DEPLOY_ENV', choices: ['dev', 'staging', 'prod'], description: 'Environment to deploy')
}
stages {
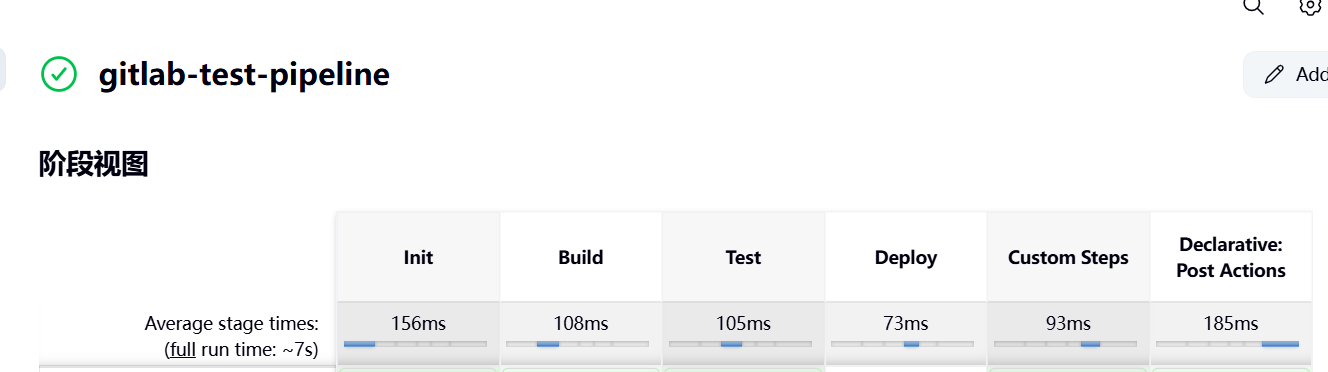
stage('Init') {
steps {
script {
Utils.printHeader(this,"CI Started")
echo "Branch: ${params.BRANCH}"
}
}
}
stage('Build') {
steps {
script {
try {
Utils.printHeader(this,"Build Stage")
echo 'mvn clean install'
} catch (err) {
sendSlack(message: "Build failed!", status: "FAILURE")
error("Build failed: ${err}")
}
}
}
}
stage('Test') {
steps {
script {
try {
Utils.printHeader(this,"Test Stage")
echo 'mvn compile test'
} catch (err) {
sendSlack(message: "Tests failed!", status: "FAILURE")
error("Tests failed: ${err}")
}
}
}
}
stage('Deploy') {
when {
expression { return params.DEPLOY_ENV != 'dev' }
}
steps {
script {
try {
deployApp(env: params.DEPLOY_ENV)
sendSlack(message: "Deployment to ${params.DEPLOY_ENV} successful")
} catch (err) {
sendSlack(message: "Deployment failed!", status: "FAILURE")
error("Deployment failed: ${err}")
}
}
}
}
stage('Custom Steps') {
steps {
script {
if (body != null) {
Utils.printHeader(this,"Running custom steps")
body()
}
}
}
}
}
post {
always {
script {
sendSlack(
message: "Pipeline completed at ${Utils.getTimestamp()}",
status: currentBuild.result ?: 'SUCCESS'
)
}
}
}
}
}
💡 功能亮點:
- 支持 Jenkins 參數(BRANCH、DEPLOY_ENV)
- 內置錯誤捕獲與 Slack 通知
- 可注入自定義階段(body)
- 自動後置通知(post always)
調用示例 Jenkinsfile
@Library('my-shared-lib') _
ciPipeline(env: 'prod') {
    stage('Custom Verification') {
        echo '🔍 Running custom security scan...'
        echo '"Scan complete."'
    }
}
運行後,你會在控制枱輸出看到:
最佳實踐建議
| 類別 | 最佳實踐 | 説明 |
|---|---|---|
| 📁 目錄結構 | vars/ 放函數入口,src/ 放類 |
讓代碼更乾淨、易維護 |
| 🧱 命名規則 | 函數名用動詞開頭,如 deployApp()、runTests() |
一目瞭然 |
| 🔄 參數管理 | 用 Map config + 默認值方式 |
兼容性強 |
| 🧩 錯誤處理 | try/catch + notifySlack |
保證失敗有反饋 |
| 🔔 通知 | 用 post 塊統一收尾 | 防止遺漏通知 |
| 🧪 測試 | 本地用 Jenkinsfile Runner 測試 Shared Library | 避免推錯到主庫 |
| 🧬 版本管理 | 用 tag 固定版本 @Library('lib@v1.2.0') |
穩定性保障 |
寫在最後
這也許是最近一直想做的事情把,把自己練習和所學,從語雀中移到博客來,堅持輸出,如果可以我希望明天的閲讀量是200,HH,比昨天強就行。
當然,最近也在嘗試收心,收回自己的注意力和能量,雖然説不太明白,但是總體感覺算是舒服把,先甭管別的,感動自己再説吧!
最後,感謝屏幕前認真閲讀的你,如果文章對您有幫助,老規矩,還請幫忙點贊轉發,謝謝啦!
今天就到這裏啦,晚安,好夢!


