前言
Demo源碼地址:https://gitee.com/ruozxby/springsecuritydemo
springSesurity本質是一串過濾器執行鏈 我們自定義主要分為三個部分 1.配置文件 2登錄認證 3權限認證
大概流程 調用自定義登錄—> 成功返回token(同時用户數據存入redis) —>後續調用則進入自定義的jwt校驗過濾器,成功則把用户數據、權限數據存入SecurityContextHolder的Context中,後續過濾器會通過context中是否有數據判斷是否登錄成功—>進入權限認證—>權限認證成功進入接口
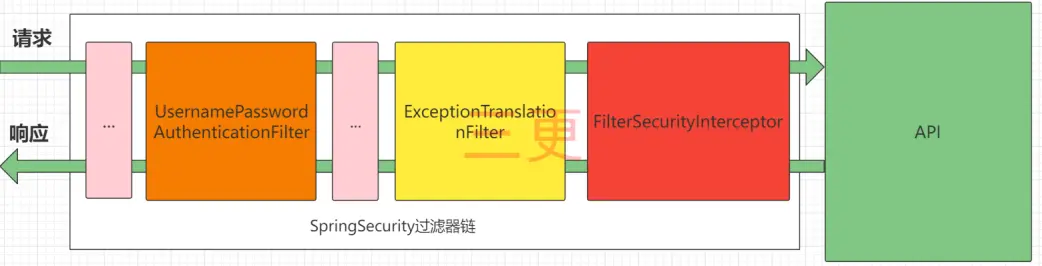
圖中只展示了核心過濾器,其它的非核心過濾器並沒有在圖中展示。
UsernamePasswordAuthenticationFilter:負責處理我們在登陸頁面填寫了用户名密碼後的登陸請
求。
ExceptionTranslationFilter:處理過濾器鏈中拋出的任何AccessDeniedException和AuthenticationException 。
FilterSecurityInterceptor:負責權限校驗的過濾器。
1 配置文件
主要配置需要放行的接口,登錄認證失敗處理器,權限認證失敗處理器,還有些其他配置(權限認證配置,密碼編輯器等)
配置文件
@Configuration
@EnableWebSecurity
@EnableGlobalMethodSecurity(prePostEnabled = true) //開啓權限註解
public class SecurityConfig {

    @Autowired
    private RedisTemplate redisTemplate;

    @Autowired
    private SpringSecurityUserDetailsConfig springSecurityUserDetailsConfig;

    @Autowired
    private AuthenticationEntryPointImpl authenticationEntryPointImpl;

    @Autowired
    private MyAccessDeniedHandlerImpl accessDeniedHandlerImpl;

    public JwtAuthenticationFilter authenticationJwtTokenFilter() {
        return new JwtAuthenticationFilter(redisTemplate);
    }

    @Bean
    public PasswordEncoder passwordEncoder() {
        return new BCryptPasswordEncoder();
    }

    @Bean
    public AuthenticationProvider authenticationProvider() {
        DaoAuthenticationProvider authProvider = new DaoAuthenticationProvider();
        // 提供自定義loadUserByUsername
        authProvider.setUserDetailsService(springSecurityUserDetailsConfig);
        // 指定密碼編輯器
        authProvider.setPasswordEncoder(passwordEncoder());
        return authProvider;
    }

    @Bean
    public AuthenticationManager authenticationManager(AuthenticationConfiguration config) throws Exception {
        return config.getAuthenticationManager();
    }

    @Bean
    public SecurityFilterChain filterChain(HttpSecurity http) throws Exception {
        http
                // CSRF禁用,因為不使用session
                .csrf().disable()
                // 禁用basic明文驗證
                //.httpBasic().disable()
                // 禁用默認登錄頁
                //.formLogin().disable()
                // 禁用默認登出頁
                //.logout().disable()
                // 前後端分離是無狀態的,不需要session了,直接禁用。
                .sessionManagement(session -> session.sessionCreationPolicy(SessionCreationPolicy.STATELESS))
                .authorizeHttpRequests((authorizeRequests -> {
                    authorizeRequests
                            // 允許直接訪問授權登錄接口
                            // .requestMatchers(HttpMethod.POST,"/user/login").permitAll()//當前接口無論登沒登錄都可以訪問
                            .requestMatchers(HttpMethod.POST, "/user/login").anonymous()//當前接口未登錄才能訪問
                            //.requestMatchers(HttpMethod.POST, "/user/login").hasAnyAuthority("權限表示符")//當前接口必須要有某個權限才能訪問
                            // 除上面外的所有請求全部需要鑑權認證
                            .anyRequest().authenticated();//其他所有接口登錄才能訪問
                }))
                //自定義 authenticationJwtTokenFilter過濾器 把用户數據存入 SecurityContextHolder中,方便後面的過濾器判斷是否登錄
                .addFilterBefore(authenticationJwtTokenFilter(), UsernamePasswordAuthenticationFilter.class)
                // 設置自定義異常處理器
                .exceptionHandling(exceptions -> exceptions.authenticationEntryPoint(authenticationEntryPointImpl)) //認證失敗處理器
                .exceptionHandling(exceptions -> exceptions.accessDeniedHandler(accessDeniedHandlerImpl)) //授權失敗處理器
                .authenticationProvider(authenticationProvider());
        return http.build();

    }
}
登錄認證失敗處理器
@Component
public class AuthenticationEntryPointImpl implements AuthenticationEntryPoint {
    @Override
    public void commence(HttpServletRequest request, HttpServletResponse response, AuthenticationException authException) throws IOException, ServletException {
        //從本地線程獲取errMsg
        Object errMsg = ThreadLocalUtil.getLaterRemove("errMsg");

        response.setStatus(HttpStatus.OK.value());
        response.setContentType("application/json");
        response.setCharacterEncoding("utf-8");
        ResponseResult result= new ResponseResult(HttpStatus.FORBIDDEN.value(), Objects.isNull(errMsg) ? "登錄認證失敗,請重新登錄" : errMsg);
        response.getWriter().print(JSON.toJSONString(result));
    }
}
權限認證失敗處理器
@Component
public class MyAccessDeniedHandlerImpl implements AccessDeniedHandler {
    @Override
    public void handle(HttpServletRequest request, HttpServletResponse response, AccessDeniedException accessDeniedException) throws IOException, ServletException {
        //獲取失敗信息

        //返回
        response.setStatus(HttpStatus.OK.value());
        response.setContentType("application/json");
        response.setCharacterEncoding("utf-8");
        ResponseResult result= new ResponseResult(HttpStatus.UNAUTHORIZED.value(),"權限不足"); //accessDeniedException.getMessage();
        response.getWriter().print(JSON.toJSONString(result));
    }
}
工具類
JWTUtil
public class JWTUtil {
    //加密算法
    private final static SignatureAlgorithm SIGNATURE_ALGORITHM = SignatureAlgorithm.HS256;

    //私鑰 / 生成簽名的時候使用的秘鑰secret,一般可以從本地配置文件中讀取,切記這個秘鑰不能外露,只在服務端使用,在任何場景都不應該流露出去。
    // 一旦客户端得知這個secret, 那就意味着客户端是可以自我簽發jwt了。
    private final static String secret = "secretKey";

    // 過期時間(單位秒)/ 2小時
    private final static Long access_token_expiration = 7200L;

    //jwt簽發者
    private final static String jwt_iss = "jlLiu";

    //jwt所有人
    private final static String subject = "Liujl";


    /**
     * 創建jwt
     *
     * @return 返回生成的jwt token
     */
    public static String generateJwtToken(Map<String, Object> claims) {

        // 頭部 map / Jwt的頭部承載,第一部分
        // 可不設置 默認格式是{"alg":"HS256"}
        Map<String, Object> map = new HashMap<>();
        map.put("alg", "HS256");
        map.put("typ", "JWT");


        //載荷 map / Jwt的載荷,第二部分
/*        Map<String,Object> claims = new HashMap<String,Object>();

        //私有聲明 / 自定義數據,根據業務需要添加
        claims.put("id","123456");
        claims.put("userName", "admin");*/

        //標準中註冊的聲明 (建議但不強制使用)
        //一旦寫標準聲明賦值之後,就會覆蓋了那些標準的聲明
        claims.put("iss", jwt_iss);
            /*  iss: jwt簽發者
                sub: jwt所面向的用户
                aud: 接收jwt的一方
                exp: jwt的過期時間,這個過期時間必須要大於簽發時間
                nbf: 定義在什麼時間之前,該jwt都是不可用的.
                iat: jwt的簽發時間
                jti: jwt的唯一身份標識,主要用來作為一次性token,從而回避重放攻擊
            */


        //下面就是在為payload添加各種標準聲明和私有聲明瞭
        return Jwts.builder() // 這裏其實就是new一個JwtBuilder,設置jwt的body
                .setHeader(map)         // 頭部信息
                .setClaims(claims)      // 載荷信息
                .setId(UUID.randomUUID().toString()) // 設置jti(JWT ID):是JWT的唯一標識,從而回避重放攻擊。
                .setIssuedAt(new Date())       // 設置iat: jwt的簽發時間
                //.setExpiration(new Date(System.currentTimeMillis() + access_token_expiration * 1000)) // 設置exp:jwt過期時間
                .setSubject(subject)    //設置sub:代表這個jwt所面向的用户,所有人
                .signWith(SIGNATURE_ALGORITHM, secret)//設置簽名:通過簽名算法和秘鑰生成簽名
                .compact(); // 開始壓縮為xxxxx.yyyyy.zzzzz 格式的jwt token
    }

    public static String getUserIdByJwt(String jwt) {
        Claims claims = getClaimsFromJwt(jwt);
        return Objects.isNull(claims) ? null : Objects.toString(claims.get("userId"));
    }


    /**
     * 從jwt中獲取 載荷 信息
     *
     * @param jwt
     * @return
     */
    private static Claims getClaimsFromJwt(String jwt) {
        Claims claims = null;
        try {
            claims = Jwts.parser().setSigningKey(secret).parseClaimsJws(jwt).getBody();
        } catch (Exception e) {
            e.printStackTrace();
        }
        return claims;
    }

}
ThreadLocalUtil
public class ThreadLocalUtil {
    private static final ThreadLocal<Map<String, Object>> threadLocal = ThreadLocal.withInitial(() -> new HashMap<>(10));

    public static Map<String, Object> getThreadLocal() {
        return threadLocal.get();
    }

    public static Object get(String key) {
        Map<String, Object> map = threadLocal.get();
        return map.get(key);
    }

    public static void set(String key, Object value) {
        Map<String, Object> map = threadLocal.get();
        map.put(key, value);
    }

    public static void set(Map<String, Object> keyValueMap) {
        Map<String, Object> map = threadLocal.get();
        map.putAll(keyValueMap);
    }

    public static void remove() {
        threadLocal.remove();
    }

    public static <T> T remove(String key) {
        Map<String, Object> map = threadLocal.get();
        return (T) map.remove(key);
    }

    public static Object getLaterRemove(String key) {
        Map<String, Object> map = threadLocal.get();
        remove();
        return map.get(key);
    }
}
2 登錄驗證
登錄驗證主要分為兩部分
1 自定義用户校驗:通過前端傳入的賬號密碼校驗用户是否合法
2 自定義jwt過濾器:校驗token是否合法,合法則把用户數據、權限數據放入SecurityContextHolder的Context中,後續過濾器鏈會通過Context中是否有用户數據判斷登錄校驗是否通過
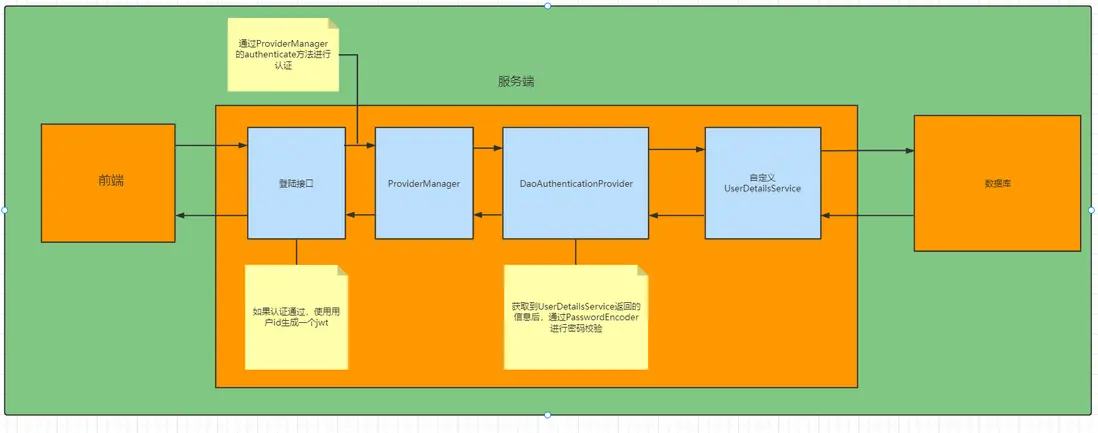
3 登錄接口: 在登錄接口中調用AuthenticationManager的authenticate方法,最終他會調用我們自定義的用户校驗,以及選擇的密碼加密方式校驗賬號密碼,成功則生成token,存入redis後返回
1 自定義用户校驗
實現UserDetailsService接口 ,重寫 loadUserByUsername 方法
@Component
public class SpringSecurityUserDetailsConfig implements UserDetailsService {

    /**
     * 自定義查詢用户
     *
     * @param username
     * @return
     * @throws
     */

    @Override
    public UserDetails loadUserByUsername(String username) throws UsernameNotFoundException {
        //從數據庫查詢用户信息 權限信息
        User user = null;
        if (username.equals("root")) {
            // $2a$10$XDrWFhZC4btSkQQ4hs0Yte0RyZFjtts0wh4swL4Rv11arnyVhJBPy 123456
            user = new User(1L, "root", "$2a$10$XDrWFhZC4btSkQQ4hs0Yte0RyZFjtts0wh4swL4Rv11arnyVhJBPy");
        }
        //有問題 UsernameNotFoundException
        if (user == null) {
            ThreadLocalUtil.set("errMsg","登錄失敗,當前賬號不存在");
            throw new UsernameNotFoundException("");
        }

        //查詢用户的權限信息
        LoginUser loginUser = new LoginUser();
        //權限list 正常從數據庫查詢 rbac模型 用户->角色->權限
        ArrayList<String> roles = new ArrayList<>(List.of("menu1", "menu1"));

        //封裝成userDetails返回
        loginUser.setUser(user);
        loginUser.setPermissions(roles);
        return loginUser;
    }
}
LoginUser 實體類
@Data
@AllArgsConstructor
@NoArgsConstructor
public class LoginUser implements UserDetails {

    private User user;

    /**
     * 自定義權限list
     */
    private List<String> permissions;

    @JSONField(serialize = false) //不序列化,序列化redis會報錯
    private List<SimpleGrantedAuthority> authority;

    /**
     * 權限list 框架從這個接口過去權限list
     * @return
     */
    @Override
    public Collection<? extends GrantedAuthority> getAuthorities() {
        //單例模式,減少重複調用
        if (Objects.isNull(authority)){
            authority = permissions.stream().map(SimpleGrantedAuthority::new).collect(Collectors.toList());
        }
        return authority;
    }

    @Override
    public String getPassword() {
        return user.getPassword();
    }

    @Override
    public String getUsername() {
        return user.getUserName();
    }

    @Override
    public boolean isAccountNonExpired() {
        return true;
    }

    @Override
    public boolean isAccountNonLocked() {
        return true;
    }

    @Override
    public boolean isCredentialsNonExpired() {
        return true;
    }

    @Override
    public boolean isEnabled() {
        return true;
    }
}
user實體類
@Data
@NoArgsConstructor
@AllArgsConstructor
public class User  implements Serializable {
    // 序列化 ID,通常是一個唯一的 long 值,用於版本控制
    private static final long serialVersionUID = 1L;

    private Long id;

    private String userName;

    private String password;
}
2 自定義jwt過濾器
在過濾器中校驗token合法性以及插入 用户數據、權限數據到context中
@Component
public class JwtAuthenticationFilter extends OncePerRequestFilter {


    private RedisTemplate redisTemplate;

    public JwtAuthenticationFilter(RedisTemplate redisTemplate) {
        this.redisTemplate = redisTemplate;
    }

    /**
     * 自定義filter 用户登錄則把用户數據存入SecurityContextHolder上下文中,沒有則直接放行,後面過濾器會自行判斷是否有數據(是否登錄)
     *
     * @param request
     * @param response
     * @param filterChain
     * @throws ServletException
     * @throws IOException
     */
    @Override
    protected void doFilterInternal(HttpServletRequest request, HttpServletResponse response, FilterChain filterChain) throws ServletException, IOException {

        String jwt = getJwtFromRequest(request);
        //TODO token時效校驗
        if (StringUtils.isNotBlank(jwt)) {
            //token存在,通過token獲取userId,通過userId從redis中拿用户數據
            String userId = JWTUtil.getUserIdByJwt(jwt);
            LoginUser redisLoginUser = (LoginUser) redisTemplate.opsForValue().get("api:login:" + userId);
            Optional.ofNullable(redisLoginUser).ifPresent(loginUser -> {
                UsernamePasswordAuthenticationToken authentication = new UsernamePasswordAuthenticationToken(loginUser, null, loginUser.getAuthorities());
                //authentication.setDetails(new WebAuthenticationDetailsSource().buildDetails(request));
                SecurityContextHolder.getContext().setAuthentication(authentication);
            });

        }
        filterChain.doFilter(request, response);
    }

    private String getJwtFromRequest(HttpServletRequest request) {
        // 從請求頭或其他地方獲取 JWT
/*        String token = request.getHeader("Authorization");
        if (token != null && token.startsWith("Bearer ")) {
            return token.substring(7);
        }
        return null;*/
        return request.getHeader("token");
    }

}
記得在配置文件中加入自定義的過濾器
//自定義 authenticationJwtTokenFilter過濾器 把用户數據存入 SecurityContextHolder中,方便後面的過濾器判斷是否登錄
.addFilterBefore(authenticationJwtTokenFilter(), UsernamePasswordAuthenticationFilter.class)
3 登錄接口
調用springSecurity AuthenticationManager.authenticate 方法進行登錄校驗 最終會調用到自定義的用户查詢邏輯,成功生成token,存入reids後返回
//調用springSecurity AuthenticationManager.authenticate 方法進行登錄校驗 最終會調用到自定義的用户查詢邏輯
Authentication authenticate;
try {
    AuthenticationManager  authenticationManager = authenticationConfiguration.getAuthenticationManager();
    UsernamePasswordAuthenticationToken authenticationToken = new UsernamePasswordAuthenticationToken(user.getUserName(), user.getPassword());
     authenticate = authenticationManager.authenticate(authenticationToken);
} catch (Exception e) {
    ThreadLocalUtil.set("errMsg",Objects.isNull(ThreadLocalUtil.get("errMsg")) ? "登錄失敗,賬號或密碼錯誤" : ThreadLocalUtil.get("errMsg"));
    throw new RuntimeException(e);
}

//校驗是否認證通過
if (Objects.isNull(authenticate)){
    ThreadLocalUtil.set("errMsg","登錄失敗,賬號或密碼錯誤");
    throw new RuntimeException("登錄失敗");
}

//認證通過生產jwt,存入redis後返回
LoginUser loginUser = (LoginUser) authenticate.getPrincipal();
String userId = loginUser.getUser().getId().toString();
//創建jwt
String jwt = JWTUtil.generateJwtToken(new HashMap<>() {{put("userId", userId);}});
//存入redis
redisTemplate.opsForValue().set("api:login:"+userId, loginUser);
return jwt;
3 權限驗證
權限驗證分為兩個部分
1 配置文件開啓權限校驗
2 在接口上添加權限校驗註解:註解指定該接口所需權限,自定義jwt校驗中,成功會把權限數據存入context中,spring會去拿出做比較
1開啓權限校驗
在配置文件上通過註解開啓權限校驗
@EnableGlobalMethodSecurity(prePostEnabled = true) //開啓權限註解2 在接口上添加權限校驗註解
默認權限校驗
hasAnyAuthority是spring提供的默認權限校驗中的一種
@PreAuthorize("hasAnyAuthority('menu2')")在UserDetails實現類的實體類中,有個getAuthorities方法,spring會調用該方法
private User user;

/**
 * 自定義權限list
 */
private List<String> permissions;

@JSONField(serialize = false) //不序列化,序列化redis會報錯
private List<SimpleGrantedAuthority> authority;

/**
 * 權限list 框架從這個接口獲取權限list
 * @return
 */
@Override
public Collection<? extends GrantedAuthority> getAuthorities() {
    //單例模式,減少重複調用
    if (Objects.isNull(authority)){
        authority = permissions.stream().map(SimpleGrantedAuthority::new).collect(Collectors.toList());
    }
    return authority;
}
其中 hasAnyAuthority 是spring提供的校驗方式,我們也可以自定義權限校驗
自定義權限校驗
自定義權限校驗器
@Component("sspc")
public class SpringSecurityPermissionsConfig {


    public boolean myHasAnyAuthority(String authority){
        //獲取用户權限
        Authentication authentication = SecurityContextHolder.getContext().getAuthentication();
        LoginUser loginUser = (LoginUser)authentication.getPrincipal();
        List<String> permissions = loginUser.getPermissions();
        return permissions.contains(authority);
    }
}
接口上
//@PreAuthorize("hasAnyAuthority('menu1')")
@PreAuthorize("@sspc.myHasAnyAuthority('menu1')")