RabbitMQ介紹
RabbitMQ是基於Erlang語言開發的開源消息通信中間件,官網地址:
Messaging that just works — RabbitMQ
接下來,我們就學習它的基本概念和基礎用法。
安裝
在安裝命令中有兩個映射的端口:
- 15672:RabbitMQ提供的管理控制枱的端口
- 5672:RabbitMQ的消息發送處理接口
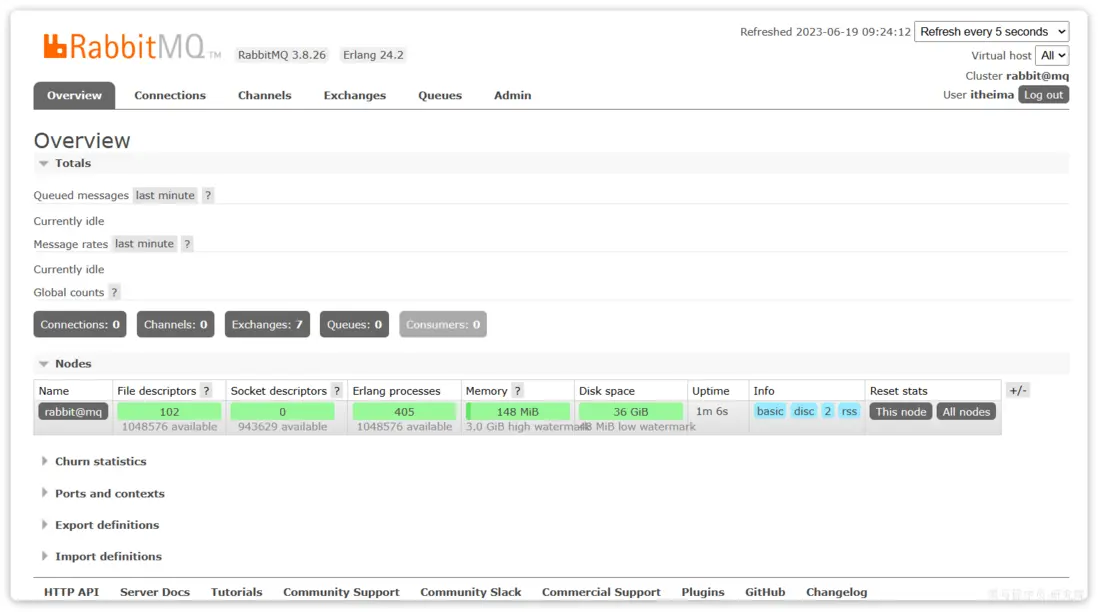
安裝完成後,訪問 http://127.0.0.1:15672即可看到管理控制枱。首次訪問需要登錄,默認的用户名和密碼在配置文件中已經指定了。
登錄後即可看到管理控制枱總覽頁面:
RabbitMQ對應的架構如圖:
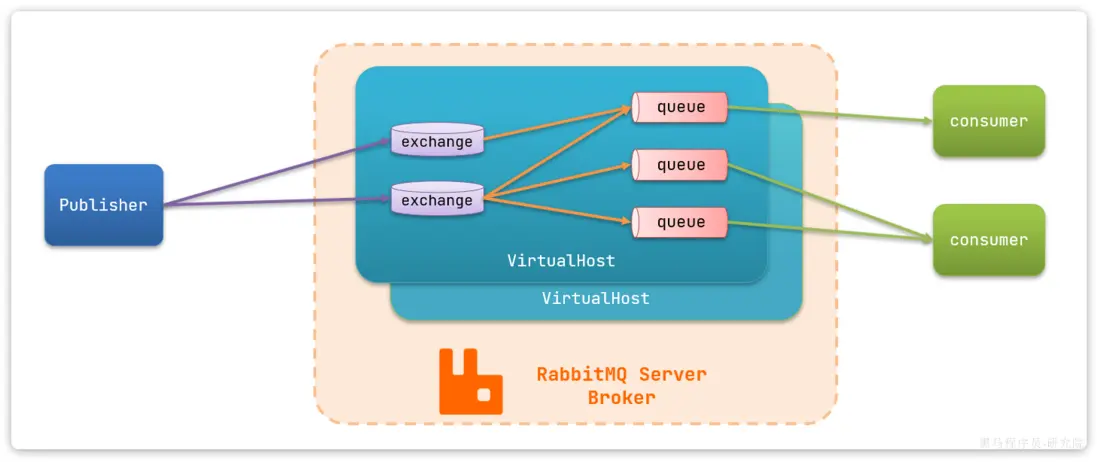
其中包含幾個概念:
publisher:生產者,也就是發送消息的一方consumer:消費者,也就是消費消息的一方queue:隊列,存儲消息。生產者投遞的消息會暫存在消息隊列中,等待消費者處理exchange:交換機,負責消息路由。生產者發送的消息由交換機決定投遞到哪個隊列。virtual host:虛擬主機,起到數據隔離的作用。每個虛擬主機相互獨立,有各自的exchange、queue
上述這些東西都可以在RabbitMQ的管理控制枱來管理,下一節我們就一起來學習控制枱的使用。
收發消息
交換機
打開Exchanges選項卡,可以看到已經存在很多交換機:
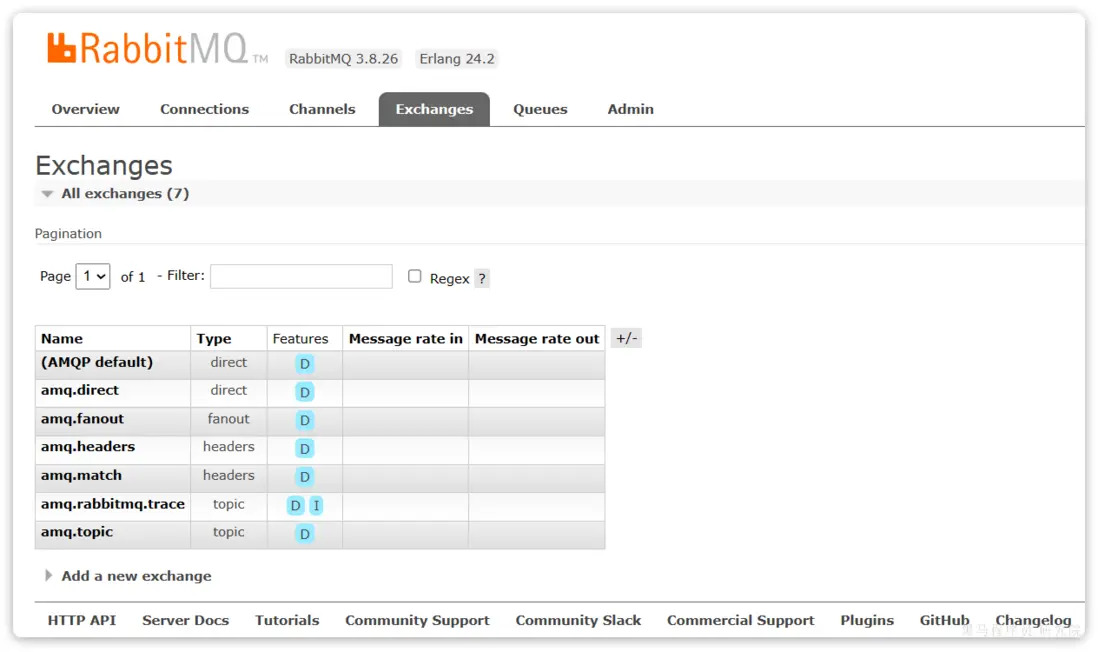
點擊任意交換機,即可進入交換機詳情頁面。仍然會利用控制枱中的publish message 發送一條消息:
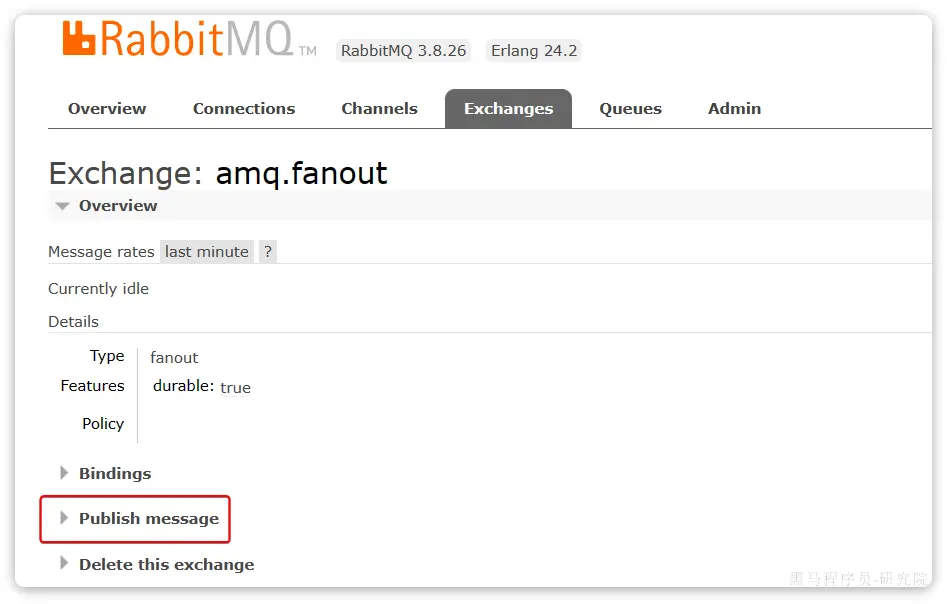
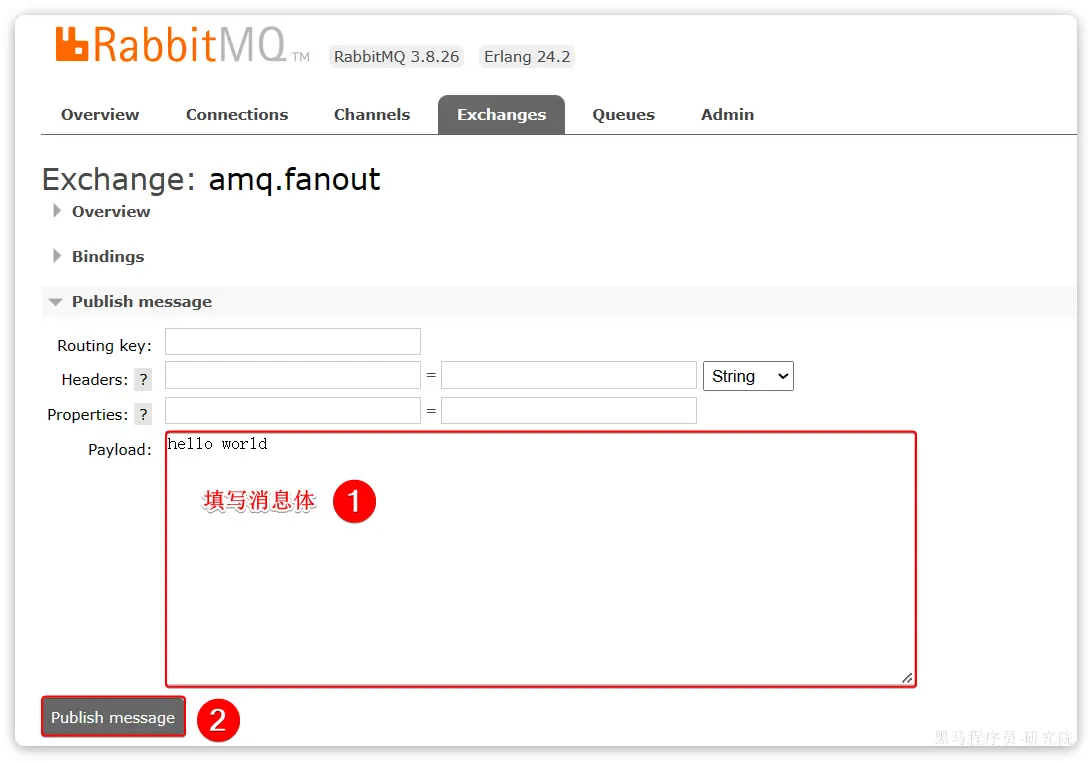
這裏是由控制枱模擬了生產者發送的消息。由於沒有消費者存在,最終消息丟失了,這樣説明交換機沒有存儲消息的能力。
隊列
打開Queues選項卡,新建一個隊列:
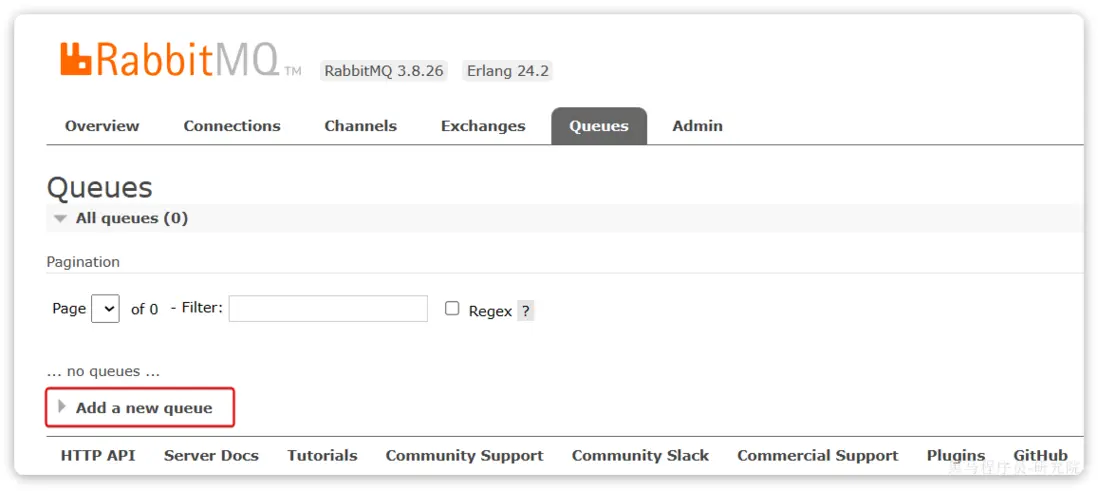
命名為hello.queue1:
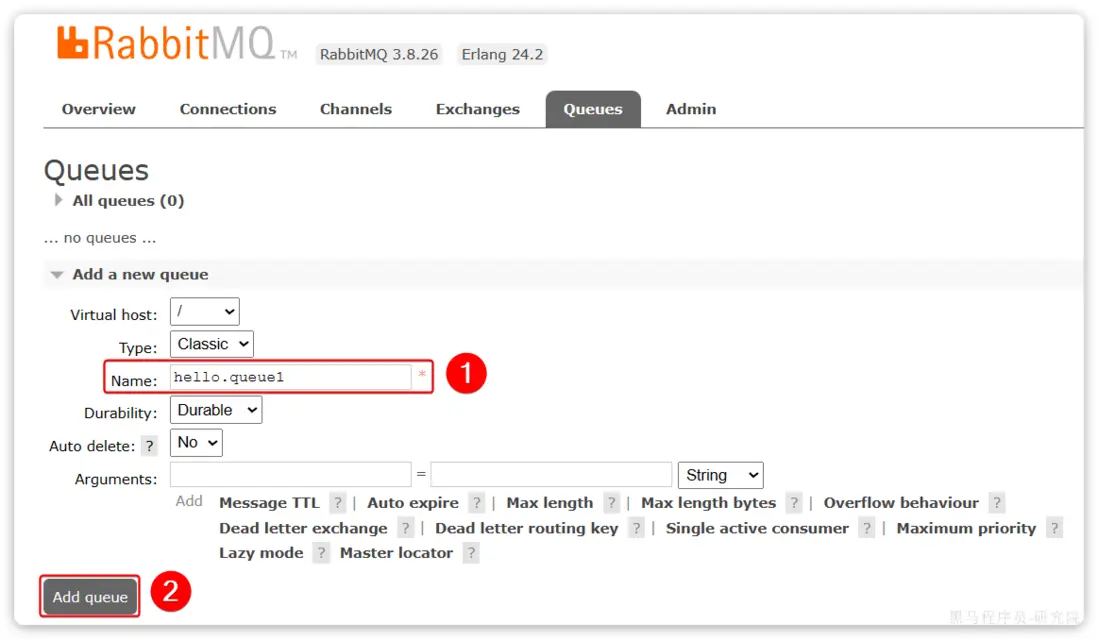
再以相同的方式,創建一個隊列,密碼為hello.queue2,最終隊列列表如下:
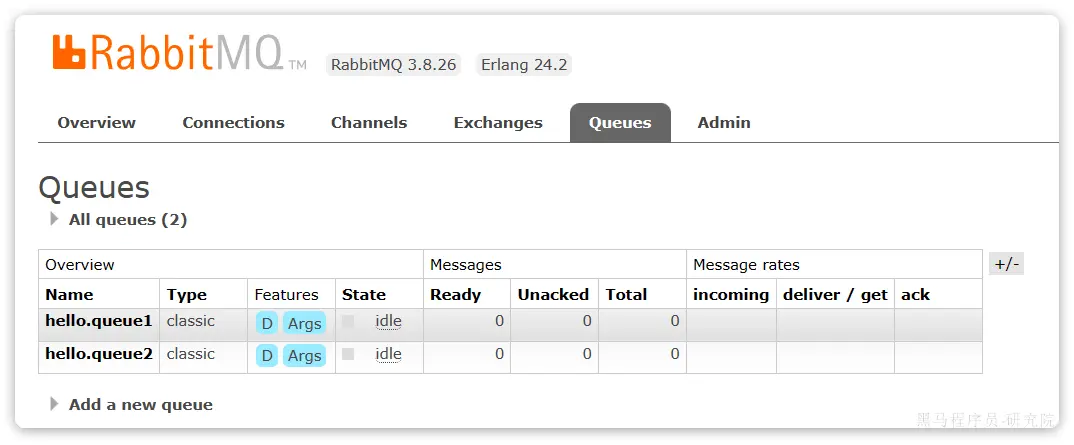
此時,再次向amq.fanout交換機發送一條消息。會發現消息依然沒有到達隊列!!
怎麼回事呢?
發送到交換機的消息,只會路由到與其綁定的隊列,因此僅僅創建隊列是不夠的,還需要將其與交換機綁定。
綁定關係
點擊Exchanges選項卡,點擊amq.fanout交換機,進入交換機詳情頁,然後點擊Bindings菜單,在表單中填寫要綁定的隊列名稱:
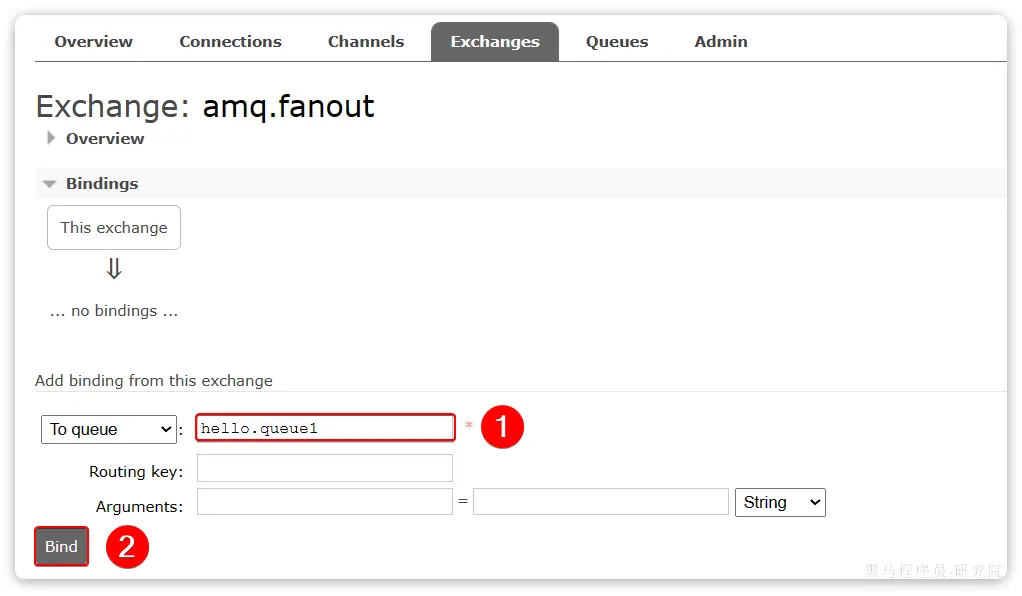
相同的方式,將hello.queue2也綁定到改交換機。
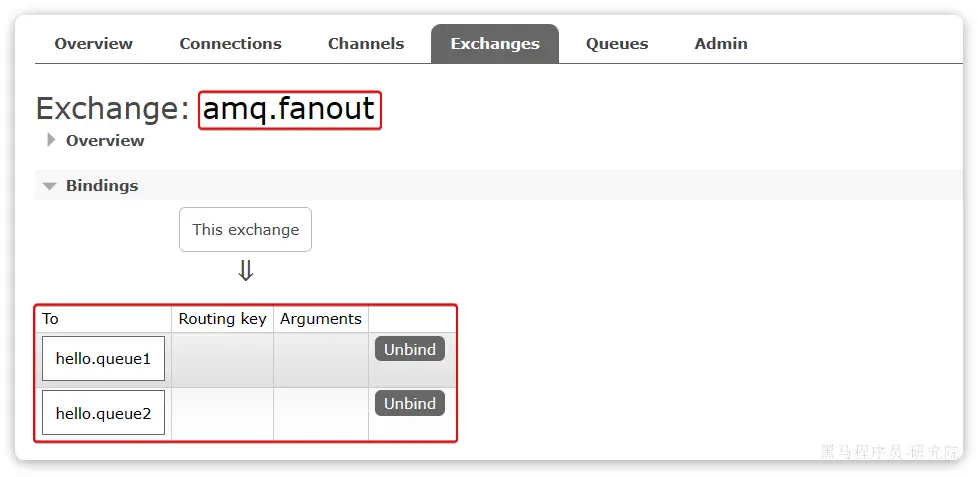
最終,綁定結果如下:
發送消息
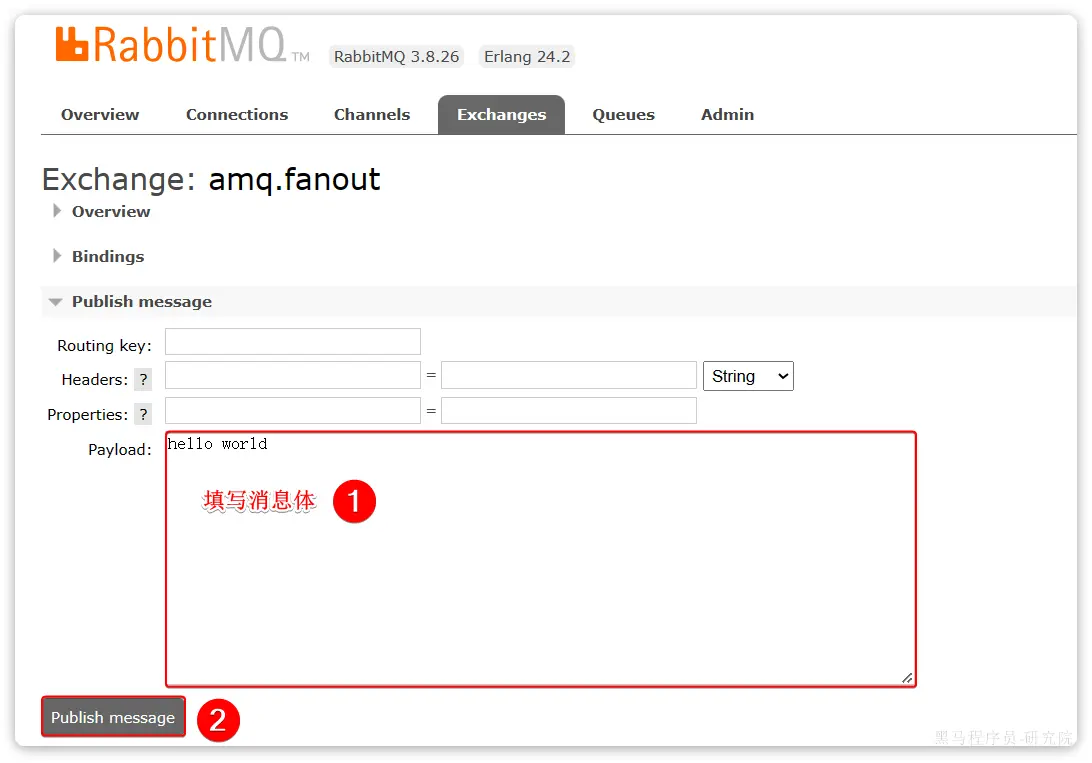
再次回到exchange頁面,找到剛剛綁定的amq.fanout,點擊進入詳情頁,再次發送一條消息:
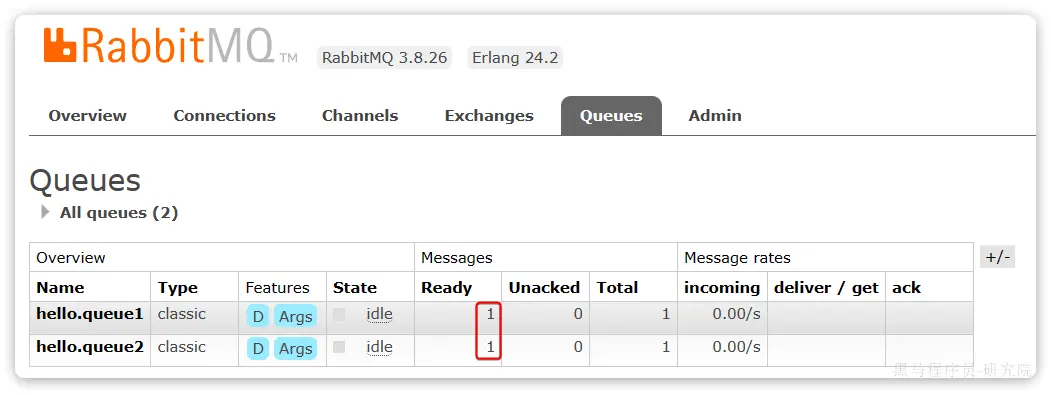
回到Queues頁面,可以發現hello.queue中已經有一條消息了:
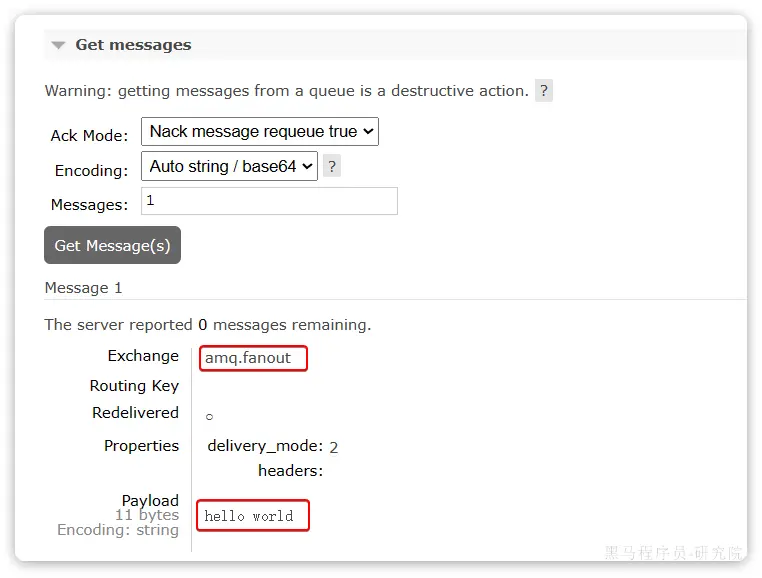
點擊隊列名稱,進入詳情頁,查看隊列詳情,這次我們點擊get message:

可以看到消息到達隊列了:
這個時候如果有消費者監聽了MQ的hello.queue1或hello.queue2隊列,自然就能接收到消息了。
數據隔離
用户管理
點擊Admin選項卡,首先會看到RabbitMQ控制枱的用户管理界面:
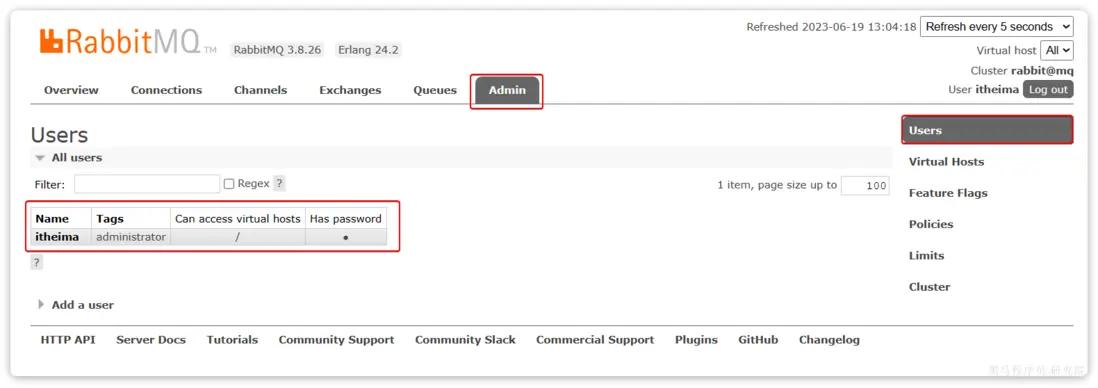
這裏的用户都是RabbitMQ的管理或運維人員。目前只有安裝RabbitMQ時添加的itheima這個用户。仔細觀察用户表格中的字段,如下:
Name:itheima,也就是用户名Tags:administrator,説明itheima用户是超級管理員,擁有所有權限Can access virtual host:/,可以訪問的virtual host,這裏的/是默認的virtual host
對於小型企業而言,出於成本考慮,我們通常只會搭建一套MQ集羣,公司內的多個不同項目同時使用。這個時候為了避免互相干擾, 我們會利用virtual host的隔離特性,將不同項目隔離。一般會做兩件事情:
- 給每個項目創建獨立的運維賬號,將管理權限分離。
- 給每個項目創建不同的
virtual host,將每個項目的數據隔離。
virtual host
先退出登錄:

切換到剛剛創建的 用户登錄,然後點擊Virtual Hosts菜單,進入virtual host管理頁:

可以看到目前只有一個默認的virtual host,名字為 /。
我們可以給項目創建一個單獨的virtual host,而不是使用默認的/。
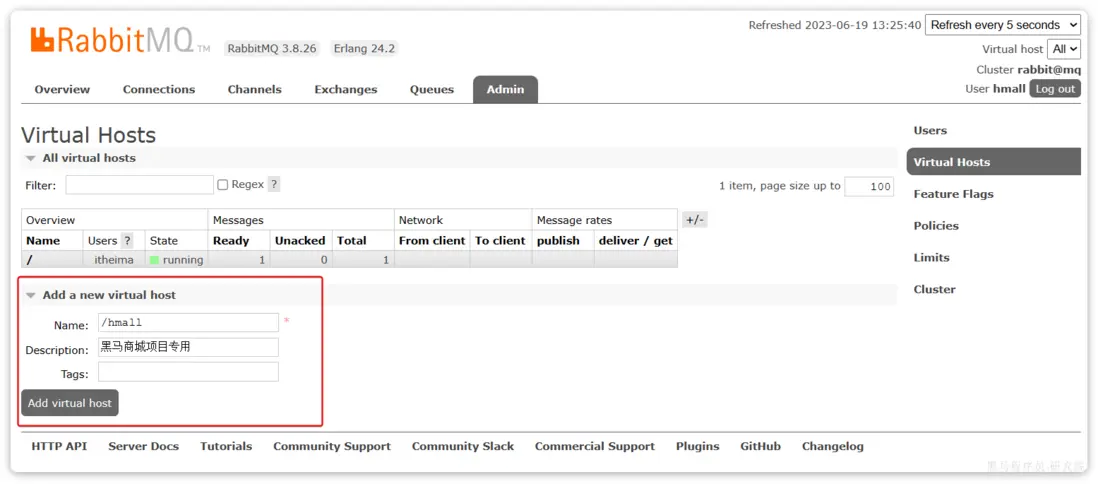
創建完成後如圖:

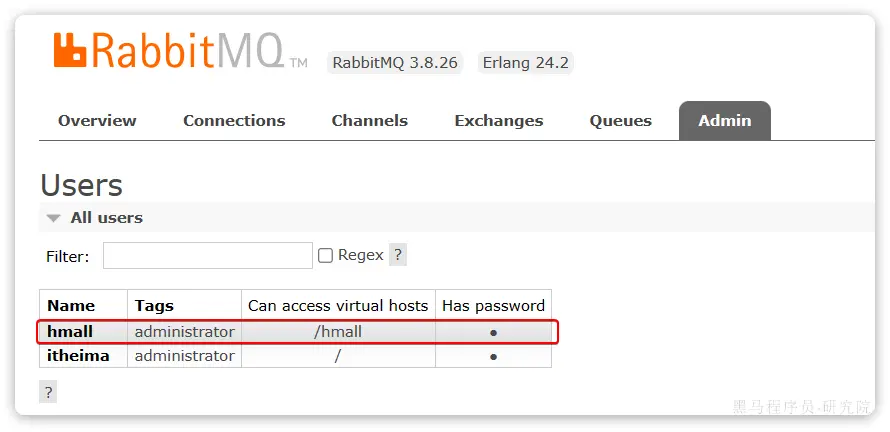
由於是登錄hmall賬户後創建的virtual host,因此回到users菜單,你會發現當前用户已經具備了對/hmall這個virtual host的訪問權限了:
此時,點擊頁面右上角的virtual host下拉菜單,切換virtual host為 /hmall:

然後再次查看queues選項卡,會發現之前的隊列已經看不到了:
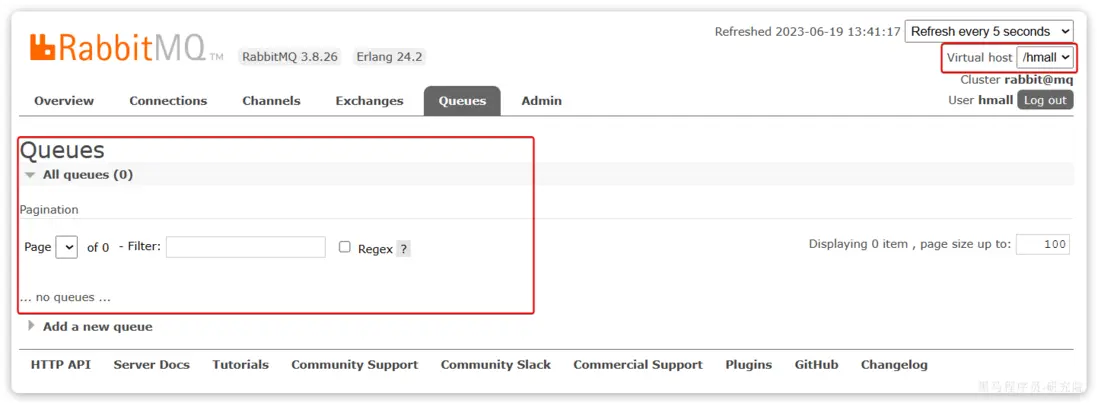
這就是基於virtual host 的隔離效果。
SpringAMQP
將來我們開發業務功能的時候,肯定不會在控制枱收發消息,而是應該基於編程的方式。由於RabbitMQ採用了AMQP協議,因此它具備跨語言的特性。任何語言只要遵循AMQP協議收發消息,都可以與RabbitMQ交互。並且RabbitMQ官方也提供了各種不同語言的客户端。
但是,RabbitMQ官方提供的Java客户端編碼相對複雜,一般生產環境下我們更多會結合Spring來使用。而Spring的官方剛好基於RabbitMQ提供了這樣一套消息收發的模板工具:SpringAMQP。並且還基於SpringBoot對其實現了自動裝配,使用起來非常方便。
SpringAmqp的官方地址:Spring AMQP
SpringAMQP提供了三個功能:
- 自動聲明隊列、交換機及其綁定關係
- 基於註解的監聽器模式,異步接收消息
- 封裝了RabbitTemplate工具,用於發送消息
這一章我們就一起學習一下,如何利用SpringAMQP實現對RabbitMQ的消息收發。
配置依賴
配置SpringAMQP相關的依賴:
<?xml version="1.0" encoding="UTF-8"?>
<project xmlns="http://maven.apache.org/POM/4.0.0"
         xmlns:xsi="http://www.w3.org/2001/XMLSchema-instance"
         xsi:schemaLocation="http://maven.apache.org/POM/4.0.0 http://maven.apache.org/xsd/maven-4.0.0.xsd">
    <modelVersion>4.0.0</modelVersion>

    <groupId>cn.itcast.demo</groupId>
    <artifactId>mq-demo</artifactId>
    <version>1.0-SNAPSHOT</version>
    <modules>
        <module>publisher</module>
        <module>consumer</module>
    </modules>
    <packaging>pom</packaging>

    <parent>
        <groupId>org.springframework.boot</groupId>
        <artifactId>spring-boot-starter-parent</artifactId>
        <version>2.7.12</version>
        <relativePath/>
    </parent>

    <properties>
        <maven.compiler.source>8</maven.compiler.source>
        <maven.compiler.target>8</maven.compiler.target>
    </properties>

    <dependencies>
        <dependency>
            <groupId>org.projectlombok</groupId>
            <artifactId>lombok</artifactId>
        </dependency>
        <!--AMQP依賴,包含RabbitMQ-->
        <dependency>
            <groupId>org.springframework.boot</groupId>
            <artifactId>spring-boot-starter-amqp</artifactId>
        </dependency>
        <!--單元測試-->
        <dependency>
            <groupId>org.springframework.boot</groupId>
            <artifactId>spring-boot-starter-test</artifactId>
        </dependency>
    </dependencies>
</project>
快速入門
在之前的案例中,我們都是經過交換機發送消息到隊列,不過有時候為了測試方便,我們也可以直接向隊列發送消息,跳過交換機。如圖:

也就是:
- publisher直接發送消息到隊列
- 消費者監聽並處理隊列中的消息
注意:這種模式一般測試使用,很少在生產中使用。
為了方便測試,我們現在控制枱新建一個隊列:simple.queue
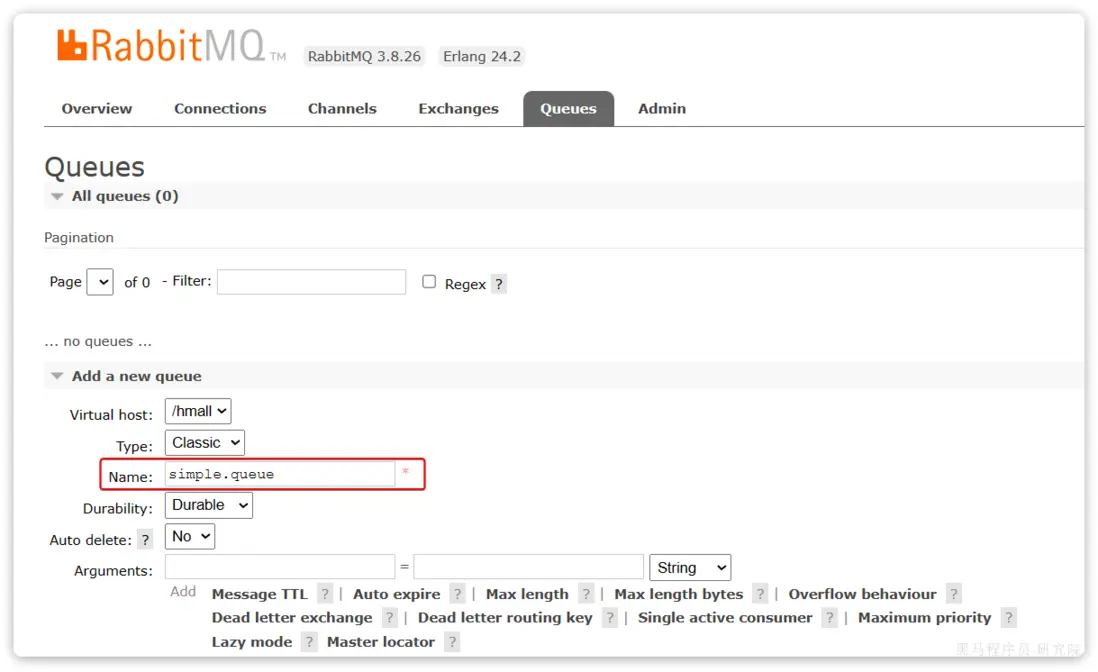
添加成功:
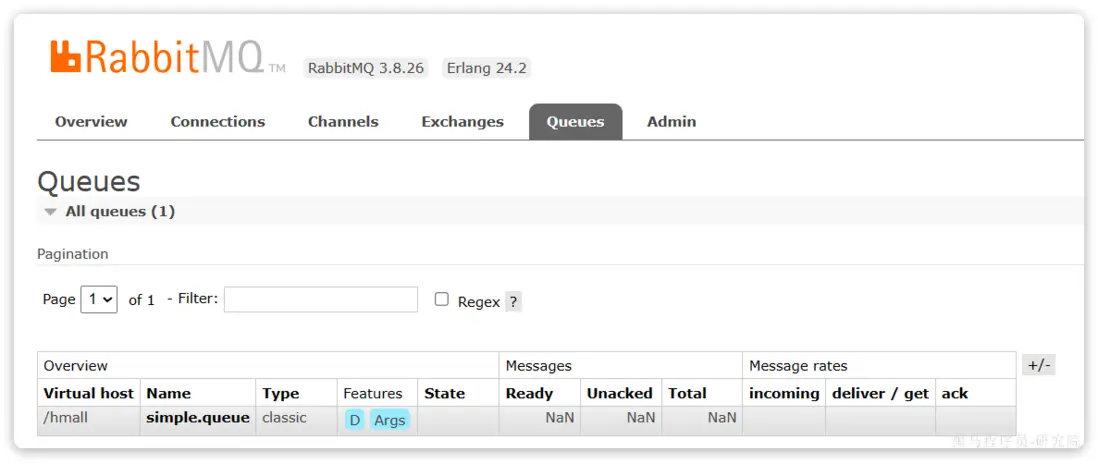
接下來,我們就可以利用Java代碼收發消息了。
消息發送
首先配置MQ地址,在publisher服務的application.yml中添加配置:
spring:
  rabbitmq:
    host: 127.0.0.1 # 你的虛擬機IP
    port: 5672 # 端口
    virtual-host: /hmall # 虛擬主機
    username: hmall # 用户名
password: 123 # 密碼然後在publisher服務中編寫測試類SpringAmqpTest,並利用RabbitTemplate實現消息發送:
import org.junit.jupiter.api.Test;
import org.springframework.amqp.rabbit.core.RabbitTemplate;
import org.springframework.beans.factory.annotation.Autowired;
import org.springframework.boot.test.context.SpringBootTest;

@SpringBootTest
public class SpringAmqpTest {

    @Autowired
    private RabbitTemplate rabbitTemplate;

    @Test
    public void testSimpleQueue() {
        // 隊列名稱
        String queueName = "simple.queue";
        // 消息
        String message = "hello, spring amqp!";
        // 發送消息
        rabbitTemplate.convertAndSend(queueName, message);
    }
}
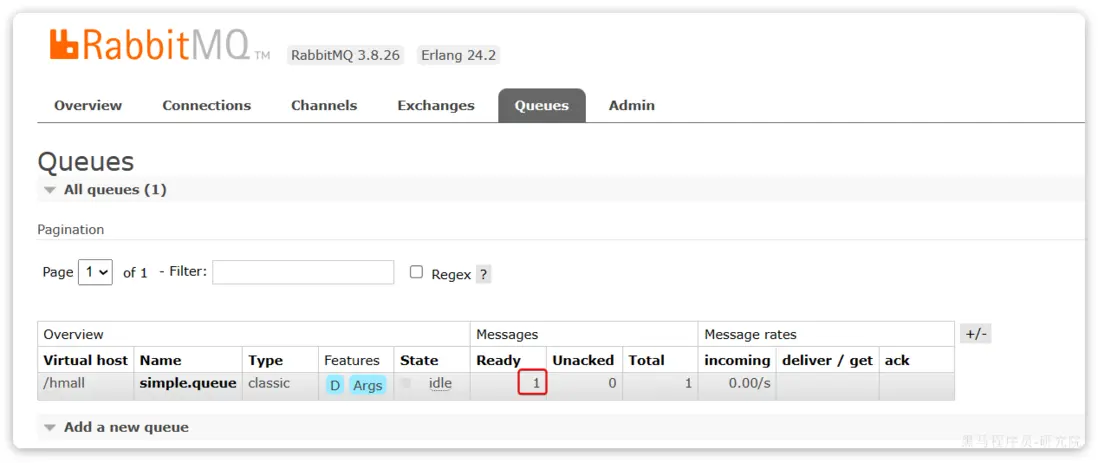
打開控制枱,可以看到消息已經發送到隊列中:
接下來,我們再來實現消息接收。
消息接收
首先配置MQ地址,在consumer服務的application.yml中添加配置:
spring:
  rabbitmq:
    host: 127.0.0.1 # 你的虛擬機IP
    port: 5672 # 端口
    virtual-host: /hmall # 虛擬主機
    username: hmall # 用户名
password: 123 # 密碼然後在consumer服務的com.itheima.consumer.listener包中新建一個類SpringRabbitListener,代碼如下:
import org.springframework.amqp.rabbit.annotation.RabbitListener;
import org.springframework.stereotype.Component;

@Component
public class SpringRabbitListener {
    // 利用RabbitListener來聲明要監聽的隊列信息
    // 將來一旦監聽的隊列中有了消息,就會推送給當前服務,調用當前方法,處理消息。
    // 可以看到方法體中接收的就是消息體的內容
    @RabbitListener(queues = "simple.queue")
    public void listenSimpleQueueMessage(String msg) throws InterruptedException {
        System.out.println("spring 消費者接收到消息:【" + msg + "】");
    }
}
測試
啓動consumer服務,然後在publisher服務中運行測試代碼,發送MQ消息。最終consumer收到消息:
WorkQueues模型
Work queues,任務模型。簡單來説就是讓多個消費者綁定到一個隊列,共同消費隊列中的消息。
當消息處理比較耗時的時候,可能生產消息的速度會遠遠大於消息的消費速度。長此以往,消息就會堆積越來越多,無法及時處理。
此時就可以使用work 模型,多個消費者共同處理消息處理,消息處理的速度就能大大提高了。
接下來,我們就來模擬這樣的場景。
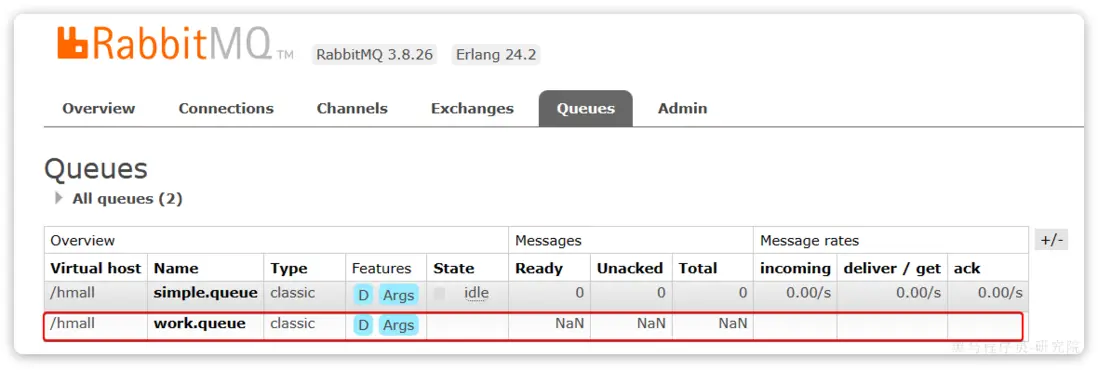
首先,我們在控制枱創建一個新的隊列,命名為work.queue:
消息發送
這次我們循環發送,模擬大量消息堆積現象。
在publisher服務中的SpringAmqpTest類中添加一個測試方法:
/**
     * workQueue
     * 向隊列中不停發送消息,模擬消息堆積。
     */
@Test
public void testWorkQueue() throws InterruptedException {
    // 隊列名稱
    String queueName = "simple.queue";
    // 消息
    String message = "hello, message_";
    for (int i = 0; i < 50; i++) {
        // 發送消息,每20毫秒發送一次,相當於每秒發送50條消息
        rabbitTemplate.convertAndSend(queueName, message + i);
        Thread.sleep(20);
    }
}
消息接收
要模擬多個消費者綁定同一個隊列,我們在consumer服務的SpringRabbitListener中添加2個新的方法:
@RabbitListener(queues = "work.queue")
public void listenWorkQueue1(String msg) throws InterruptedException {
    System.out.println("消費者1接收到消息:【" + msg + "】" + LocalTime.now());
    Thread.sleep(20);
}

@RabbitListener(queues = "work.queue")
public void listenWorkQueue2(String msg) throws InterruptedException {
    System.err.println("消費者2........接收到消息:【" + msg + "】" + LocalTime.now());
    Thread.sleep(200);
}注意到這兩消費者,都設置了Thead.sleep,模擬任務耗時:
- 消費者1 sleep了20毫秒,相當於每秒鐘處理50個消息
- 消費者2 sleep了200毫秒,相當於每秒處理5個消息
測試
啓動ConsumerApplication後,在執行publisher服務中剛剛編寫的發送測試方法testWorkQueue。
最終結果如下:
消費者1接收到消息:【hello, message_0】21:06:00.869555300
消費者2........接收到消息:【hello, message_1】21:06:00.884518
消費者1接收到消息:【hello, message_2】21:06:00.907454400
消費者1接收到消息:【hello, message_4】21:06:00.953332100
消費者1接收到消息:【hello, message_6】21:06:00.997867300
消費者1接收到消息:【hello, message_8】21:06:01.042178700
消費者2........接收到消息:【hello, message_3】21:06:01.086478800
消費者1接收到消息:【hello, message_10】21:06:01.087476600
消費者1接收到消息:【hello, message_12】21:06:01.132578300
消費者1接收到消息:【hello, message_14】21:06:01.175851200
消費者1接收到消息:【hello, message_16】21:06:01.218533400
消費者1接收到消息:【hello, message_18】21:06:01.261322900
消費者2........接收到消息:【hello, message_5】21:06:01.287003700
消費者1接收到消息:【hello, message_20】21:06:01.304412400
消費者1接收到消息:【hello, message_22】21:06:01.349950100
消費者1接收到消息:【hello, message_24】21:06:01.394533900
消費者1接收到消息:【hello, message_26】21:06:01.439876500
消費者1接收到消息:【hello, message_28】21:06:01.482937800
消費者2........接收到消息:【hello, message_7】21:06:01.488977100
消費者1接收到消息:【hello, message_30】21:06:01.526409300
消費者1接收到消息:【hello, message_32】21:06:01.572148
消費者1接收到消息:【hello, message_34】21:06:01.618264800
消費者1接收到消息:【hello, message_36】21:06:01.660780600
消費者2........接收到消息:【hello, message_9】21:06:01.689189300
消費者1接收到消息:【hello, message_38】21:06:01.705261
消費者1接收到消息:【hello, message_40】21:06:01.746927300
消費者1接收到消息:【hello, message_42】21:06:01.789835
消費者1接收到消息:【hello, message_44】21:06:01.834393100
消費者1接收到消息:【hello, message_46】21:06:01.875312100
消費者2........接收到消息:【hello, message_11】21:06:01.889969500
消費者1接收到消息:【hello, message_48】21:06:01.920702500
消費者2........接收到消息:【hello, message_13】21:06:02.090725900
消費者2........接收到消息:【hello, message_15】21:06:02.293060600
消費者2........接收到消息:【hello, message_17】21:06:02.493748
消費者2........接收到消息:【hello, message_19】21:06:02.696635100
消費者2........接收到消息:【hello, message_21】21:06:02.896809700
消費者2........接收到消息:【hello, message_23】21:06:03.099533400
消費者2........接收到消息:【hello, message_25】21:06:03.301446400
消費者2........接收到消息:【hello, message_27】21:06:03.504999100
消費者2........接收到消息:【hello, message_29】21:06:03.705702500
消費者2........接收到消息:【hello, message_31】21:06:03.906601200
消費者2........接收到消息:【hello, message_33】21:06:04.108118500
消費者2........接收到消息:【hello, message_35】21:06:04.308945400
消費者2........接收到消息:【hello, message_37】21:06:04.511547700
消費者2........接收到消息:【hello, message_39】21:06:04.714038400
消費者2........接收到消息:【hello, message_41】21:06:04.916192700
消費者2........接收到消息:【hello, message_43】21:06:05.116286400
消費者2........接收到消息:【hello, message_45】21:06:05.318055100
消費者2........接收到消息:【hello, message_47】21:06:05.520656400
消費者2........接收到消息:【hello, message_49】21:06:05.723106700
可以看到消費者1和消費者2竟然每人消費了25條消息:
- 消費者1很快完成了自己的25條消息
- 消費者2卻在緩慢的處理自己的25條消息。
也就是説消息是平均分配給每個消費者,並沒有考慮到消費者的處理能力。導致1個消費者空閒,另一個消費者忙的不可開交。沒有充分利用每一個消費者的能力,最終消息處理的耗時遠遠超過了1秒。這樣顯然是有問題的。
能者多勞
在spring中有一個簡單的配置,可以解決這個問題。我們修改consumer服務的application.yml文件,添加配置:
spring:
  rabbitmq:
    listener:
      simple:
        prefetch: 1 # 每次只能獲取一條消息,處理完成才能獲取下一個消息
再次測試,發現結果如下:
消費者1接收到消息:【hello, message_0】21:12:51.659664200
消費者2........接收到消息:【hello, message_1】21:12:51.680610
消費者1接收到消息:【hello, message_2】21:12:51.703625
消費者1接收到消息:【hello, message_3】21:12:51.724330100
消費者1接收到消息:【hello, message_4】21:12:51.746651100
消費者1接收到消息:【hello, message_5】21:12:51.768401400
消費者1接收到消息:【hello, message_6】21:12:51.790511400
消費者1接收到消息:【hello, message_7】21:12:51.812559800
消費者1接收到消息:【hello, message_8】21:12:51.834500600
消費者1接收到消息:【hello, message_9】21:12:51.857438800
消費者1接收到消息:【hello, message_10】21:12:51.880379600
消費者2........接收到消息:【hello, message_11】21:12:51.899327100
消費者1接收到消息:【hello, message_12】21:12:51.922828400
消費者1接收到消息:【hello, message_13】21:12:51.945617400
消費者1接收到消息:【hello, message_14】21:12:51.968942500
消費者1接收到消息:【hello, message_15】21:12:51.992215400
消費者1接收到消息:【hello, message_16】21:12:52.013325600
消費者1接收到消息:【hello, message_17】21:12:52.035687100
消費者1接收到消息:【hello, message_18】21:12:52.058188
消費者1接收到消息:【hello, message_19】21:12:52.081208400
消費者2........接收到消息:【hello, message_20】21:12:52.103406200
消費者1接收到消息:【hello, message_21】21:12:52.123827300
消費者1接收到消息:【hello, message_22】21:12:52.146165100
消費者1接收到消息:【hello, message_23】21:12:52.168828300
消費者1接收到消息:【hello, message_24】21:12:52.191769500
消費者1接收到消息:【hello, message_25】21:12:52.214839100
消費者1接收到消息:【hello, message_26】21:12:52.238998700
消費者1接收到消息:【hello, message_27】21:12:52.259772600
消費者1接收到消息:【hello, message_28】21:12:52.284131800
消費者2........接收到消息:【hello, message_29】21:12:52.306190600
消費者1接收到消息:【hello, message_30】21:12:52.325315800
消費者1接收到消息:【hello, message_31】21:12:52.347012500
消費者1接收到消息:【hello, message_32】21:12:52.368508600
消費者1接收到消息:【hello, message_33】21:12:52.391785100
消費者1接收到消息:【hello, message_34】21:12:52.416383800
消費者1接收到消息:【hello, message_35】21:12:52.439019
消費者1接收到消息:【hello, message_36】21:12:52.461733900
消費者1接收到消息:【hello, message_37】21:12:52.485990
消費者1接收到消息:【hello, message_38】21:12:52.509219900
消費者2........接收到消息:【hello, message_39】21:12:52.523683400
消費者1接收到消息:【hello, message_40】21:12:52.547412100
消費者1接收到消息:【hello, message_41】21:12:52.571191800
消費者1接收到消息:【hello, message_42】21:12:52.593024600
消費者1接收到消息:【hello, message_43】21:12:52.616731800
消費者1接收到消息:【hello, message_44】21:12:52.640317
消費者1接收到消息:【hello, message_45】21:12:52.663111100
消費者1接收到消息:【hello, message_46】21:12:52.686727
消費者1接收到消息:【hello, message_47】21:12:52.709266500
消費者2........接收到消息:【hello, message_48】21:12:52.725884900
消費者1接收到消息:【hello, message_49】21:12:52.746299900
可以發現,由於消費者1處理速度較快,所以處理了更多的消息;消費者2處理速度較慢,只處理了6條消息。而最終總的執行耗時也在1秒左右,大大提升。
正所謂能者多勞,這樣充分利用了每一個消費者的處理能力,可以有效避免消息積壓問題。
總結
Work模型的使用:
- 多個消費者綁定到一個隊列,同一條消息只會被一個消費者處理
- 通過設置prefetch來控制消費者預取的消息數量
交換機類型
在之前的兩個測試案例中,都沒有交換機,生產者直接發送消息到隊列。而一旦引入交換機,消息發送的模式會有很大變化:
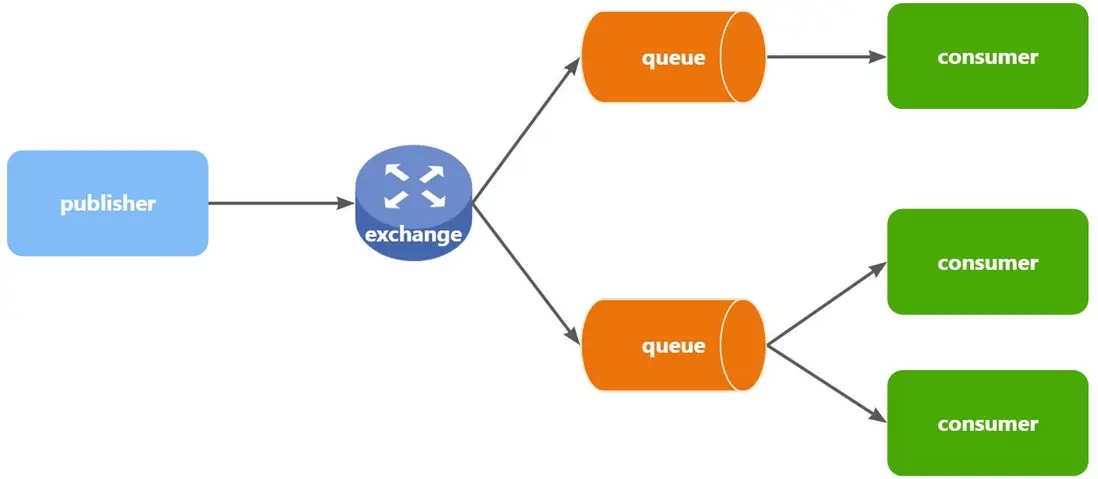
可以看到,在訂閲模型中,多了一個exchange角色,而且過程略有變化:
- Publisher:生產者,不再發送消息到隊列中,而是發給交換機
- Exchange:交換機,一方面,接收生產者發送的消息。另一方面,知道如何處理消息,例如遞交給某個特別隊列、遞交給所有隊列、或是將消息丟棄。到底如何操作,取決於Exchange的類型。
- Queue:消息隊列也與以前一樣,接收消息、緩存消息。不過隊列一定要與交換機綁定。
- Consumer:消費者,與以前一樣,訂閲隊列,沒有變化
Exchange(交換機)只負責轉發消息,不具備存儲消息的能力,因此如果沒有任何隊列與Exchange綁定,或者沒有符合路由規則的隊列,那麼消息會丟失!
交換機的類型有四種:
- Fanout:廣播,將消息交給所有綁定到交換機的隊列。我們最早在控制枱使用的正是Fanout交換機
- Direct:訂閲,基於RoutingKey(路由key)發送給訂閲了消息的隊列
- Topic:通配符訂閲,與Direct類似,只不過RoutingKey可以使用通配符
- Headers:頭匹配,基於MQ的消息頭匹配,用的較少。
這裏主要講解前面的三種交換機模式。
Fanout交換機
Fanout,英文翻譯是扇出,我覺得在MQ中叫廣播更合適。
在廣播模式下,消息發送流程是這樣的:
- 1) 可以有多個隊列
- 2) 每個隊列都要綁定到Exchange(交換機)
- 3) 生產者發送的消息,只能發送到交換機
- 4) 交換機把消息發送給綁定過的所有隊列
- 5) 訂閲隊列的消費者都能拿到消息
我們的計劃是這樣的:
- 創建一個名為
hmall.fanout的交換機,類型是Fanout - 創建兩個隊列
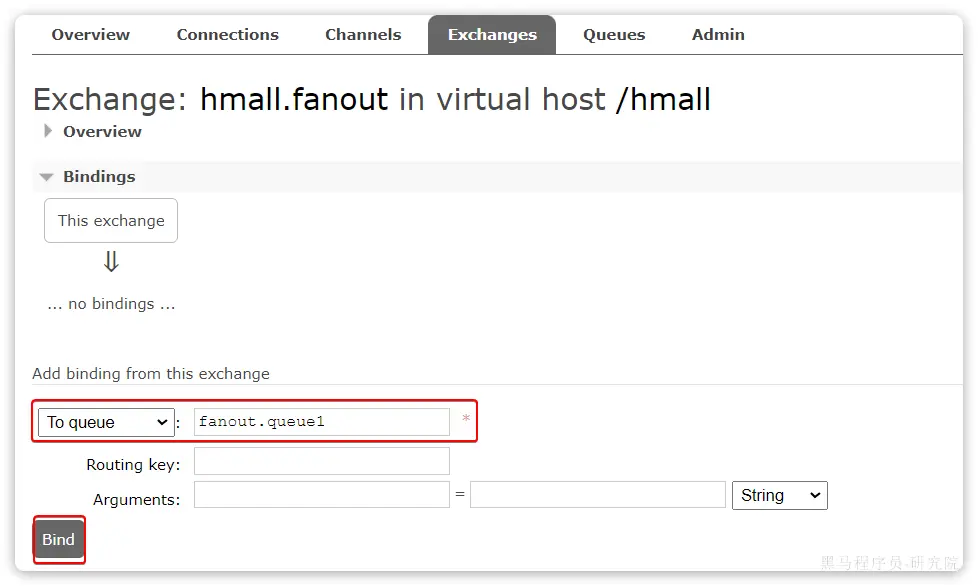
fanout.queue1和fanout.queue2,綁定到交換機hmall.fanout
聲明隊列和交換機
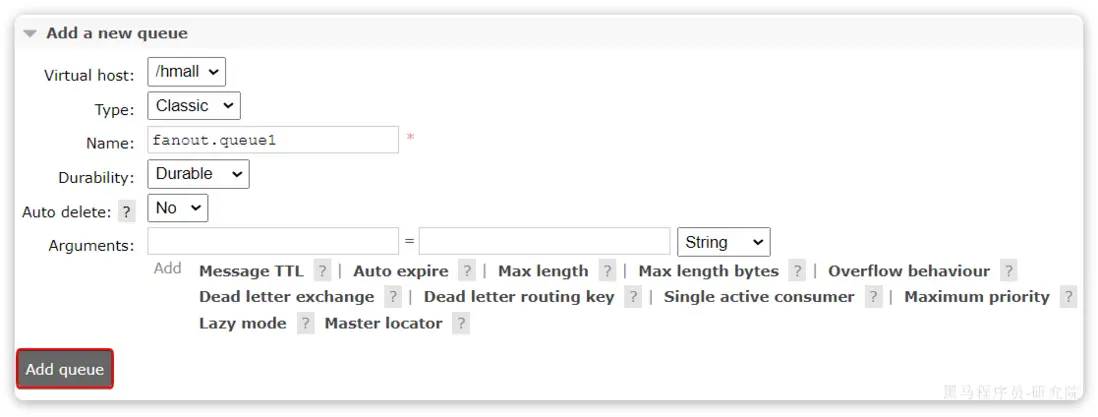
在控制枱創建隊列fanout.queue1:
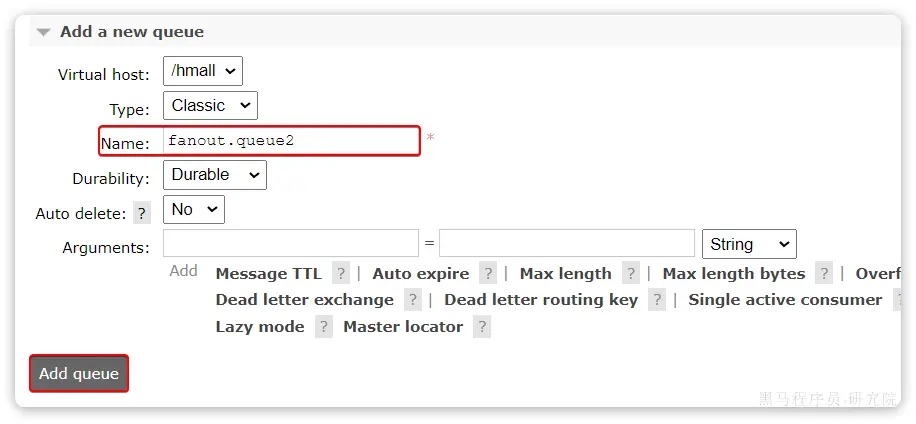
在創建一個隊列fanout.queue2:
然後再創建一個交換機:
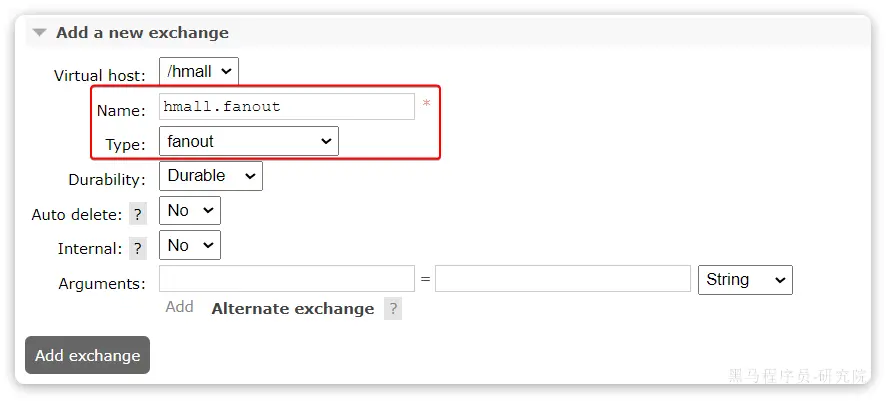
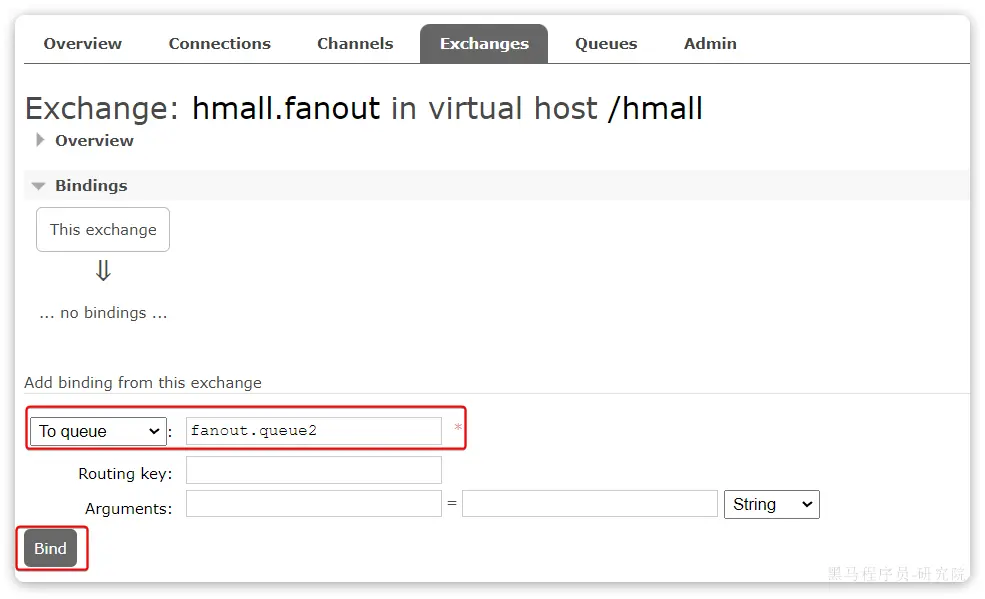
然後綁定兩個隊列到交換機:
消息發送
在publisher服務的SpringAmqpTest類中添加測試方法:
@Test
public void testFanoutExchange() {
    // 交換機名稱
    String exchangeName = "hmall.fanout";
    // 消息
    String message = "hello, everyone!";
    rabbitTemplate.convertAndSend(exchangeName, "", message);
}
消息接收
在consumer服務的SpringRabbitListener中添加兩個方法,作為消費者:
@RabbitListener(queues = "fanout.queue1")
public void listenFanoutQueue1(String msg) {
    System.out.println("消費者1接收到Fanout消息:【" + msg + "】");
}

@RabbitListener(queues = "fanout.queue2")
public void listenFanoutQueue2(String msg) {
    System.out.println("消費者2接收到Fanout消息:【" + msg + "】");
}
總結
交換機的作用是什麼?
- 接收publisher發送的消息
- 將消息按照規則路由到與之綁定的隊列
- 不能緩存消息,路由失敗,消息丟失
- FanoutExchange的會將消息路由到每個綁定的隊列
Direct交換機
在Fanout模式中,一條消息,會被所有訂閲的隊列都消費。但是,在某些場景下,我們希望不同的消息被不同的隊列消費。這時就要用到Direct類型的Exchange。

在Direct模型下:
- 隊列與交換機的綁定,不能是任意綁定了,而是要指定一個
RoutingKey(路由key) - 消息的發送方在 向 Exchange發送消息時,也必須指定消息的
RoutingKey。 - Exchange不再把消息交給每一個綁定的隊列,而是根據消息的
Routing Key進行判斷,只有隊列的Routingkey與消息的Routing key完全一致,才會接收到消息
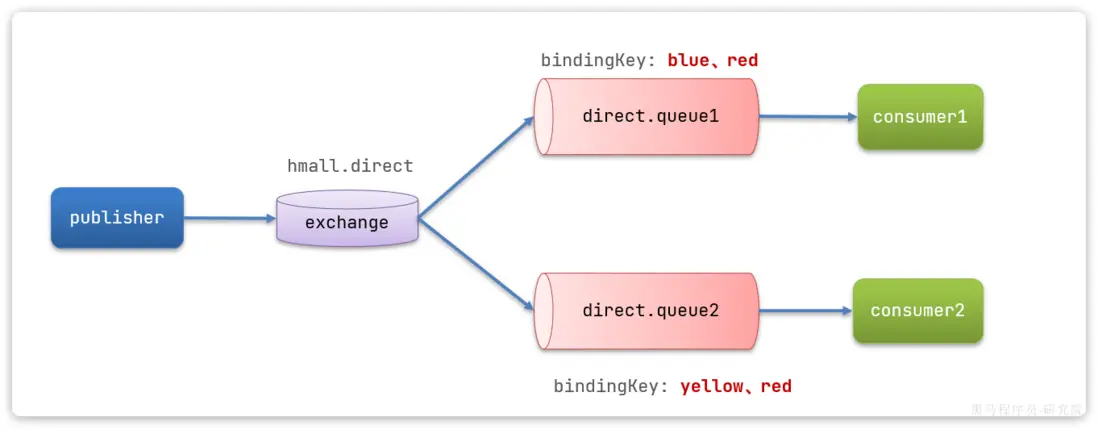
案例需求如圖:
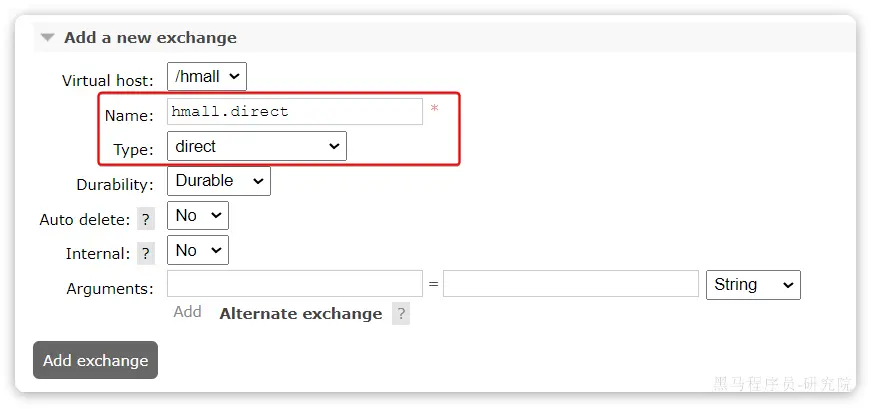
- 聲明一個名為
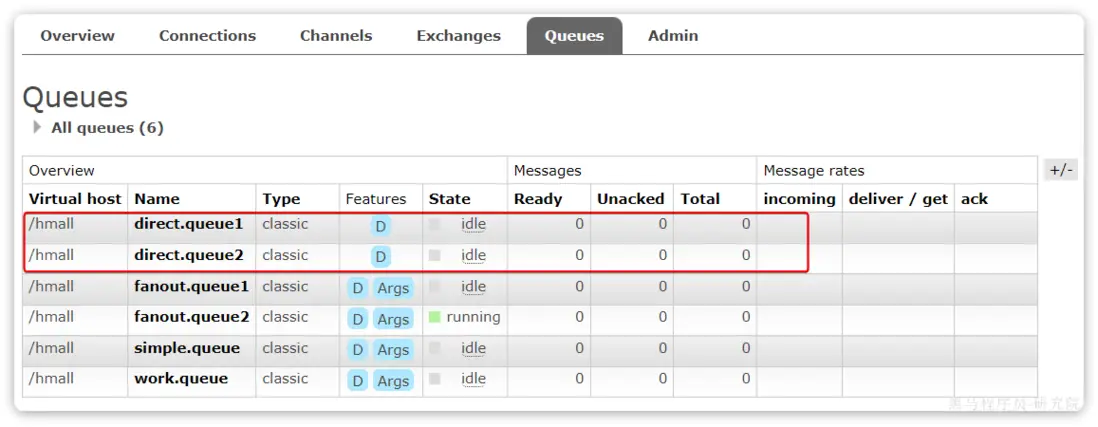
hmall.direct的交換機 - 聲明隊列
direct.queue1,綁定hmall.direct,bindingKey為blud和red - 聲明隊列
direct.queue2,綁定hmall.direct,bindingKey為yellow和red - 在
consumer服務中,編寫兩個消費者方法,分別監聽direct.queue1和direct.queue2 - 在publisher中編寫測試方法,向
hmall.direct發送消息
聲明隊列和交換機
首先在控制枱聲明兩個隊列direct.queue1和direct.queue2,這裏不再展示過程:
然後聲明一個direct類型的交換機,命名為hmall.direct:
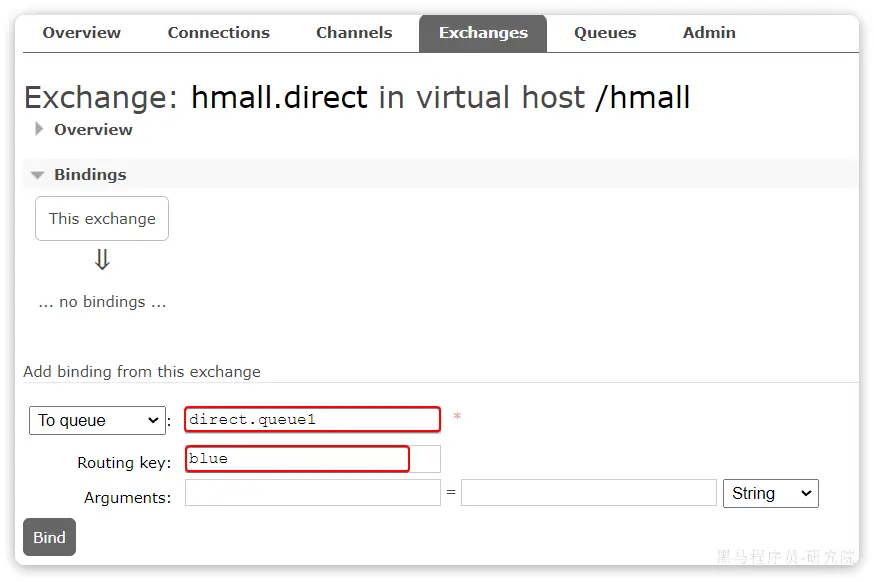
然後使用red和blue作為key,綁定direct.queue1到hmall.direct:
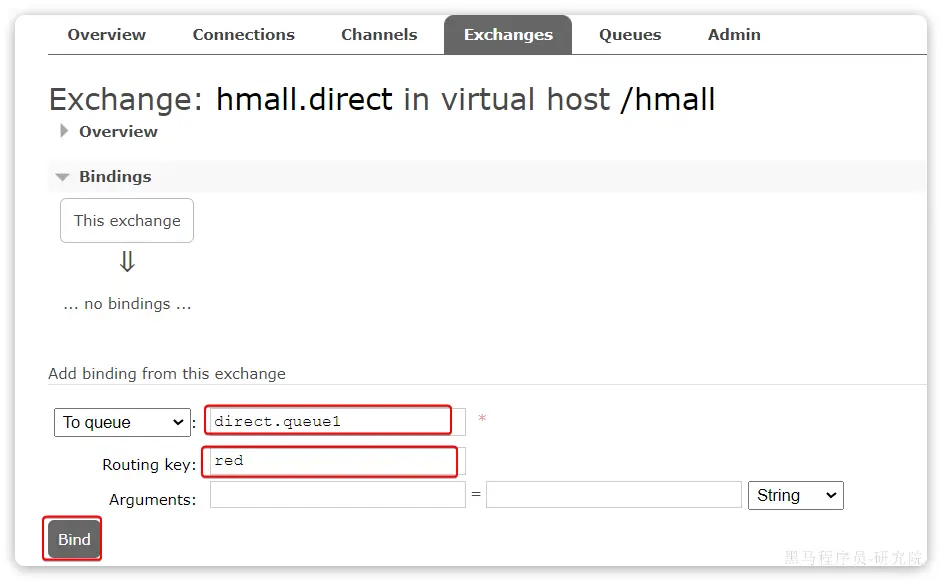
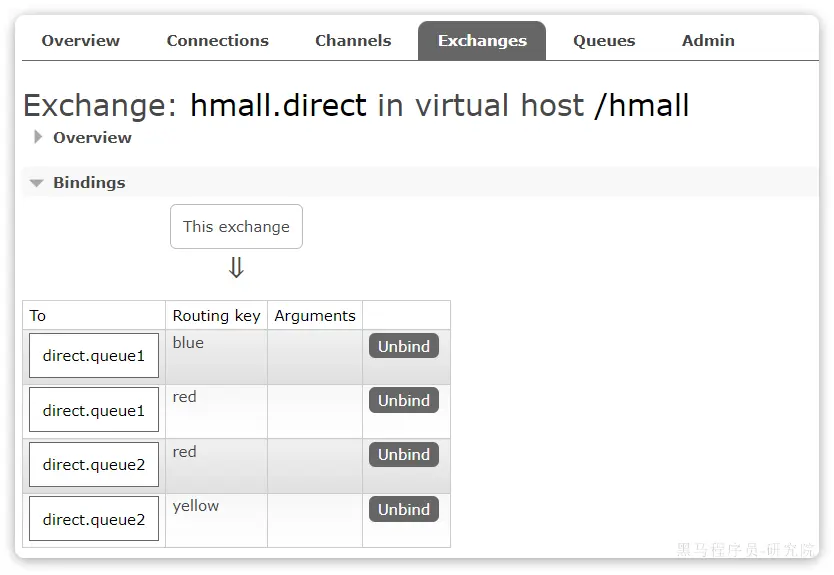
同理,使用red和yellow作為key,綁定direct.queue2到hmall.direct,步驟略,最終結果:
消息接收
在consumer服務的SpringRabbitListener中添加方法:
@RabbitListener(queues = "direct.queue1")
public void listenDirectQueue1(String msg) {
    System.out.println("消費者1接收到direct.queue1的消息:【" + msg + "】");
}

@RabbitListener(queues = "direct.queue2")
public void listenDirectQueue2(String msg) {
    System.out.println("消費者2接收到direct.queue2的消息:【" + msg + "】");
}
消息發送
在publisher服務的SpringAmqpTest類中添加測試方法:
@Test
public void testSendDirectExchange() {
    // 交換機名稱
    String exchangeName = "hmall.direct";
    // 消息
    String message = "紅色警報!日本亂排核廢水,導致海洋生物變異,驚現哥斯拉!";
    // 發送消息
    rabbitTemplate.convertAndSend(exchangeName, "red", message);
}
由於使用的red這個key,所以兩個消費者都收到了消息:

我們再切換為blue這個key:
@Test
public void testSendDirectExchange() {
    // 交換機名稱
    String exchangeName = "hmall.direct";
    // 消息
    String message = "最新報道,哥斯拉是居民自治巨型氣球,虛驚一場!";
    // 發送消息
    rabbitTemplate.convertAndSend(exchangeName, "blue", message);
}
你會發現,只有消費者1收到了消息:
總結
描述下Direct交換機與Fanout交換機的差異?
- Fanout交換機將消息路由給每一個與之綁定的隊列
- Direct交換機根據RoutingKey判斷路由給哪個隊列
- 如果多個隊列具有相同的RoutingKey,則與Fanout功能類似
Topic交換機
説明
Topic類型的Exchange與Direct相比,都是可以根據RoutingKey把消息路由到不同的隊列。
只不過Topic類型Exchange可以讓隊列在綁定BindingKey 的時候使用通配符!
BindingKey 一般都是有一個或多個單詞組成,多個單詞之間以.分割,例如: item.insert
通配符規則:
#:匹配一個或多個詞*:匹配不多不少恰好1個詞
舉例:
item.#:能夠匹配item.spu.insert或者item.spuitem.*:只能匹配item.spu
圖示:

假如此時publisher發送的消息使用的RoutingKey共有四種:
china.news代表有中國的新聞消息;china.weather代表中國的天氣消息;japan.news則代表日本新聞japan.weather代表日本的天氣消息;
解釋:
-
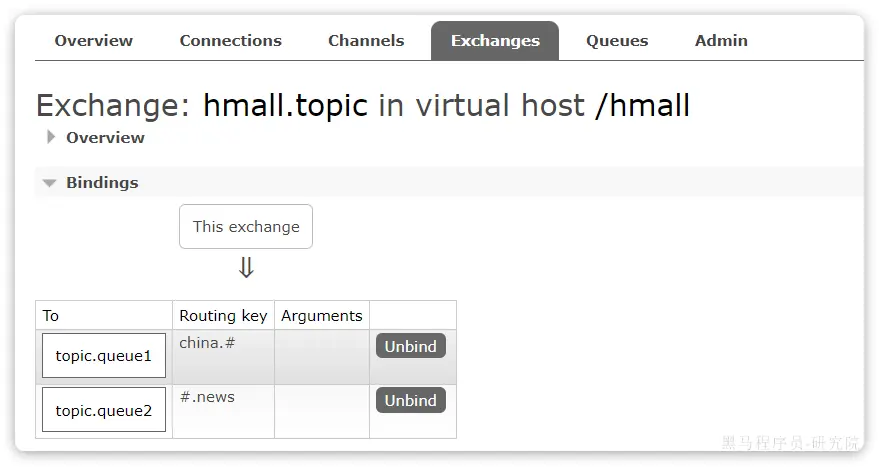
topic.queue1:綁定的是china.#,凡是以china.開頭的routing key都會被匹配到,包括:china.newschina.weather
-
topic.queue2:綁定的是#.news,凡是以.news結尾的routing key都會被匹配。包括:china.newsjapan.news
接下來,我們就按照上圖所示,來演示一下Topic交換機的用法。
首先,在控制枱按照圖示例子創建隊列、交換機,並利用通配符綁定隊列和交換機。此處步驟略。最終結果如下:
消息發送
在publisher服務的SpringAmqpTest類中添加測試方法:
/**
 * topicExchange
 */
@Test
public void testSendTopicExchange() {
    // 交換機名稱
    String exchangeName = "hmall.topic";
    // 消息
    String message = "喜報!孫悟空大戰哥斯拉,勝!";
    // 發送消息
    rabbitTemplate.convertAndSend(exchangeName, "china.news", message);
}
消息接收
在consumer服務的SpringRabbitListener中添加方法:
@RabbitListener(queues = "topic.queue1")
public void listenTopicQueue1(String msg){
    System.out.println("消費者1接收到topic.queue1的消息:【" + msg + "】");
}

@RabbitListener(queues = "topic.queue2")
public void listenTopicQueue2(String msg){
    System.out.println("消費者2接收到topic.queue2的消息:【" + msg + "】");
}
總結
描述下Direct交換機與Topic交換機的差異?
- Topic交換機接收的消息RoutingKey必須是多個單詞,以
**.**分割 - Topic交換機與隊列綁定時的bindingKey可以指定通配符
#:代表0個或多個詞*:代表1個詞
聲明隊列和交換機
在之前我們都是基於RabbitMQ控制枱來創建隊列、交換機。但是在實際開發時,隊列和交換機是程序員定義的,將來項目上線,又要交給運維去創建。那麼程序員就需要把程序中運行的所有隊列和交換機都寫下來,交給運維。在這個過程中是很容易出現錯誤的。
因此推薦的做法是由程序啓動時檢查隊列和交換機是否存在,如果不存在自動創建。
基本API
SpringAMQP提供了一個Queue類,用來創建隊列:
SpringAMQP還提供了一個Exchange接口,來表示所有不同類型的交換機:

我們可以自己創建隊列和交換機,不過SpringAMQP還提供了ExchangeBuilder來簡化這個過程:
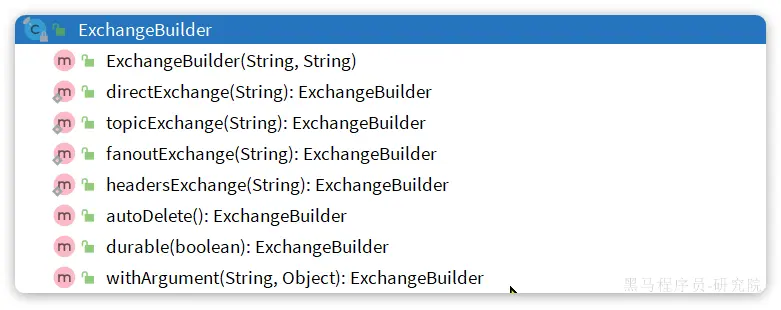
而在綁定隊列和交換機時,則需要使用BindingBuilder來創建Binding對象:
fanout示例
在consumer中創建一個類,聲明隊列和交換機:
import org.springframework.amqp.core.Binding;
import org.springframework.amqp.core.BindingBuilder;
import org.springframework.amqp.core.FanoutExchange;
import org.springframework.amqp.core.Queue;
import org.springframework.context.annotation.Bean;
import org.springframework.context.annotation.Configuration;

@Configuration
public class FanoutConfig {
    /**
     * 聲明交換機
     * @return Fanout類型交換機
     */
    @Bean
    public FanoutExchange fanoutExchange(){
        return new FanoutExchange("hmall.fanout");
    }

    /**
     * 第1個隊列
     */
    @Bean
    public Queue fanoutQueue1(){
        return new Queue("fanout.queue1");
    }

    /**
     * 綁定隊列和交換機
     */
    @Bean
    public Binding bindingQueue1(Queue fanoutQueue1, FanoutExchange fanoutExchange){
        return BindingBuilder.bind(fanoutQueue1).to(fanoutExchange);
    }

    /**
     * 第2個隊列
     */
    @Bean
    public Queue fanoutQueue2(){
        return new Queue("fanout.queue2");
    }

    /**
     * 綁定隊列和交換機
     */
    @Bean
    public Binding bindingQueue2(Queue fanoutQueue2, FanoutExchange fanoutExchange){
        return BindingBuilder.bind(fanoutQueue2).to(fanoutExchange);
    }
}
direct示例
direct模式由於要綁定多個KEY,會非常麻煩,每一個Key都要編寫一個binding:
import org.springframework.amqp.core.*;
import org.springframework.context.annotation.Bean;
import org.springframework.context.annotation.Configuration;

@Configuration
public class DirectConfig {

    /**
     * 聲明交換機
     * @return Direct類型交換機
     */
    @Bean
    public DirectExchange directExchange(){
        return ExchangeBuilder.directExchange("hmall.direct").build();
    }

    /**
     * 第1個隊列
     */
    @Bean
    public Queue directQueue1(){
        return new Queue("direct.queue1");
    }

    /**
     * 綁定隊列和交換機
     */
    @Bean
    public Binding bindingQueue1WithRed(Queue directQueue1, DirectExchange directExchange){
        return BindingBuilder.bind(directQueue1).to(directExchange).with("red");
    }
    /**
     * 綁定隊列和交換機
     */
    @Bean
    public Binding bindingQueue1WithBlue(Queue directQueue1, DirectExchange directExchange){
        return BindingBuilder.bind(directQueue1).to(directExchange).with("blue");
    }

    /**
     * 第2個隊列
     */
    @Bean
    public Queue directQueue2(){
        return new Queue("direct.queue2");
    }

    /**
     * 綁定隊列和交換機
     */
    @Bean
    public Binding bindingQueue2WithRed(Queue directQueue2, DirectExchange directExchange){
        return BindingBuilder.bind(directQueue2).to(directExchange).with("red");
    }
    /**
     * 綁定隊列和交換機
     */
    @Bean
    public Binding bindingQueue2WithYellow(Queue directQueue2, DirectExchange directExchange){
        return BindingBuilder.bind(directQueue2).to(directExchange).with("yellow");
    }
}
基於註解聲明
基於@Bean的方式聲明隊列和交換機比較麻煩,Spring還提供了基於註解方式來聲明。
例如,我們同樣聲明Direct模式的交換機和隊列:
@RabbitListener(bindings = @QueueBinding(
    value = @Queue(name = "direct.queue1"),
    exchange = @Exchange(name = "hmall.direct", type = ExchangeTypes.DIRECT),
    key = {"red", "blue"}
))
public void listenDirectQueue1(String msg){
    System.out.println("消費者1接收到direct.queue1的消息:【" + msg + "】");
}

@RabbitListener(bindings = @QueueBinding(
    value = @Queue(name = "direct.queue2"),
    exchange = @Exchange(name = "hmall.direct", type = ExchangeTypes.DIRECT),
    key = {"red", "yellow"}
))
public void listenDirectQueue2(String msg){
    System.out.println("消費者2接收到direct.queue2的消息:【" + msg + "】");
}
是不是簡單多了。
再試試Topic模式:
@RabbitListener(bindings = @QueueBinding(
    value = @Queue(name = "topic.queue1"),
    exchange = @Exchange(name = "hmall.topic", type = ExchangeTypes.TOPIC),
    key = "china.#"
))
public void listenTopicQueue1(String msg){
    System.out.println("消費者1接收到topic.queue1的消息:【" + msg + "】");
}

@RabbitListener(bindings = @QueueBinding(
    value = @Queue(name = "topic.queue2"),
    exchange = @Exchange(name = "hmall.topic", type = ExchangeTypes.TOPIC),
    key = "#.news"
))
public void listenTopicQueue2(String msg){
    System.out.println("消費者2接收到topic.queue2的消息:【" + msg + "】");
}
消息轉換器
Spring的消息發送代碼接收的消息體是一個Object:
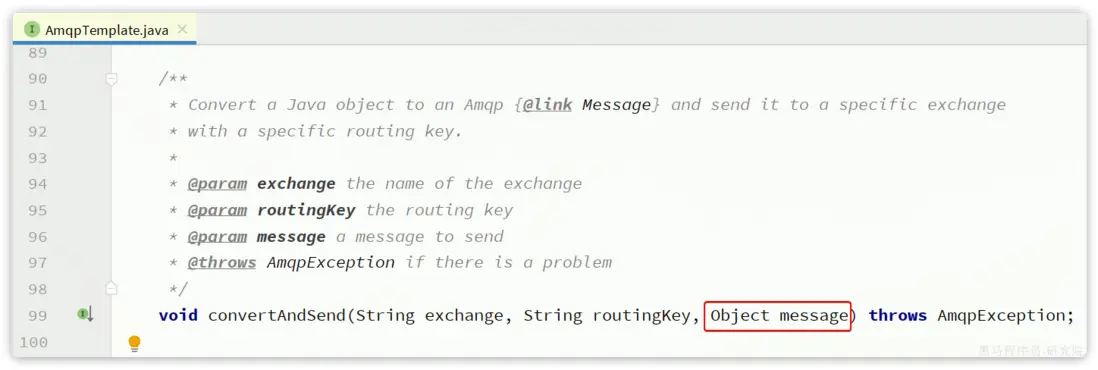
而在數據傳輸時,它會把你發送的消息序列化為字節發送給MQ,接收消息的時候,還會把字節反序列化為Java對象。
只不過,默認情況下Spring採用的序列化方式是JDK序列化。眾所周知,JDK序列化存在下列問題:
- 數據體積過大
- 有安全漏洞
- 可讀性差
我們來測試一下。
測試默認轉換器
1)創建測試隊列
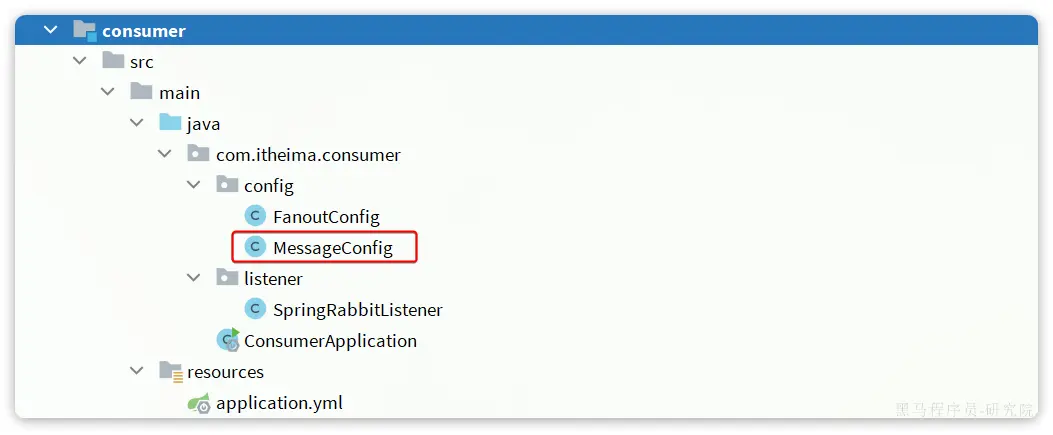
首先,我們在consumer服務中聲明一個新的配置類:
利用@Bean的方式創建一個隊列,具體代碼:
import org.springframework.amqp.core.Queue;
import org.springframework.context.annotation.Bean;
import org.springframework.context.annotation.Configuration;

@Configuration
public class MessageConfig {

    @Bean
    public Queue objectQueue() {
        return new Queue("object.queue");
    }
}
注意,這裏我們先不要給這個隊列添加消費者,我們要查看消息體的格式。
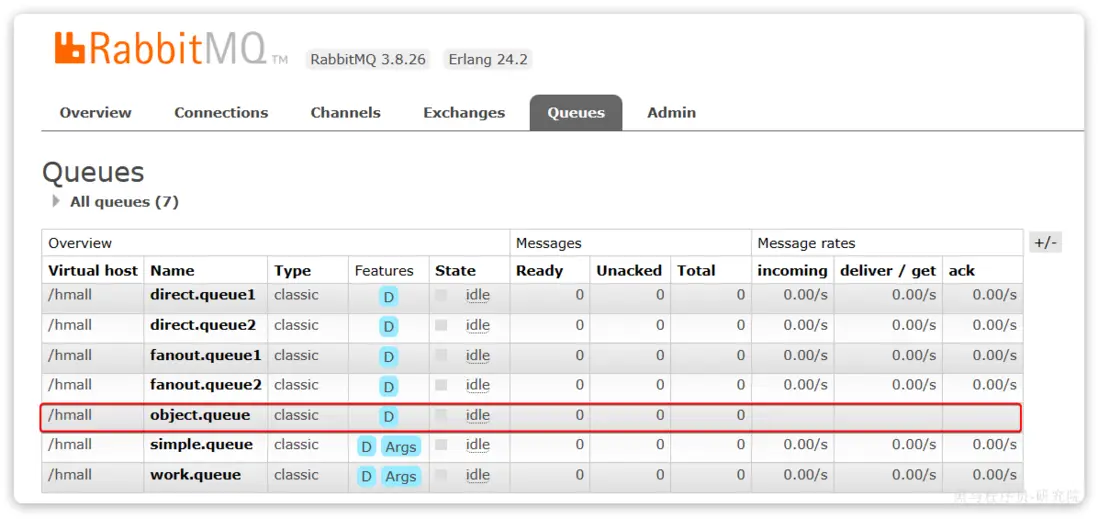
重啓consumer服務以後,該隊列就會被自動創建出來了:
2)發送消息
我們在publisher模塊的SpringAmqpTest中新增一個消息發送的代碼,發送一個Map對象:
@Test
public void testSendMap() throws InterruptedException {
    // 準備消息
    Map<String,Object> msg = new HashMap<>();
    msg.put("name", "柳巖");
    msg.put("age", 21);
    // 發送消息
    rabbitTemplate.convertAndSend("object.queue", msg);
}
發送消息後查看控制枱:
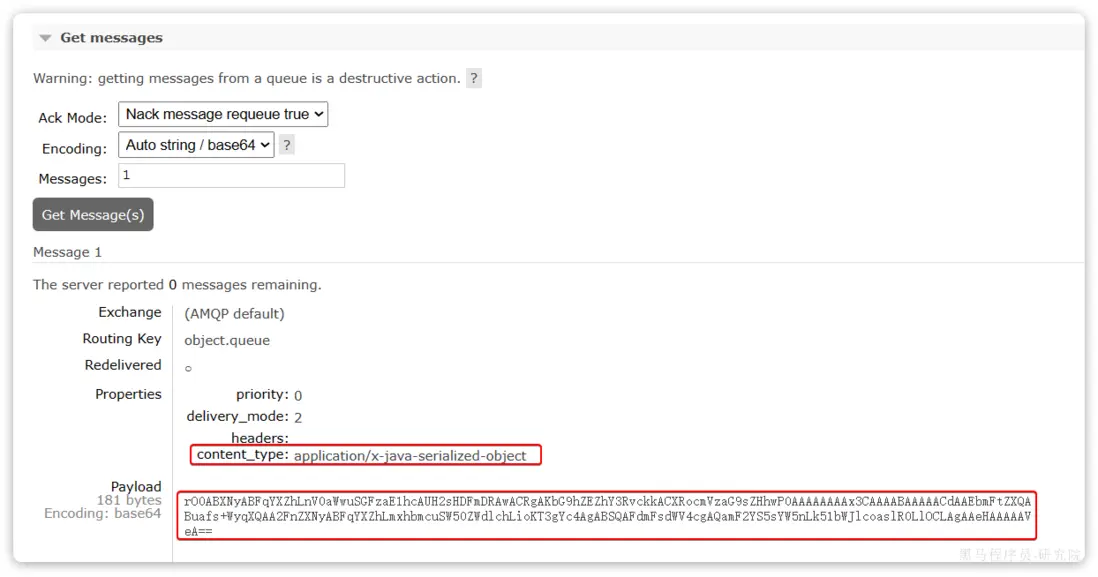
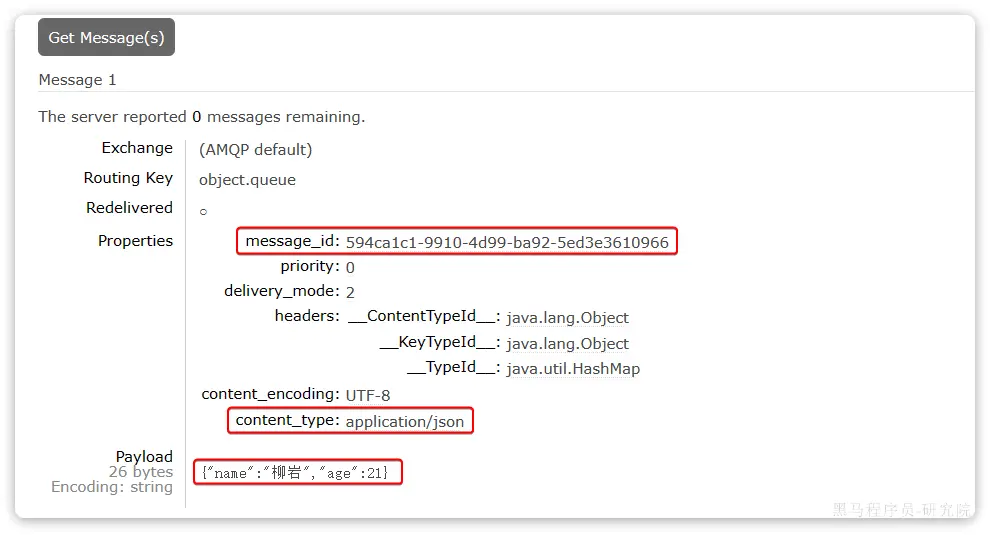
可以看到消息格式非常不友好。
配置JSON轉換器
顯然,JDK序列化方式並不合適。我們希望消息體的體積更小、可讀性更高,因此可以使用JSON方式來做序列化和反序列化。
在publisher和consumer兩個服務中都引入依賴:
<dependency>
    <groupId>com.fasterxml.jackson.dataformat</groupId>
    <artifactId>jackson-dataformat-xml</artifactId>
    <version>2.9.10</version>
</dependency>注意,如果項目中引入了spring-boot-starter-web依賴,則無需再次引入Jackson依賴。
配置消息轉換器,在publisher和consumer兩個服務的啓動類中添加一個Bean即可:
@Bean
public MessageConverter messageConverter(){
    // 1.定義消息轉換器
    Jackson2JsonMessageConverter jackson2JsonMessageConverter = new Jackson2JsonMessageConverter();
    // 2.配置自動創建消息id,用於識別不同消息,也可以在業務中基於ID判斷是否是重複消息
    jackson2JsonMessageConverter.setCreateMessageIds(true);
    return jackson2JsonMessageConverter;
}
消息轉換器中添加的messageId可以便於我們將來做冪等性判斷。
此時,我們到MQ控制枱刪除object.queue中的舊的消息。然後再次執行剛才的消息發送的代碼,到MQ的控制枱查看消息結構:
消費者接收Object
我們在consumer服務中定義一個新的消費者,publisher是用Map發送,那麼消費者也一定要用Map接收,格式如下:
@RabbitListener(queues = "object.queue")
public void listenSimpleQueueMessage(Map<String, Object> msg) throws InterruptedException {
    System.out.println("消費者接收到object.queue消息:【" + msg + "】");
}
常用的 RabbitMQ 插件
RabbitMQ 支持許多插件,這些插件可以擴展 RabbitMQ 的功能和特性。以下是一些常用的 RabbitMQ 插件:
- Management Plugin: RabbitMQ 管理插件提供了一個 Web 管理界面,用於監控和管理 RabbitMQ 服務器。可以查看隊列、交換機、連接、通道等的狀態,並進行配置和操作。
- Shovel Plugin: Shovel 插件用於將消息從一個 RabbitMQ 服務器傳遞到另一個 RabbitMQ 服務器,實現消息複製和跨集羣通信。它可以用於實現數據複製、故障恢復、數據中心間同步等。
- Federation Plugin: Federation 插件允許不同 RabbitMQ 集羣之間建立聯合,實現消息的跨集羣傳遞。這對於構建分佈式系統、將消息從一個地理位置傳遞到另一個地理位置非常有用。
- STOMP Plugin: STOMP插件允許使用 STOMP 協議與 RabbitMQ 進行通信。這對於使用非 AMQP 協議的客户端與 RabbitMQ 交互非常有用,例如使用 WebSocket 的 Web 應用程序。
- Prometheus Plugin: Prometheus 插件用於將 RabbitMQ 的性能指標導出到 Prometheus 監控系統,以便進行性能監控和警報。
- Delayed Message Plugin: 延遲消息插件允許發佈延遲交付的消息,使你能夠在稍後的時間點將消息傳遞給消費者。這對於實現定時任務、延遲重試等場景非常有用。


