


單實例微前端設計思想
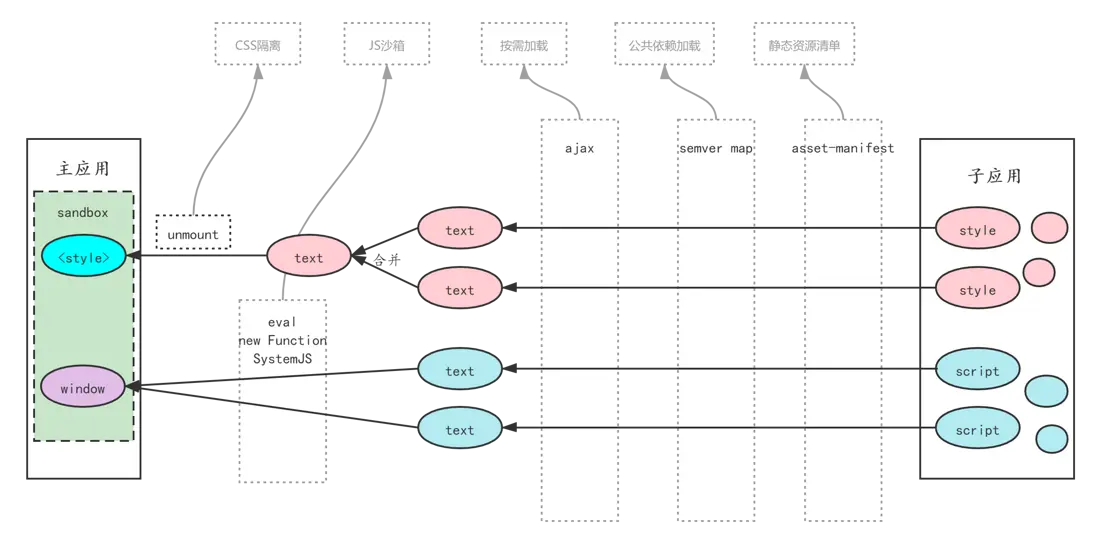
- 拿到子應用構建後的資源清單,一般項目中都會生成一個
asset-manifest.json文件,用來記錄各個子應用的入口資源url信息,以便在切換不同子應用時使用模塊加載器去遠程加載。因為每次子應用更新後入口資源的hash通常會變化,所以需要服務端定時去更新該配置表,以便框架能及時加載子應用最新的資源; - 同樣,子應用之間的一些公共依賴通過配置文件記錄;
- 主應用監聽路由按需加載子應用模塊;
- 主應用請求獲取到
JS模塊後,可以通過eval、new Function、SystemJS方式執行JS模塊,拿到子應用生命週期鈎子,掛載到DOM。這一過程為了避免全局變量的命名衝突,應該做到JS沙箱隔離; - 主應用請求獲取到
CSS模塊後,拼接CSS字符串,使用style標籤動態注入到頁面中,為了避免子應用之間樣式衝突,在unmount階段將注入的style標籤刪除;
single-spa
Single-spa 是一個將多個單頁面應用聚合為一個整體應用的 JavaScript 微前端框架。 使用 single-spa 進行前端架構設計可以帶來很多好處,例如:
- 在同一頁面上使用多個前端框架 而不用刷新頁面 (React, AngularJS, Angular, Ember, 你正在使用的框架)
- 獨立部署每一個單頁面應用
- 新功能使用新框架,舊的單頁應用不用重寫可以共存
- 改善初始加載時間,遲加載代碼
single-spa 借鑑了組件生命週期的思想,它為應用設置了針對路由的生命週期。當應用匹配路由處於激活狀態時,應用會把自身的內容掛載到頁面上;反之則卸載。
該框架核心提供兩個功能,我這裏稱之為加載器和包裝器。加載器用來調度子應用,決定何時展示哪一個子應用,可以把它理解為電源。包裝器可以把子應用進行包裝,給子應用提供生命週期鈎子,並將其導出,使得加載器可以使用它們,它相當於電源適配器。

single-spa-react是針對react項目的包裝器
import React from 'react'
import ReactDOM from 'react-dom'
import singleSpaReact from 'single-spa-react';

const domElementGetter = () => {
  let el = document.getElementById("micro-content");
  if (!el) {
    el = document.createElement('div');
    el.id = 'micro-content';
    document.body.appendChild(el);
  }

  return el;
}

export const singleSpaPacker = (rootComponent: React.FC<any>) => {
  const reactLifecycles = singleSpaReact({
    React,
    ReactDOM,
    rootComponent,
    domElementGetter,
  })

  const bootstrap = (props: any) => {
    return reactLifecycles.bootstrap(props);
  }

  const mount = (props: any) => {
    return reactLifecycles.mount(props);
  }

  const unmount = (props: any) => {
    return reactLifecycles.unmount(props);
  }

  return { bootstrap, mount, unmount };
}
import React from 'react';
import { HashRouter } from 'react-router-dom';
import { renderRoutes } from 'react-router-config';
import routes from './config/routes';
import { Provider } from 'mobx-react';
import stores from './stores';
const App = () => {
return (
<HashRouter>
<Provider {...stores}>{renderRoutes(routes)}</Provider>
</HashRouter>
)
}
export default App;import ReactDOM from 'react-dom';
import React from 'react';
import { singleSpaPacker } from './utils';
import App from './App';
if (process.env.NODE_ENV === 'development') {
ReactDOM.render(
<React.StrictMode>
<App />
</React.StrictMode>,
document.getElementById('root')
);
}
const { bootstrap, mount, unmount } = singleSpaPacker(App);
export { bootstrap, mount, unmount };registerApplication是single-spa提供的加載器,包含四個參數:
appName: 註冊的應用名稱;applicationOrLoadingFn:應用入口文件(必須是一個函數,返回一個函數或者一個promise);activityFn:控制應用是否激活的函數(必須是一個純函數,接受window.location作為參數,返回一個boolean);customProps:在包裝器生命週期函數中傳遞給子應用的props(應該是一個對象,可選)。
import { LifeCycles, registerApplication, start } from 'single-spa';
/** 匹配路由 */
const pathPrefix = (prefix: string) => {
return (location: Location) => location.hash.startsWith(prefix);
}
/** 按需加載子應用 */
const applicationOrLoadingFn = async (url: string, appName: string): Promise<LifeCycles> => {
// coding
}
registerApplication(appName, ({ name }) => applicationOrLoadingFn(url, name), pathPrefix(hash));
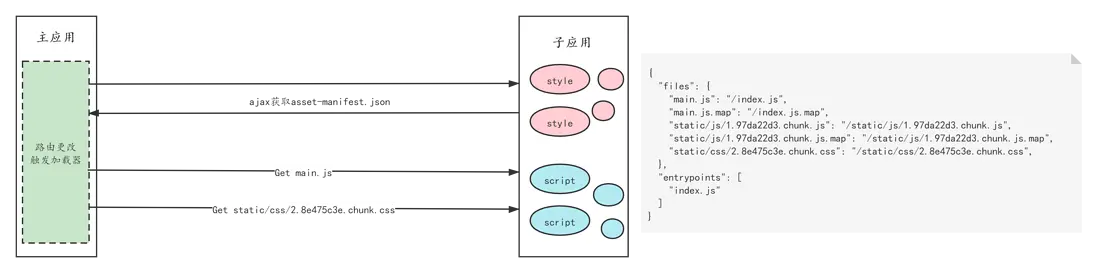
start();子應用資源清單
上面single-spa方案流程中提到子應用構建生成的資源清單應該在部署時寫入資源配置表中,例子中我準備直接請求子應用的資源清單。
構建配置 stats-webpack-plugin 插件,生成一個資源清單manifest.json文件,create-react-app搭建的react項目中webpack默認使用webpack-manifest-plugin生成資源清單。
子應用模塊加載
動態加載子應用主要是讓子應用自己將內容渲染到某個 DOM 節點,因而動態加載的目的主要是執行子應用的代碼,另外是需要拿到子工程聲明的一些生命週期鈎子。
由於子應用通常又有集成部署、獨立部署兩種模式同時支持的需求,使得我們只能選擇 umd 這種兼容性的模塊格式打包我們的子應用。
// src/config-overrides.js
const pkg = require('./package.json');
const path = require('path')

module.exports = function override(config, env) {
  config.entry = path.resolve(__dirname, 'src/index.tsx');
  config.output.library = pkg.name;
  config.output.libraryTarget = 'window';

  delete config.optimization;

  return config;
};我在使用create-react-app腳手架搭建React微前端項目時,選擇umd模塊格式,但是執行子應用腳本時生命週期鈎子沒有賦值給window[pkg.name],因為主應用全局環境下存在define函數屬性,導致webpackUniversalModuleDefinition在做環境判斷時採用的是amd模塊格式,而主應用中並沒有引入RequestJS,因此無法拿到鈎子


因此,我將libraryTarget 設置成 'window',但是window[pkg.name]拿到的值卻是數值1,查看main.chunk.js發現window[pkg.name]得到的是數組push後的返回值

後面我將刪除掉webpack中optimization配置後,window[pkg.name]能拿到鈎子

JS加載
dynamic script
/** 獲取構建後生成的資源清單asset-manifest.json */
const fetchAssets = (url: string) => {
  return new Promise<string[]>(async (resolve) => {
    const mainfest = 'asset-manifest.json';
    const { data } = await axios.get(`${url}/${mainfest}?version=${Date.now()}`);
    const { files } = data;
    resolve(Object.values(files as string[]).filter(s => /\^*.(js|css)$/.test(s)));
  });
}

/** dynamic script */
const insertScript = (src: string) => {
  return new Promise<void>((resolve, reject) => {
    const script = document.createElement('script');
    script.charset = 'utf-8';
    script.async = true;
    script.crossOrigin = 'anonymous';
    script.onload = () => {
      document.head.removeChild(script);
      resolve();
    };
    script.onerror = reject;
    script.src = src;
    document.head.appendChild(script);
  })
}

/** 按需加載子應用 */
const applicationOrLoadingFn = async (url: string, appName: string): Promise<LifeCycles> => {
  /** 獲取mainfest */
  const files = await fetchAssets(url);
  const JSList = files.filter(s => /\^*.js$/.test(s));
  /** 動態執行JS模塊 */
  await Promise.all(JSList.map((file: string) => insertScript(`${url}${file}`)))

  /** 返回子應用生命週期鈎子 */
  return (window as any)[appName];
}啓動項目訪問子應用時,發現window[appName]並沒有拿到鈎子,但是動態腳本全部寫入到頁面中,請求也發起了


我很懷疑上面的現場,為了驗證這個問題,我寫了一個html,直接注入script,然後使用http-server -p 8888 --cors啓動
<!DOCTYPE html>
<html lang="en">
<head>
  <meta charset="UTF-8">
  <meta http-equiv="X-UA-Compatible" content="IE=edge">
  <meta name="viewport" content="width=device-width, initial-scale=1.0">
  <title>Document</title>
</head>
<body>
  <script src="http://localhost:8234/static/js/main.00f2ddab.js?version=1626774357341"></script>
  <script src="http://localhost:8234/static/js/1.5ba77f0d.chunk.js?version=1626774357341"></script>
  <script src="http://localhost:8234/static/js/2.023d622e.chunk.js?version=1626774357352"></script>
  <script src="http://localhost:8234/static/js/3.92fd6021.chunk.js?version=1626774357374"></script>
</body>
</html>發現例子通過window[appName]可以拿到聲明週期鈎子

那麼為什麼動態注入script沒有執行呢?因為React 從設計層面上就具備了很好的防禦 XSS 的能力,所以雖然你在"檢查元素"時看到了<script>,但HTML裏的代碼實際是\<script\>,注入行為沒成功,代碼沒執行
React官方中提到了React DOM在渲染所有輸入內容之前,默認會進行轉義。它可以確保在你的應用中,永遠不會注入那些並非自己明確編寫的內容。所有的內容在渲染之前都被轉換成了字符串,因此惡意代碼無法成功注入,從而有效地防止了XSS攻擊。詳情可以參考淺談 React 中的 XSS 攻擊
eval/new Function
new Function()方案:用 fetch 或者其他請求庫直接拿到子應用內容,然後用 new Function 將子模塊作為 function 的函數體來執行,將輸出掛載到 window,跟 eval 是類似的,但使用起來會清晰一些。
eval()方案:用 fetch 或者其他請求庫直接拿到子應用內容,直接 eval 執行,將輸出掛載到 window。
/** 根據路由加載子應用 */
const applicationOrLoadingFn = async (url: string, appName: string): Promise<LifeCycles> => {
  /** 獲取mainfest */
  const files = await fetchAssets(url);
  const JSList = files.filter(s => /\^*.js$/.test(s));

  await Promise.all(JSList.map((file: string) => axios.get(`${url}${file}?version=${Date.now()}`))).then(res => {
    res.forEach(r => {
      // new Function(r.data)()
      // eval(r.data)會報錯
      window.eval(r.data) // 或者eval.call(null, r.data)
    })
  })

  return (window as any)[appName];
}注意:使用eval執行子應用模塊時需要指定eval執行函數體內的this指針,不然控制枱會報Cannot read property 'webpackJsonpicec-cloud-inquiry-mall-react' of undefined


因為eval在鬆散模式下運行代碼會在當前的作用域中創建局部變量,不會把webpackJsonpicec-cloud-inquiry-mall-react掛載到全局環境中,因此拿不到,所以需要在全局環境中調用eval。參考以 eval() 和 new Function() 執行JavaScript代碼
window.eval(r.data) // 或者eval.call(null, r.data)SystemJS
SystemJS 是一個插件化的、通用的模塊加載器,它能在瀏覽器或者 NodeJS 上動態加載模塊,並且支持 CommonJS、AMD、全局模塊對象和 ES6 模塊,也是Angular2官推的加載器。通過使用插件,它不僅可以加載 JavaScript,還可以加載 CoffeeScript 和 TypeScript。雖然Chrome瀏覽器其實已經支持js代碼中的import、export有一段時間了,但是其他瀏覽器還不支持,要想使用import動態加載只能引入polyfill。
通常它支持創建的插件種類有:
CSSSystem.import('my/file.css!')ImageSystem.import('some/image.png!image')JSONSystem.import('some/data.json!').then(function(json){})MarkdownSystem.import('app/some/project/README.md!').then(function(html) {})TextSystem.import('some/text.txt!text').then(function(text) {})WebFontSystem.import('google Port Lligat Slab, Droid Sans !font')
SystemJS原理核心思想:動態創建script標籤執行模塊,將執行結果模塊導出

SystemJS是在頁面完成加載後解析importmap,然後加載執行模塊,但是我的importmap並不是在頁面加載前注入的,而是在加載完後動態注入的,因此不會被解析執行。那怎麼辦呢?好在SystemJS@6.4.0之後開始支持動態注入importmap,需要在主應用html中引入dynamic-import-maps.js
// dynamic-import-maps.js
(function(){/*
 * Support for live DOM updating import maps
 */
new MutationObserver(function (mutations) {
  for (var i = 0; i < mutations.length; i++) {
    var mutation = mutations[i];
    if (mutation.type === 'childList')
    for (var j = 0; j < mutation.addedNodes.length; j++) {
      var addedNode = mutation.addedNodes[j];
      if (addedNode.tagName === 'SCRIPT' && addedNode.type === 'systemjs-importmap' && !addedNode.sp) {
        System.prepareImport(true);
        break;
      }
    }
  }
}).observe(document, { childList: true, subtree: true });}());
因此,我們可以在加載函數中動態注入importmap,然後執行返回子應用聲明週期鈎子
interface IImports {
  imports: {
    [key: string]: string;
  }
}

/** 動態注入importMap */
const insertNewImportMap = (newMapJSON: IImports) => {
  return new Promise<void>(resolve => {
      const newScript = document.createElement('script');
      newScript.type = 'systemjs-importmap';
      newScript.text = JSON.stringify(newMapJSON);

      /** 刪除上次注入的importmap */
      [].filter.call(document.querySelectorAll('script'), (script) => script.type === 'systemjs-importmap').forEach(s => document.head.removeChild(s));

      document.head.appendChild(newScript);
      resolve();
  })
}

/** 根據路由加載子應用 */
const applicationOrLoadingFn = async (url: string, appName: string): Promise<LifeCycles> => {
  /** 獲取mainfest */
  const files = await fetchAssets(url);
  /** 動態importmap */
  const maps: IImports = { imports: {} } as IImports;
  const JSList = files.filter(s => /\^*.js$/.test(s));

  JSList.forEach(async (file: string) => {
    maps.imports[`@${appName}${file}`] = `${url}${file}?version=${Date.now()}`
  });
  await insertNewImportMap(maps);

  await Promise.all(Object.keys(maps.imports).map((key: string) => (window as any).System.import(key)))

  return (window as any)[appName];
}疑問:SystemJS也是動態創建script加載執行模塊,跟直接創建動態script加載執行模塊有什麼區別嗎?為什麼SystemJS動態script加載執行模塊時不會遇到XSS防禦呢?
CSS加載
dynamic style
獲取資源清單中的所有CSS,拼接成字符串,使用<style>注入頁面中
/** 根據路由加載子應用 */
const applicationOrLoadingFn = async (url: string, appName: string): Promise<LifeCycles> => {
  /** 獲取mainfest */
  const files = await fetchAssets(url);
  /** 動態importmap */
  const maps: IImports = { imports: {} } as IImports;
  const JSList = files.filter(s => /\^*.js$/.test(s));
  const styleText: string = '';
  const CSSList = files.filter(s => /\^*.css$/.test(s));

  /** 注入importmap */
  JSList.forEach(async (file: string) => {
    maps.imports[`@${appName}${file}`] = `${url}${file}?version=${Date.now()}`
  });
  await insertNewImportMap(maps);

  /** 注入style */
  await Promise.all(CSSList.map((file: string) => axios.get(`${url}${file}?version=${Date.now()}`))).then(res => {
    styleText = res.map(r => r.data).join('\n');
    const style = document.createElement('style');
    style.id = appName;
    style.appendChild(document.createTextNode(styleText));
    document.head.appendChild(style);
  })

  await Promise.all(Object.keys(maps.imports).map((key: string) => (window as any).System.import(key)))

  return (window as any)[appName];
}
沙箱隔離
JS沙箱
針對 JS 隔離的問題,我們獨創了一個運行時的 JS 沙箱。簡單畫了個架構圖:

即在應用的 bootstrap 及 mount 兩個生命週期開始之前分別給全局狀態打下快照,然後當應用切出/卸載時,將狀態回滾至 bootstrap 開始之前的階段,確保應用對全局狀態的污染全部清零。而當應用二次進入時則再恢復至 mount 前的狀態的,從而確保應用在 remount 時擁有跟第一次 mount 時一致的全局上下文。
class Sandbox {
  constructor(name) {
    this.name = name;
    this.modifyMap = {}; // 存放修改的屬性
    this.windowSnapshot = {};
  }

  active() {
    // 緩存active狀態的沙箱
    this.windowSnapshot = {};
    for (const item in window) {
      this.windowSnapshot[item] = window[item];
    }
    Object.keys(this.modifyMap).forEach(p => {
      window[p] = this.modifyMap[p];
    })
  }

  inactive() {
    for (const item in window) {
      if (this.windowSnapshot[item] !== window[item]) {
        // 記錄變更
        this.modifyMap[item] = window[item];
        // 還原window
        window[item] = this.windowSnapshot[item];
      }
    }
  }
}
/** single-spa應用包裝器 */
export const singleSpaPacker = (rootComponent: React.FC<any>) => {
const reactLifecycles = singleSpaReact({
React,
ReactDOM,
rootComponent,
domElementGetter,
})
const sandbox = new Sandbox('');
const bootstrap = (props: any) => {
diffSandbox.active();
return reactLifecycles.bootstrap(props);
}
const mount = (props: any) => {
return reactLifecycles.mount(props);
}
const unmount = (props: any) => {
diffSandbox.inactive();
return reactLifecycles.unmount(props);
}
return { bootstrap, mount, unmount };
}CSS隔離
在使用create-react-app創建的項目中,如果照下面方式引入樣式是不會進行css module和postcss處理
import 'index.css';
// 或者import 'index.scss';

const Demo = () => (
  <span className='text'/>
)

// 構建後注入頁面的樣式
<style>
  .text {}
</style>一般我們在項目中使用第三方組件庫時會這樣引入,比如引入antd樣式
import 'antd/dist/antd.css';假如兩個子應用中都是用了antd,但是如果引入的antd版本不一樣,那麼就可能會產生樣式衝突。
附上react-scripts構建時對樣式處理的關鍵代碼,不難看出對import 'index.css'或者import 'index.scss'這兩種引入方式不會進行css module和postcss處理
// style files regexes
const cssRegex = /\.css$/;
const cssModuleRegex = /\.module\.css$/;
const sassRegex = /\.(scss|sass)$/;
const sassModuleRegex = /\.module\.(scss|sass)$/;

// common function to get style loaders
const getStyleLoaders = (cssOptions, preProcessor) => {
  const loaders = [
    isEnvDevelopment && require.resolve('style-loader'),
    isEnvProduction && {
      loader: MiniCssExtractPlugin.loader,
      // css is located in `static/css`, use '../../' to locate index.html folder
      // in production `paths.publicUrlOrPath` can be a relative path
      options: paths.publicUrlOrPath.startsWith('.')
        ? { publicPath: '../../' }
        : {},
    },
    {
      loader: require.resolve('css-loader'),
      options: cssOptions,
    },
    {
      // Options for PostCSS as we reference these options twice
      // Adds vendor prefixing based on your specified browser support in
      // package.json
      loader: require.resolve('postcss-loader'),
      options: {
        // Necessary for external CSS imports to work
        // https://github.com/facebook/create-react-app/issues/2677
        ident: 'postcss',
        plugins: () => [
          require('postcss-flexbugs-fixes'),
          require('postcss-preset-env')({
            autoprefixer: {
              flexbox: 'no-2009',
            },
            stage: 3,
          }),
          // Adds PostCSS Normalize as the reset css with default options,
          // so that it honors browserslist config in package.json
          // which in turn let's users customize the target behavior as per their needs.
          postcssNormalize(),
        ],
        sourceMap: isEnvProduction ? shouldUseSourceMap : isEnvDevelopment,
      },
    },
  ].filter(Boolean);
  if (preProcessor) {
    loaders.push(
      {
        loader: require.resolve('resolve-url-loader'),
        options: {
          sourceMap: isEnvProduction ? shouldUseSourceMap : isEnvDevelopment,
          root: paths.appSrc,
        },
      },
      {
        loader: require.resolve(preProcessor),
        options: {
          sourceMap: true,
        },
      }
    );
  }
  return loaders;
};


// "postcss" loader applies autoprefixer to our CSS.
// "css" loader resolves paths in CSS and adds assets as dependencies.
// "style" loader turns CSS into JS modules that inject <style> tags.
// In production, we use MiniCSSExtractPlugin to extract that CSS
// to a file, but in development "style" loader enables hot editing
// of CSS.
// By default we support CSS Modules with the extension .module.css
{
  test: cssRegex,
  exclude: cssModuleRegex,
  use: getStyleLoaders({
    importLoaders: 1,
    sourceMap: isEnvProduction
      ? shouldUseSourceMap
      : isEnvDevelopment,
  }),
  // Don't consider CSS imports dead code even if the
  // containing package claims to have no side effects.
  // Remove this when webpack adds a warning or an error for this.
  // See https://github.com/webpack/webpack/issues/6571
  sideEffects: true,
},
// Adds support for CSS Modules (https://github.com/css-modules/css-modules)
// using the extension .module.css
{
  test: cssModuleRegex,
  use: getStyleLoaders({
    importLoaders: 1,
    sourceMap: isEnvProduction
      ? shouldUseSourceMap
      : isEnvDevelopment,
    modules: {
      getLocalIdent: getCSSModuleLocalIdent,
    },
  }),
},
// Opt-in support for SASS (using .scss or .sass extensions).
// By default we support SASS Modules with the
// extensions .module.scss or .module.sass
{
  test: sassRegex,
  exclude: sassModuleRegex,
  use: getStyleLoaders(
    {
      importLoaders: 3,
      sourceMap: isEnvProduction
        ? shouldUseSourceMap
        : isEnvDevelopment,
    },
    'sass-loader'
  ),
  // Don't consider CSS imports dead code even if the
  // containing package claims to have no side effects.
  // Remove this when webpack adds a warning or an error for this.
  // See https://github.com/webpack/webpack/issues/6571
  sideEffects: true,
},
// Adds support for CSS Modules, but using SASS
// using the extension .module.scss or .module.sass
{
  test: sassModuleRegex,
  use: getStyleLoaders(
    {
      importLoaders: 3,
      sourceMap: isEnvProduction
        ? shouldUseSourceMap
        : isEnvDevelopment,
      modules: {
        getLocalIdent: getCSSModuleLocalIdent,
      },
    },
    'sass-loader'
  ),
},針對上述不會進行CSS module和postcss處理的引入方式場景需要做樣式隔離。在加載子應用時給動態注入的<style>打上id標識,並將被加載的子應用名通過customProps傳遞給鈎子,在子應用卸載時刪除動態注入的<style>
registerApplication(appName, ({ name }) => applicationOrLoadingFn(url, name), (name, location) => ({
    appName: name,
}))
/** single-spa應用包裝器 */
export const singleSpaPacker = (rootComponent: React.FC<any>) => {
const reactLifecycles = singleSpaReact({
React,
ReactDOM,
rootComponent,
domElementGetter,
})
const sandbox = new Sandbox('');
const bootstrap = (props: any) => {
diffSandbox.active();
return reactLifecycles.bootstrap(props);
}
const mount = (props: any) => {
return reactLifecycles.mount(props);
}
const unmount = (props: any) => {
/** 還原環境 */
diffSandbox.inactive();
/** 刪除注入的樣式 */
document.getElementById(props.appName)?.remove();
return reactLifecycles.unmount(props);
}
return { bootstrap, mount, unmount };
}從子應用A切到子應用B然後再切回子應用A時發現卸載後的<style>不會重新注入頁面,這是因為single-spa只會在首次加載子應用才會執行加載函數,其餘情況走的都是緩存,因此上述做法不行。
然後我想了下能不能在mount階段對相應的<style>加上display: block;,在unmount階段對相應的<style>加上display: none;,控制樣式生效呢?但是實際上發現這並不能控制<style>生效或者失效,加上display: none;也會生效。
const mount = (props: any) => {
  const styleLabel = document.getElementById(props.appName);
  if (styleLabel) {
    styleLabel.style.display = 'block';
  }
  return reactLifecycles.mount(props);
}

const unmount = (props: any) => {
  const styleLabel = document.getElementById(props.appName);
  if (styleLabel) {
    styleLabel.style.display = 'none';
  }
  diffSandbox.inactive();
  return reactLifecycles.unmount(props);
}那我將兩次初次加載注入頁面的<style>記錄到全局對象中,然後通過customProps傳遞給子應用,在mount階段注入頁面,在unmount階段刪除
let styleTag: any = {};

/** 根據路由加載子應用 */
const applicationOrLoadingFn = async (url: string, appName: string): Promise<LifeCycles> => {
  /** 獲取mainfest */
  const files = await fetchAssets(url);
  /** 獲取JS腳本,並出入到importsmap中,後續通過systemjs獲取 */
  // const maps: IImports = { imports: {} } as IImports;
  let styleText: string = '';
  const JSList = files.filter(s => /\^*.js$/.test(s));

  await Promise.all(JSList.map((file: string) => axios.get(`${url}${file}?version=${Date.now()}`))).then(res => {
    res.forEach(r => {
      // new Function(r.data)();
      eval.call(null, r.data);
    })
  })

  // SystemJS加載方式
  // JSList.forEach(async (file: string) => {
  //   maps.imports[`@${appName}${file}`] = `${url}${file}?version=${Date.now()}`
  // });
  // await insertNewImportMap(maps);
  // await Promise.all(Object.keys(maps.imports).map((key: string) => (window as any).System.import(key)))

  /** 注入style */
  const CSSList = files.filter(s => /\^*.css$/.test(s));
  await Promise.all(CSSList.map((file: string) => axios.get(`${url}${file}?version=${Date.now()}`))).then(res => {
    styleText = res.map(r => r.data).join('\n');
    const style = document.createElement('style');
    style.id = appName;
    style.appendChild(document.createTextNode(styleText));
    // 記錄子應用style
    styleTag[appName] = style;
  })

  return (window as any)[appName];
}

/** 註冊single-spa應用 */
routerConfig.forEach((item) => {
  const { appName, hash, url } = item;
  registerApplication(appName, ({ name }) => applicationOrLoadingFn(url, name), pathPrefix(hash), (name) => ({
    appName: name,
    styleTag // 將子應用style傳遞給鈎子
  }));
})子應用鈎子注入、刪除<style>
/** single-spa應用包裝器 */
export const singleSpaPacker = (rootComponent: React.FC<any>) => {

  const reactLifecycles = singleSpaReact({
    React,
    ReactDOM,
    rootComponent,
    domElementGetter,
  })

  const diffSandbox = new DiffSandbox('');

  const bootstrap = (props: any) => {
    diffSandbox.active();
    return reactLifecycles.bootstrap(props);
  }

  const mount = (props: any) => {
    document.head.appendChild(props.styleTag[props.name]);
    return reactLifecycles.mount(props);
  }

  const unmount = (props: any) => {
    props.styleTag[props.appName].remove();
    diffSandbox.inactive();
    return reactLifecycles.unmount(props);
  }

  return { bootstrap, mount, unmount };
}github傳送門:https://github.com/Revelation...
參考
差點被SystemJs驚掉了下巴,解密模塊加載黑魔法


