@Observed裝飾器和@ObjectLink裝飾器:嵌套類對象屬性變化
概述
@ObjectLink和@Observed類裝飾器用於在涉及嵌套對象或數組的場景中進行雙向數據同步:
- 被@Observed裝飾的類,可以被觀察到屬性的變化;
- 子組件中@ObjectLink裝飾器裝飾的狀態變量用於接收@Observed裝飾的類的實例,和父組件中對應的狀態變量建立雙向數據綁定。這個實例可以是數組中的被@Observed裝飾的項,或者是class
object中的屬性,這個屬性同樣也需要被@Observed裝飾。 - 單獨使用@Observed是沒有任何作用的,需要搭配@ObjectLink或者@Prop使用。
限制條件
- 使用@Observed裝飾class會改變class原始的原型鏈,@Observed和其他類裝飾器裝飾同一個class可能會帶來問題。
- @ObjectLink裝飾器不能在@Entry裝飾的自定義組件中使用。
裝飾器説明
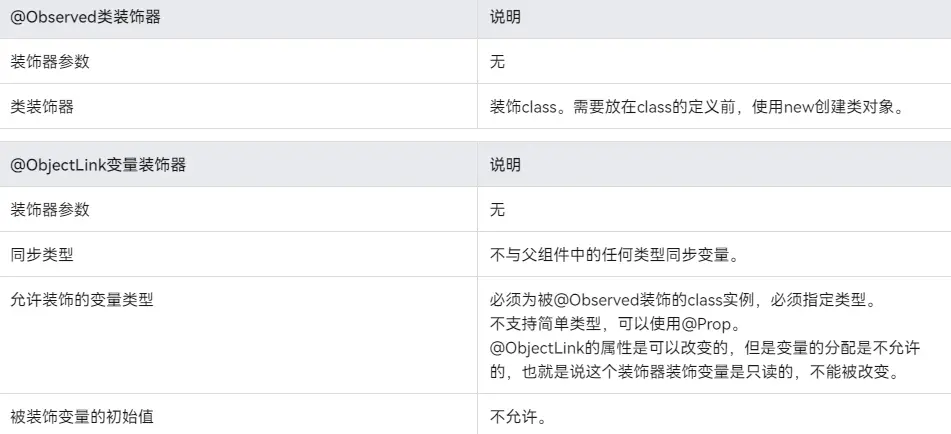
@ObjectLink裝飾的數據為可讀示例。
// 允許@ObjectLink裝飾的數據屬性賦值
this.objLink.a= ...
// 不允許@ObjectLink裝飾的數據自身賦值
this.objLink= ...
説明
@ObjectLink裝飾的變量不能被賦值,如果要使用賦值操作,請使用@Prop。
- @Prop裝飾的變量和數據源的關係是是單向同步,@Prop裝飾的變量在本地拷貝了數據源,所以它允許本地更改,如果父組件中的數據源有更新,@Prop裝飾的變量本地的修改將被覆蓋;
- @ObjectLink裝飾的變量和數據源的關係是雙向同步,@ObjectLink裝飾的變量相當於指向數據源的指針。如果一旦發生@ObjectLink裝飾的變量的賦值,則同步鏈將被打斷。
變量的傳遞/訪問規則説明
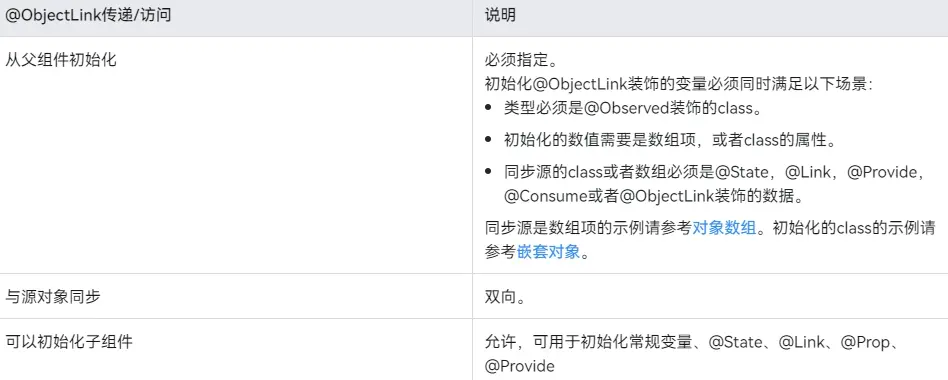
圖1 初始化規則圖示
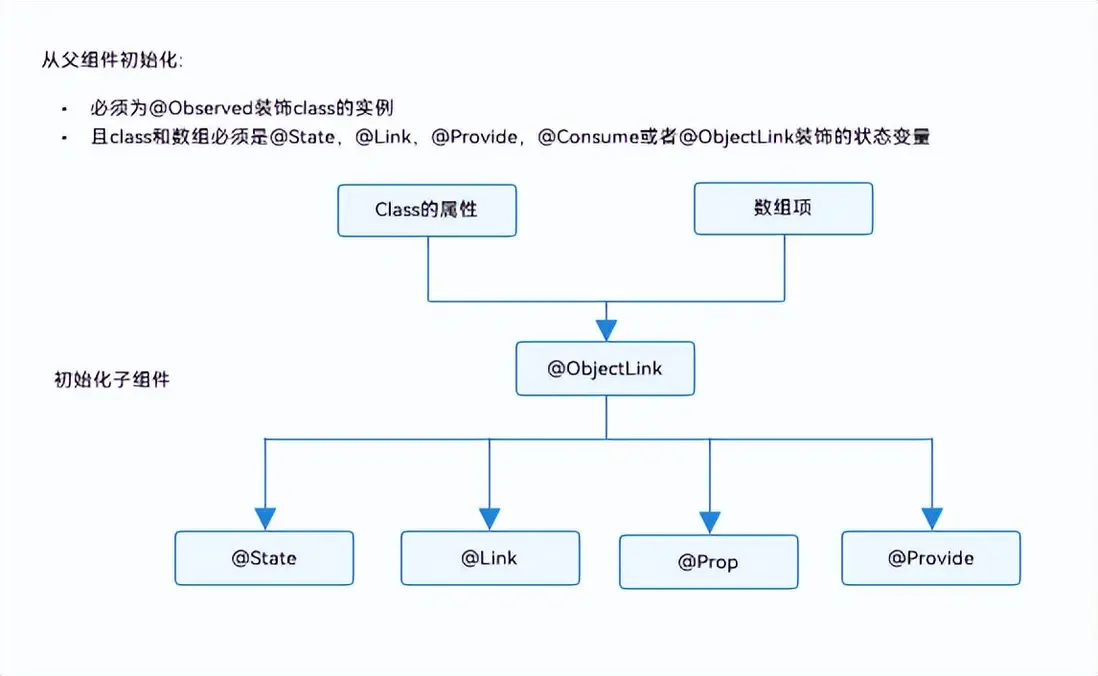
觀察變化和行為表現
觀察的變化
@Observed裝飾的類,如果其屬性為非簡單類型,比如class、Object或者數組,也需要被@Observed裝飾,否則將觀察不到其屬性的變化。
class ClassA {
  public c: number;
  constructor(c: number) {
    this.c = c;
  }
}
@Observed
class ClassB {
  public a: ClassA;
  public b: number;
  constructor(a: ClassA, b: number) {
    this.a = a;
    this.b = b;
  }
}
以上示例中,ClassB被@Observed裝飾,其成員變量的賦值的變化是可以被觀察到的,但對於ClassA,沒有被@Observed裝飾,其屬性的修改不能被觀察到。
@ObjectLink b: ClassB
// 賦值變化可以被觀察到
this.b.a = new ClassA(5)
this.b.b = 5
// ClassA沒有被@Observed裝飾,其屬性的變化觀察不到
this.b.a.c = 5
@ObjectLink:@ObjectLink只能接收被@Observed裝飾class的實例,可以觀察到:
- 其屬性的數值的變化,其中屬性是指Object.keys(observedObject)返回的所有屬性,示例請參考嵌套對象。
- 如果數據源是數組,則可以觀察到數組item的替換,如果數據源是class,可觀察到class的屬性的變化,示例請參考對象數組。
框架行為
1.初始渲染:
a.@Observed裝飾的class的實例會被不透明的代理對象包裝,代理了class上的屬性的setter和getter方法
b.子組件中@ObjectLink裝飾的從父組件初始化,接收被@Observed裝飾的class的實例,@ObjectLink的包裝類會將自己註冊給@Observed class。
2.屬性更新:當@Observed裝飾的class屬性改變時,會走到代理的setter和getter,然後遍歷依賴它的@ObjectLink包裝類,通知數據更新。
使用場景
嵌套對象
以下是嵌套類對象的數據結構。
// objectLinkNestedObjects.ets
let NextID: number = 1;
@Observed
class ClassA {
  public id: number;
  public c: number;
  constructor(c: number) {
    this.id = NextID++;
    this.c = c;
  }
}
@Observed
class ClassB {
  public a: ClassA;
  constructor(a: ClassA) {
    this.a = a;
  }
}
以下組件層次結構呈現的是嵌套類對象的數據結構。
@Component
struct ViewA {
  label: string = 'ViewA1';
  @ObjectLink a: ClassA;
  build() {
    Row() {
      Button(`ViewA [${this.label}] this.a.c=${this.a.c} +1`)
        .onClick(() => {
          this.a.c += 1;
        })
    }
  }
}
@Entry
@Component
struct ViewB {
  @State b: ClassB = new ClassB(new ClassA(0));
  build() {
    Column() {
      // in low version,DevEco may throw a warning,but it does not matter.
      // you can still compile and run.
      ViewA({ label: 'ViewA #1', a: this.b.a })
      ViewA({ label: 'ViewA #2', a: this.b.a })
      Button(`ViewB: this.b.a.c+= 1`)
        .onClick(() => {
          this.b.a.c += 1;
        })
      Button(`ViewB: this.b.a = new ClassA(0)`)
        .onClick(() => {
          this.b.a = new ClassA(0);
        })
      Button(`ViewB: this.b = new ClassB(ClassA(0))`)
        .onClick(() => {
          this.b = new ClassB(new ClassA(0));
        })
    }
  }
}
ViewB中的事件句柄:
- this.b.a = new ClassA(0) 和this.b = new ClassB(new ClassA(0)):
對@State裝飾的變量b和其屬性的修改。 - this.b.a.c = ...
:該變化屬於第二層的變化,@State無法觀察到第二層的變化,但是ClassA被@Observed裝飾,ClassA的屬性c的變化可以被@ObjectLink觀察到。
ViewA中的事件句柄:
- this.a.c += 1:對@ObjectLink變量a的修改,將觸發Button組件的刷新。@ObjectLink和@Prop不同,@ObjectLink不拷貝來自父組件的數據源,而是在本地構建了指向其數據源的引用。
- @ObjectLink變量是隻讀的,this.a = new
ClassA(...)是不允許的,因為一旦賦值操作發生,指向數據源的引用將被重置,同步將被打斷。
對象數組
對象數組是一種常用的數據結構。以下示例展示了數組對象的用法。
@Component
struct ViewA {
  // 子組件ViewA的@ObjectLink的類型是ClassA
  @ObjectLink a: ClassA;
  label: string = 'ViewA1';
  build() {
    Row() {
      Button(`ViewA [${this.label}] this.a.c = ${this.a.c} +1`)
        .onClick(() => {
          this.a.c += 1;
        })
    }
  }
}
@Entry
@Component
struct ViewB {
  // ViewB中有@State裝飾的ClassA[]
  @State arrA: ClassA[] = [new ClassA(0), new ClassA(0)];
  build() {
    Column() {
      ForEach(this.arrA,
        (item) => {
          ViewA({ label: `#${item.id}`, a: item })
        },
        (item) => item.id.toString()
      )
      // 使用@State裝飾的數組的數組項初始化@ObjectLink,其中數組項是被@Observed裝飾的ClassA的實例
      ViewA({ label: `ViewA this.arrA[first]`, a: this.arrA[0] })
      ViewA({ label: `ViewA this.arrA[last]`, a: this.arrA[this.arrA.length-1] })

      Button(`ViewB: reset array`)
        .onClick(() => {
          this.arrA = [new ClassA(0), new ClassA(0)];
        })
      Button(`ViewB: push`)
        .onClick(() => {
          this.arrA.push(new ClassA(0))
        })
      Button(`ViewB: shift`)
        .onClick(() => {
          this.arrA.shift()
        })
      Button(`ViewB: chg item property in middle`)
        .onClick(() => {
          this.arrA[Math.floor(this.arrA.length / 2)].c = 10;
        })
      Button(`ViewB: chg item property in middle`)
        .onClick(() => {
          this.arrA[Math.floor(this.arrA.length / 2)] = new ClassA(11);
        })
    }
  }
}-
this.arrA[Math.floor(this.arrA.length/2)] = new ClassA(..)
:該狀態變量的改變觸發2次更新:a.ForEach:數組項的賦值導致ForEach的itemGenerator被修改,因此數組項被識別為有更改,ForEach的item builder將執行,創建新的ViewA組件實例。
b.ViewA({ label:
ViewA this.arrA[last], a: this.arrA[this.arrA.length-1] }):上述更改改變了數組中第二個元素,所以綁定this.arrA[1]的ViewA將被更新; -
this.arrA.push(new ClassA(0)) : 將觸發2次不同效果的更新:
a.ForEach:新添加的ClassA對象對於ForEach是未知的itemGenerator,ForEach的item builder將執行,創建新的ViewA組件實例。
b.ViewA({ label:
ViewA this.arrA[last], a: this.arrA[this.arrA.length-1] }):數組的最後一項有更改,因此引起第二個ViewA的實例的更改。對於ViewA({ label:ViewA this.arrA[first], a: this.arrA[0] }),數組的更改並沒有觸發一個數組項更改的改變,所以第一個ViewA不會刷新。 - this.arrA[Math.floor(this.arrA.length/2)].c:@State無法觀察到第二層的變化,但是ClassA被@Observed裝飾,ClassA的屬性的變化將被@ObjectLink觀察到。
二維數組
使用@Observed觀察二維數組的變化。可以聲明一個被@Observed裝飾的繼承Array的子類。
@Observed
class StringArray extends Array<String> {
}
使用new StringArray()來構造StringArray的實例,new運算符使得@Observed生效,@Observed觀察到StringArray的屬性變化。
聲明一個從Array擴展的類class StringArray extends Array<String> {},並創建StringArray的實例。@Observed裝飾的類需要使用new運算符來構建class實例。
@Observed
class StringArray extends Array<String> {
}
@Component
struct ItemPage {
  @ObjectLink itemArr: StringArray;
  build() {
    Row() {
      Text('ItemPage')
        .width(100).height(100)

      ForEach(this.itemArr,
        item => {
          Text(item)
            .width(100).height(100)
        },
        item => item
      )
    }
  }
}
@Entry
@Component
struct IndexPage {
  @State arr: Array<StringArray> = [new StringArray(), new StringArray(), new StringArray()];
  build() {
    Column() {
      ItemPage({ itemArr: this.arr[0] })
      ItemPage({ itemArr: this.arr[1] })
      ItemPage({ itemArr: this.arr[2] })
      Divider()
      ForEach(this.arr,
        itemArr => {
          ItemPage({ itemArr: itemArr })
        },
        itemArr => itemArr[0]
      )
      Divider()
      Button('update')
        .onClick(() => {
          console.error('Update all items in arr');
          if (this.arr[0][0] !== undefined) {
            // 正常情況下需要有一個真實的ID來與ForEach一起使用,但此處沒有
            // 因此需要確保推送的字符串是唯一的。
            this.arr[0].push(`${this.arr[0].slice(-1).pop()}${this.arr[0].slice(-1).pop()}`);
            this.arr[1].push(`${this.arr[1].slice(-1).pop()}${this.arr[1].slice(-1).pop()}`);
            this.arr[2].push(`${this.arr[2].slice(-1).pop()}${this.arr[2].slice(-1).pop()}`);
          } else {
            this.arr[0].push('Hello');
            this.arr[1].push('World');
            this.arr[2].push('!');
          }
        })
    }
  }
}
作為一名合格一線開發程序員,大家心裏肯定會有很多疑問!鴻蒙系統這麼強大~~
為了能夠讓大家跟上互聯網時代的技術迭代,在這裏跟大家分享一下我自己近期學習心得以及參考網上資料整理出的一份最新版的鴻蒙學習提升資料,有需要的小夥伴自行領取,限時開源,先到先得~~~~
領取以下高清學習路線原圖請點擊→《鴻蒙全套學習指南》純血鴻蒙HarmonyOS基礎技能學習路線圖
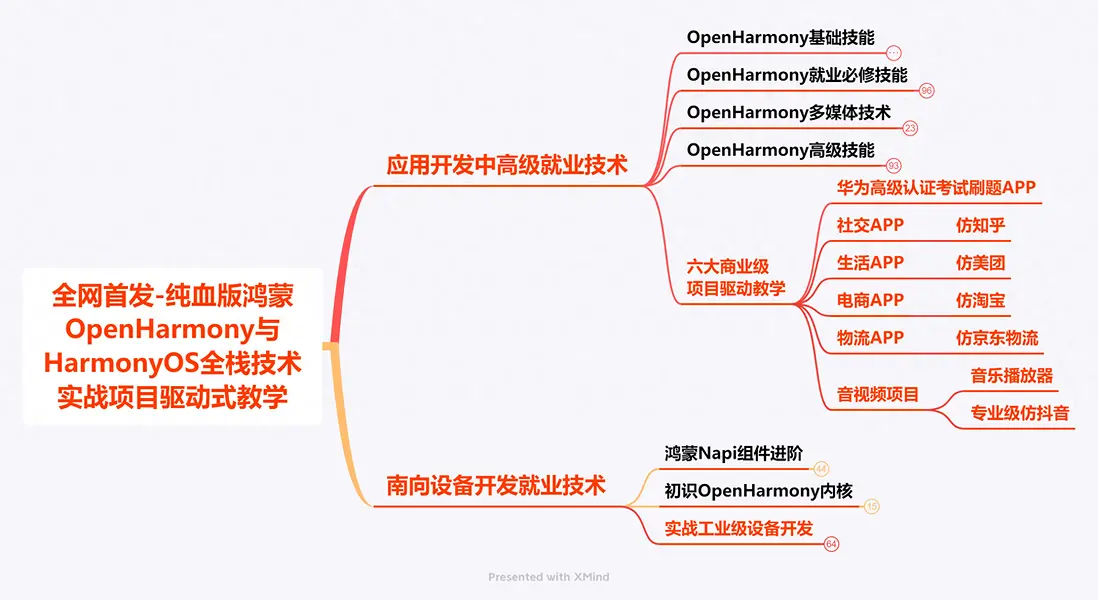
領取以上完整高清學習路線圖,請點擊→《鴻蒙開發學習之應用模型》小編自己整理的部分學習資料(包含有高清視頻、開發文檔、電子書籍等)
以上分享的學習路線都適合哪些人跟着學習?
- -應屆生/計算機專業通過學習鴻蒙新興技術,入行互聯網,未來高起點就業。
- -0基礎轉行提前佈局新方向,抓住風口,自我提升,獲得更多就業機會。
- -技術提升/進階跳槽發展瓶頸期,提升職場競爭力,快速掌握鴻蒙技術,享受藍海紅利。
最後
鴻蒙開發學習是一個系統化的過程,從基礎知識的學習到實戰技能的錘鍊,再到對前沿技術的探索,每一環節都至關重要。希望這份教程資料能幫助您快速入門並在鴻蒙開發之路上步步攀升,成就一番事業。讓我們一起乘風破浪,擁抱鴻蒙生態的廣闊未來!
如果你覺得這篇內容對你有幫助,我想麻煩大家動動小手給我:點贊,轉發,有你們的 『點贊和評論』,才是我創造的動力。
關注我,同時可以期待後續文章ing,不定期分享原創知識。
想要獲取更多完整鴻蒙最新VIP學習資料,請點擊→《鴻蒙基礎入門學習指南》


